


My install experience - long writeup


Thread Starter
|
Senior Member
Joined: Oct 2010
Posts: 327
Likes: 1
From: Austin, Tx
SalsaNChips
I don't have the Sony factory system so my response may not be applicable.
For the standard factory head unit I seem to have a pretty flat signal. I don't get the bass reduction that I did before the LC6i.
With the Sony you would probably have to take the mid and tweeter high level feeds and sum them. If you used the LC6i you would loose the ability to fade between the front and back.
A better choice might be the LC8i. You could input and sum the front channels on the first two channels and then the rear to channel 3 and then autosummed the sub with channel 4.
By summing the fronts you should have no crazy factory EQ and would be relatively flat signal.
I don't have a real time analyzer so I had to play it by ear. I knew that before the upgrades about 3/4 full volume or the E on the VOLUME display was about the loudest I could play before I started hearing distortion. That is the setting I used for my max volume and that is where I set my gains at.
The LC6i gains are real easy to set.
There is a clipping light so I turned the amp gains all the way down, played really dynamic music at 3/4 volume and adjusted the LC6i gains till the clipping light started to flicker. When I went active on the front stage I did have to make minor adjustments to the tweeter amp gains. I turned that amps sensitivity down and then gained up just a bit. I needed to tame the Focal tweeters to match the rest of the system. All part of the tuning process.
For the back wall I deadened because I knew I was going to cut the carpet and backing. I needed the extra space to route all my wiring. If I kept the wiring on top of the amp rack I wouldn't have cut the carpet. But to be honest I would have still deadned the back wall. It is just thin sheet metal and those MKIII can vibrate anything.
As to helping with road noice it does a little but not a lot. The deadner does make up for the lack of factory carpet and pad but to truly stop the noise would take a closed cell foam and mass loaded vinyl. But then I wouldn't have that extra space I needed. It is a trade off.
Spend the few bucks and deaden the back. If nothing else it will keep that back wall from buzzing when the bass hits.
I don't have the Sony factory system so my response may not be applicable.
For the standard factory head unit I seem to have a pretty flat signal. I don't get the bass reduction that I did before the LC6i.
With the Sony you would probably have to take the mid and tweeter high level feeds and sum them. If you used the LC6i you would loose the ability to fade between the front and back.
A better choice might be the LC8i. You could input and sum the front channels on the first two channels and then the rear to channel 3 and then autosummed the sub with channel 4.
By summing the fronts you should have no crazy factory EQ and would be relatively flat signal.
I don't have a real time analyzer so I had to play it by ear. I knew that before the upgrades about 3/4 full volume or the E on the VOLUME display was about the loudest I could play before I started hearing distortion. That is the setting I used for my max volume and that is where I set my gains at.
The LC6i gains are real easy to set.
There is a clipping light so I turned the amp gains all the way down, played really dynamic music at 3/4 volume and adjusted the LC6i gains till the clipping light started to flicker. When I went active on the front stage I did have to make minor adjustments to the tweeter amp gains. I turned that amps sensitivity down and then gained up just a bit. I needed to tame the Focal tweeters to match the rest of the system. All part of the tuning process.
For the back wall I deadened because I knew I was going to cut the carpet and backing. I needed the extra space to route all my wiring. If I kept the wiring on top of the amp rack I wouldn't have cut the carpet. But to be honest I would have still deadned the back wall. It is just thin sheet metal and those MKIII can vibrate anything.
As to helping with road noice it does a little but not a lot. The deadner does make up for the lack of factory carpet and pad but to truly stop the noise would take a closed cell foam and mass loaded vinyl. But then I wouldn't have that extra space I needed. It is a trade off.
Spend the few bucks and deaden the back. If nothing else it will keep that back wall from buzzing when the bass hits.

Member
Joined: Apr 2011
Posts: 93
Likes: 0
From: Chicago
Langlowe, did you know that the LC6i has sound sensing turn on? I did a test this morning and unplugged my remote fuse tap going to my LC6i and everything turned on fine when I turned my radio on.
All you really need is the remote out trigger from the AC to your amps and it should turn everything on for you. Pretty cool.
I was testing to see if it would help with my static pop and thump when i push the on/off button on the radio.
All you really need is the remote out trigger from the AC to your amps and it should turn everything on for you. Pretty cool.
I was testing to see if it would help with my static pop and thump when i push the on/off button on the radio.
Thread Starter
|
Senior Member
Joined: Oct 2010
Posts: 327
Likes: 1
From: Austin, Tx
Yeah I had kinda forgotten about the autosense turn on. If I recall correctly some people were having problems with that feature and the way Sync worked, or something like that.
I didn't even mess with it and ran the remote power on. I am still wondering why you have the turn on pop. It is usually your amp is ready before the HU so the JL must be ready pretty quick.
Let me know if you have any crazy issues with the LC6 autosense feature. It is a little late for me to use it now. I just redid the amp rack, again, and am running dedicated fused power to the LC6i. Not just taping off an amp 12v and ground.
I didn't even mess with it and ran the remote power on. I am still wondering why you have the turn on pop. It is usually your amp is ready before the HU so the JL must be ready pretty quick.
Let me know if you have any crazy issues with the LC6 autosense feature. It is a little late for me to use it now. I just redid the amp rack, again, and am running dedicated fused power to the LC6i. Not just taping off an amp 12v and ground.

Senior Member
Joined: Aug 2008
Posts: 187
Likes: 0
From: Austin, Texas
Langlowe great job on the build. Judging by how everything came out you definitely are not lacking in the inginuity department. I'm in Austin too. I would love to hear how those BM's sound. 
Thread Starter
|
Senior Member
Joined: Oct 2010
Posts: 327
Likes: 1
From: Austin, Tx
Well I guess it is time to update my build thread.
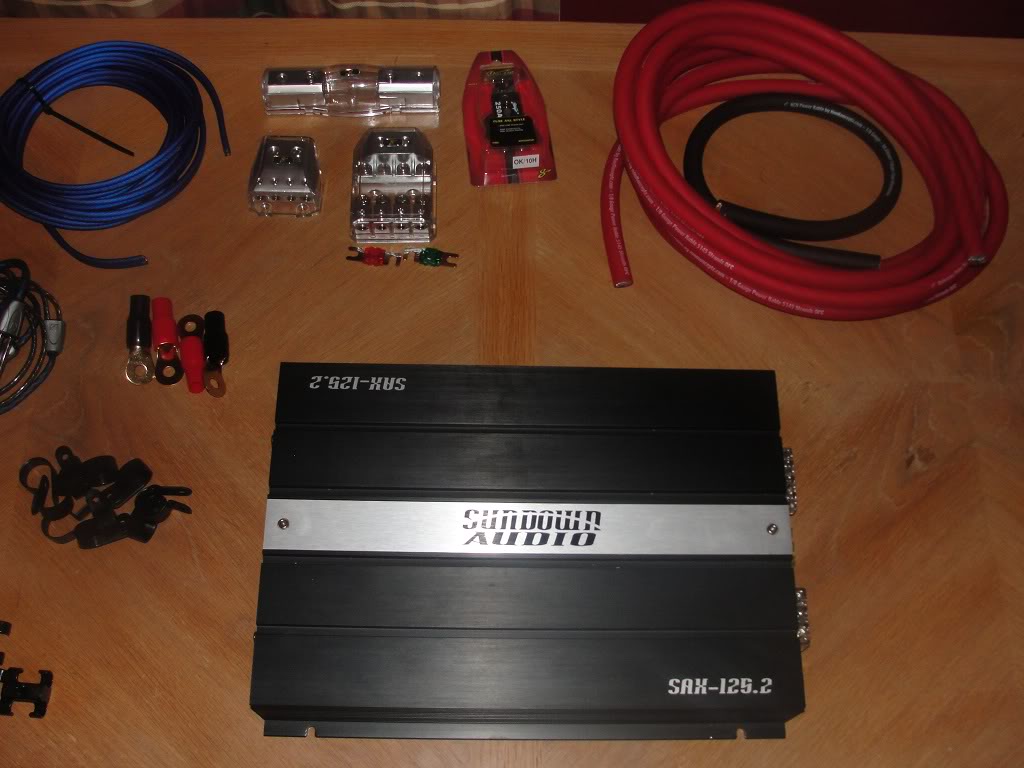
As I have been eluding to I added a third amp, Sundown SAX 125.2. and went active with my front stage.
I am running the Focal TNB tweeters off the Clarion XH5410 front channels at 75 watts when at full tilt. I have them high passed around 3500Hz.
The Sundown SAZ-125.2 is sending all the power it can to the Massive Ck6 mids. I have them bandpassed at 92Hz and 3200Hz.
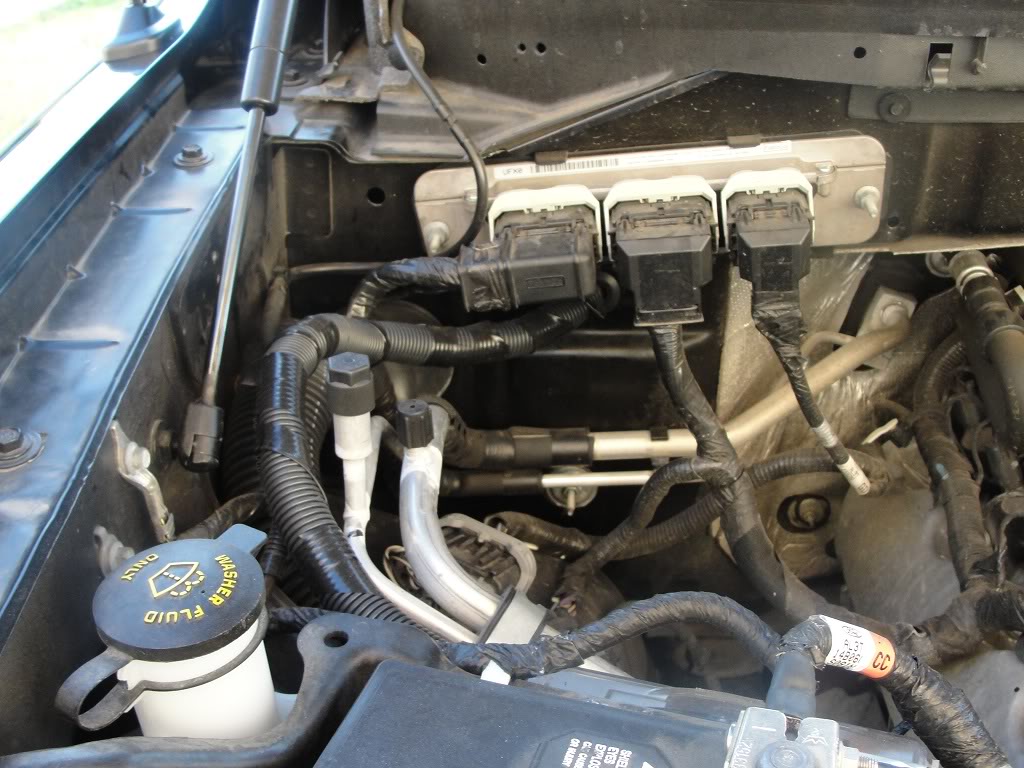
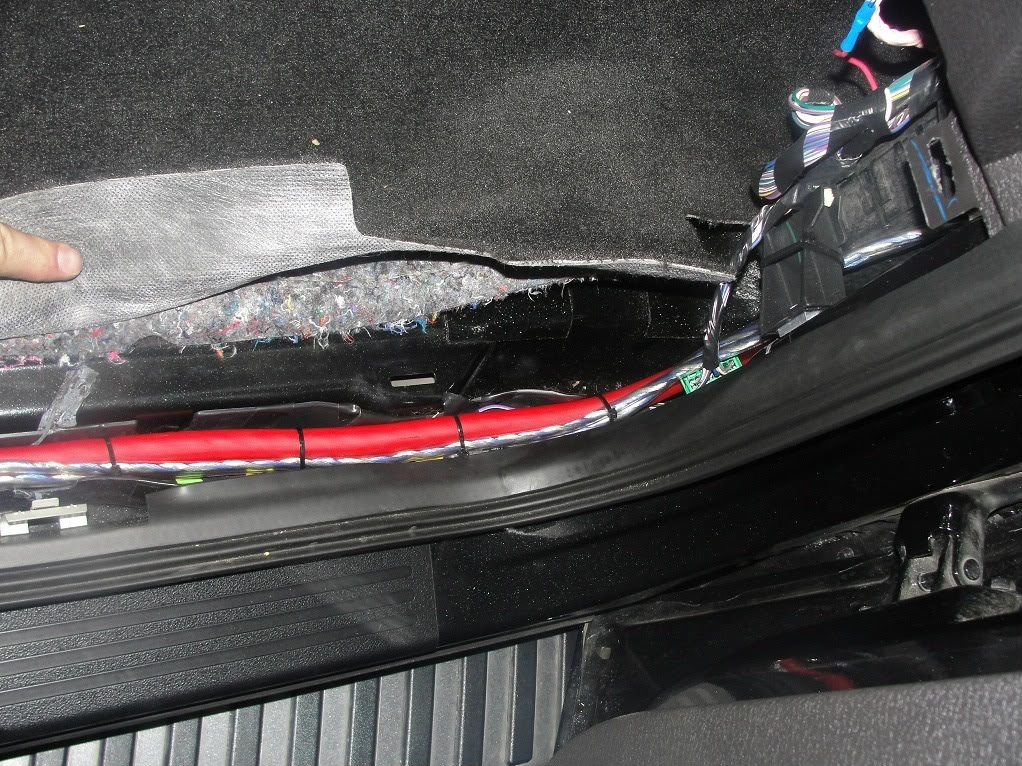
I replaced the 4ga power and ground runs. With the reassurance of a fellow member, I was able to fit the 1/0 gauge through the same factory grommet that I used for the 4ga.
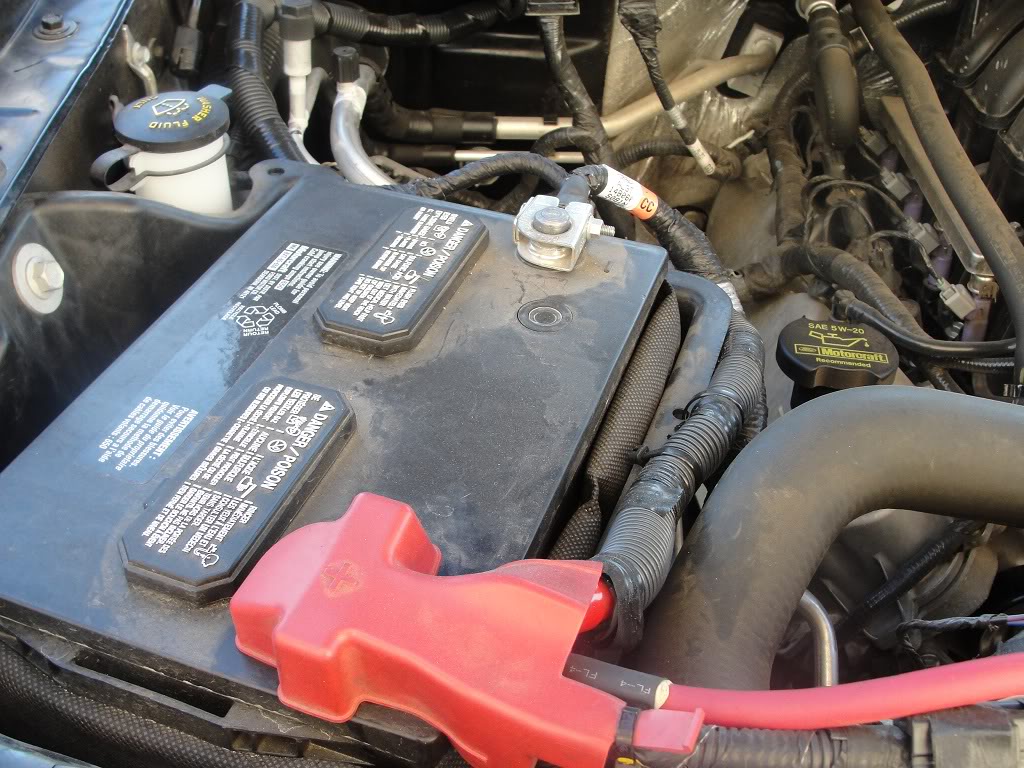
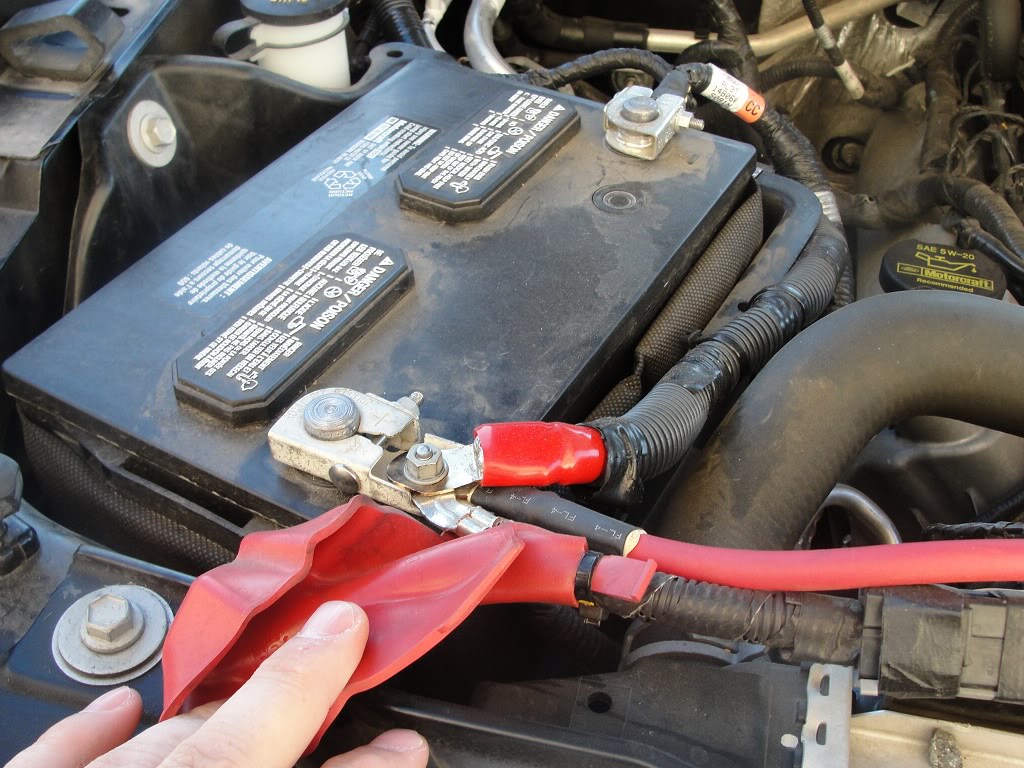
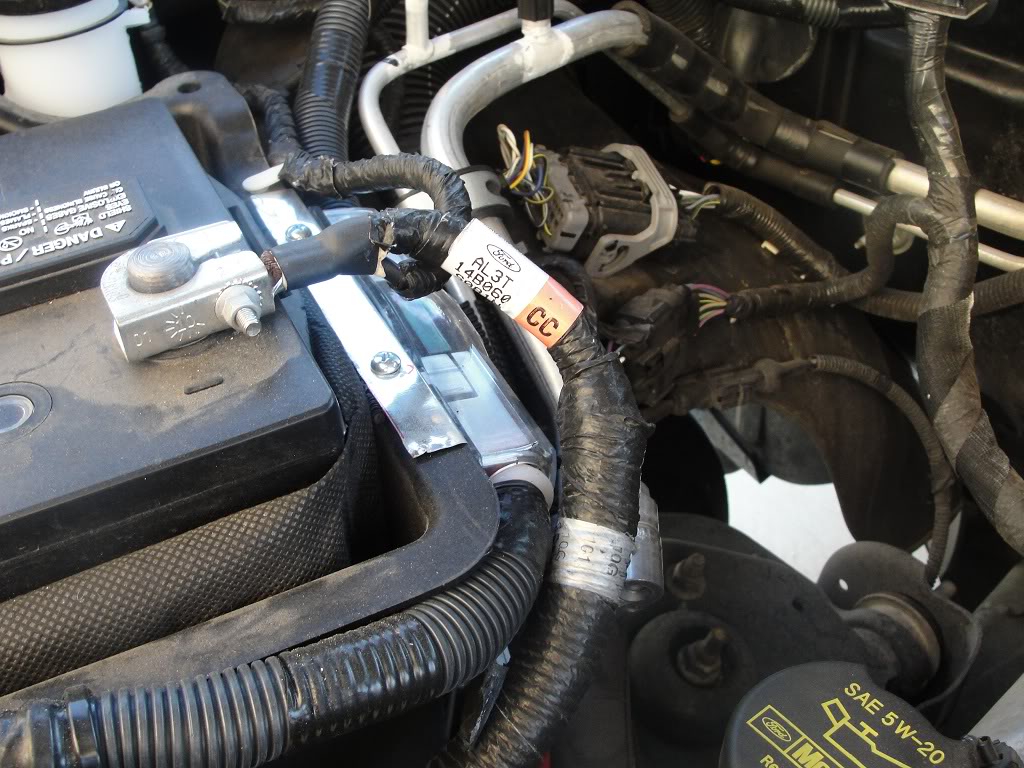
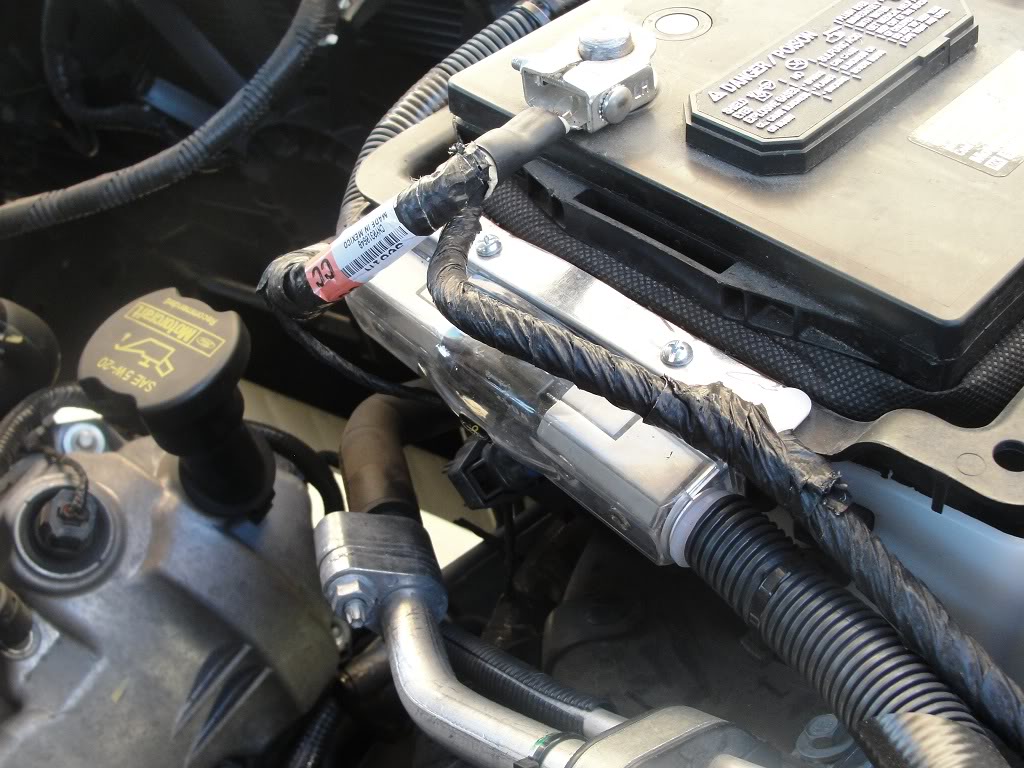
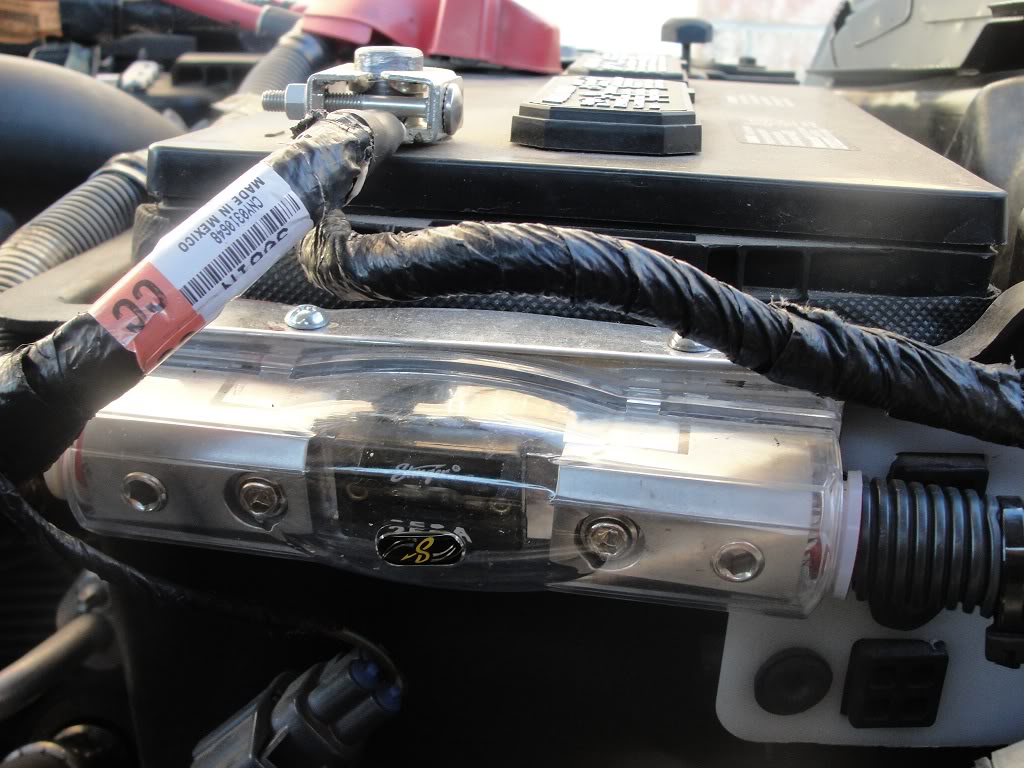
Replaced all fuse blocks and inline fuses. Made a little custom inline fuse holder that mounts to the back of the battery box. I am going for stealth. Even wrapped the cable sheathing in electrical tape to make it look more like the factory.
Made a new amp rack, actually 3 before I got it to where it is and still not happy with it.
Next steps are to carpet the amp rack and finish deading/sealing the front doors.
Here are some picks.
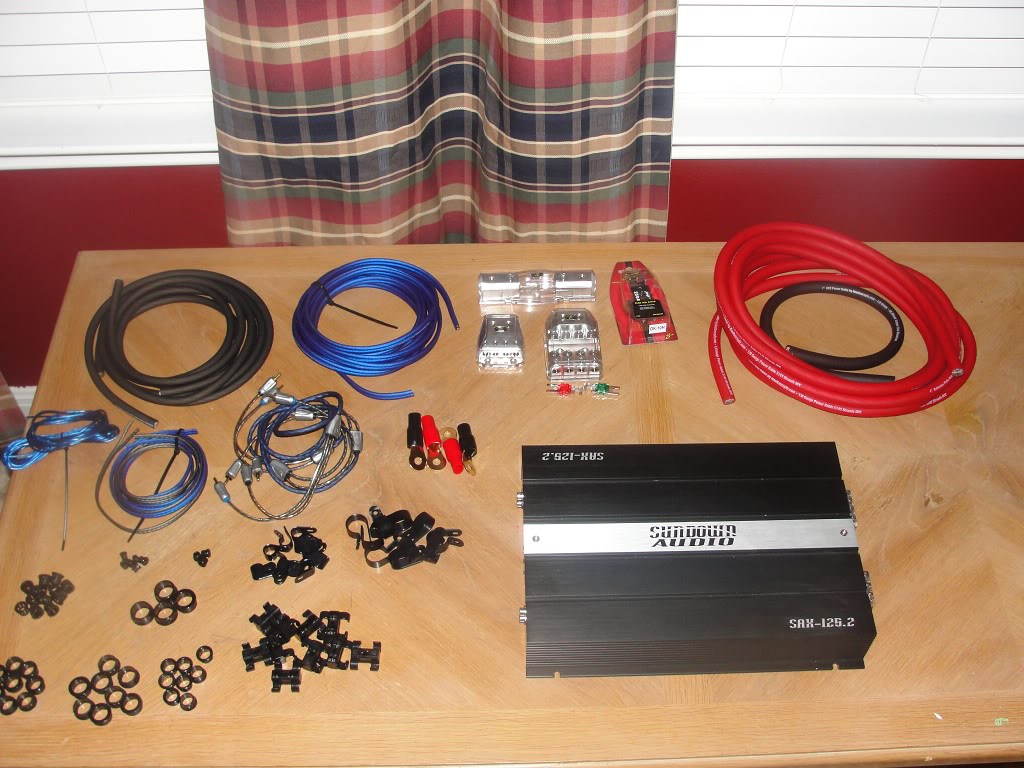
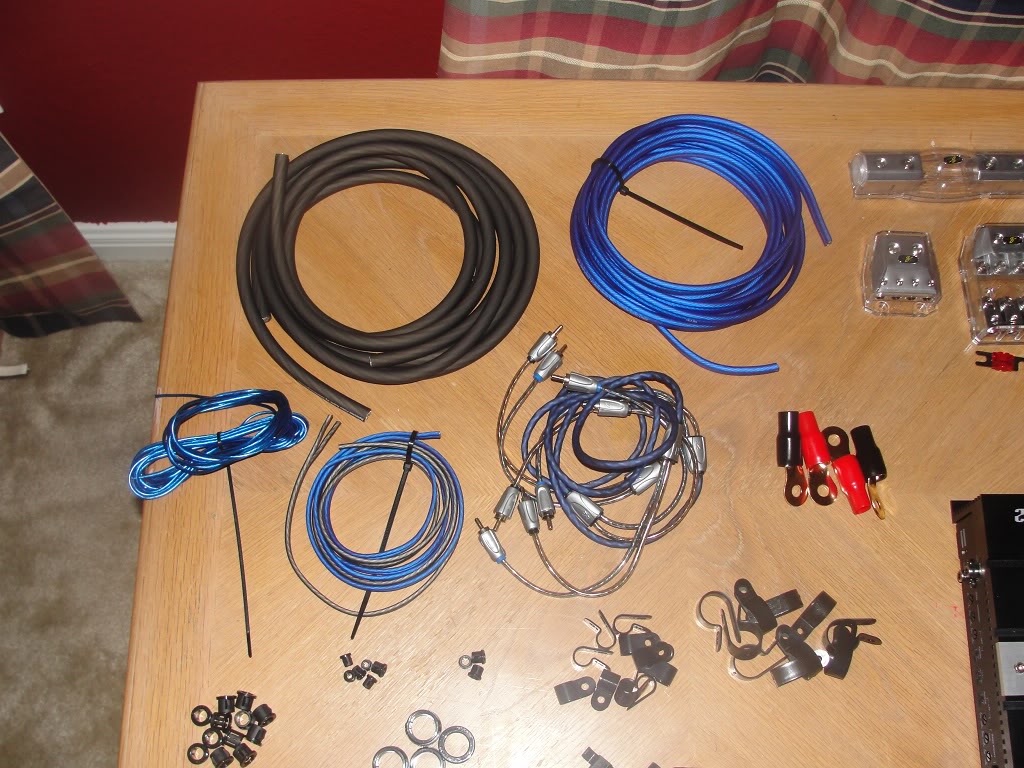
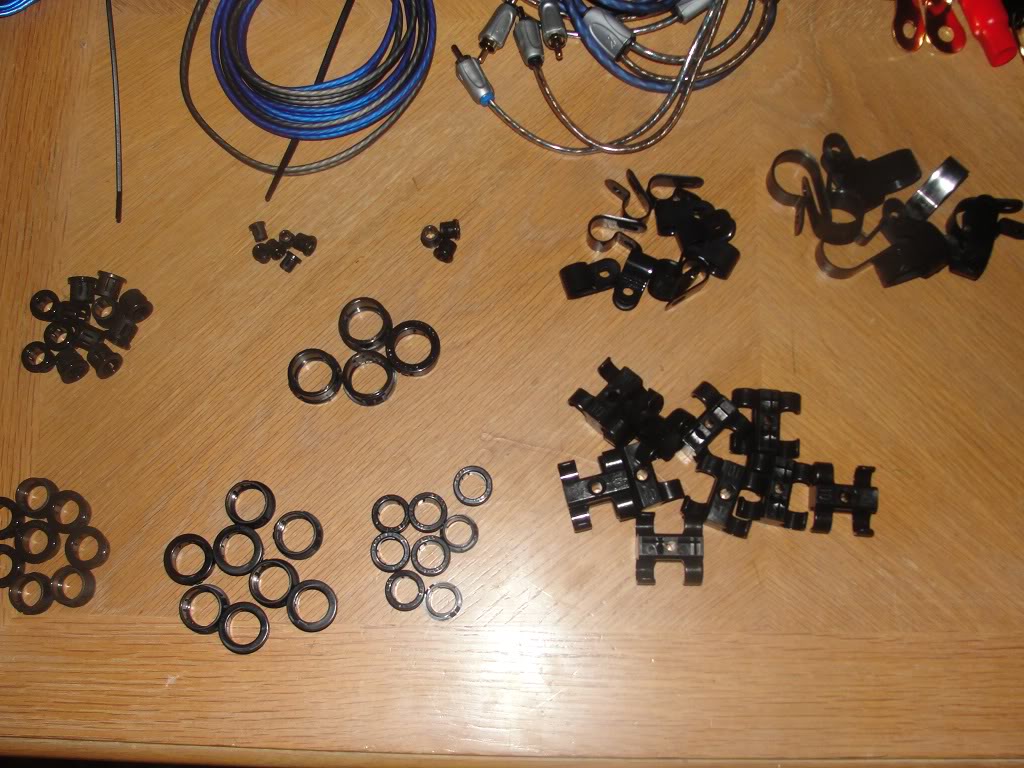
Parts to install
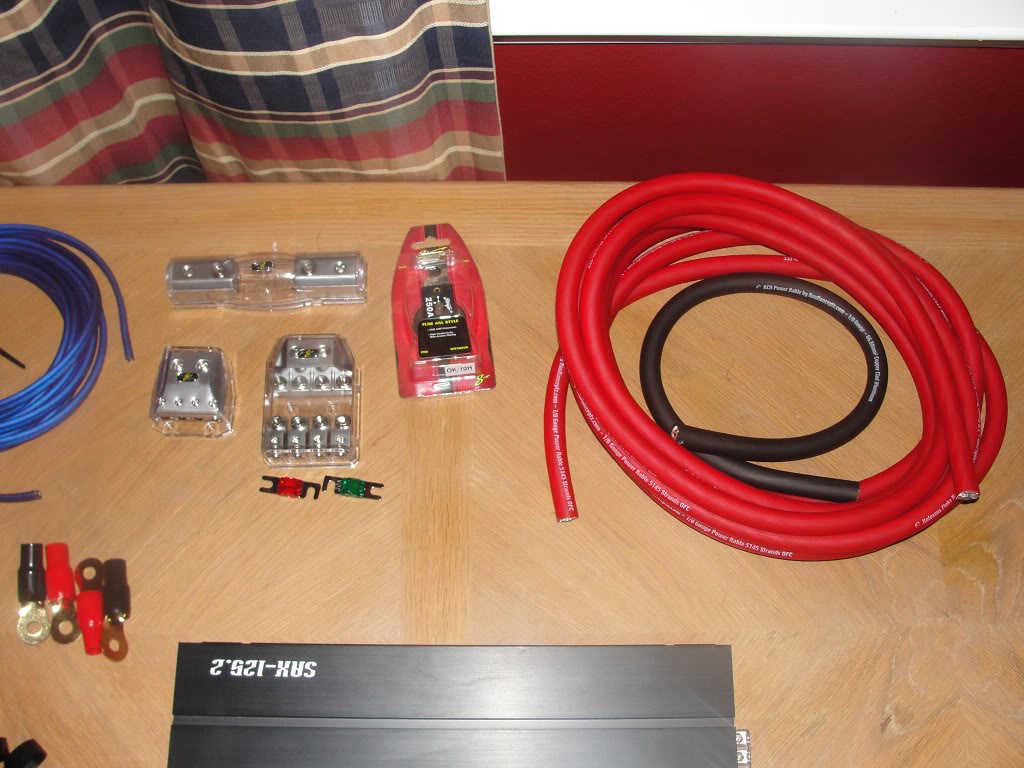
Power and Inline fuse.
Amp Rack
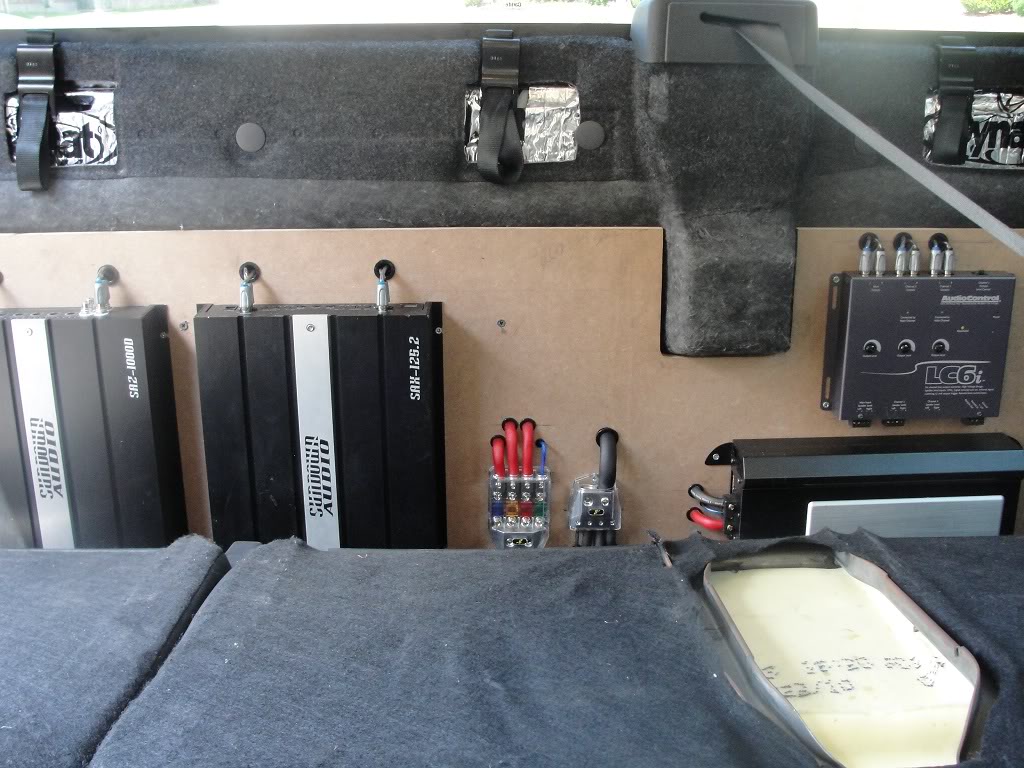
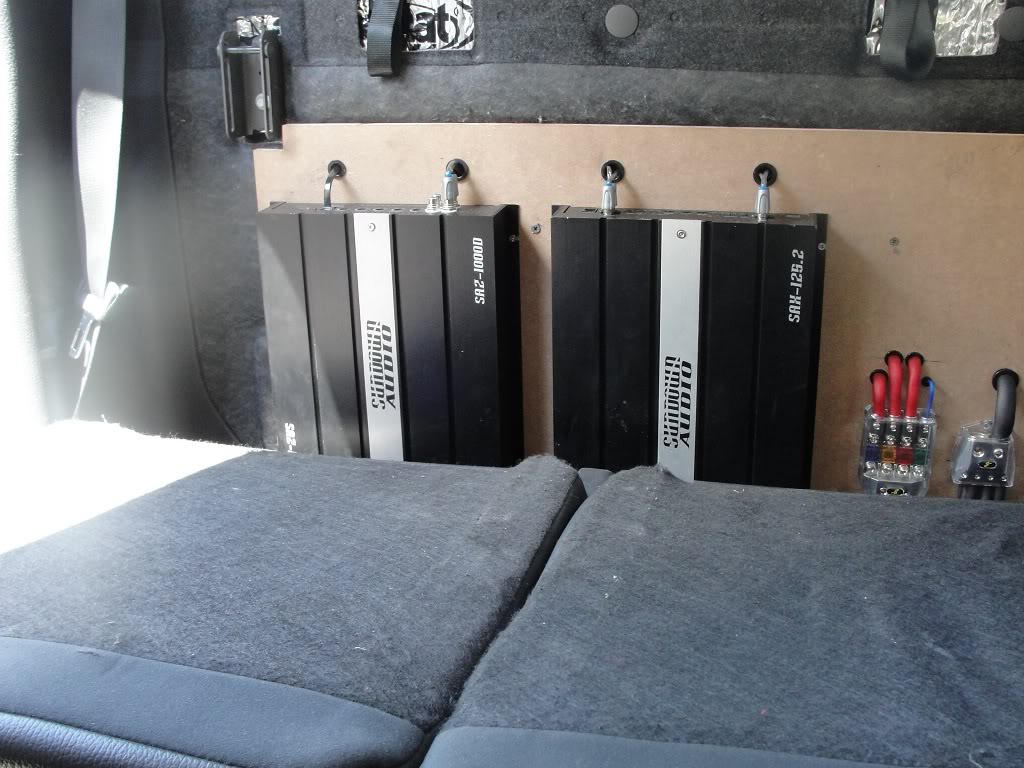
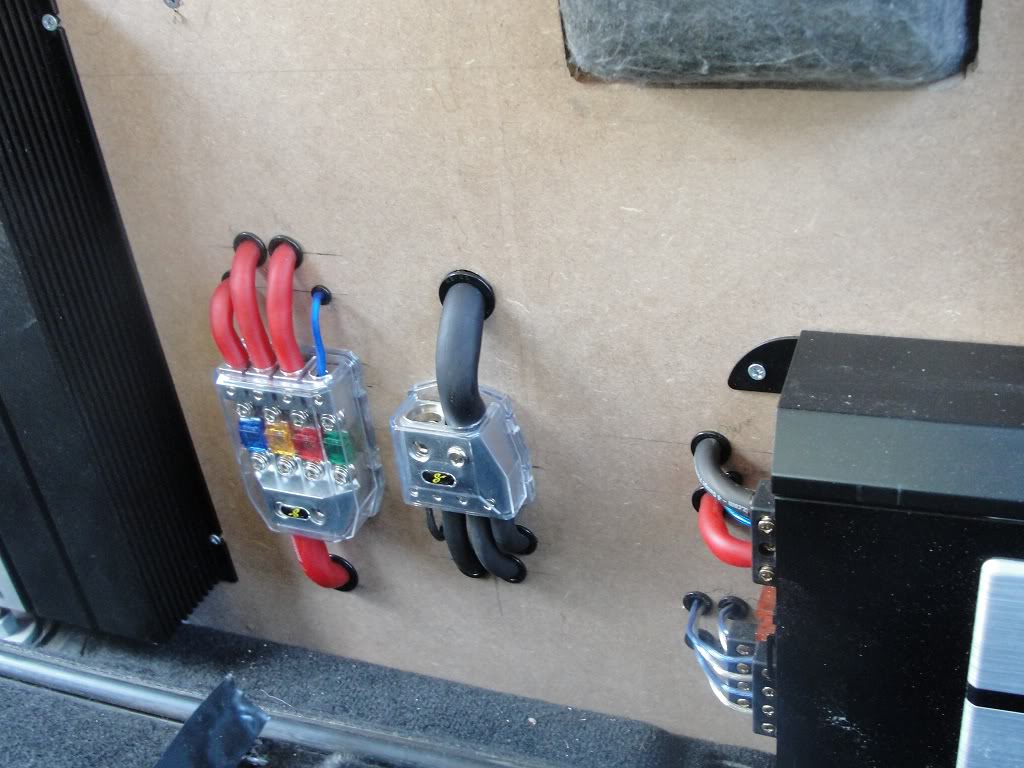
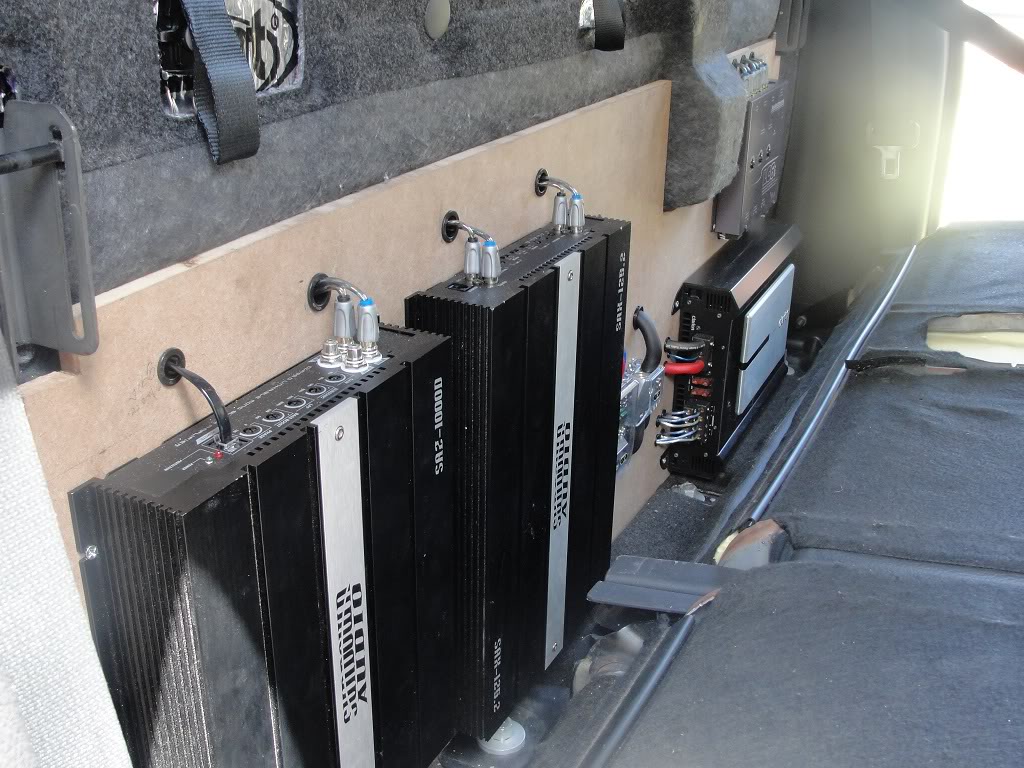
As I have been eluding to I added a third amp, Sundown SAX 125.2. and went active with my front stage.
I am running the Focal TNB tweeters off the Clarion XH5410 front channels at 75 watts when at full tilt. I have them high passed around 3500Hz.
The Sundown SAZ-125.2 is sending all the power it can to the Massive Ck6 mids. I have them bandpassed at 92Hz and 3200Hz.
I replaced the 4ga power and ground runs. With the reassurance of a fellow member, I was able to fit the 1/0 gauge through the same factory grommet that I used for the 4ga.
Replaced all fuse blocks and inline fuses. Made a little custom inline fuse holder that mounts to the back of the battery box. I am going for stealth. Even wrapped the cable sheathing in electrical tape to make it look more like the factory.
Made a new amp rack, actually 3 before I got it to where it is and still not happy with it.
Next steps are to carpet the amp rack and finish deading/sealing the front doors.
Here are some picks.
Parts to install
Power and Inline fuse.
Amp Rack
Last edited by Langlowe; Aug 11, 2011 at 07:10 PM.

Thread Starter
|
Senior Member
Joined: Oct 2010
Posts: 327
Likes: 1
From: Austin, Tx
I am finally getting it where I want it. The whole point was to get more midbass to keep up with the SI BM MKIIIs.
I had trouble at first because I couldn't get a handle on the tweeters. They were just way to loud and overpowering.
After many tuning sessions with the LC6i gains, amp gains, crossover points, and the input voltage selector on the Clarion I have it almost where I what it.
I really need a real time analyzer so I can see what is going on. That or fly mSall to Austin so he can do it for me.
I had trouble at first because I couldn't get a handle on the tweeters. They were just way to loud and overpowering.
After many tuning sessions with the LC6i gains, amp gains, crossover points, and the input voltage selector on the Clarion I have it almost where I what it.
I really need a real time analyzer so I can see what is going on. That or fly mSall to Austin so he can do it for me.
Thread Starter
|
Senior Member
Joined: Oct 2010
Posts: 327
Likes: 1
From: Austin, Tx
12 gauge speaker wire it is. I am using it to feed power to the LC6i. It is fused with a 20amp fuse at the distribution block.
I wasn't even thinking when I ordered it and got blue for the + side. I need to replace it with a red one to make it match.
I wasn't even thinking when I ordered it and got blue for the + side. I need to replace it with a red one to make it match.
Member
Joined: Apr 2011
Posts: 93
Likes: 0
From: Chicago
Lol nice.
My fricken polk audio front components are not doin the truck for me anymore. plus im starting to get some buzzing. idk why tho the gains are turned down and the filters are turned. they are just ****ty. Prolly gonna step up to something a bit more expensive up front. i looked at the focals....and said...yikes.
My fricken polk audio front components are not doin the truck for me anymore. plus im starting to get some buzzing. idk why tho the gains are turned down and the filters are turned. they are just ****ty. Prolly gonna step up to something a bit more expensive up front. i looked at the focals....and said...yikes.

Senior Member
Joined: Jan 2005
Posts: 703
Likes: 0
From: Grand Prairie, Texas
Hey Langlowe...I am looking at redoing my amp rack. Trying to make it clean and simple like yours. Can you give me any tips? I have two SAX 125.2, two passive crossovers, and a power distribution block. Do you recommend a groud distribution block? What specific items from Darvex did you use on yours. What does the back of the board look like regarding all the wires, how are they secured on the back? What thickness is the MDF for your rack?
Thread Starter
|
Senior Member
Joined: Oct 2010
Posts: 327
Likes: 1
From: Austin, Tx
I will see if I can help out on this.
I used 1/2 MDF. HomeDepot has 2x4 sheets for $10.
I would use a grounding distro block. Just because it makes wire routing much more efficient.
By running all wiring behind the amp rack you are limited by the raised support structure that is 13.5 inches from the bottom and goes to 16 inches up. Trying to keep the power and ground below 13.5 inches can be a challenge but is neccessary to have a clean mount.
Speaker and rcas not so much a problem. A little channel routing behind the amp rack and they can pass over the support beam. Look at where I have my LC6i mounted. Those RCA are well above the support. I have a routed out channel they pass through to get below the rear seat belt mechanism. There is another channel routed out on the amp side to get the RCAs above the mount support and to the amps.
One of my other attemps had all three amps mounted vertically and it was a fail. I ran out of room for the power and ground.
I would recommend putting your two Sundowns along the bottom of the rack like I have my Clarion. I know for a fact this will allow you to raise your seats without issues. With them mounted vertically, like I have them now, the top of the seat hits when raising. Not a big deal for me because I have two car seats in at all times anyway.
To make things easier you might want to trim the seat belt bolts down. I used a Dremel and fiber cutoff wheel and it only took a few minutes. Otherwise it will scratch the crap out of everything.
The back of the board, I have to say, is not as clean as the front. I have everything mounted and tied down with zip ties with screw mounts, Stinger power routing plastic things, 1/2 and 3/8 screw clamp things, plastic zip tie adhesive mounts and what every else works.
Everything other than my power and ground are on Anderson PowerPole quick disconnects. I can have the entire amp board out of the truck in less than 5 minutes.
On the back wall I have all cables zip tied using the same plastic adhesive mounts. I bought a hundred of them from monoprice.com and while back and they work really well. Even sticks to the deadner on the back wall.
http://www.monoprice.com/products/pr...seq=1&format=2
Here are my items from Darvex for this go round. I have quite a few extra pieces left over because I redid this thing three times and I still don't like it.
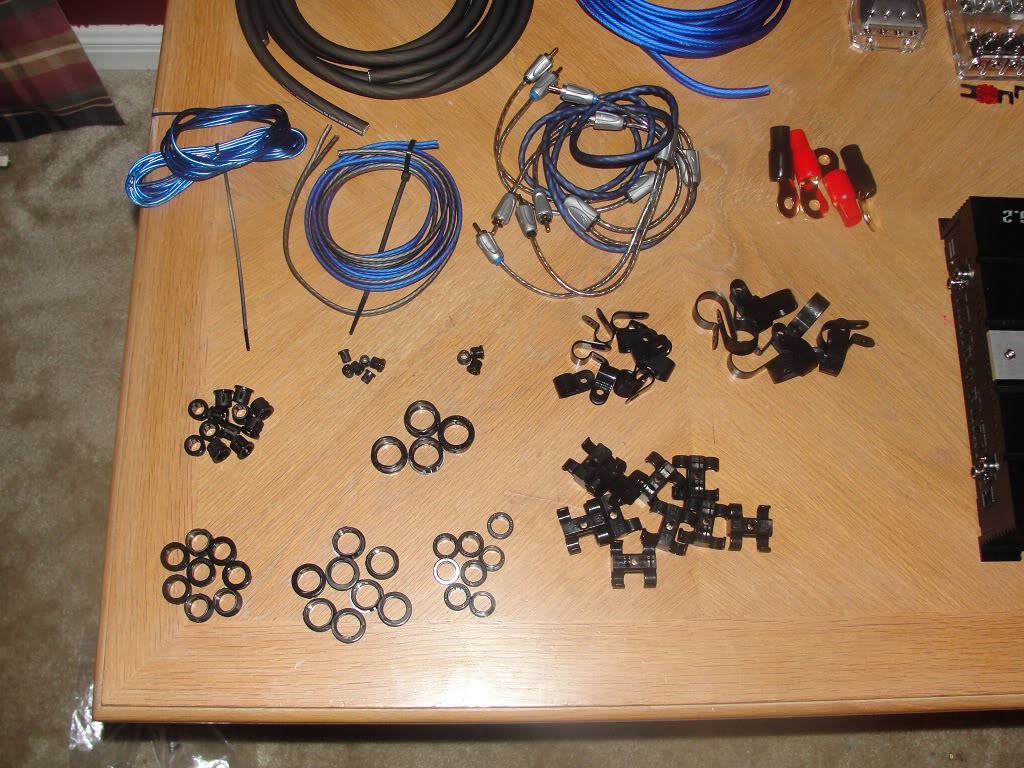
One thing on the grommets. I used Knukonceptz wire and they sell grommets. All the grommets used for the 1/0 and 4ga power/ground where bought from Knu. All the ones below are for everything else: RCA, speaker, high level inputs, remote turn on, 12ga power/ground to LC6i.
12 BSB516 8 Gauge Power Wire 5/16" Snap Bushing Grommet
8 BSB12 4 Gauge Power Wire 1/2" Snap Bushing Grommet
8 BSB3964 4 Gauge With 1/2" Loom Snap Bushing
5 BSB18 Remote Power Wire 1/8" Snap Bushing Grommet
4 BSB316 10 Gauge Power Wire 3/16" Snap Bushing Grommet
1 SWT4B-10 10 Pack Stinger 4 Gauge Dual Wire Management Clip
1 CC34-10 10 Pack 0 Gauge Wire Management Clips
1 CC38-10 10 Pack 4 Gauge Wire Management Clips
1 SPF52250 Stinger 250 Amp ANL Shoc-Krome Finish Fuse
1 SPF5850 Stinger 50 Amp Shoc-Krome MIDI Fuse
1 SPF5830 Stinger 30 Amp Shoc-Krome MIDI Fuse
1 SHD201 Stinger HPM Water Resistant ANL Fuse Holder
1 SHD21 Stinger HPM 0 / 4 / 8 Gauge Distribution Block
1 SHD821 Singer HPM MIDI Fused Distribution Block
14 SHW512B Stinger 12 Gauge Blue Twisted Speaker Wire
4 SHW516B Stinger 16 Gauge Blue Twisted Speaker Wire
4 SHW516G Stinger 16 Gauge Gray Twisted Speaker Wire
If I missed anything or I need to explain in further detail I am here to help.
I used 1/2 MDF. HomeDepot has 2x4 sheets for $10.
I would use a grounding distro block. Just because it makes wire routing much more efficient.
By running all wiring behind the amp rack you are limited by the raised support structure that is 13.5 inches from the bottom and goes to 16 inches up. Trying to keep the power and ground below 13.5 inches can be a challenge but is neccessary to have a clean mount.
Speaker and rcas not so much a problem. A little channel routing behind the amp rack and they can pass over the support beam. Look at where I have my LC6i mounted. Those RCA are well above the support. I have a routed out channel they pass through to get below the rear seat belt mechanism. There is another channel routed out on the amp side to get the RCAs above the mount support and to the amps.
One of my other attemps had all three amps mounted vertically and it was a fail. I ran out of room for the power and ground.
I would recommend putting your two Sundowns along the bottom of the rack like I have my Clarion. I know for a fact this will allow you to raise your seats without issues. With them mounted vertically, like I have them now, the top of the seat hits when raising. Not a big deal for me because I have two car seats in at all times anyway.
To make things easier you might want to trim the seat belt bolts down. I used a Dremel and fiber cutoff wheel and it only took a few minutes. Otherwise it will scratch the crap out of everything.
The back of the board, I have to say, is not as clean as the front. I have everything mounted and tied down with zip ties with screw mounts, Stinger power routing plastic things, 1/2 and 3/8 screw clamp things, plastic zip tie adhesive mounts and what every else works.
Everything other than my power and ground are on Anderson PowerPole quick disconnects. I can have the entire amp board out of the truck in less than 5 minutes.
On the back wall I have all cables zip tied using the same plastic adhesive mounts. I bought a hundred of them from monoprice.com and while back and they work really well. Even sticks to the deadner on the back wall.
http://www.monoprice.com/products/pr...seq=1&format=2
Here are my items from Darvex for this go round. I have quite a few extra pieces left over because I redid this thing three times and I still don't like it.
One thing on the grommets. I used Knukonceptz wire and they sell grommets. All the grommets used for the 1/0 and 4ga power/ground where bought from Knu. All the ones below are for everything else: RCA, speaker, high level inputs, remote turn on, 12ga power/ground to LC6i.
12 BSB516 8 Gauge Power Wire 5/16" Snap Bushing Grommet
8 BSB12 4 Gauge Power Wire 1/2" Snap Bushing Grommet
8 BSB3964 4 Gauge With 1/2" Loom Snap Bushing
5 BSB18 Remote Power Wire 1/8" Snap Bushing Grommet
4 BSB316 10 Gauge Power Wire 3/16" Snap Bushing Grommet
1 SWT4B-10 10 Pack Stinger 4 Gauge Dual Wire Management Clip
1 CC34-10 10 Pack 0 Gauge Wire Management Clips
1 CC38-10 10 Pack 4 Gauge Wire Management Clips
1 SPF52250 Stinger 250 Amp ANL Shoc-Krome Finish Fuse
1 SPF5850 Stinger 50 Amp Shoc-Krome MIDI Fuse
1 SPF5830 Stinger 30 Amp Shoc-Krome MIDI Fuse
1 SHD201 Stinger HPM Water Resistant ANL Fuse Holder
1 SHD21 Stinger HPM 0 / 4 / 8 Gauge Distribution Block
1 SHD821 Singer HPM MIDI Fused Distribution Block
14 SHW512B Stinger 12 Gauge Blue Twisted Speaker Wire
4 SHW516B Stinger 16 Gauge Blue Twisted Speaker Wire
4 SHW516G Stinger 16 Gauge Gray Twisted Speaker Wire
If I missed anything or I need to explain in further detail I am here to help.
Last edited by Langlowe; Aug 11, 2011 at 11:44 PM.

Technical Article Contributor
Joined: Aug 2006
Posts: 7,862
Likes: 0
From: Northern California

What kind of EQ options do you have? Any plans for a more intricate digital sound processor? Active is cool, but without time-alignment and many bands of EQ per channel you are really missing out on potential of your system. For your 3-way system, you could pick up a RF 3sixty.2 fairly cheap and it will blow your mind what kind of sound you can get. If you have extra monies then the Zapco DSP6 is friggin awesome and you can tune everything from your laptop using RTA, etc.