
How-To: Push-button Start (2004-2008)


Suspended
Joined: Nov 2007
Posts: 701
Likes: 0
From: Navasota, Tx
2 Way switch: $2.99
Wire and Connectors: Free (already had them lol)

Suspended
Joined: Nov 2007
Posts: 701
Likes: 0
From: Navasota, Tx
That is to wire up the switch. You have the red/blue wire coming from the steering wheel on one post of the switch. On the other post you have the other red/blue wire AND a wire that goes to the push button.
Blue/green wire goes directly to the button. It does not need to go to the switch. You can use a tap it if you like.

Senior Member
Joined: Mar 2009
Posts: 398
Likes: 0
From: englewood, FL
ok i think i got this now. lol. so dont tap the red/blue cut it put one end to one pole of the switch and the other to the other pole with another wire going to the push button.

is that better?
is that better?


Member
Joined: May 2009
Posts: 74
Likes: 0
Nope when you cut the end off and drill it out it removes the piece that would catch it. So it just pushes in and comes right back out. Its neat because I can pull out the lighter and be like its just a cig lighter, lol.
I got it installed including the switch. Works great. My remote start doesnt work unless the switch is flipped to allow the key to work though. Other than that there were not any problems. Spliced and taped everything up. My wires are ultra scary because I have an elaborate alarm system down there as well. But the instructions were the same non the less.
I got it installed including the switch. Works great. My remote start doesnt work unless the switch is flipped to allow the key to work though. Other than that there were not any problems. Spliced and taped everything up. My wires are ultra scary because I have an elaborate alarm system down there as well. But the instructions were the same non the less.
Suspended
Joined: Nov 2007
Posts: 701
Likes: 0
From: Navasota, Tx
And to remove the cig lighter...oh boy. When you get almost to the point of blowing your butt muscle, it will come out, lol. It was the hardest part of the job. Trying to get that **** out.

Thread Starter
|
Technical Article Contributor
Joined: Nov 2008
Posts: 340
Likes: 0
From: OK

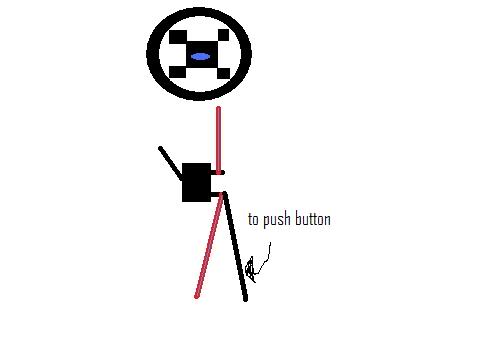
heres a little better pic for you mono

Member
Joined: May 2009
Posts: 74
Likes: 0
Hmm, I will look into that. The way the alarm is set up was they cut the two wires that are mentioned above. They then rerouted them through the alarm box. And back to the other side. So my remote start is treated the exact same as turning the key. It uses the same wires.
And to remove the cig lighter...oh boy. When you get almost to the point of blowing your butt muscle, it will come out, lol. It was the hardest part of the job. Trying to get that **** out.
And to remove the cig lighter...oh boy. When you get almost to the point of blowing your butt muscle, it will come out, lol. It was the hardest part of the job. Trying to get that **** out.
Okay, how about this- Squirt. If you switch the wire to the opposite side of the switch and it doesn't work...
Run the wire from the remote starter to a small relay and from the connecter on the relay where you attach the wire from the starter... back to the side of the switch with the button. So where you connect the wire from your remote starter to the relay, you should have two wires- one going to the remote starter and one going to the red/blue on the side of the switch with the button. Run the other side of the relay (the side that will charge up when the remote starter charges the relay) to the red/blue on the opposite side of the switch- the one that doesn't have the button. This way, when your remote starter is attempting to start the motor, that red/blue is charged throughout, just like factory.
If that doesn't work, I give up... but I've been thinking about this for hours trying to figure it out, so if it doesn't work, I'm very likely to keep thinking up another way around it.
That said... I'm not planning to do any of the stuff mentioned in this thread. It's a really pimp idea, but my F-150 is my DD and I'm not going to risk screwing something up. I understand the benefit of security for those of you in areas that your trucks may be stolen, but that's not really a problem around here, so I'll leave my starting systems like they are.


after you cut the piece off the back where the power plug goes, there is two black tabs that you bend back and the metal peices should slide out. that way you don't have to break off the black tabs to get the black piece out, then you will have to glue that piece back in. all you will have to do, is slide the metal piece back into the black piece. hope this helps.
Suspended
Joined: Nov 2007
Posts: 701
Likes: 0
From: Navasota, Tx
after you cut the piece off the back where the power plug goes, there is two black tabs that you bend back and the metal peices should slide out. that way you don't have to break off the black tabs to get the black piece out, then you will have to glue that piece back in. all you will have to do, is slide the metal piece back into the black piece. hope this helps.