


painted my headlights this weekend!!


Thread Starter
|
Senior Member
Joined: Sep 2007
Posts: 265
Likes: 1
painted my headlights this weekend!!
ive been so busy lately, but schedules finally lined up and i painted my headlights. i used the info and how to's found on this site. very cool.
only thing was, we had a hard time putting them back together. instructions from this site said to leave the stock glue in, just heat it up. but looking back i think we should have removed ALL the stock glue. but anyway here is a peak......
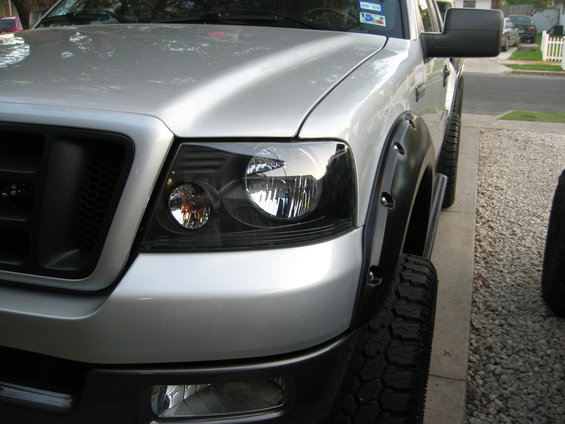
only thing was, we had a hard time putting them back together. instructions from this site said to leave the stock glue in, just heat it up. but looking back i think we should have removed ALL the stock glue. but anyway here is a peak......


Technical Article Contributor
Joined: Aug 2006
Posts: 7,862
Likes: 0
From: Northern California
I would makes sure it is sealed really well, or else you are going to get condensation building up in there once the rainy season comes.
Otherwise, it looks great. Really adds to your front end look.
Otherwise, it looks great. Really adds to your front end look.
Looks very nice. Good job. x2 on the sealing job, I would have removed all OEM glue, and re-applied with fresh silicone. Now paint that bumper black and smoke the fogs a hair and the silver & black look will flow very very nicely.


Senior Member

Joined: Jan 2007
Posts: 4,039
Likes: 0
From: NJ
looks great.
Did u use nightshades on the running light cover guy? (not sure what is called)
if so, how well does it still shine through?
Did u use nightshades on the running light cover guy? (not sure what is called)
if so, how well does it still shine through?
Trending Topics

Thread Starter
|
Senior Member
Joined: Sep 2007
Posts: 265
Likes: 1
nope, just painted right over them. the light still shines through.
the instructions i got from the site said just heat the factory glue back up and add new silicone as well. i would not do it that way again. i would do like stated above and clean all the old glue out.
the instructions i got from the site said just heat the factory glue back up and add new silicone as well. i would not do it that way again. i would do like stated above and clean all the old glue out.


Senior Member
Joined: May 2008
Posts: 2,703
Likes: 1
From: Friendswood, Texas
every how-to ive read on this site has always said to remove the factory sealer and put a nice fat silicone bead in them...
ive considered painting my headlights...the jurys still out on that one tho lol
ive considered painting my headlights...the jurys still out on that one tho lol

Senior Member
Joined: Jan 2007
Posts: 4,039
Likes: 0
From: NJ
nope, just painted right over them. the light still shines through.
the instructions i got from the site said just heat the factory glue back up and add new silicone as well. i would not do it that way again. i would do like stated above and clean all the old glue out.
the instructions i got from the site said just heat the factory glue back up and add new silicone as well. i would not do it that way again. i would do like stated above and clean all the old glue out.
also what paint did u use Krylon fusion , i assume, but wat finish?

Thread Starter
|
Senior Member
Joined: Sep 2007
Posts: 265
Likes: 1
raptoro5121--- the directions i got said 250 degrees for 10 minutes. we had to pry on them then put them back in. if you go too slow the glue gets cool and hard again.
im sure the post i got said re heat the old stuff. but dont do it. and beware of the little tabs. they will deform real easy when they are hot.
indc76--- i actually used some rustoleum professional high performance enamel. semi gloss black. my boyfriend has used it for years on his suspension parts with very good results. we just misted the reflector holding the can very far away while we sprayed.
overall, a very neat experience.
summary:
be very generous while prying on the tabs.
take your time. put them back in the oven for afew moments at a time to reheat them.
remove all old glue.
im sure the post i got said re heat the old stuff. but dont do it. and beware of the little tabs. they will deform real easy when they are hot.
indc76--- i actually used some rustoleum professional high performance enamel. semi gloss black. my boyfriend has used it for years on his suspension parts with very good results. we just misted the reflector holding the can very far away while we sprayed.
overall, a very neat experience.
summary:
be very generous while prying on the tabs.
take your time. put them back in the oven for afew moments at a time to reheat them.
remove all old glue.