
NewTSB on spark plug removal


Senior Member
Joined: Sep 2013
Posts: 108
Likes: 0


Junior Member
Joined: Oct 2014
Posts: 3
Likes: 0
From: Near Chicago
Thank you to all who have posted their 5.4L 3V plug change info & experiences!
Having spent a considerable amount of time going through all the related forum entries here, I can say that I gathered enough useful info that the plugs change I just did on my truck today probably went better than I should have expected.
Background: just bought a 2005 XLT SuperCrew with 122,990 on the clock when I drove it off the lot 6 Oct 14. The dealer pulled the maintenance records for the vehicle from Ford for me, both prior owners used dealer maintenance for everything.
One of the things I'd noticed was that there was no mention of a plugs change, nor of a fuel filter swap...and there was a notable misfire going on between 2000-3000 RPM under load while accelerating. So, I did my research here on the Triton 5.4L 3V plugs swap, and realized I'd gotten myself into a potential spot of bother. Picked up a can of Seafoam, was already running fuel system cleaner in the tank, got the plugs & anti-seize & the purpose-built socket with built-in wobble & extension, and of course got a loaner of the Lisle 65600 tool. Swapped the fuel filter yesterday...the rust marks from the mount and the way the paint came with the filter out of the bracket indicates it was the factory original...then drove it a little while to make sure I got the air out of the fuel system.
Started off with a dead-cold engine at 123,400 miles this morning, fired it & brought it to normal idle closed-loop, then with my wife on the gas pedal I put about 3/4 of the can of Seafoam through the intake while she kept it at 2000 RPM. Right after that, I shut it down & let it cool for a couple hours. 45�F outside at the time, so it didn't take longer than that to cool down. Spent some of that time getting the intake ductwork out of the way & unplugging all the coils.
Did the plugs front to back starting with the driver's front as the easiest to reach...and broke the #5 plug right off the bat. Left the metal shell but gave me all the porcelain. First shot with the Lisle tool, no sweat, took all of about three minutes because I didn't have to do the first step. However, given the ease of using the Lisle tool, I declared "******* this by hand s***" and pulled out the compressor and air tools.
Got plugs #6, 7, 8 out flawlessly with the impact gun used in bursts, then switched to the other side. #1 also went fine, but #2 did the same as before - gave me the porcelain but left the shell inside. Same short use of the Lisle tool, and back to work. #3 came out no problem also, but #4 had to be done by hand due to the severe angles & known access issues. Since I could get in there with fingers & tools reasonably well (thank God for extensions & wobbles!), I decided to leave the computer in place and work around it.
Of course, #4 not only broke, but this time the porcelain stayed with the shell to the extent that it had a couple extra millimeters from further up inside the plug than the usual breakage I've seen illustrated. Got the whole electrode back, though. So, this time I had to use the Lisle kit's "porcelain pusher", which was interesting because "far enough to touch the strap" wasn't far enough for the extractor to even start biting. Put the porcelain pusher back in and cranked on it with a bit more authority, pushed the porcelain through the strap far enough to get the extractor to bite.
Getting that plug out was about 15 minutes from "it broke" to "got you, *********!", because of the extra back & forth with the Lisle tool pieces.
No damaged boots, the coils were visually in good condition. Cleaned them up, got the anti-seize on the new plugs and whopped them all in, put dielectric grease in the boots and whopped those back on in the original cylinder location order. I decided to "live dangerously" and put everything back together road-ready before starting it.
Test fire gave expected roughness & smoking from the rest of the Seafoam getting purged, before it settled into an idle. I let it idle that way for about ten minutes, to get the engine up to temp & let the computer figure out how to run again - the idle was "hunting" up & down for a couple minutes while it relearned the idle fuel trim with the new plugs.
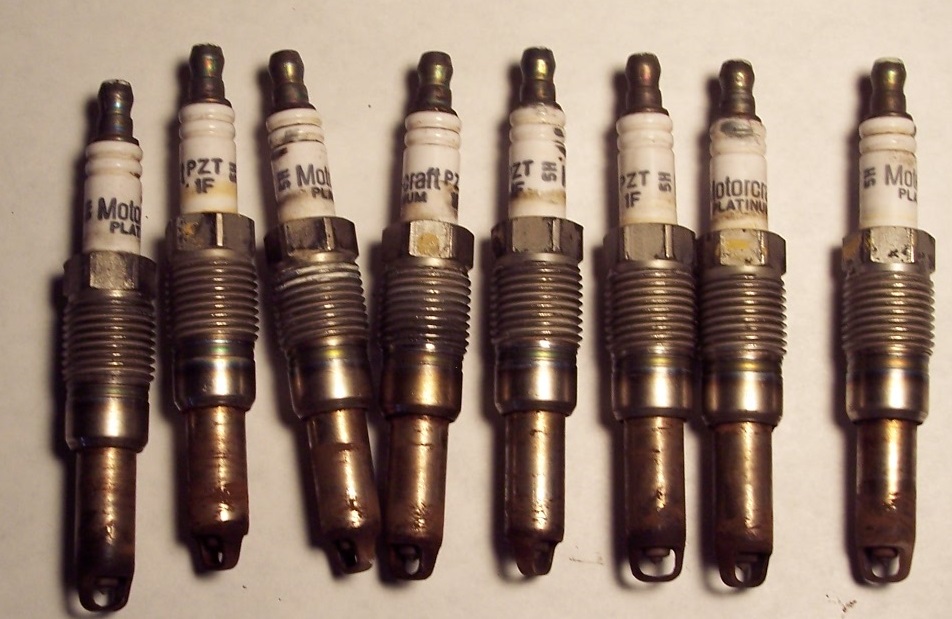
The old plugs, by the way, were all the /factory originals/ - 122,400 miles on the factory plugs. No wonder there was a misfire!
I used the test drive to take the Lisle tool back to the parts shop, as well as putting the truck through most of the RPM & load ranges so it could relearn the rest of the new fuel trims. One thing I'll have to do tomorrow is get the deceleration trims, traffic on the local expressway was too busy for me to get the needed three coast-downs from 60 to 40 MPH. I'd have gotten slammed in the rear if I slowed down that much.
Aside from that, the truck now runs like a raped ape, misfire completely gone. Tomorrow if the weather holds I'll be using my tablet and KIWI adapter to run a couple logging sessions with Torque Pro and check if there's anything further needing attention right away.
Thanks again for those who have gone through all this crap before and documented their experience - it definitely shortened the time it took for me to get this thing done.
Background: just bought a 2005 XLT SuperCrew with 122,990 on the clock when I drove it off the lot 6 Oct 14. The dealer pulled the maintenance records for the vehicle from Ford for me, both prior owners used dealer maintenance for everything.
One of the things I'd noticed was that there was no mention of a plugs change, nor of a fuel filter swap...and there was a notable misfire going on between 2000-3000 RPM under load while accelerating. So, I did my research here on the Triton 5.4L 3V plugs swap, and realized I'd gotten myself into a potential spot of bother. Picked up a can of Seafoam, was already running fuel system cleaner in the tank, got the plugs & anti-seize & the purpose-built socket with built-in wobble & extension, and of course got a loaner of the Lisle 65600 tool. Swapped the fuel filter yesterday...the rust marks from the mount and the way the paint came with the filter out of the bracket indicates it was the factory original...then drove it a little while to make sure I got the air out of the fuel system.
Started off with a dead-cold engine at 123,400 miles this morning, fired it & brought it to normal idle closed-loop, then with my wife on the gas pedal I put about 3/4 of the can of Seafoam through the intake while she kept it at 2000 RPM. Right after that, I shut it down & let it cool for a couple hours. 45�F outside at the time, so it didn't take longer than that to cool down. Spent some of that time getting the intake ductwork out of the way & unplugging all the coils.
Did the plugs front to back starting with the driver's front as the easiest to reach...and broke the #5 plug right off the bat. Left the metal shell but gave me all the porcelain. First shot with the Lisle tool, no sweat, took all of about three minutes because I didn't have to do the first step. However, given the ease of using the Lisle tool, I declared "******* this by hand s***" and pulled out the compressor and air tools.
Got plugs #6, 7, 8 out flawlessly with the impact gun used in bursts, then switched to the other side. #1 also went fine, but #2 did the same as before - gave me the porcelain but left the shell inside. Same short use of the Lisle tool, and back to work. #3 came out no problem also, but #4 had to be done by hand due to the severe angles & known access issues. Since I could get in there with fingers & tools reasonably well (thank God for extensions & wobbles!), I decided to leave the computer in place and work around it.
Of course, #4 not only broke, but this time the porcelain stayed with the shell to the extent that it had a couple extra millimeters from further up inside the plug than the usual breakage I've seen illustrated. Got the whole electrode back, though. So, this time I had to use the Lisle kit's "porcelain pusher", which was interesting because "far enough to touch the strap" wasn't far enough for the extractor to even start biting. Put the porcelain pusher back in and cranked on it with a bit more authority, pushed the porcelain through the strap far enough to get the extractor to bite.
Getting that plug out was about 15 minutes from "it broke" to "got you, *********!", because of the extra back & forth with the Lisle tool pieces.
No damaged boots, the coils were visually in good condition. Cleaned them up, got the anti-seize on the new plugs and whopped them all in, put dielectric grease in the boots and whopped those back on in the original cylinder location order. I decided to "live dangerously" and put everything back together road-ready before starting it.
Test fire gave expected roughness & smoking from the rest of the Seafoam getting purged, before it settled into an idle. I let it idle that way for about ten minutes, to get the engine up to temp & let the computer figure out how to run again - the idle was "hunting" up & down for a couple minutes while it relearned the idle fuel trim with the new plugs.
The old plugs, by the way, were all the /factory originals/ - 122,400 miles on the factory plugs. No wonder there was a misfire!
I used the test drive to take the Lisle tool back to the parts shop, as well as putting the truck through most of the RPM & load ranges so it could relearn the rest of the new fuel trims. One thing I'll have to do tomorrow is get the deceleration trims, traffic on the local expressway was too busy for me to get the needed three coast-downs from 60 to 40 MPH. I'd have gotten slammed in the rear if I slowed down that much.
Aside from that, the truck now runs like a raped ape, misfire completely gone. Tomorrow if the weather holds I'll be using my tablet and KIWI adapter to run a couple logging sessions with Torque Pro and check if there's anything further needing attention right away.
Thanks again for those who have gone through all this crap before and documented their experience - it definitely shortened the time it took for me to get this thing done.

Senior Member
Joined: Aug 2009
Posts: 104
Likes: 0
From: Newnan, GA
That was a very thorough write up Grue. With all that Seafoam through the system, you may want to replace the pre cat O2 sensors(use Motorcrafts!). After I changed plugs on my 5.4 with 71k on it, the gas mileage took a dip. I believe the Techron I ran through the system pre plug change wiped off the last of the coating off the sensors.
Changed the O2's and mileage came back up at least 1 mpg anyway. Lots of [people will tell you to change O2's anyway after 75k.
I got lucky on my plug change using hand tools and got 8 of 8 out with no breakage although everyone of them, especially passenger rear felt like it was going to coming out.

Member
Joined: Nov 2007
Posts: 69
Likes: 0
Hot engine is the way to go
Based on my experience changing my 2007 F150 5.4L plugs at 70k miles there's no doubt having a hot engine makes a huge difference in removing the plugs.
As a side note I had also watched Champion's video on their 7989 plug and in that video they showed how the motorcraft plugs fail when more than approx 33 foot lbs of torque is applied. So I used 30ft/lbs as my limit when working with the plugs. (skip to 3:00)
I first tried Ford's TSB method on #5 cylinder using a beam type torque wrench to back off the plug 1/4 turn and to insure the torque was kept under 30ft/lbs. The plug wouldn't budge even when I approached 33ft/lbs, so I stopped. Given I couldn't get a least 1/4 turn it didn't make sense to soak the plug with carb cleaner.
I next tested to see it there was any improvement with a hot engine. I returned the COP to the plug, started and let the engine idle until it was fully warmed up (mid range on dash gauge).
Upon my 2nd attempt at removing the plug I was surprised to find the plug started backing out with as little as 15ft/lbs of torque. I continued to use the torque wrench to monitor my progress, because after the first 1/4 turn the plug starts making a clicking sound every 1/16 of turn. When it does click just briefly stop applying force, then reapply until the next click, continue as needed until the plug is removed.
Note I didn't do any pretreatments to the vehicle prior to the repair. As for the 1/4 turn and soaking, there's no point because the chemical boils off in a few seconds.
Also depending on how fast you work you most likely will have to warm the engine up again. I found the engine retained enough heat for about 45-60mins before I had to warm it up again.
I was taking my time and working on only 2 plugs at a time. Took me a nearly 4 hours to finish. The job was not difficult but instead highly stressful. Its a job that would be easy to start and stop if the vehicle were needed.
Recommended items
A good assortment of socket extensions.
A cheap beam type torque wrench 3/8 drive is easier to work with, but I managed with my 1/2
Permatex 77134 high temp nickle anti-seize .5oz $4 for the new plugs. I couldn't find it at any of the majors, except Pepboys.
Orielly has loaner broken plug and porcelain extractor tools, like Ford's you might want on hand. Fortunately I didn't need it.
good luck
Last edited by Scruge; Jan 22, 2015 at 03:50 PM.
Member
Joined: Mar 2015
Posts: 12
Likes: 0
Set Of 8 Motorcraft Spark Plugs SP-515 PZH14F + 8 ADP Ignition Coils GDG511 GD511
Can you guys confirm that the ignition coils that come with this kit are a-ok ?
http://tinyurl.com/qyqex9a
http://tinyurl.com/qyqex9a


Member
Joined: Mar 2015
Posts: 12
Likes: 0
Ford 5.4 3V Spark Plug Removal Kit
Thought I bookmarked it..
To save me looking back through this topic, can someone give me a link to this kit.. Pretty sure someone shared a link for this kit that only cost about 70.00..
Thanks in advance.. !
To save me looking back through this topic, can someone give me a link to this kit.. Pretty sure someone shared a link for this kit that only cost about 70.00..
Thanks in advance.. !
Member
Joined: Mar 2015
Posts: 12
Likes: 0
Eight for Eight !
Got all eight of em !
Ran one can Sea Foam with full tank, then one more can to 20.00 worth of gas. Did not spray any through the throttle body, and also did not set any lubricant on top of the plugs.
Used air, and went well.. Set my clicker ratchet to 30 lbs for the plugs.
Have only had the truck a couple months, and did notice one new COP.
Idles nice and smooth, and runs much better.. Going to put a timing light to it, and change the oil next..
Big thank you to all who have taken the time to post their experiences.. They helped me get through this plug change.
Can someone point me to the spark plug chart that I remember being mentioned someplace please ?
Global Moderator &
Senior Member
Senior Member

Joined: Mar 2005
Posts: 26,080
Likes: 85
From: Burleson/Athens/Brownsboro, TX
Glad they came out. What year and what engine? You probably need to clean the MAF and throttle body. One thing, Seafoam can stop up the catalytic converter. I would not use that stuff. Only Techron is recommended.
__________________
Jim
Jim
Member
Joined: Mar 2015
Posts: 12
Likes: 0
MAF and Throttle Body
Yes, thanks Jim.. It was a relief to get em all without breaking any.
Have been writing things down since first joined the forum a few weeks ago. Cleaning the throttle body is one, but not sure how to do that yet.
Will clean the MAF tomorrow then.
I went with the Seafoam because of reading so many folks using it. Changed the fuel filter today as well because of running the Seafoam.
Last edited by georgeingraham; Mar 28, 2015 at 11:01 PM.