


Intermittent Odometer - A Repair


Junior Member
Joined: Mar 2009
Posts: 2
Likes: 0
Failed Repair
Failed at this on my '06 F150.
I was able to remove the entire panel (instrument panel and circuit board together), and removed six screws in the back, but was not able to separate the board from the panel.
So I just analyzed the back of the board. The board did not match the images shown. I looked for fractured flux areas, but saw nothing to repair.
Then, I try too hard to separate them and accidentally broke two of the gauges (oil pressure and temp). Fractured the clear plastic stems. Now I need to repair both the board and the panel. So here are some questions:
1. How do I separate the from gauge assembly from the back board?
2. Can I glue those gauges back on?
3. Wonder if I can get a replacement panel and/or board from a wrecking yard?
4. I'm not seeing where to repair the flux? And do I need to add solder or just re-head the existing bead?
Thanks people. I'd appreciate your candid help. But no wise cracks about breaking the dang instruments.
I was able to remove the entire panel (instrument panel and circuit board together), and removed six screws in the back, but was not able to separate the board from the panel.
So I just analyzed the back of the board. The board did not match the images shown. I looked for fractured flux areas, but saw nothing to repair.
Then, I try too hard to separate them and accidentally broke two of the gauges (oil pressure and temp). Fractured the clear plastic stems. Now I need to repair both the board and the panel. So here are some questions:
1. How do I separate the from gauge assembly from the back board?
2. Can I glue those gauges back on?
3. Wonder if I can get a replacement panel and/or board from a wrecking yard?
4. I'm not seeing where to repair the flux? And do I need to add solder or just re-head the existing bead?
Thanks people. I'd appreciate your candid help. But no wise cracks about breaking the dang instruments.

Junior Member
Joined: Dec 2008
Posts: 2
Likes: 0
 Add me to the this list
This is a great site .I'm new here , so hi to everyone .Just a quick Thank-you for the step by step post on the odometer problem. I have a 2000 F150 ,and like many ,had this issue for a long time . Working geat now!!!


Member
Joined: Feb 2003
Posts: 34
Likes: 0
From: Northern WI
Fixed the problem!!! Didn't bother with the magnifying glass; just soldered the terminal that was shown and bingo! Working like new!! I love this site!!
Bionik5668, your oil gauge drop all the way down then come back to normal after awhile? I know I had a problem with mine a couple years ago showing no oil pressure, then after a few minutes it would come back to normal. Ended up being the oil sending unit, about a $30 dollar part and 15 minutes worth of time if I remember correctly. I started a thread about this quite some time ago, in there it goes over location of the unit, etc. Hope this helps..
Bionik5668, your oil gauge drop all the way down then come back to normal after awhile? I know I had a problem with mine a couple years ago showing no oil pressure, then after a few minutes it would come back to normal. Ended up being the oil sending unit, about a $30 dollar part and 15 minutes worth of time if I remember correctly. I started a thread about this quite some time ago, in there it goes over location of the unit, etc. Hope this helps..

Junior Member
Joined: Nov 2008
Posts: 2
Likes: 0
Just fixed my 2000 XLT! Thanks to Greg, who started this thread, and to all who contributed information and pics.
I had a moments trouble, like some others, removing my headlight switch until I determined mine was the "pry" type. I fashoned a 'j-hook' out of a bicycle spoke, put it into the slot at the bottom of the light switch and it popped right out. No way to damage finish on the dash this way, either.
There was an unused harness connector behind my light switch. In the pic below it's the one on the right with a red cap. Does anybody know what it does?
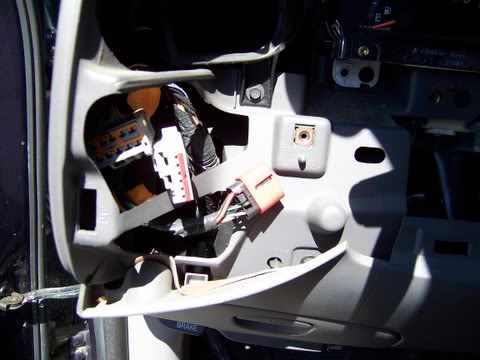
I had a moments trouble, like some others, removing my headlight switch until I determined mine was the "pry" type. I fashoned a 'j-hook' out of a bicycle spoke, put it into the slot at the bottom of the light switch and it popped right out. No way to damage finish on the dash this way, either.
There was an unused harness connector behind my light switch. In the pic below it's the one on the right with a red cap. Does anybody know what it does?

Member
Joined: Mar 2005
Posts: 12
Likes: 0
From: DURHAM, NC
Greg Upton, I really appreciate you laying the instructions out like you did, I have been putting this project off for some time now, had to replace my headlight switch, since I had to be that far into the dash, I went ahead & done this, alot easier than I ever imagined, again thanks for the help

Senior Member
Joined: Apr 2009
Posts: 135
Likes: 0
From: Fargo, North Dakota
Did this a while back on my 2000 XLT when I wasnt a member on here. Worked great and kept me from beating on the dash. A member on a different forum actually cracked his dash from hitting it trying to get the display back. All at no cost. The headlight switch did take the longest time trying to figure out.

 2005 Ford

Senior Member
Joined: Aug 2006
Posts: 100
Likes: 0
From: Oklahoma City


Can a PCM that is going out be the problem with a intermittent On/Off Odometer/Trip Display?
Chris

Junior Member
Joined: Aug 2005
Posts: 1
Likes: 0
From: Reno, Nevada
Thanks, Greg.  If you are an obsessive-compulsive lunatic like me, you'll appreciate this fix. The intermittent light was driving me crazy. You'll need a #15 torx driver and a 9/32 nut driver. I also used a flexible extension for the nut driver, which made the job a lot easier. The hardest part of the job for me was disconnecting the the connectors behind the display. I have pretty strong hands from years of guitar playing, and they were very tight. Patience.
A couple of recommendations: The nuts on the right side of the cluster are in an awkward spot, and have a nasty habit of dropping behind the dash; Also, this is a good time to replace any burnt out indicator lights on your display.
Cheers, Eric
If you are an obsessive-compulsive lunatic like me, you'll appreciate this fix. The intermittent light was driving me crazy. You'll need a #15 torx driver and a 9/32 nut driver. I also used a flexible extension for the nut driver, which made the job a lot easier. The hardest part of the job for me was disconnecting the the connectors behind the display. I have pretty strong hands from years of guitar playing, and they were very tight. Patience.A couple of recommendations: The nuts on the right side of the cluster are in an awkward spot, and have a nasty habit of dropping behind the dash; Also, this is a good time to replace any burnt out indicator lights on your display.
Cheers, Eric

Junior Member
Joined: Jan 2005
Posts: 2
Likes: 0
From: Gravois Mills, Mo.
unused harness connector w/red cap
Just fixed my 2000 XLT! Thanks to Greg, who started this thread, and to all who contributed information and pics.
I had a moments trouble, like some others, removing my headlight switch until I determined mine was the "pry" type. I fashoned a 'j-hook' out of a bicycle spoke, put it into the slot at the bottom of the light switch and it popped right out. No way to damage finish on the dash this way, either.
There was an unused harness connector behind my light switch. In the pic below it's the one on the right with a red cap. Does anybody know what it does?
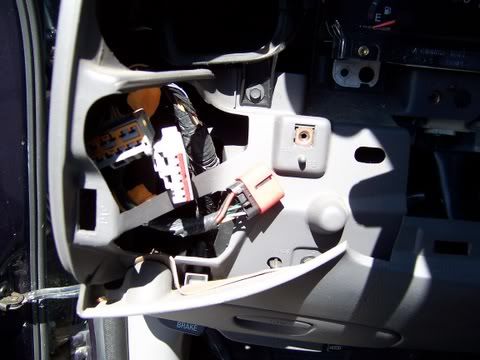
I had a moments trouble, like some others, removing my headlight switch until I determined mine was the "pry" type. I fashoned a 'j-hook' out of a bicycle spoke, put it into the slot at the bottom of the light switch and it popped right out. No way to damage finish on the dash this way, either.
There was an unused harness connector behind my light switch. In the pic below it's the one on the right with a red cap. Does anybody know what it does?

Junior Member
Joined: Mar 2009
Posts: 4
Likes: 0
From: Way to North
Wow I would just like to say thank you for all the information that you shared, there is one company that I know of that wants to charge you $25 just for the information to do this. I bought my 03 F150 Screw XLT and from the day I bought it, it would just go on and off all the time. I actually fixed this today, it took me about an hour because I already knew how to take apart the dash I just had no idea what was causing the problem. I actually had 2 bad solder connectors, fixed them and drove it all around today, it hasn't gone off since.

Junior Member
Joined: Aug 2009
Posts: 2
Likes: 0
I stumbled across this post via google and used it to fix my odometer this weekend.
The only thing that didn't go as planned was the headlight switch removal but in the end I got it out and the odometer works again.
It was also a good time to look for a rattle behind the headlight switch which I hope I fixed by padding the wires with foam water line insulation.
I thought I should register just to say thanks for the great post.
DaveJ
The only thing that didn't go as planned was the headlight switch removal but in the end I got it out and the odometer works again.
It was also a good time to look for a rattle behind the headlight switch which I hope I fixed by padding the wires with foam water line insulation.
I thought I should register just to say thanks for the great post.
DaveJ

Junior Member
Joined: Aug 2009
Posts: 1
Likes: 0
From: Indiana
Thanks for the original post Greg. I printed it off two years ago and finally decided it was time to tackle it today. Went a lot easier than I expected, except for burning my fingers on the soldering iron! Only took a couple hours but I wasn't in a hurry and cleaned everything on the instrument panel before re-assembly. Thanks again!