Articles & How-To's *NOW WITH VIDEO SECTION!*

Cowl Removal and Painting Step-By-Step (56K Waring)

Thread Tools
 
Search this Thread
 
  #16  
Old 04-28-2008, 09:03 AM
Bluejay's Avatar
Global Moderator &
Senior Member

Join Date: Mar 2005
Location: Burleson/Athens/Brownsboro, TX
Posts: 26,015
Received 68 Likes on 64 Posts
Originally Posted by tardman91
Still looks good after a couple of days. The pollen doesn't really stick to it as much as I thought it would (it's a little tackier than the original plastic finish). It's going to rain today, so we'll see how it goes.
The real test will be to see how it survives a nice hot, humid, Florida summer parked outside.
Thanks for the update. So, you're saying that Fusion does not dry hard, like paint?
 
__________________
Jim
  #17  
Old 04-28-2008, 10:17 AM
tardman91's Avatar
Technical Article Contributor

Thread Starter
Join Date: Aug 2005
Location: New Port Richey, FL
Posts: 2,331
Likes: 0
Received 0 Likes on 0 Posts
Originally Posted by bluejay432000
Thanks for the update. So, you're saying that Fusion does not dry hard, like paint?
Ok, tacky was definitely not the word I was looking for. It's hard, just like any other spray paint.
I think what I wanted to say was that it's not as smooth as it was before the paint. It has a little bit of texture to it. Kind of like when you run your hand over somewhere where you get overspray while spray-painting, catch my drift?
I went across it with a microfiber towel and it didn't glide across it smoothly. I suppose I could fix it with a bunch of clear and some sanding, but that's more work than I'm looking to do. I'm perfectly happy with it the way it is, and after a few washes and rubbing it down with some protectant I'm sure all the slight texture will wear down.
 
  #18  
Old 04-28-2008, 10:32 AM
gixxerjasen's Avatar
Senior Member
Join Date: Nov 2007
Location: DFW, Tx
Posts: 540
Likes: 0
Received 0 Likes on 0 Posts
Give it some time for the paint to cure and it should harden up from what you have now.

Incredible difference between the old and the new. I might have to go have a look at mine now.
 
  #19  
Old 04-28-2008, 10:52 AM
Bluejay's Avatar
Global Moderator &
Senior Member

Join Date: Mar 2005
Location: Burleson/Athens/Brownsboro, TX
Posts: 26,015
Received 68 Likes on 64 Posts
Originally Posted by tardman91
Ok, tacky was definitely not the word I was looking for. It's hard, just like any other spray paint.
I think what I wanted to say was that it's not as smooth as it was before the paint. It has a little bit of texture to it. Kind of like when you run your hand over somewhere where you get overspray while spray-painting, catch my drift?
I went across it with a microfiber towel and it didn't glide across it smoothly. I suppose I could fix it with a bunch of clear and some sanding, but that's more work than I'm looking to do. I'm perfectly happy with it the way it is, and after a few washes and rubbing it down with some protectant I'm sure all the slight texture will wear down.
Got it! Thanks.
 
__________________
Jim
  #20  
Old 04-28-2008, 01:32 PM
BlueFlareside's Avatar
Senior Member
Join Date: Jan 2000
Location: Central Florida
Posts: 2,075
Likes: 0
Received 1 Like on 1 Post
Looks great! Thanks for the how-to.
 
  #21  
Old 04-30-2008, 05:04 PM
GBTexas's Avatar
Senior Member
Join Date: May 2004
Location: Houston
Posts: 264
Likes: 0
Received 0 Likes on 0 Posts
tardman91

Can you post a pic of the exact Krylon products you used. The Walmart nearest me has three different types of glossy black and many types of clear. By the way how did it hold up in the rain?
 
  #22  
Old 05-01-2008, 11:05 AM
tardman91's Avatar
Technical Article Contributor

Thread Starter
Join Date: Aug 2005
Location: New Port Richey, FL
Posts: 2,331
Likes: 0
Received 0 Likes on 0 Posts
Originally Posted by GBTexas
tardman91

Can you post a pic of the exact Krylon products you used. The Walmart nearest me has three different types of glossy black and many types of clear. By the way how did it hold up in the rain?
Still looks like the pics after some rain and beating sun. Seems to me like this is the best remedy for the fading black cowls next to purchasing a new one. And if I have to take it apart again in a couple of years and strip it and repaint it, it'll be well worth the trouble.
I'm at work now so I can't get a photo, but these are the Krylon products I used:
Krylon Fusion Gloss Black

Krylon Crystal Clear
 
  #23  
Old 05-01-2008, 11:10 AM
ELVATO's Avatar
Senior Member
Join Date: May 2007
Location: Orlando
Posts: 2,101
Likes: 0
Received 0 Likes on 0 Posts
The Krylon Satin Black (black cap with "SATIN" written in white) works as well. But, that is the clear I used as well.
 
  #24  
Old 05-01-2008, 10:52 PM
Rockpick's Avatar
Moderator &
Senior Member

Join Date: Jan 2002
Location: The Bluegrass State
Posts: 31,440
Received 4 Likes on 4 Posts
Nice post, tardman!
 
  #25  
Old 05-03-2008, 06:00 PM
IDNC76's Avatar
Senior Member

Join Date: Jan 2007
Location: NJ
Posts: 4,039
Likes: 0
Received 0 Likes on 0 Posts
i ve been tempted to try this on my bed caps

they look horrible, from sun and i have tried that die

stuff and it did work for a bit , but i think mine are to bad to restore.

any one have any idea if they re hard to get off? the bed caps that is
 
  #26  
Old 05-03-2008, 06:26 PM
Bluejay's Avatar
Global Moderator &
Senior Member

Join Date: Mar 2005
Location: Burleson/Athens/Brownsboro, TX
Posts: 26,015
Received 68 Likes on 64 Posts
Originally Posted by IDNC76
i ve been tempted to try this on my bed caps

they look horrible, from sun and i have tried that die

stuff and it did work for a bit , but i think mine are to bad to restore.

any one have any idea if they re hard to get off? the bed caps that is
I have had very good luck with Bondo Restore Black. I have to redo it about every 3 months. If I were going to paint the rails, I think I would do them on the truck. It is very easy to get masking tape under them and hang paper down both sides. That would have them laid out well for painting as well. If I end up painting mine, that is my plan.
 
__________________
Jim
  #27  
Old 05-03-2008, 06:34 PM
davenay's Avatar
Member
Join Date: Feb 2005
Location: Illinois
Posts: 47
Likes: 0
Received 0 Likes on 0 Posts
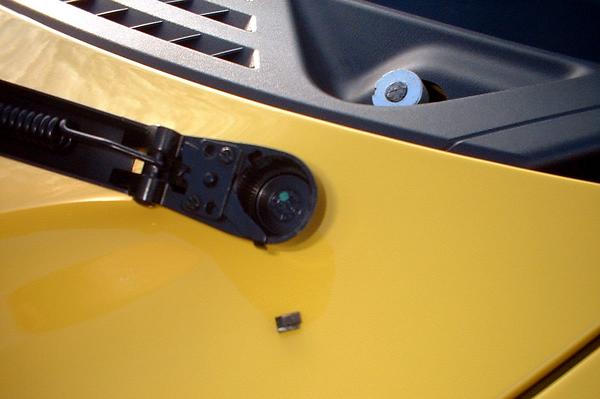
A word of caution about removing the wiper arms. There is a small metal key that aligns the arm with a notch in the drive. This key is not secured, and can fall out and get lost if you are not careful.

 
  #28  
Old 05-03-2008, 09:36 PM
GBTexas's Avatar
Senior Member
Join Date: May 2004
Location: Houston
Posts: 264
Likes: 0
Received 0 Likes on 0 Posts
The bed rails are a pain to get off. I replaced mine due to the fading problem once already. I think it would be very difficult if no impossible to get them off with out breaking at least a few of the plastic clips. The older the plastic the less flexible it is also. So unless there it some trick I do not know about be prepared to break a few.
 
  #29  
Old 05-03-2008, 09:37 PM
GBTexas's Avatar
Senior Member
Join Date: May 2004
Location: Houston
Posts: 264
Likes: 0
Received 0 Likes on 0 Posts
The bed rails are a pain to get off. I replaced mine due to the fading problem once already. I think it would be very difficult if no impossible to get them off with out breaking at least a few of the plastic clips. The older the plastic the less flexible it is also. So unless there it some trick I do not know about be prepared to break a few.

Thanks for the reply tardman91!
 
  #30  
Old 05-04-2008, 01:29 PM
keith61760's Avatar
Senior Member
Join Date: Jun 2005
Location: Lemoore, California
Posts: 369
Likes: 0
Received 0 Likes on 0 Posts
Originally Posted by IDNC76
i ve been tempted to try this on my bed caps

they look horrible, from sun and i have tried that die

stuff and it did work for a bit , but i think mine are to bad to restore.

any one have any idea if they re hard to get off? the bed caps that is
They are not hard. There are just plastic tabs that hold them down. Just start at one end and work your way down. You'll break a couple tabs on both sides but not really a big deal. Don't use the Duplicor truck Bed liner. It doesn't hold up.


Quick Reply: Cowl Removal and Painting Step-By-Step (56K Waring)


All times are GMT -4. The time now is 10:03 AM.