
Do It Yourself Intake Modification for 2004-2008

Thread Starter
|
Global Moderator &
Senior Member
Senior Member


Joined: Aug 2007
Posts: 7,890
Likes: 61
From: Among javelinas and scorpions in Zoniestan
Do It Yourself Intake Modification for 2004-2008
OK - I've been reading about the "Gotts" approach to a CAI mod long enough that I decided to try it. Here's what I did - and I take no credit at all for any of this, it was just my implementation of the excellent ideas put out by people that came before me.
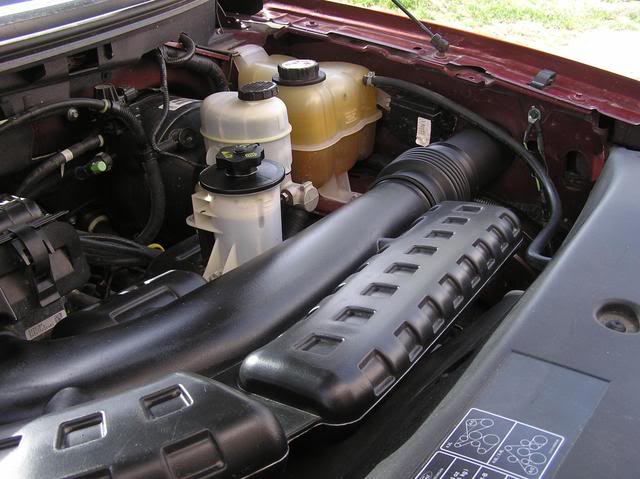
In the 2004-2008 trucks, the intake snorkel has only a 2" diameter at the end where it goes into the fender well. Other than that, it's a Cold Air Intake - so, the goal is to increase the intake opening.
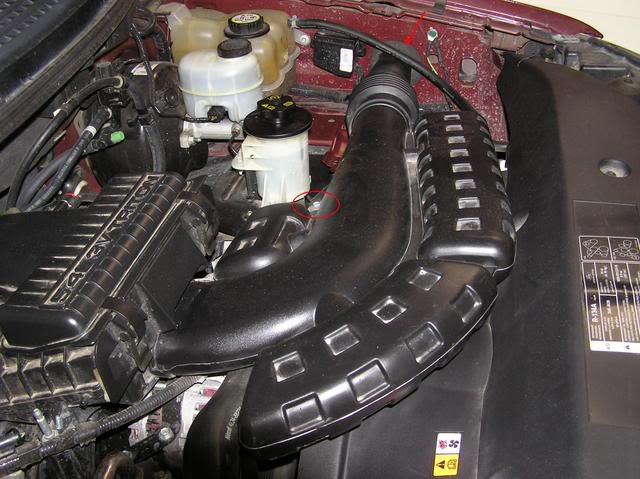
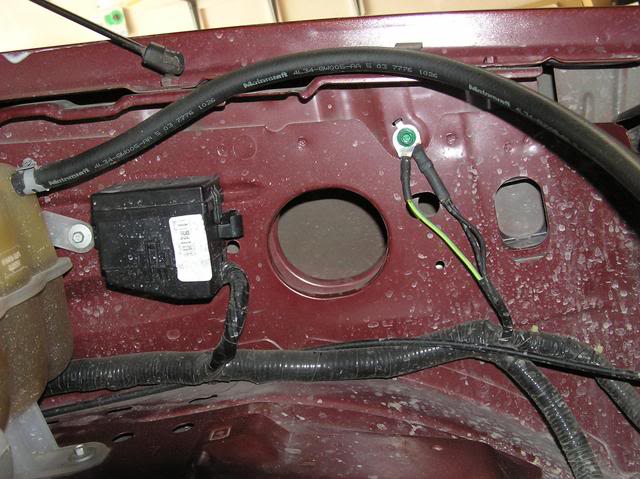
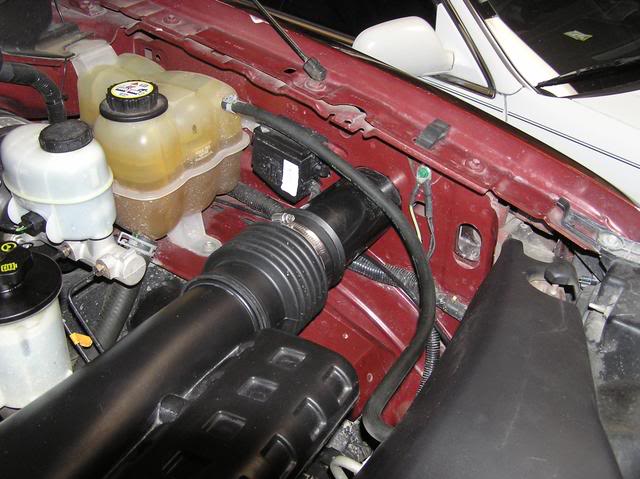
We start with the intake ducting. Remove the hold down screw (red circle) in the picture below using a 10mm socket and pull the snorkel out of the fender wall (red arrow). Once you do that, you can pull the duct away from the filter box. It will make a lot of noise that sounds like something is breaking - just smile and ignore the bad sounds. You can also ignore the dirty fender wall in this picture - it just shows my truck is actually used and is not a "Garage Queen".
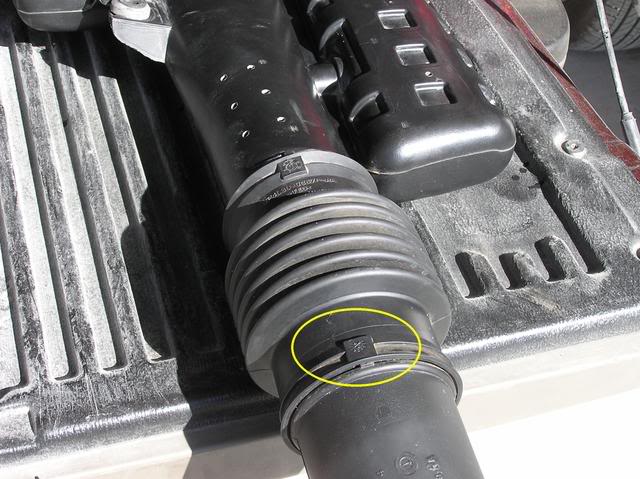
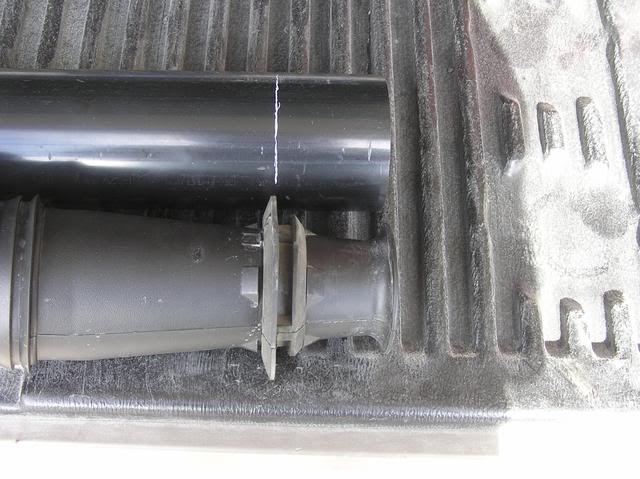
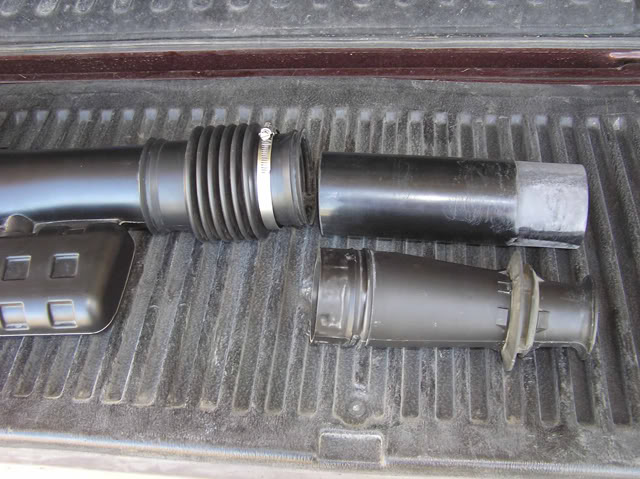
Now that you've got the intake duct out, turn it over and you'll see two rectangular "bumps" at each end of the bellows that look like they might be "release tabs". Some people have said they can pry the parts apart here using a screwdriver. I was not able to do this, but I found they sit over raised areas on the inside tube that act sort of like "tire irons" to separate the bellows from the other parts of the ducting if you twist and pull on the part you want to remove. I separated the bellows from the duct using the circled "bump" in the picture below. (Notice I like to work on the tailgate of my truck). :o
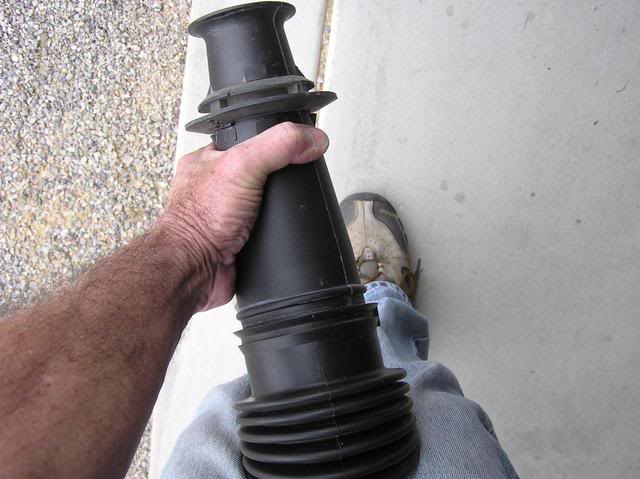
To do this, I put the duct and bellows between my knees and then twisted the snorkel (where I'm holding it with one hand) all the way around, and it comes right off. (I had to use two hands to do this, but in the picture, one hand was holding the camera).
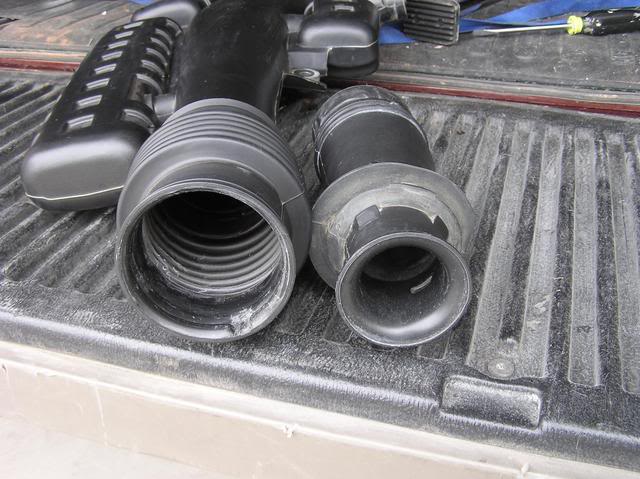
Now that the pieces are apart, compare the 2" flared opening of the snorkel that fits inside the fender with the over 3" opening of the duct at the bellows and you see why the engine might have trouble getting enough air at WOT.
I went to Home Depot and bought a 2 ft length of 3" ABS pipe and a 3" stainless hose clamp. I wanted to make sure my new duct went into the fender as far as the original snorkel, so I marked my new 3" tube with a white line to match the gasket position.
Now we have a complication. The hole in the fender is an oval, about 3 1/8" high by 3 1/2" wide. There's actually a small "lip" inside this oval too and I got rid of that lip with a Dremel grinding wheel. The resultant hole is now closer to 3 1/4" high and 3 1/2" wide. (Again, ignore the dirty fender wall). :o
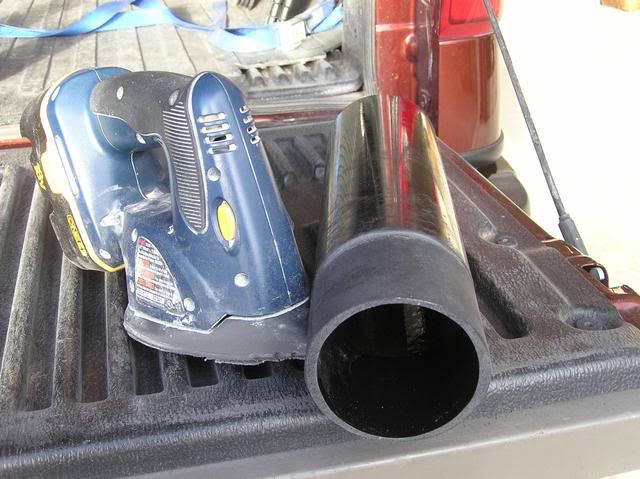
The hardest part: I had to reshape the end of my new snorkel tube back to the white line to match the 3 1/4 x 3 1/2 oval opening. I used a "Mouse" sander, pictured here with the end of the tube that I shaped.
- Jack
In the 2004-2008 trucks, the intake snorkel has only a 2" diameter at the end where it goes into the fender well. Other than that, it's a Cold Air Intake - so, the goal is to increase the intake opening.
We start with the intake ducting. Remove the hold down screw (red circle) in the picture below using a 10mm socket and pull the snorkel out of the fender wall (red arrow). Once you do that, you can pull the duct away from the filter box. It will make a lot of noise that sounds like something is breaking - just smile and ignore the bad sounds.
You can also ignore the dirty fender wall in this picture - it just shows my truck is actually used and is not a "Garage Queen".Now that you've got the intake duct out, turn it over and you'll see two rectangular "bumps" at each end of the bellows that look like they might be "release tabs". Some people have said they can pry the parts apart here using a screwdriver. I was not able to do this, but I found they sit over raised areas on the inside tube that act sort of like "tire irons" to separate the bellows from the other parts of the ducting if you twist and pull on the part you want to remove. I separated the bellows from the duct using the circled "bump" in the picture below. (Notice I like to work on the tailgate of my truck). :o
To do this, I put the duct and bellows between my knees and then twisted the snorkel (where I'm holding it with one hand) all the way around, and it comes right off. (I had to use two hands to do this, but in the picture, one hand was holding the camera).
Now that the pieces are apart, compare the 2" flared opening of the snorkel that fits inside the fender with the over 3" opening of the duct at the bellows and you see why the engine might have trouble getting enough air at WOT.
I went to Home Depot and bought a 2 ft length of 3" ABS pipe and a 3" stainless hose clamp. I wanted to make sure my new duct went into the fender as far as the original snorkel, so I marked my new 3" tube with a white line to match the gasket position.
Now we have a complication. The hole in the fender is an oval, about 3 1/8" high by 3 1/2" wide. There's actually a small "lip" inside this oval too and I got rid of that lip with a Dremel grinding wheel. The resultant hole is now closer to 3 1/4" high and 3 1/2" wide. (Again, ignore the dirty fender wall). :o
The hardest part: I had to reshape the end of my new snorkel tube back to the white line to match the 3 1/4 x 3 1/2 oval opening. I used a "Mouse" sander, pictured here with the end of the tube that I shaped.
- Jack
Last edited by Bluejay; Mar 7, 2009 at 12:42 AM.
Thread Starter
|
Global Moderator &
Senior Member
Senior Member
Joined: Aug 2007
Posts: 7,890
Likes: 61
From: Among javelinas and scorpions in Zoniestan
The Gotts Mod Revisited - For 2004+ Trucks (Part 2)
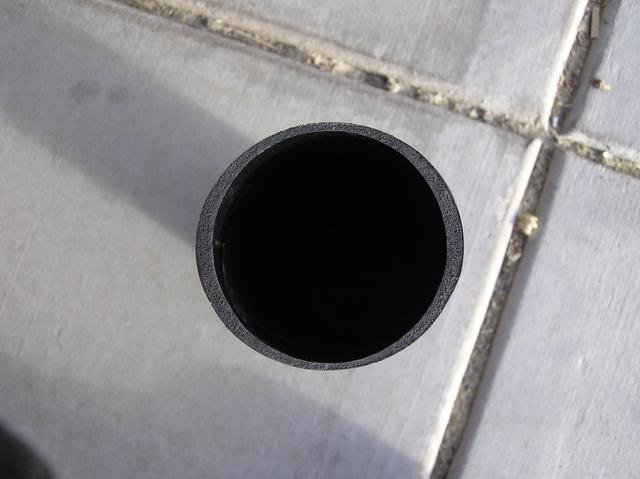
Here's the finished tube, looking straight down the intake end. The outer surface is cut down so it will just fit into the fender opening and is a 3 1/4" x 3 1/2" oval. The inside opening is a true 3" circular intake.
The new snorkel tube will have to be angled slightly from the rest of the intake to fit into the fender properly. (It needs to enter the fender at close to a right angle), so, the other end of the tube was cut at an angle try to match the truck's tube opening angle. The length of the new snorkel on the long side is 10 5/8". The length of the short side is 10 3/8". (It's about the same length now as the original snorkel). The hose clamp will be used to stabilize things.
I put my new snorkel into the fender (at a right angle) and it goes in right up to the line where I stopped shaping it. It's actually through the second hole in the inside of the fender at this point. It fits quite tightly through the opening, so I'm not worried about it getting "warm" engine air. Then, I slipped the bellows down over it. (Hey, I wiped my fender wall off a bit)!
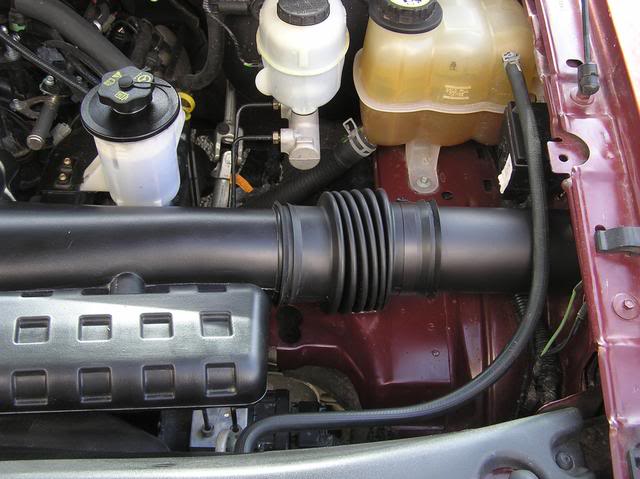
After the trial fitting, I painted the new snorkel flat black to cover up the ugly scratches and painted the hose clamp too (for "stealth" purposes). So, here we are - the final "All Black" (apologies to the New Zealand Rugby team) version of my homemade CAI:
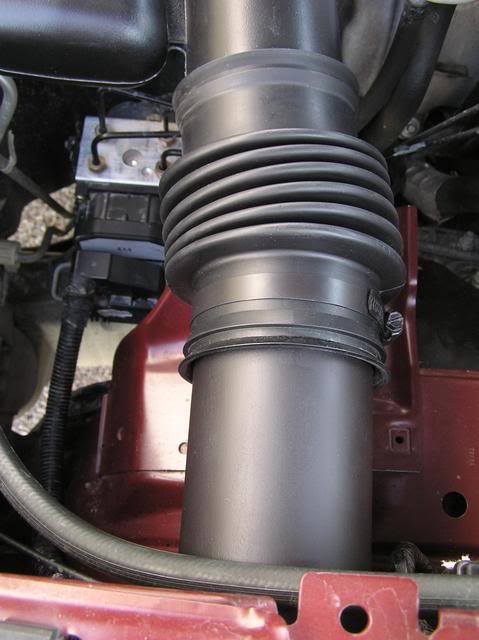
I compressed the bellows pretty much to give it some room to expand under engine torque and not pull the tube out of the fender wall. I noticed that earlier, when I had slid the bellows down the tube farther, it had pulled the tube out about 1/2 inch after a hard acceleration (because the engine twists away from the fender wall in this state).
Another view:
It's a fairly neat assembly, and even though the airflow curve is not as "smooth" as I'd like, I think it directs the flow fairly well. Best of all, the total cost was under $8.00. ($0.99 for the hose clamp and about $6.50 for the ABS pipe). And, it's something that is completely reversible if desired. The new snorkel can be taken off and the original put back in and no one will be the wiser.
And here's a final view - it looks almost "stock", even though it's anything but stock:
Now, some final thoughts:
Because the cross-sectional area of the snorkel varies with the square of the radius, the new snorkel has an opening that is about 7.07 square inches compared to just 3.14 square inches for the original snorkel. That's over twice the intake capacity!
Since the modification does not change the environment of the MAF sensor above the air filter, it will not be "fooled" and there is no danger of the engine running lean.
There is no "drone" with this CAI.
While some people have recommended disconnecting the battery so the PCM can "relearn" the new system, there's really nothing for it to learn. In fact, here is a quote from Bill Cohron at Power Hungry Performance: "Don't bother with the battery. There's really no reason to mess with it when doing the snorkel mod. All that's really happening is that the modest restriction is being alleviated allowing a little more flow at higher RPM. However, this mod DOES NOT AFFECT the Mass Airflow Sensor and doesn't significantly change AFR like a CAI does. The MAF sensor still accurately reflects the airflow into the engine and the computer handles everything from there."
I hope this writeup can be useful if you decide to try it yourself.
- Jack
The new snorkel tube will have to be angled slightly from the rest of the intake to fit into the fender properly. (It needs to enter the fender at close to a right angle), so, the other end of the tube was cut at an angle try to match the truck's tube opening angle. The length of the new snorkel on the long side is 10 5/8". The length of the short side is 10 3/8". (It's about the same length now as the original snorkel). The hose clamp will be used to stabilize things.
I put my new snorkel into the fender (at a right angle) and it goes in right up to the line where I stopped shaping it. It's actually through the second hole in the inside of the fender at this point. It fits quite tightly through the opening, so I'm not worried about it getting "warm" engine air. Then, I slipped the bellows down over it. (Hey, I wiped my fender wall off a bit)!
After the trial fitting, I painted the new snorkel flat black to cover up the ugly scratches and painted the hose clamp too (for "stealth" purposes). So, here we are - the final "All Black" (apologies to the New Zealand Rugby team) version of my homemade CAI:
I compressed the bellows pretty much to give it some room to expand under engine torque and not pull the tube out of the fender wall. I noticed that earlier, when I had slid the bellows down the tube farther, it had pulled the tube out about 1/2 inch after a hard acceleration (because the engine twists away from the fender wall in this state).
Another view:
It's a fairly neat assembly, and even though the airflow curve is not as "smooth" as I'd like, I think it directs the flow fairly well. Best of all, the total cost was under $8.00. ($0.99 for the hose clamp and about $6.50 for the ABS pipe). And, it's something that is completely reversible if desired. The new snorkel can be taken off and the original put back in and no one will be the wiser.
And here's a final view - it looks almost "stock", even though it's anything but stock:
Now, some final thoughts:
Because the cross-sectional area of the snorkel varies with the square of the radius, the new snorkel has an opening that is about 7.07 square inches compared to just 3.14 square inches for the original snorkel. That's over twice the intake capacity!
Since the modification does not change the environment of the MAF sensor above the air filter, it will not be "fooled" and there is no danger of the engine running lean.
There is no "drone" with this CAI.
While some people have recommended disconnecting the battery so the PCM can "relearn" the new system, there's really nothing for it to learn. In fact, here is a quote from Bill Cohron at Power Hungry Performance: "Don't bother with the battery. There's really no reason to mess with it when doing the snorkel mod. All that's really happening is that the modest restriction is being alleviated allowing a little more flow at higher RPM. However, this mod DOES NOT AFFECT the Mass Airflow Sensor and doesn't significantly change AFR like a CAI does. The MAF sensor still accurately reflects the airflow into the engine and the computer handles everything from there."
I hope this writeup can be useful if you decide to try it yourself.
- Jack

Technical Article Contributor
Joined: Dec 2007
Posts: 972
Likes: 0
From: Louisiana
For those of you that are lazy like me you can just remove the tube that run's into the fender well and it add's a noticable increase in power and better throttle response. With this setup my IAT's ran about the same as the outside temperature except when setting still idiling. I also got a jig saw and cut the muffler's off which improved the under hood appearance. 
Thread Starter
|
Global Moderator &
Senior Member
Senior Member
Joined: Aug 2007
Posts: 7,890
Likes: 61
From: Among javelinas and scorpions in Zoniestan
As I said at the beginning of this thread, I can't take credit for the idea, only my implementation. Here is one I learned the details of after I had posted my version on the PHP forums that had actually appeared in f150online, some time before I joined all of you. Because everyone scoffed at the idea at the time, David had Rockpick remove it.
This version is somewhat simpler to implement than what I did and looks to me like it will give similar results: http://dygytalworld.ehost-services13...l#faq_snorkel1
For those of you who don't know him, David's screen name is kd4crs.
- Jack
This version is somewhat simpler to implement than what I did and looks to me like it will give similar results: http://dygytalworld.ehost-services13...l#faq_snorkel1
For those of you who don't know him, David's screen name is kd4crs.
- Jack

Senior Member
Joined: Nov 2008
Posts: 1,006
Likes: 0
From: willow glenn
dose one need the baffles/mufflers at all? what is the reason ford put them there ? some one said that you don't need them is this true? and how dose the throttle response act
thanks for the post awesome write up even a tard like me can fallow that
thanks for the post awesome write up even a tard like me can fallow that
Global Moderator &
Senior Member
Senior Member

Joined: Mar 2005
Posts: 26,080
Likes: 85
From: Burleson/Athens/Brownsboro, TX
They are silencers. The noise would be loud without them. They can be cut off and the holes plugged.
__________________
Jim
Jim

Senior Member
Joined: Nov 2007
Posts: 521
Likes: 4
I cut them off mine because I wanted it louder. I just used 1.5" black electrical tape and wrapped it around the tube multiple times to cover the holes.
Trending Topics

Senior Member
Joined: Dec 2007
Posts: 187
Likes: 0
From: Houston, Texas
lets say you cut off one of the mufflers on the intake, and you put a cylindrical filter on in its place
do you guys think this would cause any serious problems or should i just tape it up when i do it this weekend?
do you guys think this would cause any serious problems or should i just tape it up when i do it this weekend?
Senior Member
Joined: Nov 2008
Posts: 1,006
Likes: 0
From: willow glenn
well you will pull hot air in from the motor all you need is a 1 1/4 plug a 1" and a 3/4 plug you should be able to find at home depot in the sprinkler section and i did mine last week then put on duel exhaust and a k&n drop in and put it on the dyno at a friends shop and got a 13.9 more hp and think it was 7 tk and then this weekend did about 900 mile road trip pulling a 32' t ton trailer to LA. and the last time i did this it cost me 4 tanks of gas this time did it in 2 and a 3/4 tanks thats a great plus i went up the grape vine at 70 mph with peddle left last time it was 55 or 6o and no peddle left foot stayed on the floor if you would like to see the pics of my intake here you go

https://www.f150online.com/forums/me...0-101-0091.jpg
https://www.f150online.com/forums/me...0-101-0091.jpg

Junior Member
Joined: Jan 2009
Posts: 5
Likes: 0
From: PHILADELPHIA
Yo blueovalboy, do you have part numbers for the 1-1/4", 1", & 3/4" caps that you got from home depot? I went to home depot in n.j. And saw nothing like what you have. I want to carve-up my breather tube, to clean up my engine compartment like you did, it looks slick
Senior Member
Joined: Nov 2008
Posts: 1,006
Likes: 0
From: willow glenn
thanks and no i don't have part #'s go to irrigation section and look for plugs the 1" 1/4 cap is hard to find any where you go and a plug would be nice and more clean but the cap adds that factory look mine didn't fit all that tight butt some blue glue and all was good (glue also in that section) butt look out that glue will eat your stuff up and don't clean up for s*#% so be real kind with it

this is a threaded plug and here is the cap
 and the finned product is what you see

hope this helps you and good luck!
this is a threaded plug and here is the cap
and the finned product is what you seehope this helps you and good luck!


Global Moderator &
Senior Member
Senior Member
Joined: Mar 2005
Posts: 26,080
Likes: 85
From: Burleson/Athens/Brownsboro, TX

__________________
Jim
Jim