


Custom OEM 08 expedition mirrors on my F150 Tons of pics!


Thread Starter
|
Technical Article Contributor
Joined: Mar 2006
Posts: 1,460
Likes: 1
From: Near Houston
 Custom OEM 08 expedition mirrors on my F150 Tons of pics!
LOOOONG thread! Just a heads up.
Ill make it funny so as you guys that actually read instead of just browse pics dont get bored.
My pass side mirror had a meeting with a hard place and cracked the housing, so i get on ebay to find a
sutible candidate for replacement when i find a set of 08 mirrors from an expy.
The pair of expys was cheaper than ONE pass mirror at the local stealership so i decided to get creative.
I have always wanted to add the led turn signals and these had PUDDLE LAMPS too!
so my journey begins, i also found a cheap set of replacements so i jumped on them incase my
expy expirement failed.
After a week i get both extra pairs in for a mear ten bucks over what the dealer wants for ONE mirror.
Just my luck, the brackets are completely different!
The expy is on the left and the F150 on the right.

they will now be refered to as E mirror and F mirror due to my laziness.
not just slightly but WAAAY different.
The expy mounts flush and the F150 has about a two inch offset on the mounting screws at the bottom.
So right away i knew i was going to have to make an adapter just to mount these babies.
PHASE ONE...
mounting options
I traced out the basic shape of the Ef one fiddy mounting area, and poked holes approximately
where the screws were.

I then Cut the posterboard so that i could trace it out on metal.
here it is fitted to the F mirror

I went to my friends body shop and borrowed some metal and the plasma cutter, but i left the camera at home.
heres the brackets all ready with holes drilled to mount to the expy mirrors and holes drilled ready for
tapping for the F150 pattern.

Ill make it funny so as you guys that actually read instead of just browse pics dont get bored.
My pass side mirror had a meeting with a hard place and cracked the housing, so i get on ebay to find a
sutible candidate for replacement when i find a set of 08 mirrors from an expy.
The pair of expys was cheaper than ONE pass mirror at the local stealership so i decided to get creative.
I have always wanted to add the led turn signals and these had PUDDLE LAMPS too!
so my journey begins, i also found a cheap set of replacements so i jumped on them incase my
expy expirement failed.
After a week i get both extra pairs in for a mear ten bucks over what the dealer wants for ONE mirror.
Just my luck, the brackets are completely different!
The expy is on the left and the F150 on the right.
they will now be refered to as E mirror and F mirror due to my laziness.
not just slightly but WAAAY different.
The expy mounts flush and the F150 has about a two inch offset on the mounting screws at the bottom.
So right away i knew i was going to have to make an adapter just to mount these babies.
PHASE ONE...
mounting options
I traced out the basic shape of the Ef one fiddy mounting area, and poked holes approximately
where the screws were.
I then Cut the posterboard so that i could trace it out on metal.
here it is fitted to the F mirror
I went to my friends body shop and borrowed some metal and the plasma cutter, but i left the camera at home.
heres the brackets all ready with holes drilled to mount to the expy mirrors and holes drilled ready for
tapping for the F150 pattern.
Thread Starter
|
Technical Article Contributor
Joined: Mar 2006
Posts: 1,460
Likes: 1
From: Near Houston
The E mirror needed a bit of trimming to get the surface completely flat so that i could mount a flat bracket
to it.

A little all-thread and some aluminum tubing should get this working.

checked first attempt agains the F mirror mounting and it looks good.

and here is the top mounting point on both brackets ready to go with the pieces cut and ready for the four
lower mounting points.

to it.
A little all-thread and some aluminum tubing should get this working.
checked first attempt agains the F mirror mounting and it looks good.
and here is the top mounting point on both brackets ready to go with the pieces cut and ready for the four
lower mounting points.
Thread Starter
|
Technical Article Contributor
Joined: Mar 2006
Posts: 1,460
Likes: 1
From: Near Houston
One adapter bracket ready to go,

and bolted to the E mirror.

E mirror with bracket on the left with F mirror on right.

and bolted to the E mirror.
E mirror with bracket on the left with F mirror on right.
Last edited by Fabian06SC; Mar 17, 2008 at 01:39 AM.
Thread Starter
|
Technical Article Contributor
Joined: Mar 2006
Posts: 1,460
Likes: 1
From: Near Houston
Quick test fit on the truck. (yes thats my poor door panel sitting back there)

NOTE, it took me a bit to figure out placement of where i wanted the mirror to line up,
i chose to line it up as close to the stock mirror position as possible,
which is why the E mirror cover peice is so low. They mount higher on the Expeditions apparently.
this was done before the holes were drilled on the brackets.
So it appears we need to do a bit of trimming.....

But the end result from the only spot that matters (MY drivers seat) looks pretty good!

Satisfied with my mounting idea, i decided to close phase one for the weekend..
NOTE, it took me a bit to figure out placement of where i wanted the mirror to line up,
i chose to line it up as close to the stock mirror position as possible,
which is why the E mirror cover peice is so low. They mount higher on the Expeditions apparently.
this was done before the holes were drilled on the brackets.
So it appears we need to do a bit of trimming.....
But the end result from the only spot that matters (MY drivers seat) looks pretty good!
Satisfied with my mounting idea, i decided to close phase one for the weekend..
Thread Starter
|
Technical Article Contributor
Joined: Mar 2006
Posts: 1,460
Likes: 1
From: Near Houston
fast forward a few days.
PHASE TWO...
Cosmetic integration
After a few days of resting the brain, i finally decided upon the cosmetic face of my mirror.
I had, after all, a spare set of mirrors sitting in a box so i decided to use them.
I took them completely apart and decided to make a mold of the facial part of the plastic.
After a previous experience with buying plaster at a home paint supply (lube not included)
i decided to try the corporate gaint of low prices and see what they had. After a brief search
with no luck, and about a gallon of water in my body that i had ingested to help overcome the
hangover effects from the night before, i recalled the Wal-Mart bathrooms were near the hobby isle.
SCORE!
BIG OLE bucket of plaster of paris for a little over ten bucks. Amazing how its so much cheaper when its
for "childrens crafts" then when im looking for a good molding plaster... ROLLS EYES
anyway, heres the mirror with a quick layer of wax, plaster and mixing bucket ready for some mold making!

I am by no means an experienced mold maker, i actually consider myself a connoisseur of disaster. With that in mind, i carefully made an adequate box to hold my mold around the mirror.

Now remember i have experience with plaster, but that makes me no expert lol,
so i poured me a mixture of plaster while keeping focused on not trying to stick my hand in it and make a hand print
as the plaster containter kept temping me to do.

I did one full cover layer with an addtional layer of window screen mesh to keep it from breaking and
then another layer of plaster.
PHASE TWO...
Cosmetic integration
After a few days of resting the brain, i finally decided upon the cosmetic face of my mirror.
I had, after all, a spare set of mirrors sitting in a box so i decided to use them.
I took them completely apart and decided to make a mold of the facial part of the plastic.
After a previous experience with buying plaster at a home paint supply (lube not included)
i decided to try the corporate gaint of low prices and see what they had. After a brief search
with no luck, and about a gallon of water in my body that i had ingested to help overcome the
hangover effects from the night before, i recalled the Wal-Mart bathrooms were near the hobby isle.
SCORE!
BIG OLE bucket of plaster of paris for a little over ten bucks. Amazing how its so much cheaper when its
for "childrens crafts" then when im looking for a good molding plaster... ROLLS EYES
anyway, heres the mirror with a quick layer of wax, plaster and mixing bucket ready for some mold making!
I am by no means an experienced mold maker, i actually consider myself a connoisseur of disaster. With that in mind, i carefully made an adequate box to hold my mold around the mirror.
Now remember i have experience with plaster, but that makes me no expert lol,
so i poured me a mixture of plaster while keeping focused on not trying to stick my hand in it and make a hand print
as the plaster containter kept temping me to do.
I did one full cover layer with an addtional layer of window screen mesh to keep it from breaking and
then another layer of plaster.
Last edited by Fabian06SC; Mar 17, 2008 at 01:44 AM.
Thread Starter
|
Technical Article Contributor
Joined: Mar 2006
Posts: 1,460
Likes: 1
From: Near Houston
after a brief ten min of trying to get my hands clean, the plaster was all dried up and ready for pulling off
the parts, but apparently not off my hands.

Not bad for my first time making a mold that big.
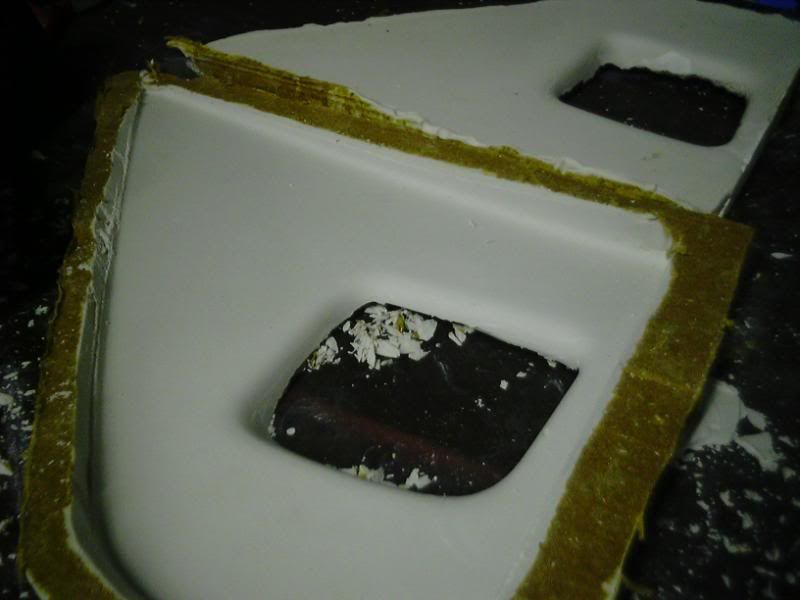
Next was seeing if i could actually make a good part from these molds.
so i waxed the mold up, and got some fleece and mixed up some fiberglass resin.
threw that all together and made a quick prototype part.

once agian, i amazed myself.
Mold on left, part pulled from mold on right. this thing was soo good, it actually had
the plastic texture and the original mold lines from the FORD part!

the parts, but apparently not off my hands.
Not bad for my first time making a mold that big.
Next was seeing if i could actually make a good part from these molds.
so i waxed the mold up, and got some fleece and mixed up some fiberglass resin.
threw that all together and made a quick prototype part.
once agian, i amazed myself.
Mold on left, part pulled from mold on right. this thing was soo good, it actually had
the plastic texture and the original mold lines from the FORD part!
Thread Starter
|
Technical Article Contributor
Joined: Mar 2006
Posts: 1,460
Likes: 1
From: Near Houston
I then took my air die grinder and zipped off most of the plastic backing from the E mirrors.
heres all thats left after cutting, grinding, and breaking.

and i test fitted the mirror to the prototype cover.

The mirror arm has a different contour as well, so that had to be cut, and now i have a pretty large hole to fill.

After seeing that the molds were going to do the job, i went ahead and cut in some glass and poured resin.
two layers of glass were used. I allowed them to dry outside for a day or two.
That conludes phase two and another half week of working after work.
heres all thats left after cutting, grinding, and breaking.
and i test fitted the mirror to the prototype cover.
The mirror arm has a different contour as well, so that had to be cut, and now i have a pretty large hole to fill.
After seeing that the molds were going to do the job, i went ahead and cut in some glass and poured resin.
two layers of glass were used. I allowed them to dry outside for a day or two.
That conludes phase two and another half week of working after work.
Trending Topics
Thread Starter
|
Technical Article Contributor
Joined: Mar 2006
Posts: 1,460
Likes: 1
From: Near Houston
PHASE THREE...
These arent dont yet?
i mean ALIGNMENT
Ok i had a good mounting bracket, and a great looking cover but i didnt know how they were going to fit together.
if i mounted the mirror, and placed the cover over, it would be anyones guess as to how it would actually fit
once it dried. Also the mirrors curves were completely different so the cover wouldnt just slide on either.
I decided to go ahead and actually mold the mirror to the door so there would be NO GUESSES as to where it would line up.
I pulled my mirrors, and masked off the entire mirror mounting area, being sure to cover EVERYTHING in plastic.
I bolted the hacked up E mirrors in and had to mark for additional clearance cuts.
Once everything that would stick out or up was cut, i bolted them in againg and started laying glass.
i put perhaps three layers on here to creat a strong back plate

and im soo glad i put plastic up. Resin RUNS

Once it dried i pulled them off and we had a perfect shape of the door, the window and the rubber seals all around
the area.

These arent dont yet?
i mean ALIGNMENT
Ok i had a good mounting bracket, and a great looking cover but i didnt know how they were going to fit together.
if i mounted the mirror, and placed the cover over, it would be anyones guess as to how it would actually fit
once it dried. Also the mirrors curves were completely different so the cover wouldnt just slide on either.
I decided to go ahead and actually mold the mirror to the door so there would be NO GUESSES as to where it would line up.
I pulled my mirrors, and masked off the entire mirror mounting area, being sure to cover EVERYTHING in plastic.
I bolted the hacked up E mirrors in and had to mark for additional clearance cuts.
Once everything that would stick out or up was cut, i bolted them in againg and started laying glass.
i put perhaps three layers on here to creat a strong back plate
and im soo glad i put plastic up. Resin RUNS
Once it dried i pulled them off and we had a perfect shape of the door, the window and the rubber seals all around
the area.
Thread Starter
|
Technical Article Contributor
Joined: Mar 2006
Posts: 1,460
Likes: 1
From: Near Houston
i then cut the front plates i made to fit the radius of tne E mirror arm.
APART

Together

then it was the magical alignment time.
I bolted the mirror in, and aligned the cover to the best fit and taped it in place.

I was back at my buddies body shop for this, so i didnt get much pics as i was trying to get finished and
get out the way. basically after alignment, i drilled a small hole on the farthest points i could, pulled
everything apart, and threw a layer of glass and resin in between the two parts.
To hold everything together and aligned, i then riveted it where i drilled the holes and put some big clamps
to get it to squeeze together.
Aligning done, starting to actually look like something.
End of phase three.
INTERMISSION... go get a snack and pee, our thread will continue shortly.
...
APART
Together
then it was the magical alignment time.
I bolted the mirror in, and aligned the cover to the best fit and taped it in place.
I was back at my buddies body shop for this, so i didnt get much pics as i was trying to get finished and
get out the way. basically after alignment, i drilled a small hole on the farthest points i could, pulled
everything apart, and threw a layer of glass and resin in between the two parts.
To hold everything together and aligned, i then riveted it where i drilled the holes and put some big clamps
to get it to squeeze together.
Aligning done, starting to actually look like something.
End of phase three.
INTERMISSION... go get a snack and pee, our thread will continue shortly.
...
Thread Starter
|
Technical Article Contributor
Joined: Mar 2006
Posts: 1,460
Likes: 1
From: Near Houston
.
.
Phase four...
This is not a PHASE, has it been an actual phase i would have gotten more accomplished in those FOUR DAYS!
I call this part,
Itch, grind, itch , itch, grind, itch, grind, itch some more.
Pics are scarce here as... well... i was too busy itching.
after the parts dried, i went to fit them and ofcourse they warped.
i was about ready to give up had it not been for a friend of my buddy at the shop that told me to put some heat
on that glass and to bend it back.
so i did, but unfortunantly it also created creases and dips.
the covers were also protruding from the door lines pretty ugly.
So i grinded... and grindedd... and grinded till it all came down level. good thing i had used tons of glass on
the backing plates. i had to fill in some holes that grinded thru too.
then came the sanding, i got a big flat block and went to town.
here are the measly few pics of sooo many days of labor.
quick grind and some kitty hair to fill in low spots.

Pass side looking a bit better.

permanent marker areas indicated high spots which require more grinding..

nice back profile shot. I made these come to about 4mm off the window. i always hated the big gap
the OE mirrors had. They also curve nicely around all the rubber trim moldings.

.
Phase four...
This is not a PHASE, has it been an actual phase i would have gotten more accomplished in those FOUR DAYS!
I call this part,
Itch, grind, itch , itch, grind, itch, grind, itch some more.
Pics are scarce here as... well... i was too busy itching.
after the parts dried, i went to fit them and ofcourse they warped.
i was about ready to give up had it not been for a friend of my buddy at the shop that told me to put some heat
on that glass and to bend it back.
so i did, but unfortunantly it also created creases and dips.
the covers were also protruding from the door lines pretty ugly.
So i grinded... and grindedd... and grinded till it all came down level. good thing i had used tons of glass on
the backing plates. i had to fill in some holes that grinded thru too.
then came the sanding, i got a big flat block and went to town.
here are the measly few pics of sooo many days of labor.
quick grind and some kitty hair to fill in low spots.
Pass side looking a bit better.
permanent marker areas indicated high spots which require more grinding..
nice back profile shot. I made these come to about 4mm off the window. i always hated the big gap
the OE mirrors had. They also curve nicely around all the rubber trim moldings.
Thread Starter
|
Technical Article Contributor
Joined: Mar 2006
Posts: 1,460
Likes: 1
From: Near Houston
more grinding and a bit of spot glazing.. and we finally have a decent result.


Lots of sanding went into that. im very pleased at how they fit, and more so at the fact that ill be done
grinding away fiberglass.
Phase whatever the heck we were at COMPLETE!
Lots of sanding went into that. im very pleased at how they fit, and more so at the fact that ill be done
grinding away fiberglass.
Phase whatever the heck we were at COMPLETE!
Thread Starter
|
Technical Article Contributor
Joined: Mar 2006
Posts: 1,460
Likes: 1
From: Near Houston
This next part is no phase,
it will be simply known as
P A I N T !!!!!!!!!!!!!
As of four today, these bad boys are in primer!
I spent all day yesterday and some of the morning radiusing and sanding and perfecting the curvature around
the actual mirror arm and contouring it to the base


here is after my buddy Brad shot a few coats of primer.
tomorrow at lunch ill be sanding them and filling the few remaining pin holes with spot putty and hopefully
get some true blue on them.
after that i just have to wire the turn signals and the puddle lamps and i should be in business!
Also, the expy mirrors for some odd reason are wired opposite of the F150s.
the f mirrors have the female and the truck door has the male whereas the expy mirrors have the male and the expy doors have the female.
so basically i have two exact same ends.
Ill be using one female off my broken pass side and lucky me, an F150 came in the shop a few days ago with another broken pass side mirror!
Thats a forty dollar plug i dont have to pay for now!
it will be simply known as
P A I N T !!!!!!!!!!!!!
As of four today, these bad boys are in primer!
I spent all day yesterday and some of the morning radiusing and sanding and perfecting the curvature around
the actual mirror arm and contouring it to the base
here is after my buddy Brad shot a few coats of primer.
tomorrow at lunch ill be sanding them and filling the few remaining pin holes with spot putty and hopefully
get some true blue on them.
after that i just have to wire the turn signals and the puddle lamps and i should be in business!
Also, the expy mirrors for some odd reason are wired opposite of the F150s.
the f mirrors have the female and the truck door has the male whereas the expy mirrors have the male and the expy doors have the female.
so basically i have two exact same ends.
Ill be using one female off my broken pass side and lucky me, an F150 came in the shop a few days ago with another broken pass side mirror!
Thats a forty dollar plug i dont have to pay for now!


