
Has anyone done a conversion to ambient lighting?


Thread Starter
|
Senior Member
Joined: Jan 2011
Posts: 610
Likes: 0
From: Fairbanks, AK
Has anyone done a conversion to ambient lighting?
Just as the title suggests, I am curious if anyone has done an ambient lighting conversion. And I am not talking about fords lame accessory kit that looks like stuff you can buy from wal-mart, but an actual conversion to mirror what the platinum, lariat limited, and harley davidson trims have. Thanks in advance for any input!
Senior Member
Joined: Jun 2010
Posts: 501
Likes: 0
In case your still asking this question.
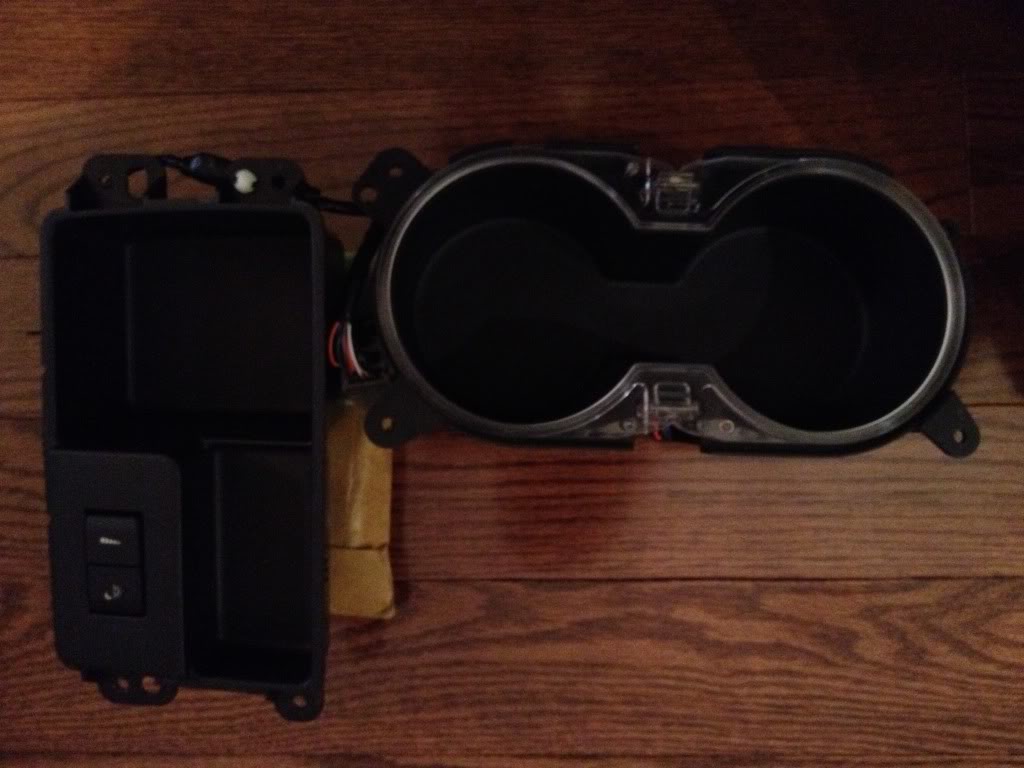
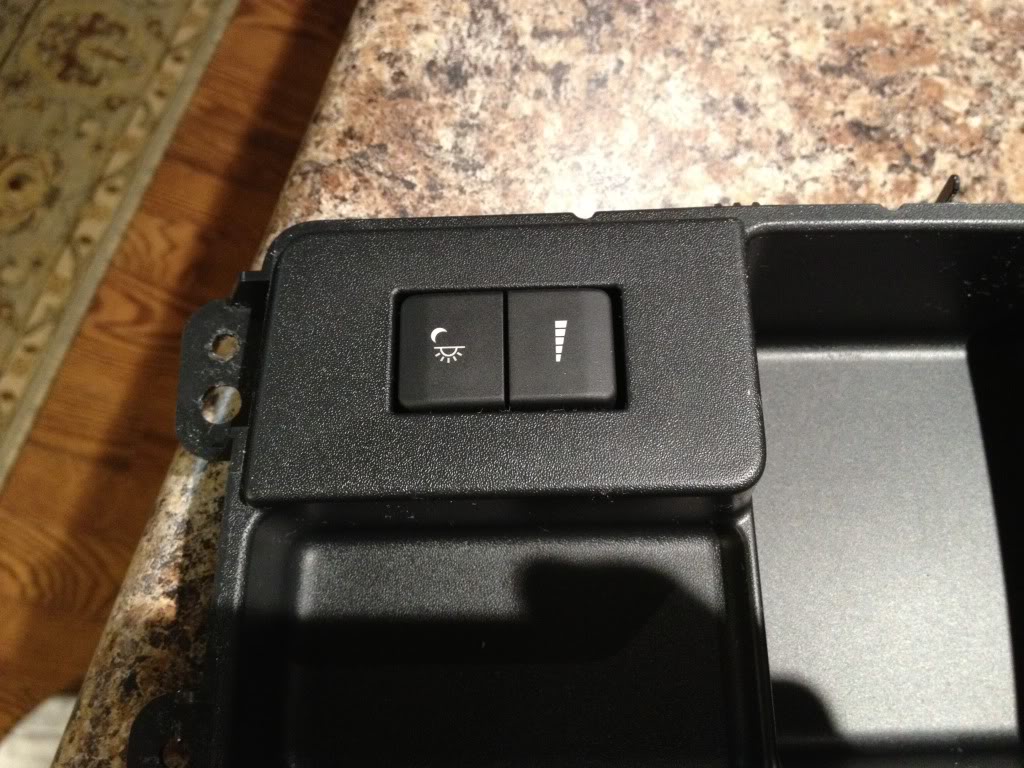
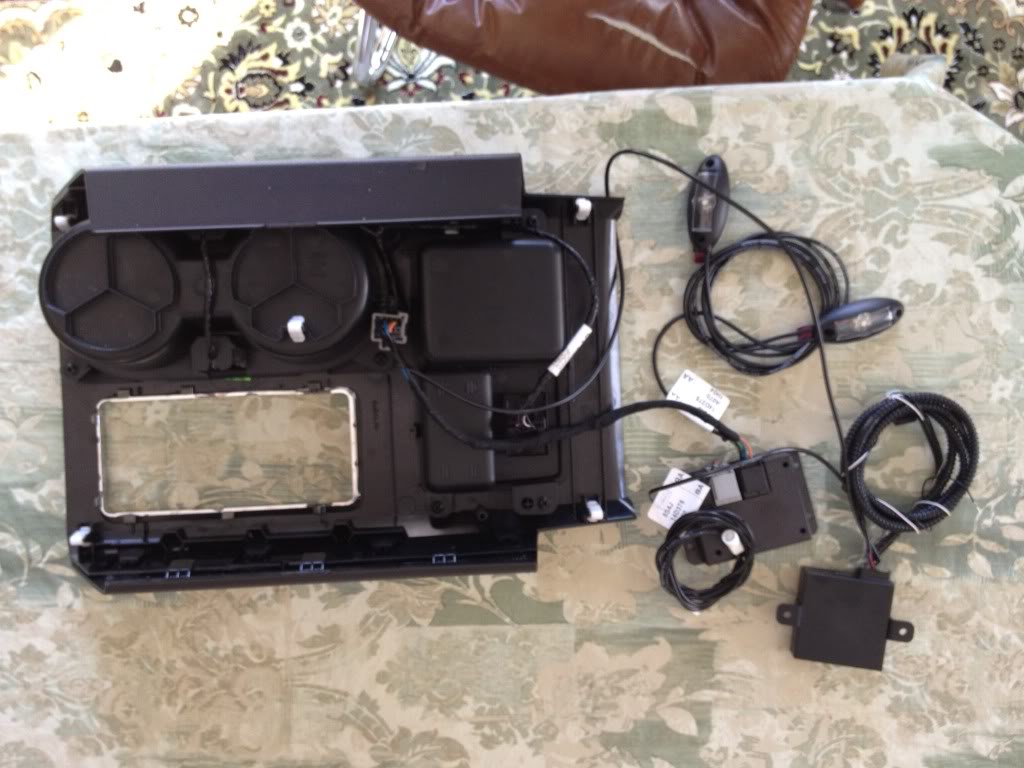
I just completed a conversion using Ford's Interior Lighting Kit and the Platinum flow through console bezel which contains the dog bone cup holder led and the built in switches located in the small storage tray at the front of the bezel.
The kit includes 2 bulbs for the front cup holder which are not used because I had the dog bone cup holder led . So I figured I could repatriot them for rear seat light similar to the Platinum. Managed to fish them to the rear section of the center console, poped off the cover that has the vents and installed them down low close to the floor.
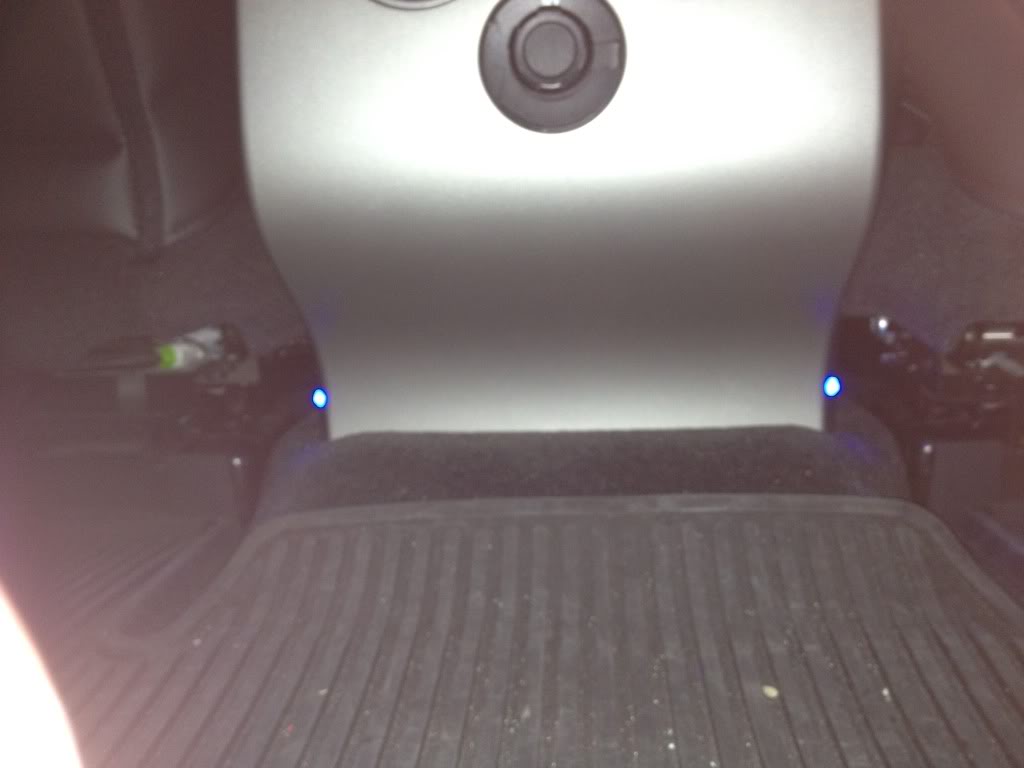
The final appearance is clean and very factory looking. Not to brag but I gave myself a pat-on-the-back when I completed this mod yesterday.
Here are a few pics:

I just completed a conversion using Ford's Interior Lighting Kit and the Platinum flow through console bezel which contains the dog bone cup holder led and the built in switches located in the small storage tray at the front of the bezel.
The kit includes 2 bulbs for the front cup holder which are not used because I had the dog bone cup holder led . So I figured I could repatriot them for rear seat light similar to the Platinum. Managed to fish them to the rear section of the center console, poped off the cover that has the vents and installed them down low close to the floor.
The final appearance is clean and very factory looking. Not to brag but I gave myself a pat-on-the-back when I completed this mod yesterday.
Here are a few pics:
Last edited by Formula jg; Feb 21, 2012 at 04:09 PM.

Senior Member
Joined: Jun 2010
Posts: 501
Likes: 0
nards,
It definitely wasn't a waste of time because I learned a lot and I no longer feel like I'm in some dark cave.
As far as the money, yea its a bit pricey but what the heck the wife asked what I wanted for my 50th and this was it.
It definitely wasn't a waste of time because I learned a lot and I no longer feel like I'm in some dark cave.
As far as the money, yea its a bit pricey but what the heck the wife asked what I wanted for my 50th and this was it.

Senior Member
Joined: Apr 2007
Posts: 464
Likes: 0
From: Andersen AFB, Guam
What are the P/N's for the swap and you should do a write up! I want to do this to my 2002 screw and when I get my raptor! Do you have any pics of the completed swap? I think I saw a write up in the how to's...I'll have to do a search for it.


Senior Member
Joined: Jul 2010
Posts: 122
Likes: 0
From: Clearwater, Florida
^^also would like to see finished pics
also what was the total price, if you dont mind me asking?
also what was the total price, if you dont mind me asking?
Trending Topics


")


Senior Member
Joined: Aug 2002
Posts: 467
Likes: 1
From: Fort Worth, TX
I just really want the parts for the cup holder. I'd love to see a part number list.
Better - does anyone know the part number or if you can just swap out to the dogbone type of cup holder?
Better - does anyone know the part number or if you can just swap out to the dogbone type of cup holder?
Senior Member
Joined: Jun 2010
Posts: 501
Likes: 0
formuladriver01,
If your planning on doing this to a Raptor keep in mind that the oem ambient light switches (dimmer and colour selection) can not be installed because the Raptor center console bezel houses other switches in this same location.
See this thread for more detail:
http://www.fordraptorforum.com/f10/a...ur-raptor-352/
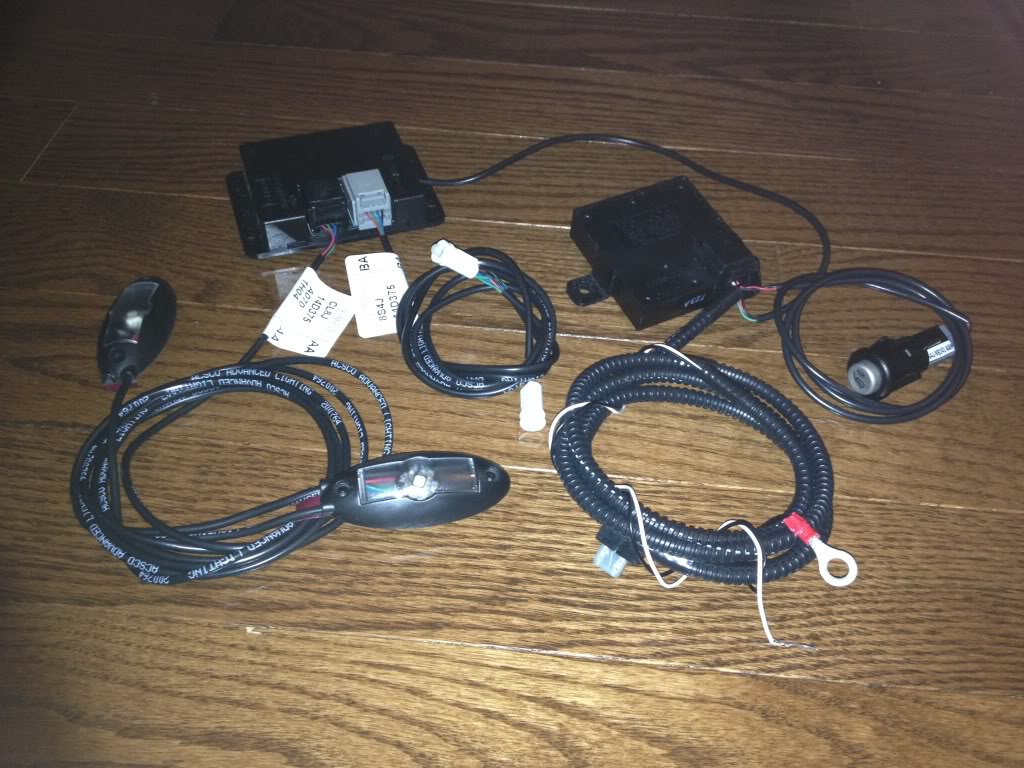
There are 2 part #'s required:
a. Interior Lighting Kit - 8L8Z13E700AA ($207.90)
b. Platinum Center Console Bezel Panel - AL3Z15045A76KB ($281.67)
Price from Tasca as of early Feb. 2012.
Here is a link to a thread from another site which was helpfull. Note that the footwell LED's that I rec'd are different than those in this older thread and a reminder that I installed the dog bone front cup holder LED and reused the 2 small button LED's (intended for the front cup holder) at the rear of the flow through console near the floor:
http://www.raptorforumz.com/showthre...nt+lighting%21
I took some pics this morning but needless to say they didn't turn out that great. Here's a few and I'll try to post more later:
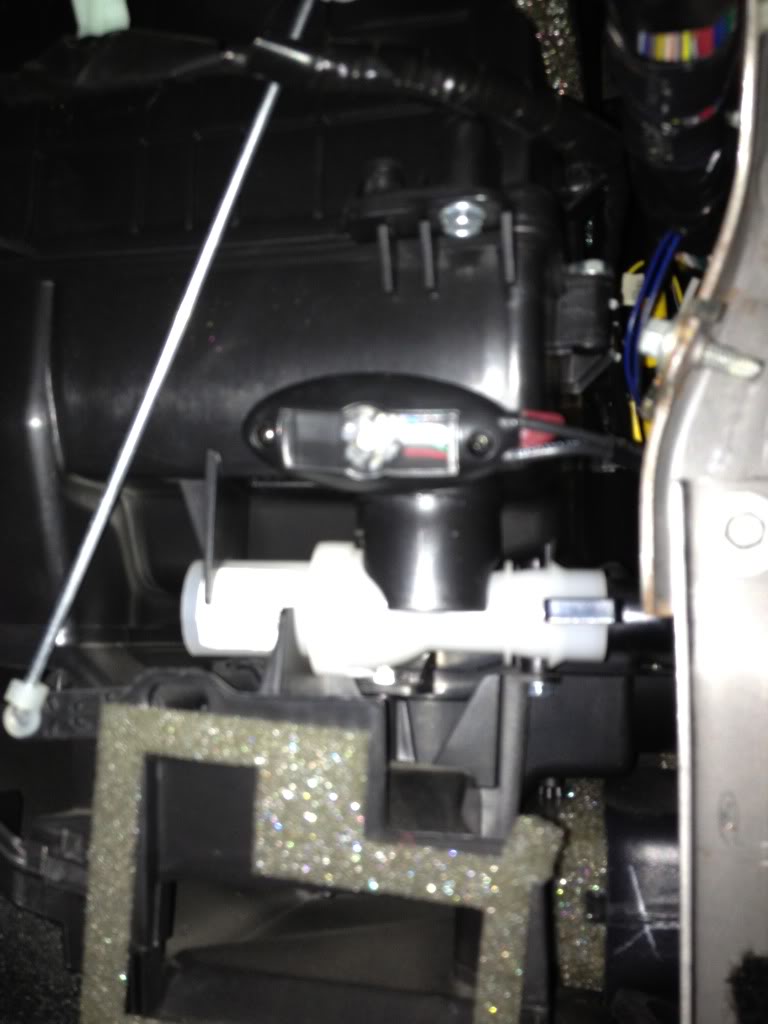
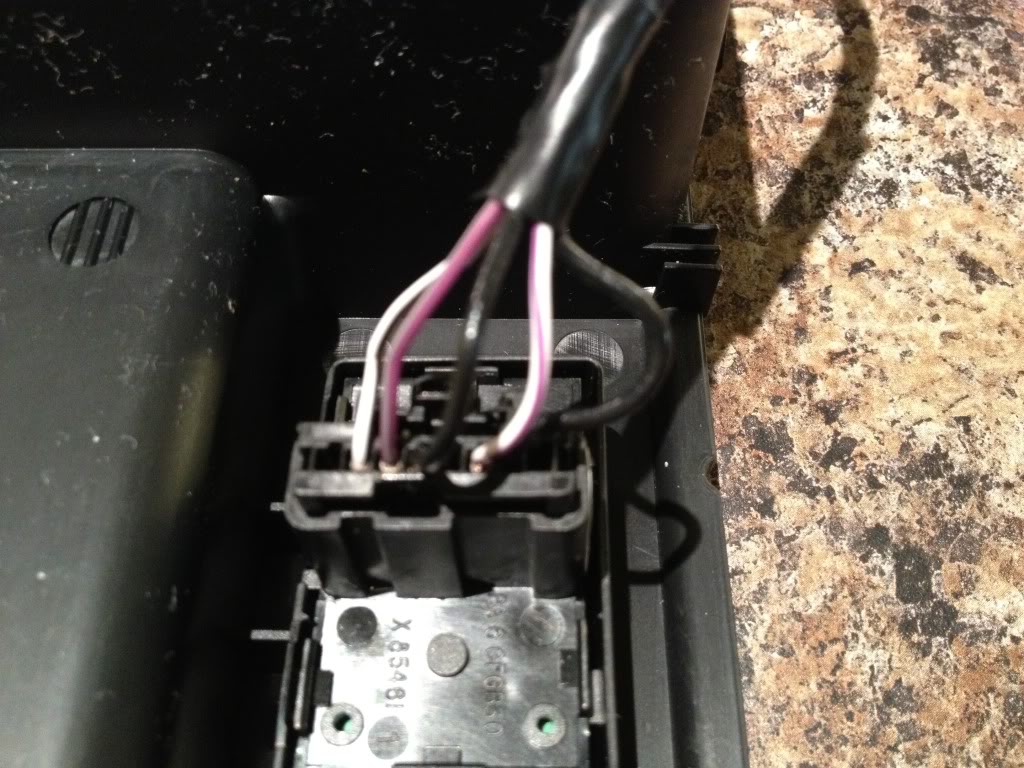
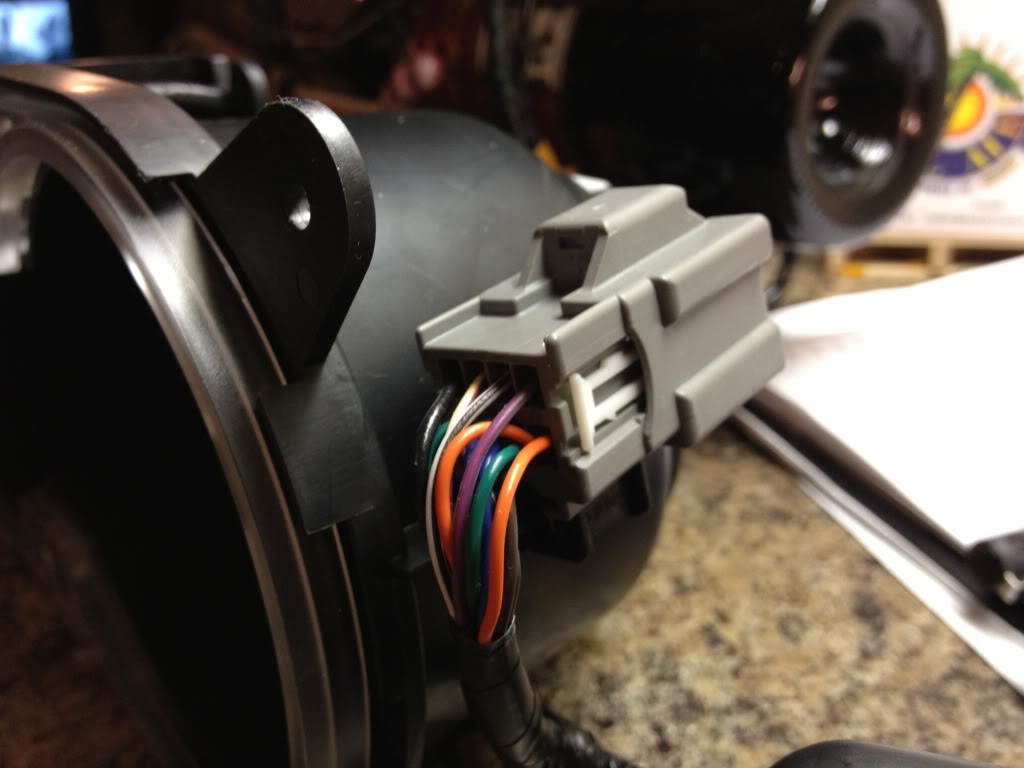
Because there is no harness that connects the 4 LED cupholder wires to the 4 LED Lighting Kit wires you have to splice from one to the other. To keep it neat I got 4 colour matched wires (g, bu, org, bn) and crimped male pin ends on either side of each wire and heat shrink. One end was connected to the gray 8 pin harness located at the underside of the cupholder and the other end connected to black 8 pin harness that plugs into the control module that holds 2 harnesses (1 blk and 1 gray). You can plug into either of these harnesses because they each have 4 unused pins for additional LED connections.
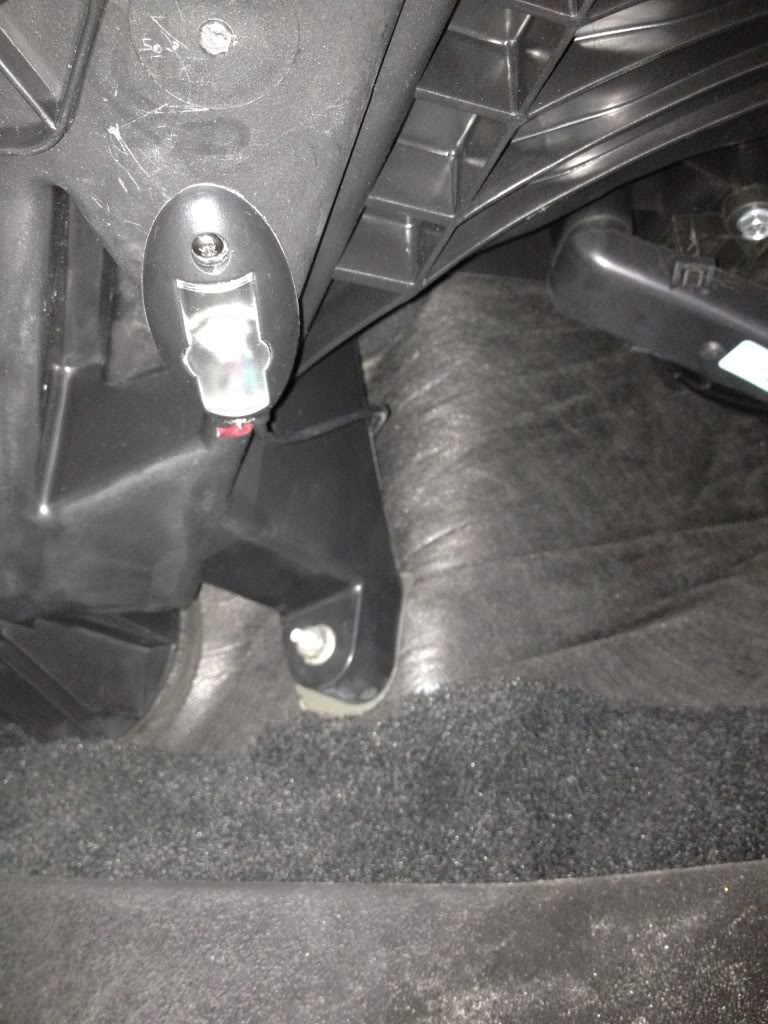
For the switch I just cut off the button switch that came with the Kit and added male pin ends to the red wire and blk wire. These can now be plugged into the same 8 pin gray harness located at the underside of the cupholder - blk to blk and red to white/violet. This will allow you to scroll through 7 colours and off using the right hand switch of the oem double switch that comes with the Platinum bezel. The other left hand switch is designed to have 5 dimmer settings but I believe it requires a different control module that may only come on vehicles that have the ambient lighting upgrade as installed at the factory (I could be wrong though), so therefore this switch is temporarily out of order.
Power and ground was connected at the SJB area (pass. kick panel) I tapped into the Parking light wire pin #6 (wht/viol) located in the harness that has all the wires bound in a pink electrical tape. Soldier only because these LED's are sensitive to the slightest weak connection.
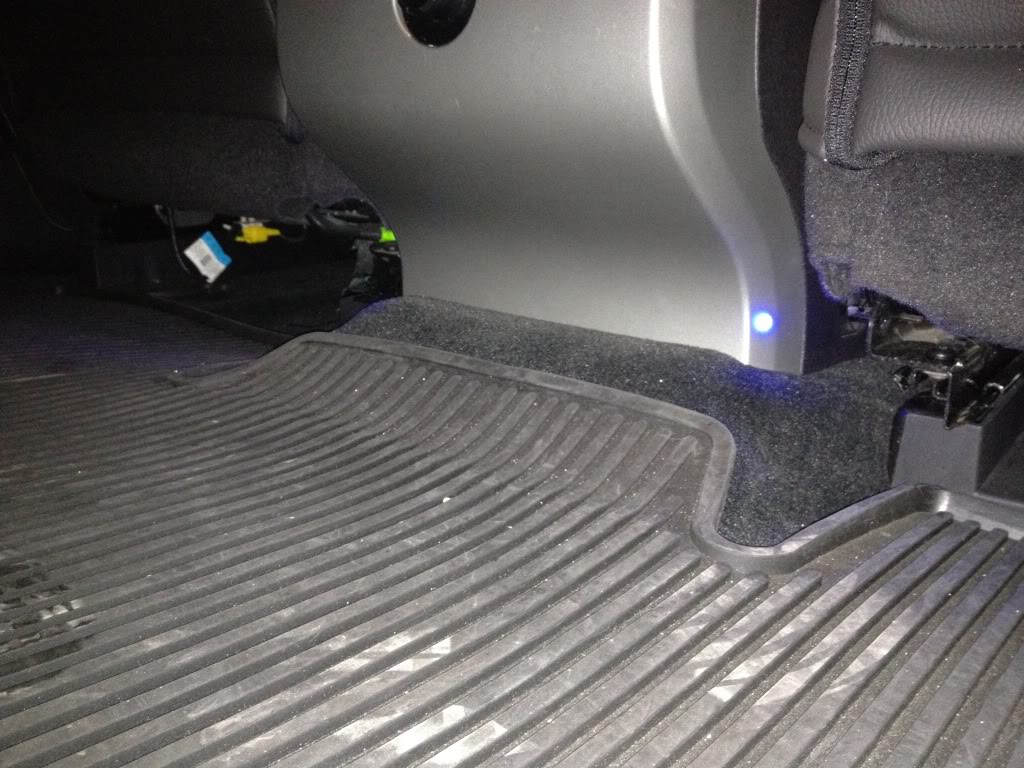
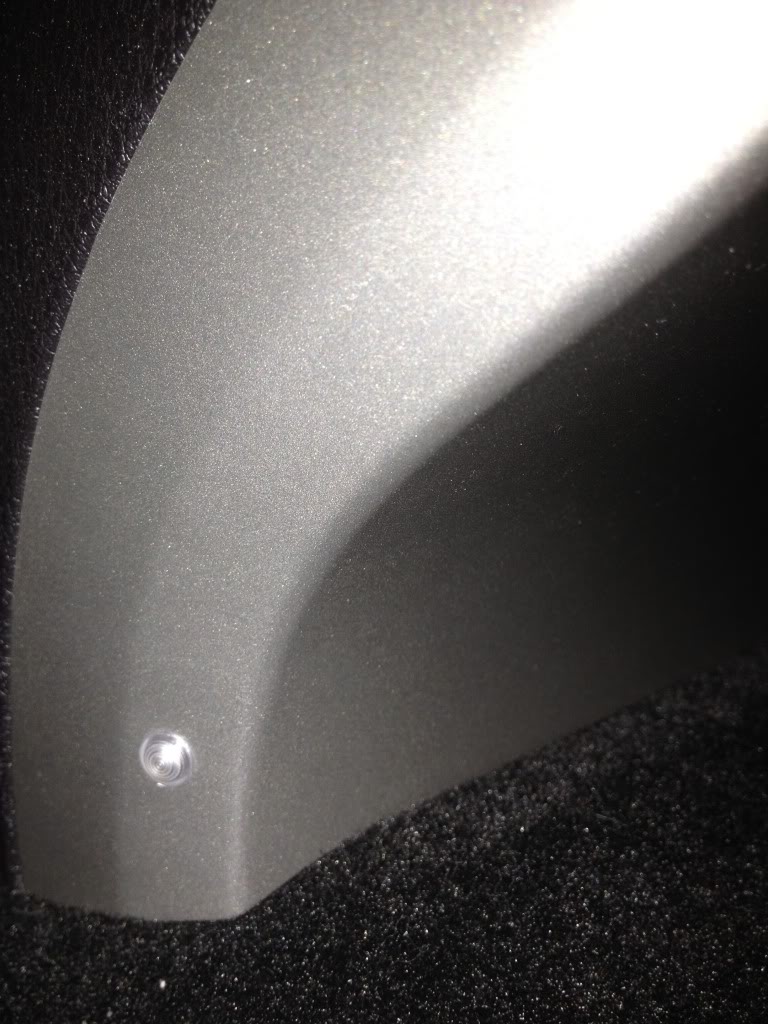
Also note to minimize the shadow effect in the front footwells try to mount the LED's somewhere in the middle and not to one side of the wells (I'll be relocating my driver side LED).
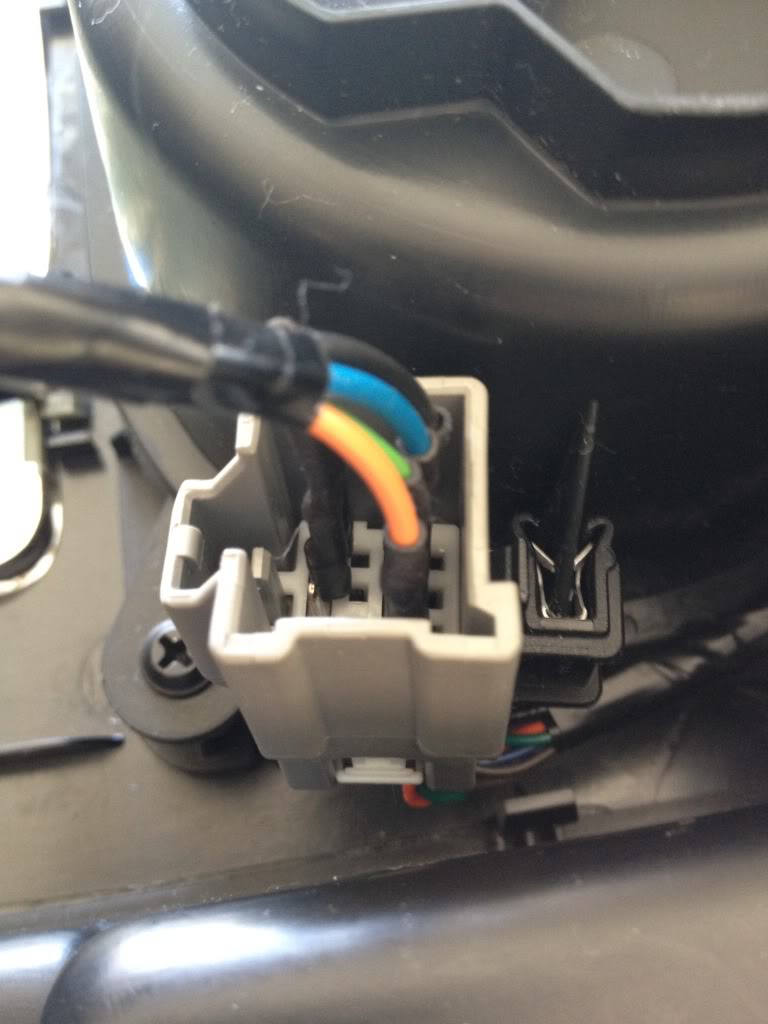
I located the 2 control modules to the underside of the console bezel, it was really tight but it all fit. The rear lighting was fished from an opening next to the shifter and followed the HVAC duct to the rear passenger corner side of the console box. The wire was just long enough to mount the first LED at that corner and the other LED was obviously matched at the opposite corner of the rear panel. Oh yea to remove this panel just remove the 3 hex screws that hold the storage box cover, then you can just lift up the silver trim slightly around the box. This uncovers 2-7mm (or 8mm??) bolts at the top rear of the back panel. Remove those and the panel can be pulled off easily.
Hope this helps those that are interested.
If your planning on doing this to a Raptor keep in mind that the oem ambient light switches (dimmer and colour selection) can not be installed because the Raptor center console bezel houses other switches in this same location.
See this thread for more detail:
http://www.fordraptorforum.com/f10/a...ur-raptor-352/
There are 2 part #'s required:
a. Interior Lighting Kit - 8L8Z13E700AA ($207.90)
b. Platinum Center Console Bezel Panel - AL3Z15045A76KB ($281.67)
Price from Tasca as of early Feb. 2012.
Here is a link to a thread from another site which was helpfull. Note that the footwell LED's that I rec'd are different than those in this older thread and a reminder that I installed the dog bone front cup holder LED and reused the 2 small button LED's (intended for the front cup holder) at the rear of the flow through console near the floor:
http://www.raptorforumz.com/showthre...nt+lighting%21
I took some pics this morning but needless to say they didn't turn out that great. Here's a few and I'll try to post more later:
Because there is no harness that connects the 4 LED cupholder wires to the 4 LED Lighting Kit wires you have to splice from one to the other. To keep it neat I got 4 colour matched wires (g, bu, org, bn) and crimped male pin ends on either side of each wire and heat shrink. One end was connected to the gray 8 pin harness located at the underside of the cupholder and the other end connected to black 8 pin harness that plugs into the control module that holds 2 harnesses (1 blk and 1 gray). You can plug into either of these harnesses because they each have 4 unused pins for additional LED connections.
For the switch I just cut off the button switch that came with the Kit and added male pin ends to the red wire and blk wire. These can now be plugged into the same 8 pin gray harness located at the underside of the cupholder - blk to blk and red to white/violet. This will allow you to scroll through 7 colours and off using the right hand switch of the oem double switch that comes with the Platinum bezel. The other left hand switch is designed to have 5 dimmer settings but I believe it requires a different control module that may only come on vehicles that have the ambient lighting upgrade as installed at the factory (I could be wrong though), so therefore this switch is temporarily out of order.
Power and ground was connected at the SJB area (pass. kick panel) I tapped into the Parking light wire pin #6 (wht/viol) located in the harness that has all the wires bound in a pink electrical tape. Soldier only because these LED's are sensitive to the slightest weak connection.
Also note to minimize the shadow effect in the front footwells try to mount the LED's somewhere in the middle and not to one side of the wells (I'll be relocating my driver side LED).
I located the 2 control modules to the underside of the console bezel, it was really tight but it all fit. The rear lighting was fished from an opening next to the shifter and followed the HVAC duct to the rear passenger corner side of the console box. The wire was just long enough to mount the first LED at that corner and the other LED was obviously matched at the opposite corner of the rear panel. Oh yea to remove this panel just remove the 3 hex screws that hold the storage box cover, then you can just lift up the silver trim slightly around the box. This uncovers 2-7mm (or 8mm??) bolts at the top rear of the back panel. Remove those and the panel can be pulled off easily.
Hope this helps those that are interested.
Last edited by Formula jg; Feb 22, 2012 at 04:41 PM.
Senior Member
Joined: Jun 2010
Posts: 501
Likes: 0
sharper4,
The dog bone cupholder LED can not be purchased individually and even if you got your hands on one it needs to be mounted onto it's specifically designed cupholder. This is why you need to order the Platinum console bezel. The cupholders and little storage trays are transferable between the oem flow through console w/ambient and flow through console w/o ambient.
The dog bone cupholder LED can not be purchased individually and even if you got your hands on one it needs to be mounted onto it's specifically designed cupholder. This is why you need to order the Platinum console bezel. The cupholders and little storage trays are transferable between the oem flow through console w/ambient and flow through console w/o ambient.
Thread Starter
|
Senior Member
Joined: Jan 2011
Posts: 610
Likes: 0
From: Fairbanks, AK
Formula-
Thanks so much for the info, it was exactly what I was looking for. I am not sure why they dont offer this as an option on some of the lower trim models, but I really like the extra lighting(gf's fusion has it and I like it a lot in there). Again, thanks for the info!
Thanks so much for the info, it was exactly what I was looking for. I am not sure why they dont offer this as an option on some of the lower trim models, but I really like the extra lighting(gf's fusion has it and I like it a lot in there). Again, thanks for the info!