Tinted and Painted Tails
#1
 07-19-2009, 10:12 PM


Join Date: May 2009
Location: Coon Rapids, MN
Posts: 163
Likes: 0
Received 0 Likes
on
0 Posts
Tinted and Painted Tails
Well this weekend was a nice one to pull the tails out of my truck to tint the lens and paint the border.
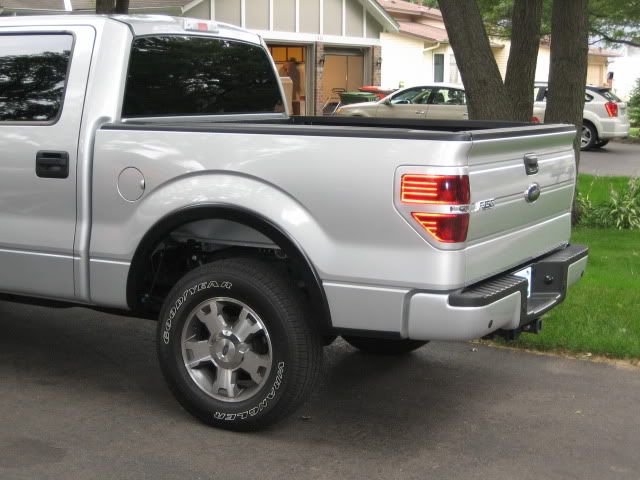
Here is the finished product. We all know what the stock ones look like. This is also a good pic to show what it looks like when you remove the FX4 decal.

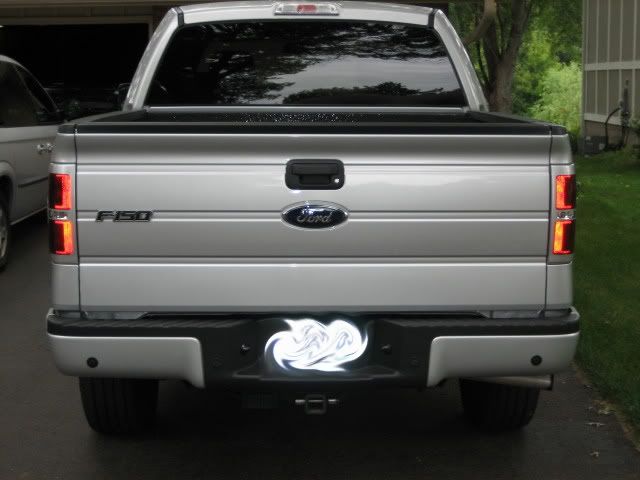
This is from the back.
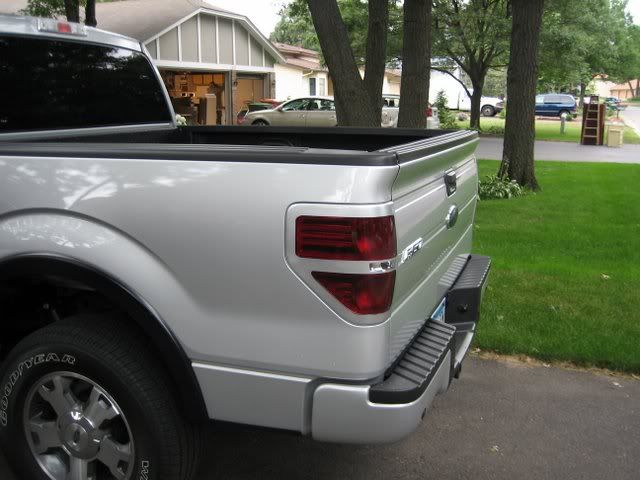
Here is a good close up. I left the backup lens clear. I have learned my lesson when it come to that.

Well some have asked for the process I used to do these.
I did this in my garage with 3M painters tape, a can of nightshades, a can of silver metallic Rust-oleum and a can of crystal clear Rust-oleum.
Step 1:
Sand the lens with 2000 grit wet or dry paper (Some say use more aggressive paper I don’t believe in it. When I refer to sanding in this post this is the grit I used).
Step 2:
Tape of the area for the back-up light (if you want it to be crystal clear that is if not skip to the next step).
Step 3:
Spray as many coats of night shades tint as you like. Just remember make them light and even. I want with two light coats with a light sanding in between.
Step4:
Lightly sand the surface and tape off the area you would like to remain tinted. I taped off just enough to cover all the chrome and white trim. I also used a razorblade to trim the tape to make a nice curve and rounded edge. Just cut lightly as to not cut into the lens itself.
Step 5:
I then painted several coats of the metallic silver paint.
Step 6:
Remove all tape and lightly sand the entire surface with a block like this (Here) this will help you get a nice even flat surface.
Step 7:
Spray even coats of clear over the lens. (It may appear to be hazy or milky in appearance this is normal and may just indicate that you have sprayed a little to thick in this spot. It will dry clear.) I put at least three even coats with not sanding in between but I also did not let the clear dry fully it was still tacky when I recoated. (This is per direction on the can. I was skeptical with this but after I was done I will never sand between coats of clear again.)
Step 8:
One more round of sanding to knock down any orange peal from the clear.
Step 9:
Polish the surface with a normal auto polish. I used Poorboys SSR1. (Do not use a plastic polish. You have covered all the plastic in clear so just use the same stuff you use to polish your paint.)
Anymore questions feel free to ask.
Here is the finished product. We all know what the stock ones look like. This is also a good pic to show what it looks like when you remove the FX4 decal.
This is from the back.
Here is a good close up. I left the backup lens clear. I have learned my lesson when it come to that.
Well some have asked for the process I used to do these.
I did this in my garage with 3M painters tape, a can of nightshades, a can of silver metallic Rust-oleum and a can of crystal clear Rust-oleum.
Step 1:
Sand the lens with 2000 grit wet or dry paper (Some say use more aggressive paper I don’t believe in it. When I refer to sanding in this post this is the grit I used).
Step 2:
Tape of the area for the back-up light (if you want it to be crystal clear that is if not skip to the next step).
Step 3:
Spray as many coats of night shades tint as you like. Just remember make them light and even. I want with two light coats with a light sanding in between.
Step4:
Lightly sand the surface and tape off the area you would like to remain tinted. I taped off just enough to cover all the chrome and white trim. I also used a razorblade to trim the tape to make a nice curve and rounded edge. Just cut lightly as to not cut into the lens itself.
Step 5:
I then painted several coats of the metallic silver paint.
Step 6:
Remove all tape and lightly sand the entire surface with a block like this (Here) this will help you get a nice even flat surface.
Step 7:
Spray even coats of clear over the lens. (It may appear to be hazy or milky in appearance this is normal and may just indicate that you have sprayed a little to thick in this spot. It will dry clear.) I put at least three even coats with not sanding in between but I also did not let the clear dry fully it was still tacky when I recoated. (This is per direction on the can. I was skeptical with this but after I was done I will never sand between coats of clear again.)
Step 8:
One more round of sanding to knock down any orange peal from the clear.
Step 9:
Polish the surface with a normal auto polish. I used Poorboys SSR1. (Do not use a plastic polish. You have covered all the plastic in clear so just use the same stuff you use to polish your paint.)
Anymore questions feel free to ask.
Last edited by BigNate; 07-20-2009 at 09:18 AM.
#2
07-19-2009, 10:15 PM

Senior Member
#3
07-19-2009, 10:20 PM

Senior Member
Join Date: Sep 2008
Location: Plano, TX
Posts: 1,473
Likes: 0
Received 0 Likes
on
0 Posts
#4
07-19-2009, 10:33 PM

#5
07-19-2009, 11:14 PM


Join Date: May 2006
Location: High Plains of West Texas
Posts: 4,391
Likes: 0
Received 0 Likes
on
0 Posts

 Can you elaborate on the process you used, or did you have it professionally done?
#6
07-19-2009, 11:26 PM

Junior Member
Join Date: Jul 2009
Location: AZ
Posts: 4
Likes: 0
Received 0 Likes
on
0 Posts
#7
07-19-2009, 11:43 PM

Join Date: Sep 2001
Location: Waterloo / Cedar Falls, IA
Posts: 643
Likes: 0
Received 0 Likes
on
0 Posts
Trending Topics

#9
07-19-2009, 11:48 PM

Senior Member
Join Date: Apr 2009
Location: Fayetteville, NC
Posts: 237
Likes: 0
Received 0 Likes
on
0 Posts


#11
07-20-2009, 06:46 AM

Senior Member
Join Date: Mar 2007
Location: San Antonio, TX
Posts: 179
Likes: 0
Received 0 Likes
on
0 Posts
#12
07-20-2009, 07:54 AM
Join Date: May 2009
Location: Coon Rapids, MN
Posts: 163
Likes: 0
Received 0 Likes
on
0 Posts
#13
07-20-2009, 08:49 AM


#15
07-20-2009, 09:12 AM