Recon Clearance Lights Installed...w/ lots of Pics....56k Warning
#1
 09-20-2008, 05:42 AM


Recon Clearance Lights Installed...w/ lots of Pics....56k Warning
I finally did it. They arrived yesterday. I spent yesterday buying wiring and prepping the power/ground looms. Also did some reading about how to mount these and some net searches of the best looking arrangement.
Sorry for the # of posts and pictures this will be. Since pretty much nobody has done this for a 04-08 F-150...and posted pics of the process, I figured why not.
FYI: I am not a master mechanic or electrician. This stuff works...and the wiring can be ugly. Copy at your own risk. It's not my fault if you f'up your truck. I recommend you get a professional install if you get lost with the wiring on this install. A radio is harder to hook up than this is.
That being said....
#2
09-20-2008, 05:43 AM
First off, lets cover some basics.
What you'll need:
I used the instructions that Recon provided as a base. They are for a 2003-2008 Dodge Ram 2500. But the basic principles are the same for our truck. And wierdly, the measurements were almost identical.
You can get them here. 2003-2008 Ram 2500 Recon Install PDF
What you'll need:
- Instructions
- Torx Driver Set
- Phillips Screwdriver
- Small Metric Socket Set
- ~20 feet of 18g or 20g electrical cord
- Misc. Electrical Connectors
- Drill with a 1/8" and a 3/8" bits
- Flashlight
- The lights of course
You can get them here. 2003-2008 Ram 2500 Recon Install PDF
#3
09-20-2008, 05:44 AM
Now the pics.
This is what showed up. I picked the Dodge ones because they just looked better than the OEM F-250/F-350 style does...IMO at least. Also, the Dodge ones fit our roof contour pretty nicely.
2003-2008 Dodge Ram 2500 Recon Clearance Lights - Smoked

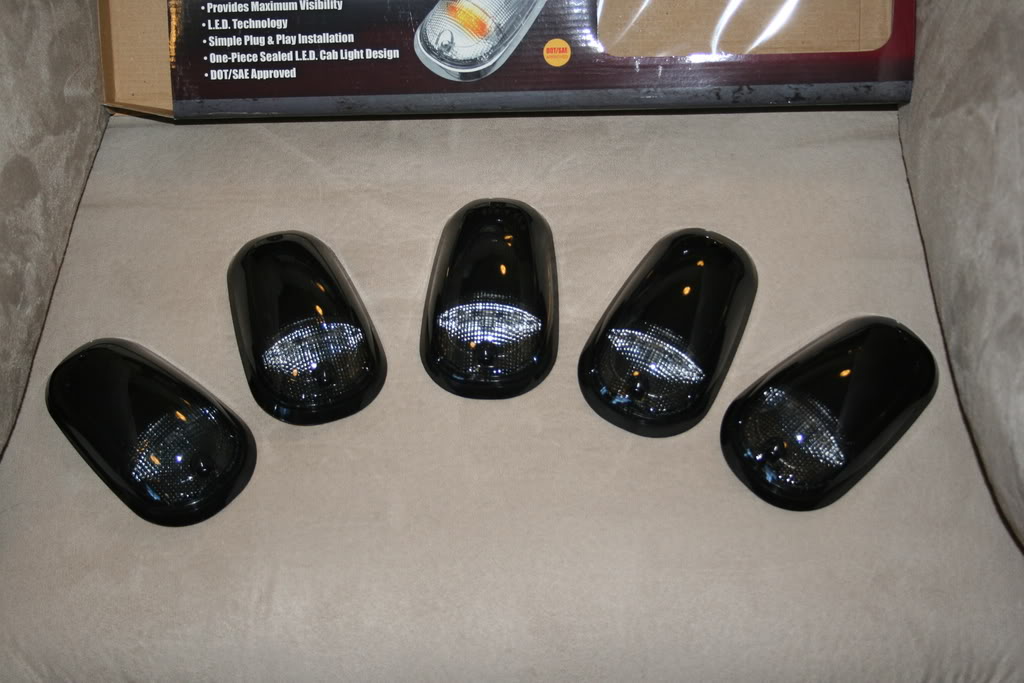
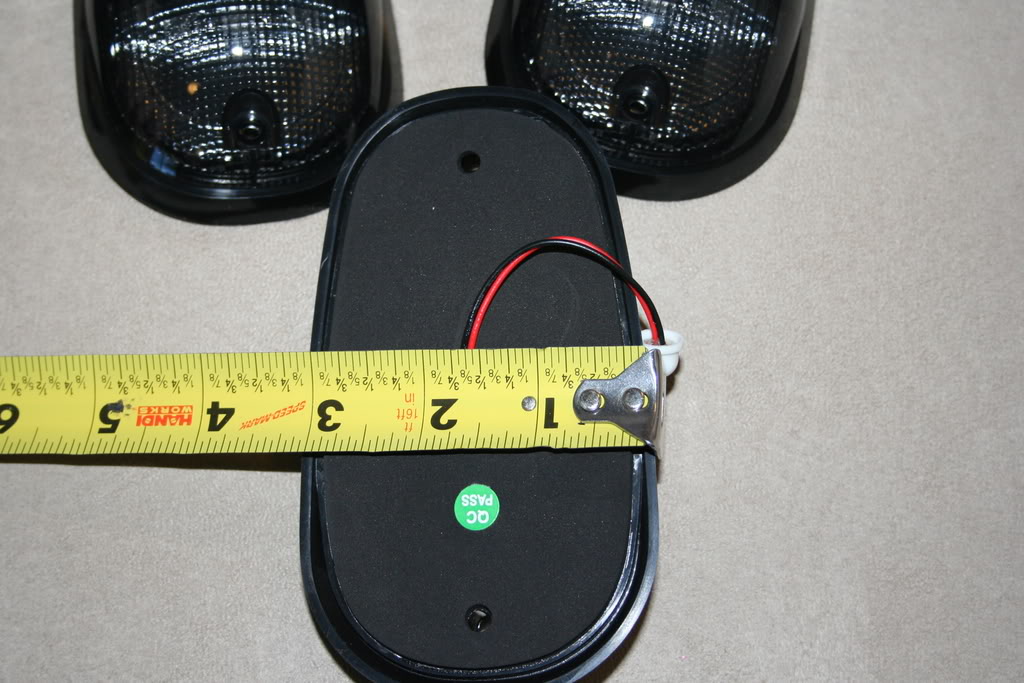
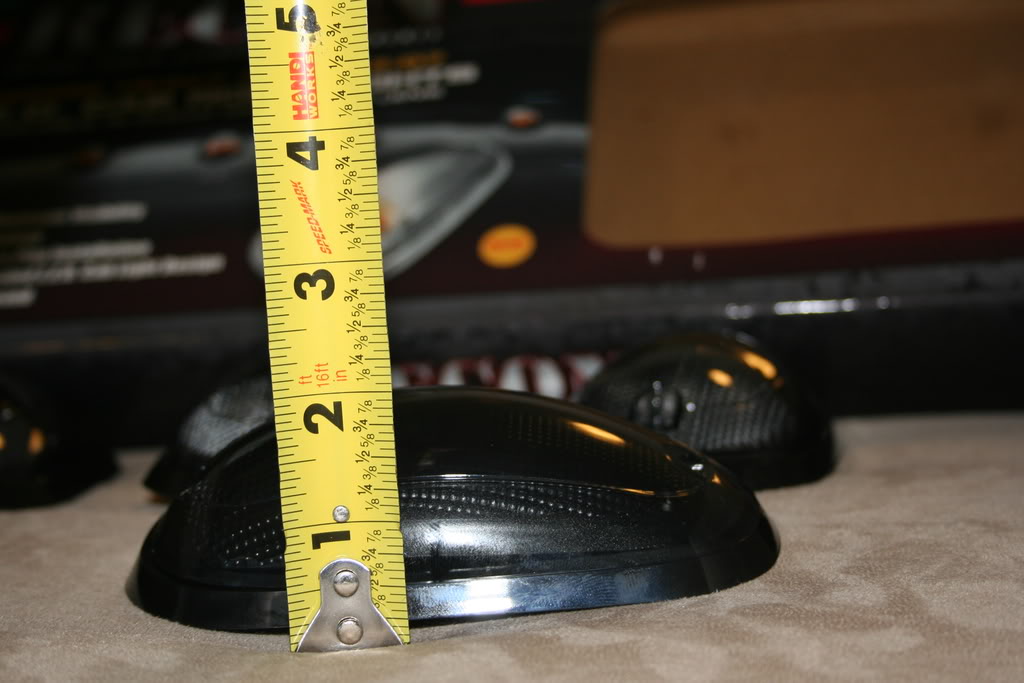
These lights are alot bigger than I imagined.
This is what showed up. I picked the Dodge ones because they just looked better than the OEM F-250/F-350 style does...IMO at least. Also, the Dodge ones fit our roof contour pretty nicely.
2003-2008 Dodge Ram 2500 Recon Clearance Lights - Smoked
These lights are alot bigger than I imagined.
#4
09-20-2008, 05:45 AM
Did some test fitting.

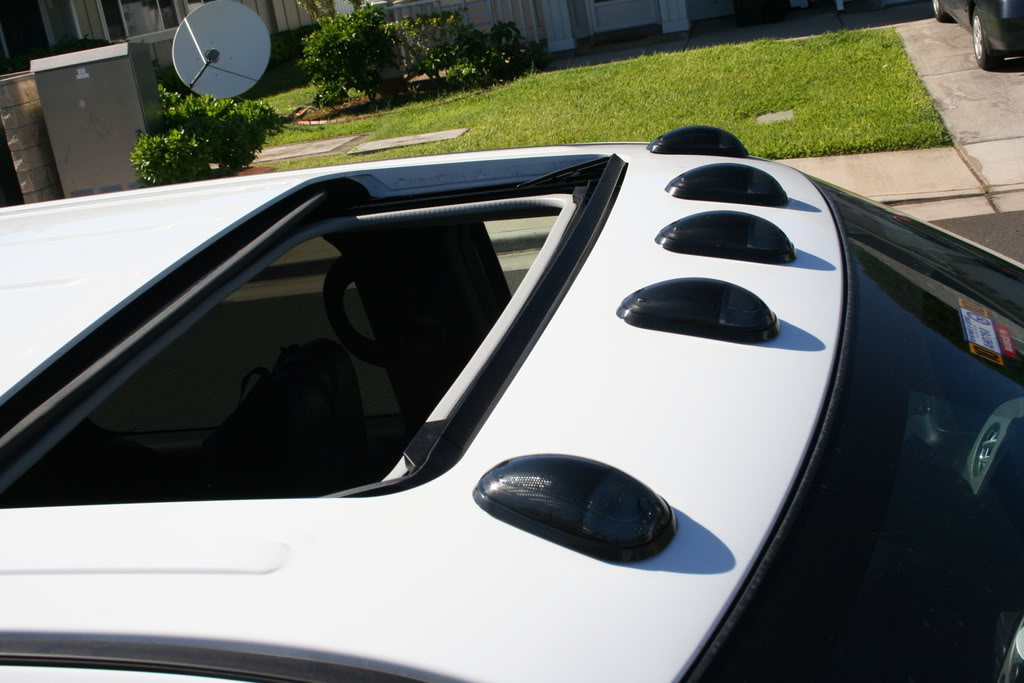
and thought it looked good. Decided to go with the 3 close grouped in center, and 2 wider spaced on the outside edges.
Now to get down to business. You start with finding 2 points on the roof that are your reference points and will not change.
I measured up 6" from the leading edge of both sides of the roof. Marked it with Dry Erase Marker. Then ran scotch tape across the roof to both points (upper tape line). Verified was evenly placed using ruler.
Then, using scotch tape again, I ran another marker line between the 2 extreme cab points (lower tape line)
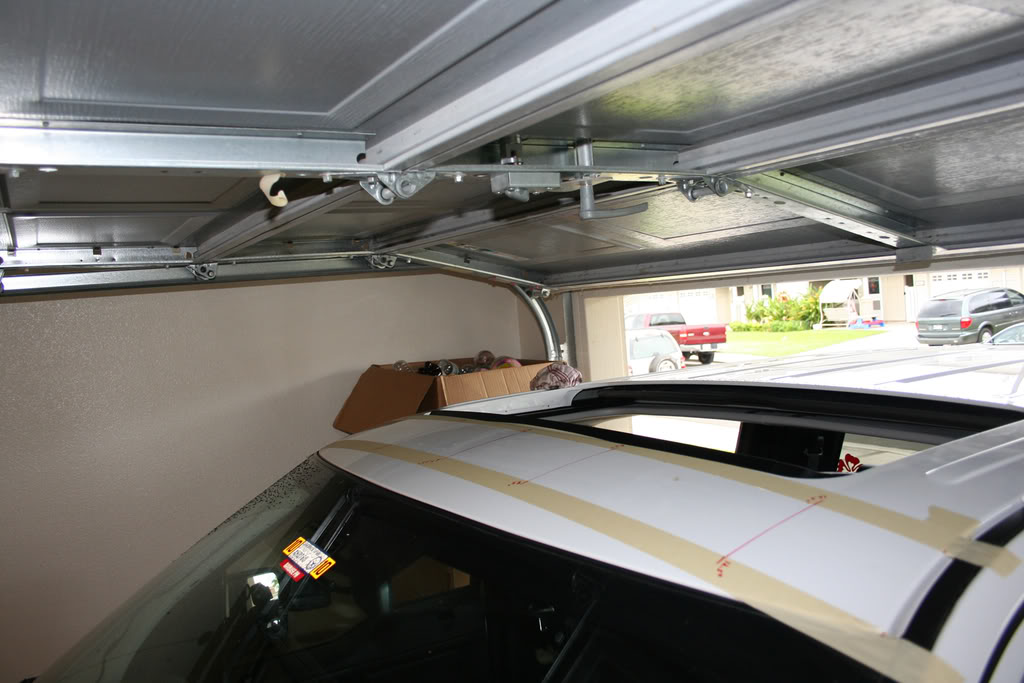
Now that you have 2 reference points that are straight across the cab, you can measure out and find your centerline of the cab. My upper line is 53" long, and the lower line is 54 1/2" long.
So, the center of the cab is roughly 26 1/2" along the upper line, and 27 1/4" along the lower line.

and thought it looked good. Decided to go with the 3 close grouped in center, and 2 wider spaced on the outside edges.
Now to get down to business. You start with finding 2 points on the roof that are your reference points and will not change.
I measured up 6" from the leading edge of both sides of the roof. Marked it with Dry Erase Marker. Then ran scotch tape across the roof to both points (upper tape line). Verified was evenly placed using ruler.
Then, using scotch tape again, I ran another marker line between the 2 extreme cab points (lower tape line)
Now that you have 2 reference points that are straight across the cab, you can measure out and find your centerline of the cab. My upper line is 53" long, and the lower line is 54 1/2" long.
So, the center of the cab is roughly 26 1/2" along the upper line, and 27 1/4" along the lower line.
#5
09-20-2008, 05:46 AM
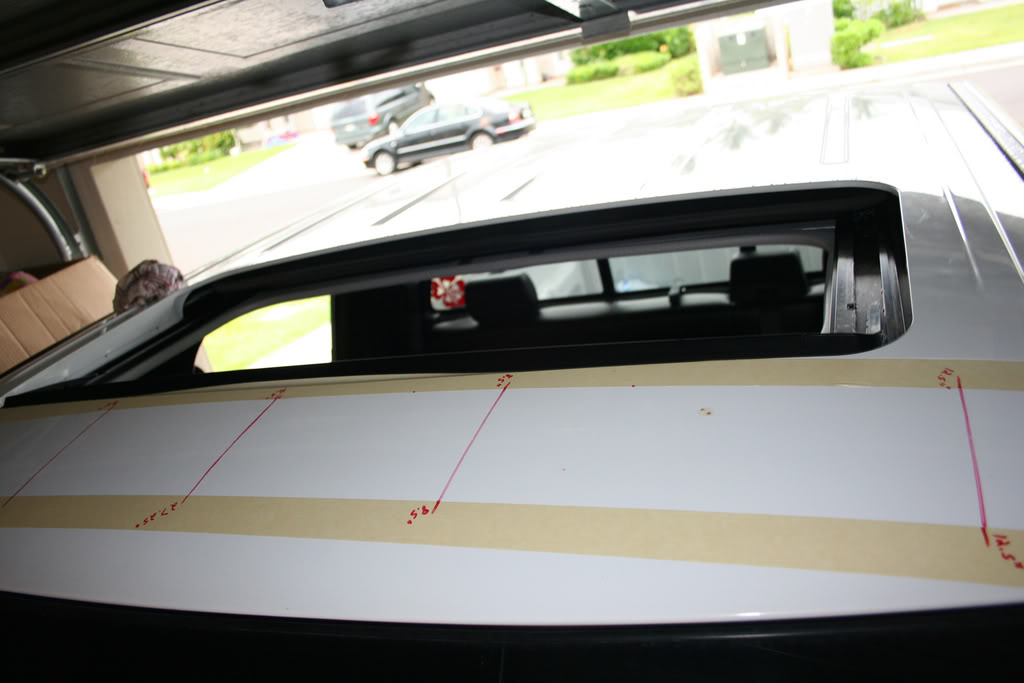
Now that your center is marked...measure it all over again. Do you want to be that guy who drilled holes off-center?
Using your centerline, measure out 8.5" on the top and the bottom tape line. Connect the marks to form another straight line that is 8.5" from center. Repeat on the other side of center.
Using your centerline, measure out 12.5" on the top and the bottom tape line. Connect the marks to form another straight line that is 12.5" from center. Repeat on the other side of center.

You now have your 5 locater lines for the marker lights. Should look something similar to this
Get your lights and dummy fit them. At this point, our trucks differ from the Dodge...especially if you have a moonroof like I do.
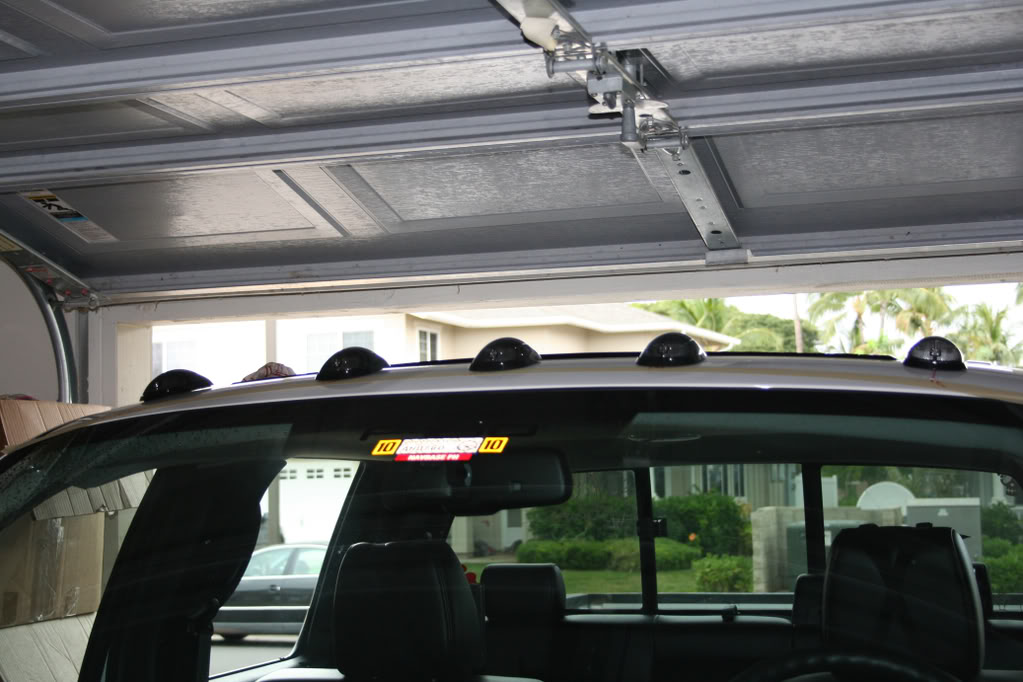
To create a very shallow V that follows the roof-line of the truck, you will need to place the lights at different hieghts along the roof. Luckily the roof itself does this for you with the center 3 lights. I personally placed the center lights at 3" from the edge of the roofline, and the outer 2 lights were 4" from the edge of roofline...all along the 5 previously marked lines of course.
I considered moving the lights farther backwards than 3" and 4"...but with my moonroof, it just didn't work out. A non-moonroof truck can probaly get away with a 4" and 5" setup

You can see the very shallow "v" shape in the above picture.
Using your centerline, measure out 8.5" on the top and the bottom tape line. Connect the marks to form another straight line that is 8.5" from center. Repeat on the other side of center.
Using your centerline, measure out 12.5" on the top and the bottom tape line. Connect the marks to form another straight line that is 12.5" from center. Repeat on the other side of center.
You now have your 5 locater lines for the marker lights. Should look something similar to this
Get your lights and dummy fit them. At this point, our trucks differ from the Dodge...especially if you have a moonroof like I do.
To create a very shallow V that follows the roof-line of the truck, you will need to place the lights at different hieghts along the roof. Luckily the roof itself does this for you with the center 3 lights. I personally placed the center lights at 3" from the edge of the roofline, and the outer 2 lights were 4" from the edge of roofline...all along the 5 previously marked lines of course.
I considered moving the lights farther backwards than 3" and 4"...but with my moonroof, it just didn't work out. A non-moonroof truck can probaly get away with a 4" and 5" setup
You can see the very shallow "v" shape in the above picture.
#6
09-20-2008, 05:48 AM
and 2 more pics showing the 4" and 3" measurements


Now measure and mark 2" from the marks you just made. This should be the middle of your light and and will be the wiring hole. It's the * (astericks looking mark) in the pictures below.


Make sure you are happy with this arrangement. The next part isn't fun.
Now measure and mark 2" from the marks you just made. This should be the middle of your light and and will be the wiring hole. It's the * (astericks looking mark) in the pictures below.
Make sure you are happy with this arrangement. The next part isn't fun.
#7
09-20-2008, 05:52 AM
you get to drill 15 holes in your multi-thousand dollar vehicle. my pucker factor was very very high.

did some drilling and smoothing of the holes.
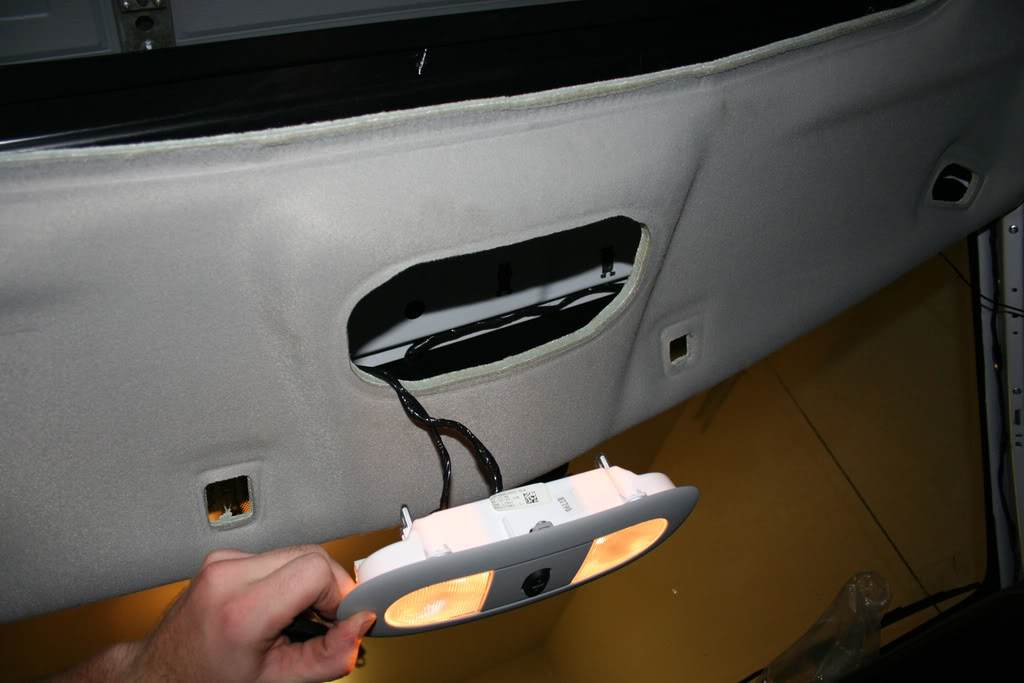
now you get to dis-assemble the interior.
remove both grab bars on the pillars, the center light (just tug, it'll come right out) and the sun visors. if you have a moon-roof, the plastic trim as well.
should look like this
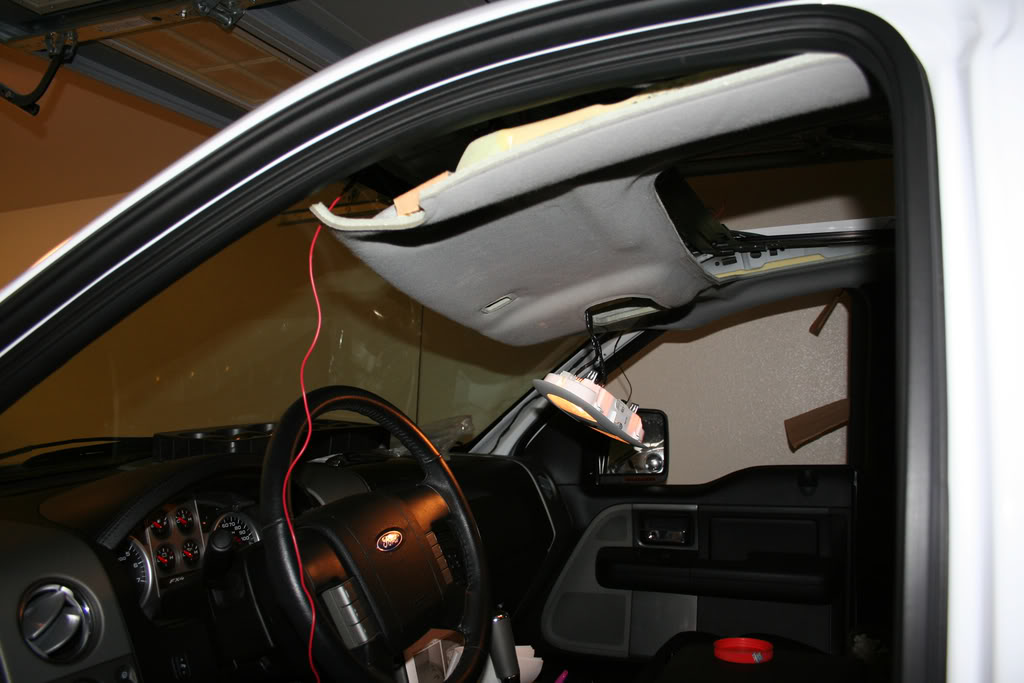
reach through the light hole and remove the plastic bracket with a torx bit
did some drilling and smoothing of the holes.
now you get to dis-assemble the interior.
remove both grab bars on the pillars, the center light (just tug, it'll come right out) and the sun visors. if you have a moon-roof, the plastic trim as well.
should look like this
reach through the light hole and remove the plastic bracket with a torx bit
Trending Topics
#8
09-20-2008, 05:56 AM
you are going to need something similar to these for the power and ground. ain't pretty, but they work just fine. each one is 1 solid piece of wire with 5 little tails spliced in

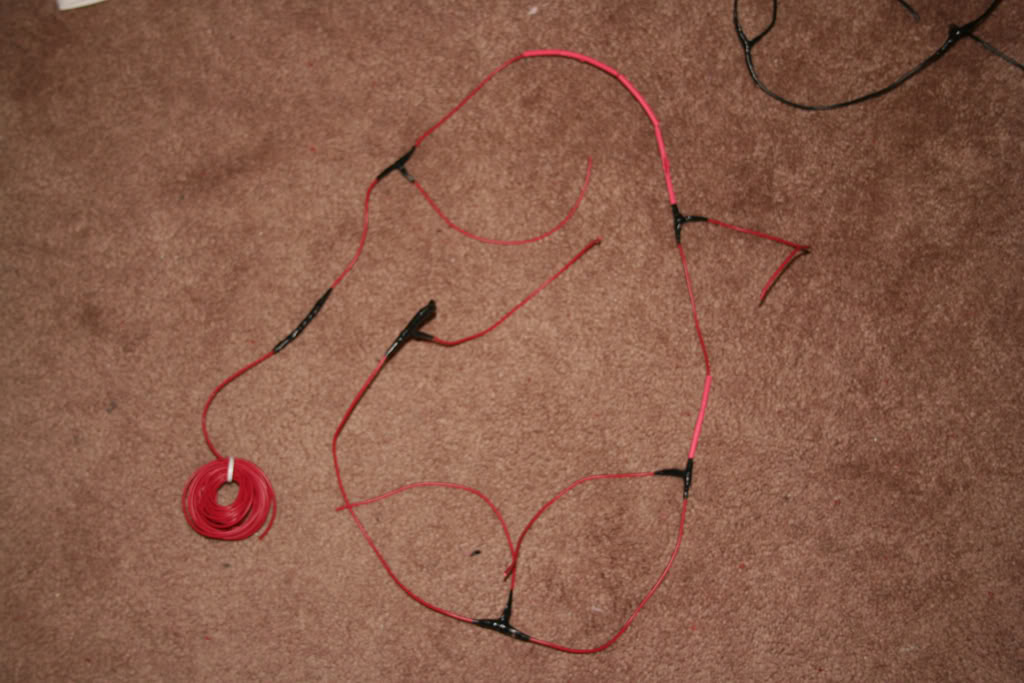
I routed the power wire (red) to drivers pillar, and ground (black) to passenger pillar
clean up the area and re-install everything.
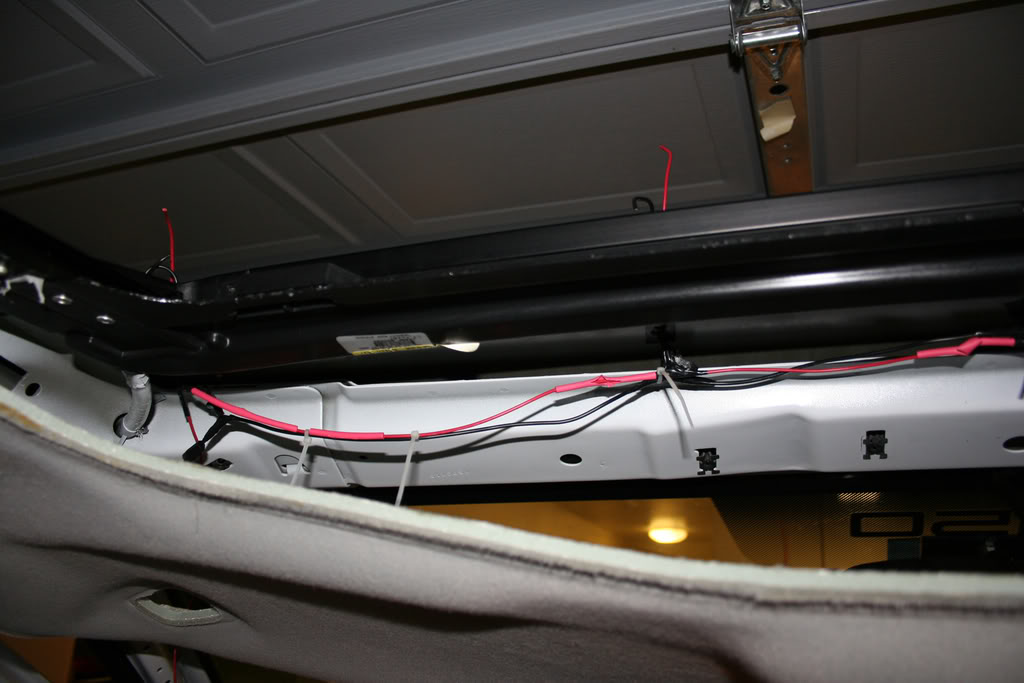
connect the lights to your wiring and make sure to protect the wires from the metal edges of the holes.
I routed the power wire (red) to drivers pillar, and ground (black) to passenger pillar
clean up the area and re-install everything.
connect the lights to your wiring and make sure to protect the wires from the metal edges of the holes.
#9
09-20-2008, 05:58 AM
and now to get some power and a ground.
Power first:
I spliced into the pigtail on the light switch. the pictures below have a little green box to identify the wire I spliced into. It's the control wire for the parking lights. So they only get power when lamps are on.
sorry, no real life pics. I was in a hurry, and it was dark out. I'll probably go back later and run a 5 amp fuse. LED's don't draw much power anyways.
You can remove the light switch panel by just pulling. It is held in by 4 of those little compression clips. A gently tug will do the job.

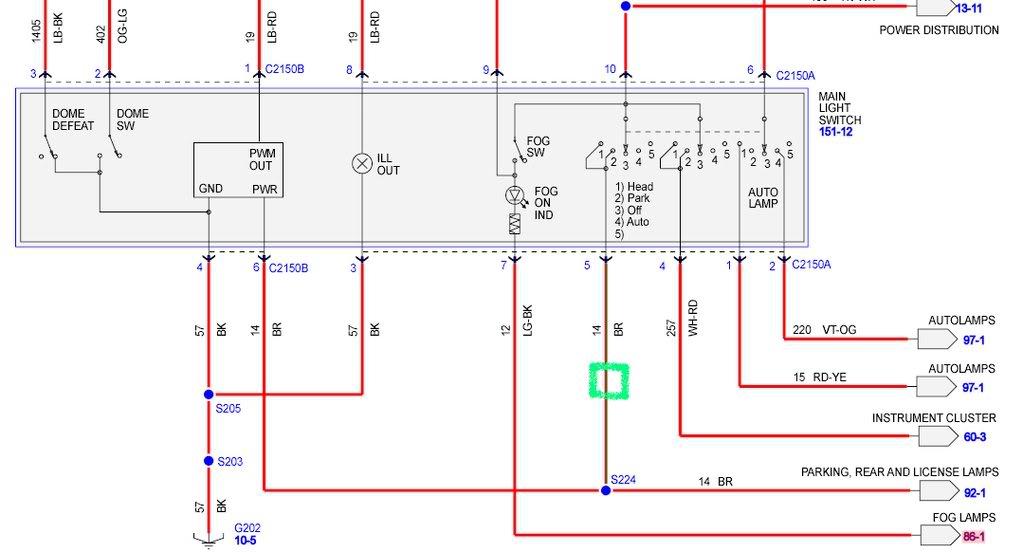
I grounded the setup using one of the 10mm bolts on the passenger pillar. Easy and effective.
Power first:
I spliced into the pigtail on the light switch. the pictures below have a little green box to identify the wire I spliced into. It's the control wire for the parking lights. So they only get power when lamps are on.
sorry, no real life pics. I was in a hurry, and it was dark out. I'll probably go back later and run a 5 amp fuse. LED's don't draw much power anyways.
You can remove the light switch panel by just pulling. It is held in by 4 of those little compression clips. A gently tug will do the job.
I grounded the setup using one of the 10mm bolts on the passenger pillar. Easy and effective.
#10
09-20-2008, 06:03 AM
and finally, what you really viewed this thread for....and I'll bet y'all were wondering when I'd get to the point.

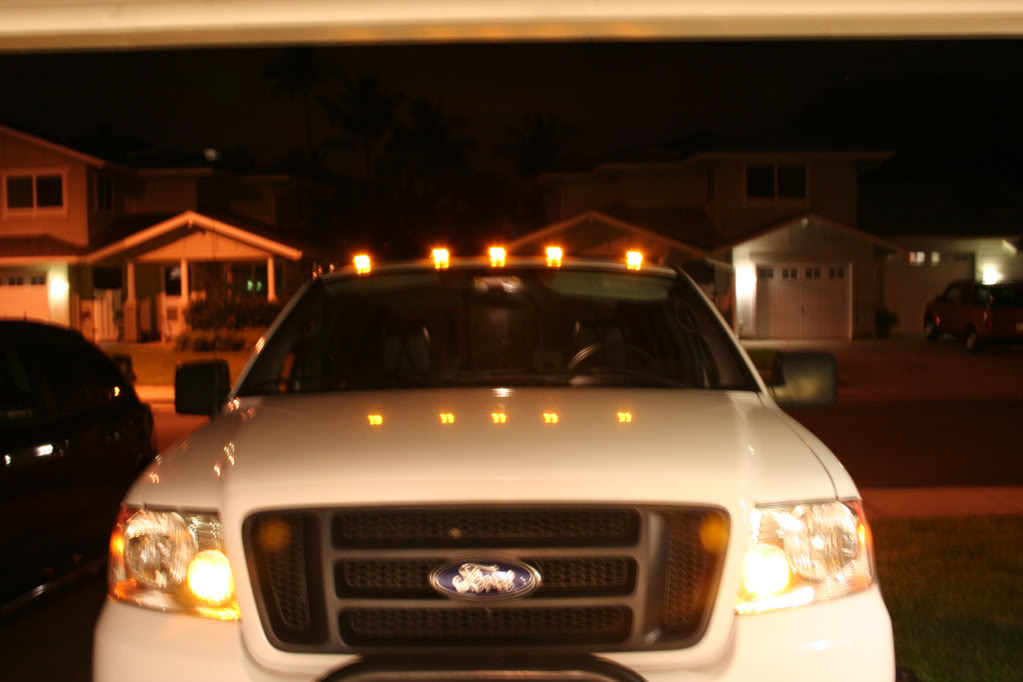
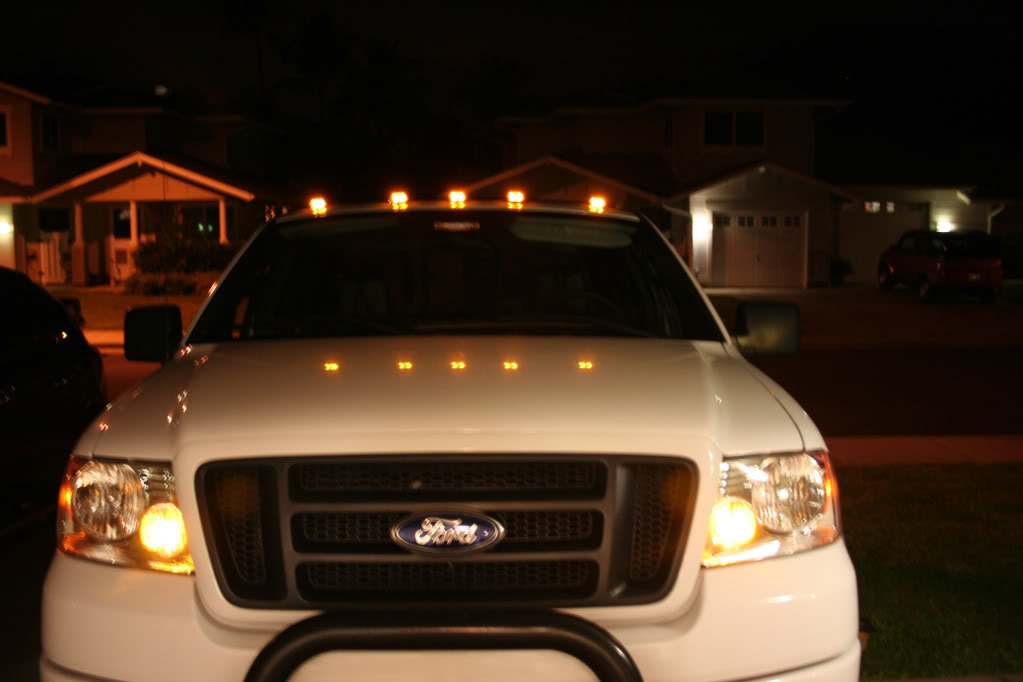
Can't find my tripod, so no good nightime pics. I'll try to get a video up later. These lights rock. For $74...can't be beat.
oh yeah, got these from http://discountpowerparts.com/ - Recon Section
Can't find my tripod, so no good nightime pics. I'll try to get a video up later. These lights rock. For $74...can't be beat.
oh yeah, got these from http://discountpowerparts.com/ - Recon Section


#14
09-20-2008, 10:31 AM


