

Clarion Sub Install.. How to with pics..


Thread Starter
|
Senior Member
Joined: Aug 2002
Posts: 632
Likes: 0
From: San Antonio, TX
Well, I have installed the Clarion Sub and it sounds great! Almost a little too boomy but I am sure I will get used to it. I have the gain all the way down, the bass on the HU about 1/4 below middle and it still thumps! Big difference...
First off, Here's what you will need.
Some cable ties, a sander (manual or elec), saw/blade etc, a pair of wire cutters, wire guides (opt.) and a few beers...
Here are the steps with photos.
This is what came in the box.. Be sure to look closely in the box because I thought I didn't get my wiring harness but it was just buried in all the angel turd packing...

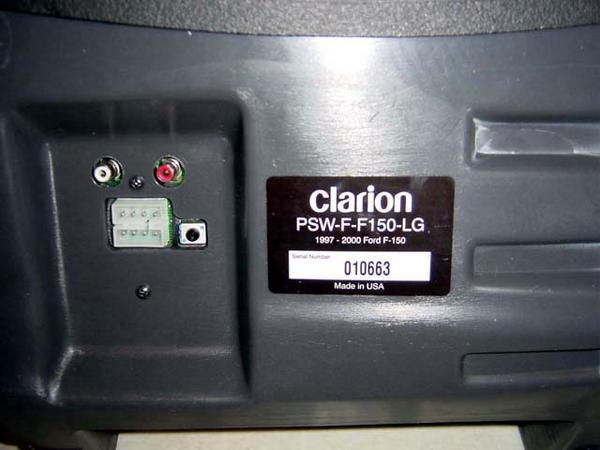
Here is a view of the rear with hookups and the bottom of the unit. Notice where the RCA's and the white multi-plug are in the first picture. To the right of that there is a little black **** - that is the gain control.
First off, Here's what you will need.
Some cable ties, a sander (manual or elec), saw/blade etc, a pair of wire cutters, wire guides (opt.) and a few beers...
Here are the steps with photos.
This is what came in the box.. Be sure to look closely in the box because I thought I didn't get my wiring harness but it was just buried in all the angel turd packing...
Here is a view of the rear with hookups and the bottom of the unit. Notice where the RCA's and the white multi-plug are in the first picture. To the right of that there is a little black **** - that is the gain control.
Thread Starter
|
Senior Member
Joined: Aug 2002
Posts: 632
Likes: 0
From: San Antonio, TX
Cont...

Getting started, first off, push the center vents towards each other and with your fingers grab the console frame where the vents are and pull. Don't worry, it should/will pop right off.. This is a good time to also remove the back floor vent panel. It has 3 pressure plugs, one on the right just behind the vent and two on the left by the gas pedal. Just wiggle it and pull the bottom part out first and it will pop right out...

If you have 4X4, it is easiest to disconnect the selector switch so you can remove the entire piece and place it out of the way.

Thread Starter
|
Senior Member
Joined: Aug 2002
Posts: 632
Likes: 0
From: San Antonio, TX
Cont...
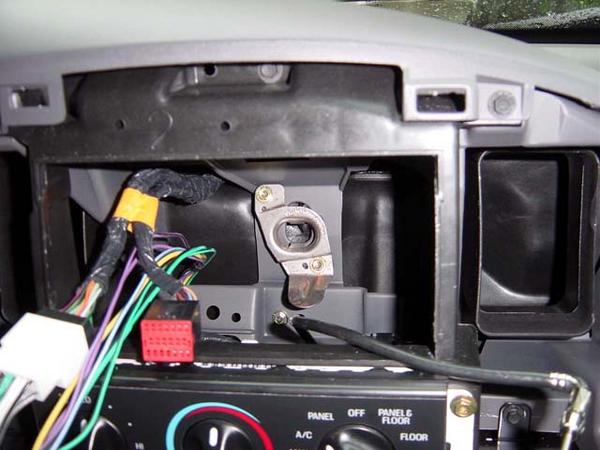
Now, using the Ford Radio Removal Keys I got from Autozone for $4, put the keys in the holes, separate each key away from each other ( pull the left one to the left and the right to the right) while gently pulling the HU out. It should come out easily once you get the feel of what it wants you to do 
After you get the HU out, disconnect the wires and hook-up the supplied inline connector. Run the sub connection down through the dash and then connect the actual sub connector cable from Clarion. This will leave a lot of slack wire that you can cable tie the excess as you see fit.
Next, Make sure all your connections to the factory are tight and completely hooked up. Take the HU and reconnect all the connections and don't forget the antennae lead also! Go ahead and place it back in the dash, locked down - you are done with this part..
Now, you need to start working on the sub itself so it will fit properly and mount. You WILL need to shave the rib on the bottom of the sub for the drink holder to open/close properly. Check it yourself beforehand to make sure but I needed to. I took a sander and a saw and just cut that 1/4" rib off flush with the rest of the frame almost to the foot tabs on the front of the unit. Next, you will need to add some type of anchor for the straps on the inside, back area so that you can secure it to the dash out of sight. This is only done if you don't want to screw the thing to the floor. Obviously, I didn't want to screw it to the floor!
Notice in the picture the rib is about gone and the white tabs are mounted in the back area (bottom of the picture). I had to supply these myself and they are just basic wire guides that have a hole for a screw to go through.
Thread Starter
|
Senior Member
Joined: Aug 2002
Posts: 632
Likes: 0
From: San Antonio, TX
Cont...
Now, take the sub and place it in the truck and start getting it into postion. You can hook it up the HU now to get your mouth watering and listen to a quick song while you drink a beer... LOL
Oh yeah, I raised the feet of mine almost as high as they would go so it would lower/level the rear/dash part as much as possible.
Once you get it in the general area, tie the wires to one of the upright frames using a cable tie and be sure to leave enough slack. Now, take the black floor vent cover and loosely put it into postion. I took a set of cable ties and ran it around the metal frame and then through the vent. I tied it off/strapped it down but made sure to go around the little rib on the vent or you will lose the cable tie. Now go ahead and secure the vent assembly completely with the pressure tabs.
Make sure everything works at this point!
Next, run a cable tie through both wire guides on the back of the sub (the ones you mounted) move it in position and then pass the cable tie through the cable ties that you tied off to the frame. It should look something like a two chain links - like this..
Thread Starter
|
Senior Member
Joined: Aug 2002
Posts: 632
Likes: 0
From: San Antonio, TX
And finally!
Now, clip off all the excess cable tie tabs, clean up your mess and rock on! Here's the finished product....


Y'all take care and I hope this helps!
Chris (ReelWork)
Y'all take care and I hope this helps!
Chris (ReelWork)

Senior Member
Joined: Aug 2000
Posts: 202
Likes: 0
From: Nashville, TN
Chris,
Great job with the how-to!! My truck is basically identical to yours (well, it's a silver FX4) and I am pretty psyched seeing how nice your install looks. Couple of questions:
1. Does the sub base straddle (and hide) the small raised portion of the transmission hump, or did you have to do some creative cutting on the right side to make it conform?
2. I know this isn't a very powerful sub (only 40W), but does it make a noticeable improvement over the bass of the Ford "premium" sound? Do your hear any kind of new dash rattle due to the mounting location? I'm not into the "disturb drivers miles away" bass that you would get with an extensive sound upgrade, but I would definitely like a little bit more punch on the lower freqs.
Again, thanks for posting!
-Mike
Last edited by DD-976; Sep 7, 2002 at 08:01 PM.
Thread Starter
|
Senior Member
Joined: Aug 2002
Posts: 632
Likes: 0
From: San Antonio, TX
Yes, the sub straddles the hump and there is no rattle that I can tell at this point. For a semi-low powered sub, this thing really puts out some sound and compliments the factory stereor quite well.
I give it a solid thumbs up and for the price you can't beat it!
Chris (ReelWork)
I give it a solid thumbs up and for the price you can't beat it!
Chris (ReelWork)
Trending Topics

Thread Starter
|
Senior Member
Joined: Aug 2002
Posts: 632
Likes: 0
From: San Antonio, TX
Thanks for the compliments!
Thanks for teh compliments, let's see some more installs now.. I really like this thing! I've finally gotten used to it and couldn't see how I went without for so long... Well, for the month and a half that I've had the new SCrew...
Chris (ReelWork)
Chris (ReelWork)

Senior Member
Joined: Nov 2001
Posts: 235
Likes: 0
From: Long Island, NY
Nice job and interesting way of doing it. BUT, here's a MUCH easier way which I did it.
Just cut 1/4 to 1/2" off the bottom of the ash tray plastic. Follow install direction that came with Sub, Wallah, DONE!!!
Looks perfect and is very easy. You can not see the part you cut off because the top of the sub case cover it.
The unit sounds ok, nothing to write home about however. It is nice clean sound, but if you want some SERIOUS boom, get yourself box for under the rear seats.
Thread Starter
|
Senior Member
Joined: Aug 2002
Posts: 632
Likes: 0
From: San Antonio, TX
re:
I hear ya on the ash tray and that is the easy way but my thought is to modify the $150 piece of equipment where it is completely invisible since it is on the floor. I opted to modify that not the dash, mainly because it was doing it right so if I do remove the sub and opt for a larger, I won't go "damn it, why did I do that!"
Thanks for the reply,
Chris (ReelWork)
Thanks for the reply,
Chris (ReelWork)

Thread Starter
|
Senior Member
Joined: Aug 2002
Posts: 632
Likes: 0
From: San Antonio, TX
re:
I got it from Crutchfield for $150 on closeout with harness and all and it matches my gray interior pretty darned well. It is a *tad* darker but since it is the lowest gray thing, it actually is hard to notice. Look at my pics, I think they speak for themselves. Those are my actual pics from my truck, not ones I found..
If I am reading your reply correctly, maybe you are referring to a darker gray? If so, I think they made it to blend with both. If you are referring to painting, they come in the matching color already..
Chris (ReelWork)
If I am reading your reply correctly, maybe you are referring to a darker gray? If so, I think they made it to blend with both. If you are referring to painting, they come in the matching color already..
Chris (ReelWork)