97-03 F150 Double Din Installation Guide
#1
 05-12-2007, 01:21 AM


97-03 F150 Double Din Installation Guide
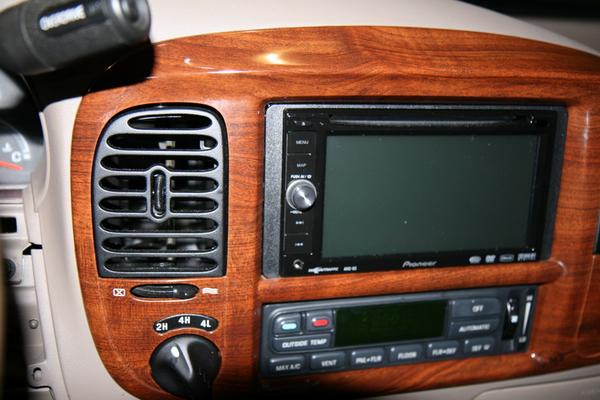
Ok, as promised here is the procedure I used to install a Pioneer AVIC-D3 in my 03 F150. As most know Ford elected not to give us a true double din opening, and some modification is required.
Note: The procedure should be the same for 97-03 vehicles, but I'm not positive and some additional modding may be required. Read through the post and I'll point out what I have read from other members about the later years. But I think overall the steps are similar and any slight variance won't be cause for much concern.
Overall I would say this was not a difficult procedure at all, and was well worth the effort. I was quoted around $400 for this install at a local custom shop, and Circuit City and Best Buy would not even consider doing it. To be honest I'm glad I choose to install it myself, as I might have took additional time and care to get the final results which I am very pleased with.
Harness: I didn't cover this as I feel its pretty straight forward. I elected to use Scosche FD16B harness and soldered all my connections together. I double checked Scosche's schematic with Ford's and its dead on.
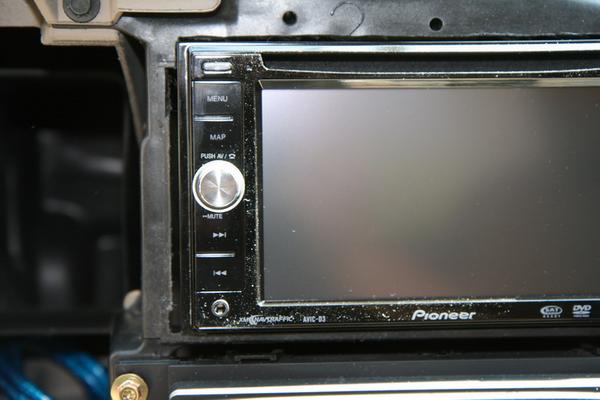
So here we go. This shot was after I removed the OEM 6-disc changer.
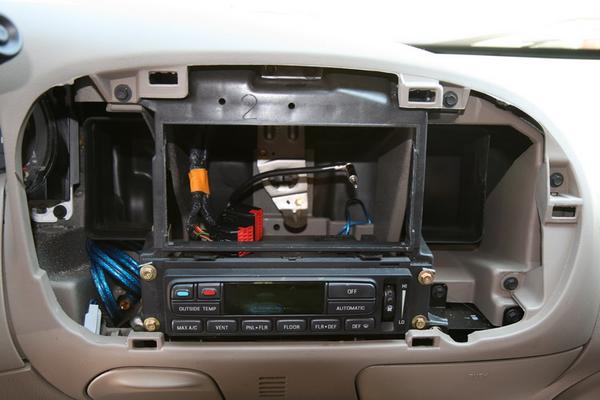
The blue RCA cables and the blue remote line was left for me by the previous owner, so you should not see those.
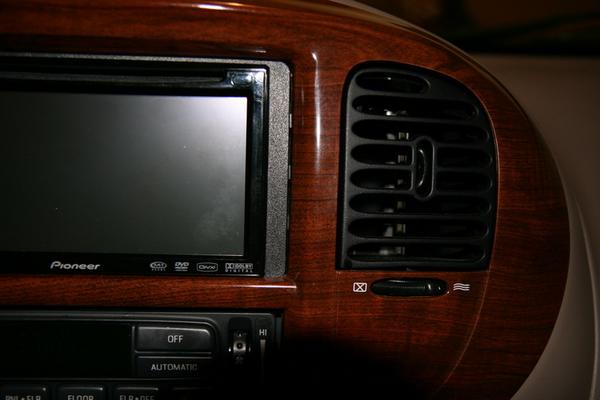
The black bracket that the OEM unit came out of is what needs to be enlarged in order to fit your new head unit. After comparing the AVIC to the OEM I came to the conclusion that all I needed to do was remove some material from the top of the bracket. Now some members have posted that they had to remove the bottom portion of the bracket as well. If I remember correctly it seemed owners of 01 and previous years mentioned this.
Take your time and really compare the two units before you determine what you need to cut. I really did not want to remove any material from the bottom as I did not want to be concerned with having to ensure the unit would sit level. If all you remove is from the top, you should have no problems when it comes time to put the outer trim bezel back on and everything lining up.
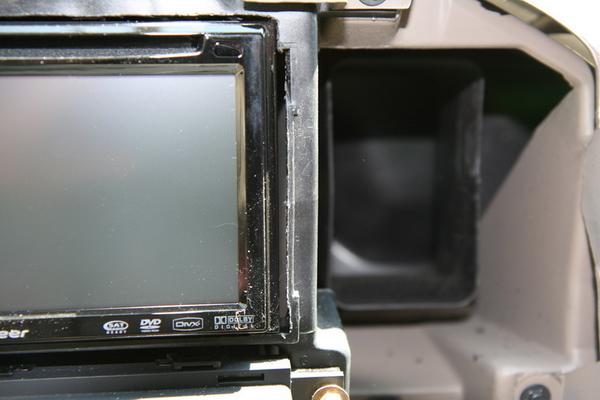
For reference here is a few more shots at different angles:

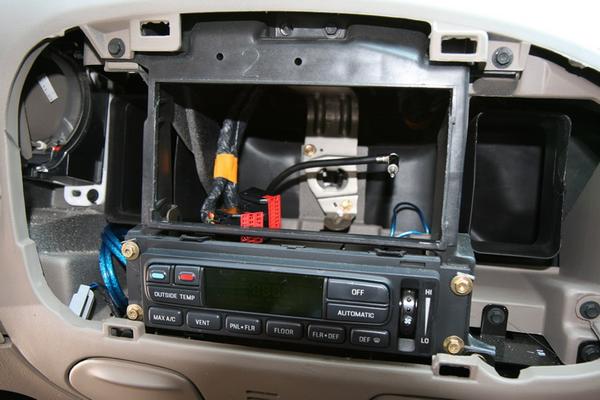
Now take note of the metal bracket more easily seen in the next shot:

Again, some members of 01 and previous have mentioned having to remove/cut out this bracket. However that was not needed in my case.
Note: The procedure should be the same for 97-03 vehicles, but I'm not positive and some additional modding may be required. Read through the post and I'll point out what I have read from other members about the later years. But I think overall the steps are similar and any slight variance won't be cause for much concern.
Overall I would say this was not a difficult procedure at all, and was well worth the effort. I was quoted around $400 for this install at a local custom shop, and Circuit City and Best Buy would not even consider doing it. To be honest I'm glad I choose to install it myself, as I might have took additional time and care to get the final results which I am very pleased with.
Harness: I didn't cover this as I feel its pretty straight forward. I elected to use Scosche FD16B harness and soldered all my connections together. I double checked Scosche's schematic with Ford's and its dead on.
So here we go. This shot was after I removed the OEM 6-disc changer.
The blue RCA cables and the blue remote line was left for me by the previous owner, so you should not see those.
The black bracket that the OEM unit came out of is what needs to be enlarged in order to fit your new head unit. After comparing the AVIC to the OEM I came to the conclusion that all I needed to do was remove some material from the top of the bracket. Now some members have posted that they had to remove the bottom portion of the bracket as well. If I remember correctly it seemed owners of 01 and previous years mentioned this.
Take your time and really compare the two units before you determine what you need to cut. I really did not want to remove any material from the bottom as I did not want to be concerned with having to ensure the unit would sit level. If all you remove is from the top, you should have no problems when it comes time to put the outer trim bezel back on and everything lining up.
For reference here is a few more shots at different angles:
Now take note of the metal bracket more easily seen in the next shot:
Again, some members of 01 and previous have mentioned having to remove/cut out this bracket. However that was not needed in my case.
Last edited by PipeHitter; 05-12-2007 at 10:28 AM.
#2
05-12-2007, 01:22 AM
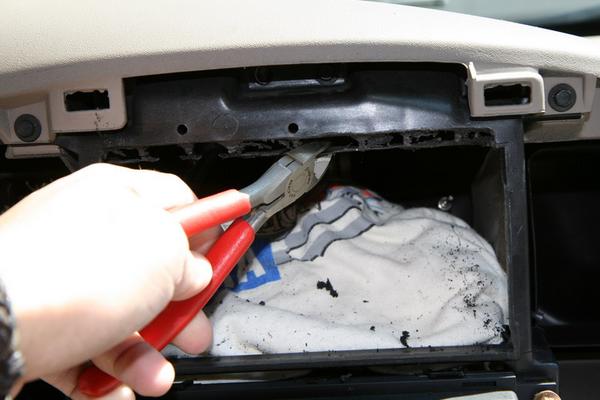
This pic shows my initial grinding:

I used a Dremel tool with a rotary cable attachment and a sanding drum. I had already took all my measurements and had a good idea on how much material to remove. However I wanted to be sure and get a snug fit so I went slow and test fitted tons of times. Looking back I could have saved even more time by just using a cutting disk instead of grinding so much, but the whole process only took 30 min or so.
Level view:

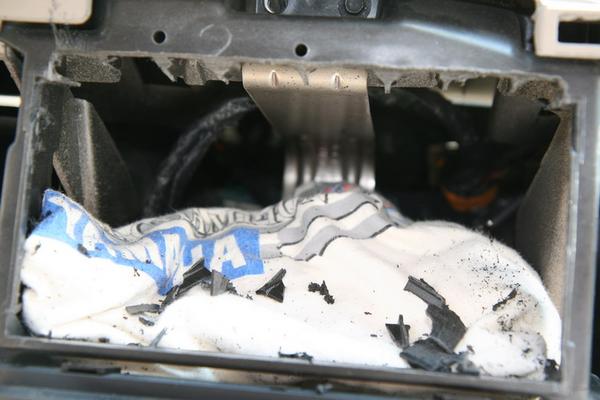
This pic show when I started getting into the hollow portions of the bracket:

Here I started using snips to cut out some of the bulk:
I used a Dremel tool with a rotary cable attachment and a sanding drum. I had already took all my measurements and had a good idea on how much material to remove. However I wanted to be sure and get a snug fit so I went slow and test fitted tons of times. Looking back I could have saved even more time by just using a cutting disk instead of grinding so much, but the whole process only took 30 min or so.
Level view:
This pic show when I started getting into the hollow portions of the bracket:
Here I started using snips to cut out some of the bulk:
Last edited by PipeHitter; 05-15-2007 at 12:56 PM.
#3
05-12-2007, 01:24 AM

#4
05-12-2007, 01:25 AM


#5
05-12-2007, 01:35 AM
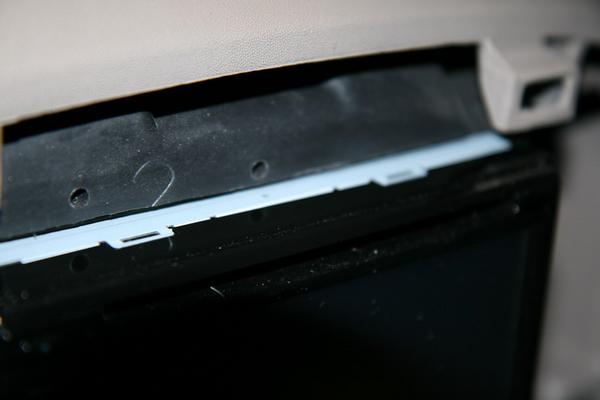
At this point you can start to determine the depth requirements of the install. I removed the vents from the trim bezel so I could get my hands in there and play with the fitment. I used Scosche kit number FD1330B and found that the trim bezel fit pretty close to perfect. I also installed the rear mounting post from the Scosche kit (screwed into the back of the AVIC) and adjusted it to rest on top of the metal bracket that the OEM unit rested on. Forgot to take a pic of that, sorry!

In my case, the first indention line in the case of the AVIC lined up with the front of the black bracket seemed to be right for a flush fit.
Line marked:

Pic of line sitting flush with bracket:
In my case, the first indention line in the case of the AVIC lined up with the front of the black bracket seemed to be right for a flush fit.
Line marked:
Pic of line sitting flush with bracket:
#6
05-12-2007, 01:42 AM
At this point, after re-installing the dash trim the unit fit VERY tight. I could not even budge it. So I debated not securing it anymore. But I worried in the event of an accident the unit might come flying out and injure someone so I deceided to bolt it in. I traced a template out of carboard from the side of the AVIC and then drilled some holes. Some how I was still a little off and had to enlarge the holes a little, but that was fine as it allowed for fine tuning and I simply used some large, flat headed bolts. Be sure and watch your depth when installing bolts, 5mm max into the unit.


Added bonus is that its much more secure against theft.
Added bonus is that its much more secure against theft.
#7
05-12-2007, 01:51 AM
Final pics with some close ups for gap inspection. Overall I am VERY pleased. I have received numerous compliments and remarks on how it looks OEM. Not to mention the unit gives the interior a newer truck feel. Gap is most evident on the right side, but only from the passenger seat and at a certain angle. Maybe 2-3mm, and not noticable from the drivers seat. I have to point it out to most people. I cant see any way of eliminating it, perhaps with a custom cut bezel. But I'm REALLY being picky here. I think the tolerances are better than some OEM units I've seen.
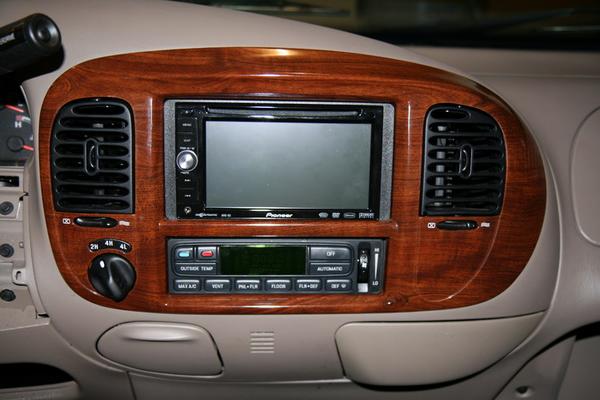
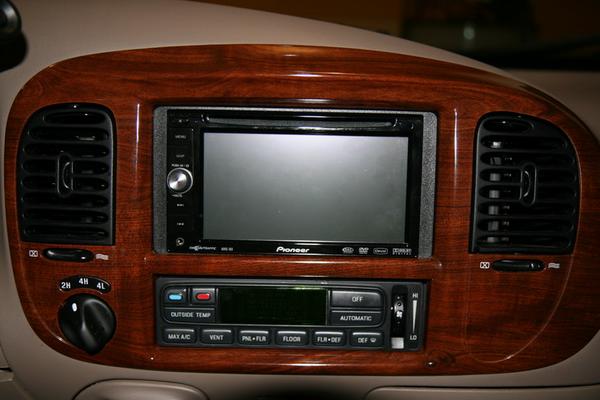
And that's all folks! The entire process took two evenings after work, maybe 4hrs max. I couldn't be happier and I am very glad I did it, especially considering the money I saved and the extra attention to detail.
Post up any questions!
And that's all folks! The entire process took two evenings after work, maybe 4hrs max. I couldn't be happier and I am very glad I did it, especially considering the money I saved and the extra attention to detail.
Post up any questions!
Last edited by PipeHitter; 05-12-2007 at 10:36 AM.
Trending Topics
#8
05-14-2007, 10:59 AM

Senior Member
Great JOB!!!
PH,
You must be a mindreader. I was just thinking about what I'd need to do in order to fit a Clarion 675 into my dash.
Your install looks very clean. The descriptions are clear and easy to read. And the pics really help. A quick question: Where did you get the Scosche harness and trim assembly?
Thanks for a great guide.
Daryl
Last edited by hawkfxr724; 05-14-2007 at 11:01 AM.
#9
05-15-2007, 01:08 PM
Thanks!
On the kit(s) I ended up getting them from an ebayer as he was local to me in TN.
Here are two more options on the trim bezel:
Best Kits #BKFMK552
http://www.autotoys.com/x/cust/produ...productid=8475
Metra #995805
http://www.thrillaudio.com/Car_Audio...5805-5962.html
Of those two the Metra would be my last choice. Its top and bottom look to be a little thicker than the Scosche or Best Kit, however its hard to tell from the pic. I picked the Scosche first as it was local, and if I didn't like it I was going to go with the Best Kit.

#11
06-02-2007, 10:54 PM
Senior Member
Wiring harness ?
PH,
I'm guessing that the Scosche wiring harness is a standard harness that fits all aftermarket HU's? I'm looking to install a Clarion Max675VD, I don't have the HU yet, but searching the Scosche website, the harness is a "generic" one to our year Ford. Is that what you found out?
Thanks
Daryl
I'm guessing that the Scosche wiring harness is a standard harness that fits all aftermarket HU's? I'm looking to install a Clarion Max675VD, I don't have the HU yet, but searching the Scosche website, the harness is a "generic" one to our year Ford. Is that what you found out?
Thanks
Daryl
#12
06-08-2007, 11:49 PM
#13
06-15-2007, 02:51 PM

2001 Supercrew Photos of Additional Dash Trimming
https://www.f150online.com/galleries....cfm?gnum=9964
Thanks to PipeHitter for posting the info and photos. Although my 2001 Supercrew required additional dash cutting his photos and descriptions helped me get the job done. I added my own photos of my install to help anyone who may require the additional dash mods.
This install takes time but is well worth the effort. Feel free to email me with any questions.
ET
#14
06-17-2007, 01:31 AM
Nicely done! I considered removing the black radio bracket as you did but just didn't want to deal with tearing the dash out. Looking back, most likey would have saved me time in the 'wire-running' portion as it took me forever to fish all the lines through the dash and cram them behind the HU. That hole you threaded yours through looks perfect.
Looks great!!
Looks great!!
#15
07-02-2007, 08:36 PM
Senior Member
Fellas,
Did you have to cut much off the sides? I've got the opening ok for the top, but the sides are causing me some grief.
I went the route of Slowguy and tore down my dash. I'll probably cut out the support as well. I've got a lot of cords coming out of the HU.
Dremeling isn't near as easy as I thought it would be. I think I might have cut too much from the top. I'm pretty sure I can cover it with the trim piece though.
Thanks again you all for the help and advice. I can't wait to get it all done.
Daryl