Shifter Indicator Repair(1997-2003)
#1
 05-06-2010, 08:25 PM


Shifter Indicator Repair(1997-2003)
For those who had the plastic break at the adjuster wheel on the cable for the gear selector pointer, I found a simple repair using a corner bracket from a hardware store. I searched here for other fixes which said to use zip ties, but this took away the ajustability and the pointer was off a bit. This repair maintains that ajustability and is permanent (no more plastic breaking)
I drew the procedure on paper below.
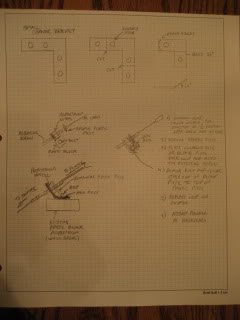
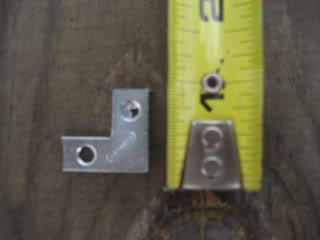
Use the smallest Stanley corner bracket. Be sure to chock the wheels when you unhook the cable by placing the gear shift at 2 (all the way down)
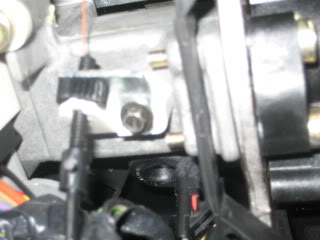
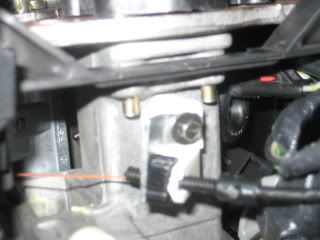
Here are photos of how it looks installed, sorry for the blurry pics, but this is the best my camera can do.
I hope this can help someone with this problem, it cost me $0.45. You will not have to buy the whole cable.
I drew the procedure on paper below.
Use the smallest Stanley corner bracket. Be sure to chock the wheels when you unhook the cable by placing the gear shift at 2 (all the way down)
Here are photos of how it looks installed, sorry for the blurry pics, but this is the best my camera can do.
I hope this can help someone with this problem, it cost me $0.45. You will not have to buy the whole cable.
The following users liked this post:
#2
05-09-2010, 02:14 PM
The repair is simple
I can't make the image larger, but you can see the corner bracket and the two cuts and one bend. Basicaly you ar taking a 4 hole corner bracket and making it a two hole bracket, enlarging the holes so that it slips over the adjuster screw. You will need to bend it 20 degrees and adjust a needed , but I think that is clear in the photo.
The words on the image are:
1) unhook loop, chock wheels, put selector in position 2, grab cable and unhook
2) remove broken piece
3) slide enlarged hole of repair piece over loop and onto the adusting screw
4) remove bolt and secure other end of reapir piece to top of plastic piece.
5) replace loop on shifter
6) adjust pointer as necessary
Now to remove dash pieces
The one over the steering colum just snaps in, just pull it out
Then the bottom one has several screws, some hidden by the top piece , and some under the dash, once removed it comes out easily, and all is exposed to work on.
#3
05-09-2010, 03:12 PM
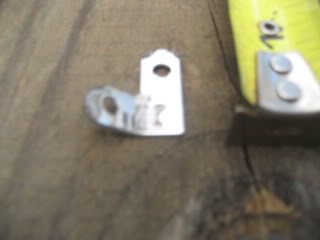
I repeated the steps of the repair piece in order of sequence, however I did not enlarge the holes which will be necessary.
Original store bought piece
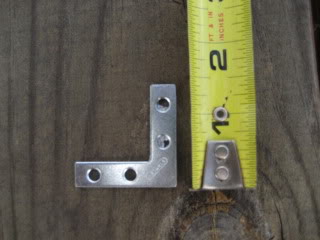
Cut off ends
Roundoff sharp edges

Bend 20 degrees, pay attention to the direction of bend on the piece
Another view
With enlarged holes, you are ready to slip the piece over the cable and bolt it down using the existing bolt that secures the original plasitic adjuster as in the photo below

Hope this clears up any confusion about the slopy photos I posted above.
Original store bought piece
Cut off ends
Roundoff sharp edges
Bend 20 degrees, pay attention to the direction of bend on the piece
Another view
With enlarged holes, you are ready to slip the piece over the cable and bolt it down using the existing bolt that secures the original plasitic adjuster as in the photo below
Hope this clears up any confusion about the slopy photos I posted above.
#4
05-09-2010, 03:37 PM

#5
05-09-2010, 03:50 PM
The end of the repair piece that goes onto the bolt is up in the air in my photo. If you do not want to unhook the cable, you can cut a channel from the edge to the hole on the other end using a hacksaw. Then you can use this channel to slip over the cable and seat it on to the adjuster screw.
Two drawbacks are that the edge will be sharp and if you are not careful, you may cut the cable and the second is the broken piece will still be on the cable which can be cut out.
Two drawbacks are that the edge will be sharp and if you are not careful, you may cut the cable and the second is the broken piece will still be on the cable which can be cut out.
#6
05-09-2010, 08:38 PM

#7
05-09-2010, 08:53 PM

Glad to see some enginuity. This repair is simple, clean, and straight foward. Thank you for your information, and see if they will put this in the technical articles, due to the fact there are NUMEROUS people on here that want to know about this repair.
Thanks again bud!
Thanks again bud!

__________________
Jim
Jim
Trending Topics
#8
05-14-2010, 11:24 AM


#10
06-06-2010, 11:21 PM
#11
09-02-2010, 02:09 PM

Junior Member
Join Date: Sep 2010
Location: Fort Worth, TX
Posts: 7
Likes: 0
Received 0 Likes
on
0 Posts
#12
09-20-2010, 11:10 PM

Member
Join Date: May 2004
Location: Winston-Salem, NC
Posts: 11
Likes: 0
Received 0 Likes
on
0 Posts

