


tinted the tails and 3rd

Thread Starter
|
Senior Member
Joined: Aug 2008
Posts: 1,553
Likes: 1
From: CO
tinted the tails and 3rd
i just did this today with some rustoleum lens tint. available at autozone. added some LEDs to the brakes/ turn signals but my cell phone doesnt take a quick picture so i could get them while blinking. ill try to get some night pics too.


looks............. boring. You should wetsand them with 1000 grit until level, polish them numerously throughout until they shine, then shoot them with 4 coats of Dupli-Color Acrylic Enamel clear, sanding with 2000 grit wet in-between until fully smooth and chalky looking, polish, and wax them a week later.
Thread Starter
|
Senior Member
Joined: Aug 2008
Posts: 1,553
Likes: 1
From: CO
thanks guys. and darren, that is what i was hoping they would come out like. when they were wet they looked JUST like that. then they dried and got darker and have a rouch texture to them. i thought of trying to sand them but didnt know if it would come off or not and was also worried about scrathing the actual lens. but thank you. i will try what you said. the way yours looks is pretty much exactly what i was going for. and i saw my LEDs at night finally. they look pretty sweet. i got one quick pic on my cell phone. actually since i left my cellphone in my truck, i had to go get it and took another pic from the side to show the LEDs better than the night pic does. LEDs are hooked up so they come on with turn signal and brakes.


Thread Starter
|
Senior Member
Joined: Aug 2008
Posts: 1,553
Likes: 1
From: CO
ok i bought some 1000 and 2000 auto sandpaper and the acrylic enamel clear. i have never wet sanded anything before but i am assuming it is just sanding while keeping a constant, light flow of water on it while sanding. and will they start clearing up when i am sanding? just wondering when i should know when to stop. darren, you are right. compared to yours they do look really dull. thanks for the info. i appreciate it. especially since tinted tails are illegal here. they are a little too dark. if they turn out like yours they should be fine tho.
Thread Starter
|
Senior Member
Joined: Aug 2008
Posts: 1,553
Likes: 1
From: CO
looks............. boring. You should wetsand them with 1000 grit until level, polish them numerously throughout until they shine, then shoot them with 4 coats of Dupli-Color Acrylic Enamel clear, sanding with 2000 grit wet in-between until fully smooth and chalky looking, polish, and wax them a week later.
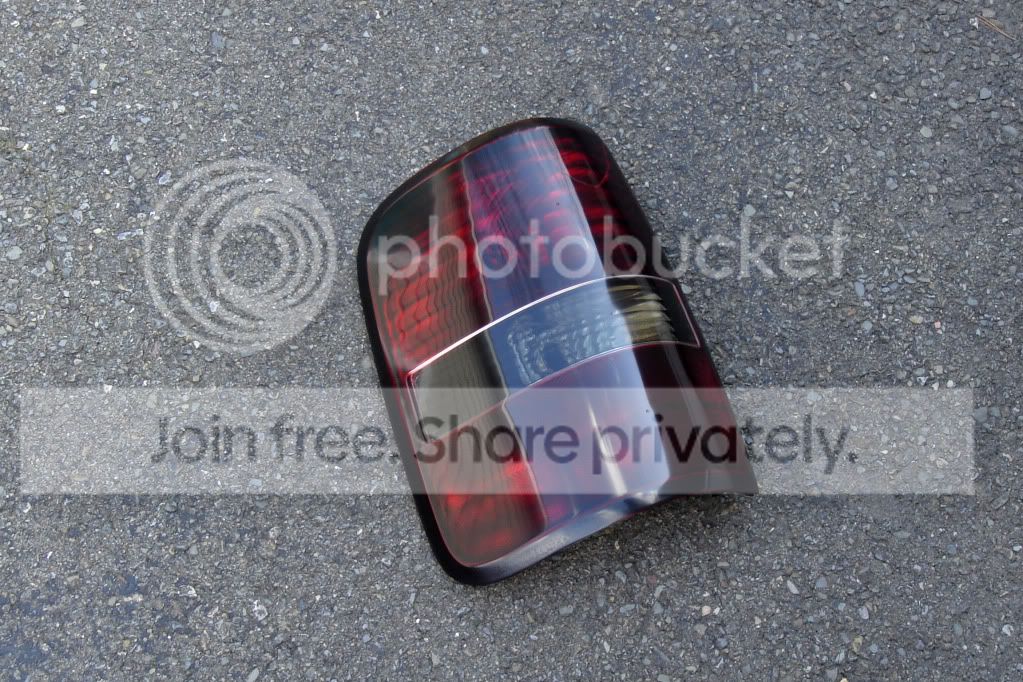
You will want to squeeze in some dawn dish soap and make it very sudsy and lubricated so you do not scratch things up. Only sand in one direction, north to south is best. Circular motions or changing N - S, E - W will induce scratches. And do not put down any pressure, very very light finger pressure ( not the tips, the fingers ) or use a soft sanding block if available. Not really needed, I just sanded from the N - S side of the light with my fingers parallel with the lines in the lights ( so my hand was going left to right ) Just hit the bare tails with a light 1000 wet sand, polish them out with a foam pad and wipe off with a micro fiber.
Shake the hell out of the clear can so its all level and no bubbles, spray it 6" - 8" away at a steady pace, do 2 layers and it should look similar to this. Going in a N - S is also a good lay down proceedure for this shape lamp. After an hour, wet sand it like how you did earlier, but with the 2000 grit. Keep wiping it dry with a random plush towel, and if its looking chalky, you are doing it right. If you see little dark dots or streaks left, those are areas that will need smoothed out, so keep wet sanding until it is all level, but not with too much pressure! Your final result when you compound and polish should be real nice, then hit them with some swirl correction products and wax them a week later, you will have gloss.
Masked the entire lamp off, and sprayed the outer border.
http://i695.photobucket.com/albums/v...e/DSC04984.jpg
If you also noticed in the shiny shot of the lamp, the reverse section is painted black, but the rest is not. That is how I figured out the Harley D tail light effect.
Shake the hell out of the clear can so its all level and no bubbles, spray it 6" - 8" away at a steady pace, do 2 layers and it should look similar to this. Going in a N - S is also a good lay down proceedure for this shape lamp. After an hour, wet sand it like how you did earlier, but with the 2000 grit. Keep wiping it dry with a random plush towel, and if its looking chalky, you are doing it right. If you see little dark dots or streaks left, those are areas that will need smoothed out, so keep wet sanding until it is all level, but not with too much pressure! Your final result when you compound and polish should be real nice, then hit them with some swirl correction products and wax them a week later, you will have gloss.
http://i695.photobucket.com/albums/v...e/DSC04984.jpg
If you also noticed in the shiny shot of the lamp, the reverse section is painted black, but the rest is not. That is how I figured out the Harley D tail light effect.
Trending Topics
Thread Starter
|
Senior Member
Joined: Aug 2008
Posts: 1,553
Likes: 1
From: CO
thanks man, very much appreciated. i will try doing this tomorrow. lol was gonna say im doing it unless it rains but i dont think that really matters since ill be wetsanding. j/k i wouldnt do it in the rain because i wouldnt be able to see what i was doing very well. but thanks. i just hope they turn out ok. and yeah i just noticed the black section of the reverse. that looks sweet. did you pull the lens apart to do that? also i think i will try for that border effect. ill just shoot it with the lens tint from behind so the paint is on the inside. that will darken it up. it will also make my LEDs stand out a little more i think.
Thread Starter
|
Senior Member
Joined: Aug 2008
Posts: 1,553
Likes: 1
From: CO
changed your sig huh? looks nice! but then again, the old one was nice too. i think i like the new one better tho. except you REALLY need a pic of a f-117 nighthawk instead of that other plane(which i cant tell what it is).
Last edited by timmypstyle; Jun 15, 2010 at 05:05 PM.
 The plane is an F-35, which I build.
thanks man, very much appreciated. i will try doing this tomorrow. lol was gonna say im doing it unless it rains but i dont think that really matters since ill be wetsanding. j/k i wouldnt do it in the rain because i wouldnt be able to see what i was doing very well. but thanks. i just hope they turn out ok. and yeah i just noticed the black section of the reverse. that looks sweet. did you pull the lens apart to do that? also i think i will try for that border effect. ill just shoot it with the lens tint from behind so the paint is on the inside. that will darken it up. it will also make my LEDs stand out a little more i think.
And yes, I pulled it apart first and stuck a black shirt in the side and it looked like a Harley tail, so that motivated me to try it on my truck's tails.
Thread Starter
|
Senior Member
Joined: Aug 2008
Posts: 1,553
Likes: 1
From: CO
lol i figured out a way to practice doing the sanding and stuff. i am 1 month away from moving so i am going thru some stuff and found the clear plastic that came with an action figure i bought years ago that has no value now. well i can spray the tint on it and try to wetsand it to practice. it is soft enough where it will probably scratch if i sand too much or too hard and it has rounded edges so i can see how light of pressure i need to use. you were lucky you had a cracked tail to use. but i think i may have found a really good alternative.
Thread Starter
|
Senior Member
Joined: Aug 2008
Posts: 1,553
Likes: 1
From: CO
I dont think shooting it from the under side will work because as is, it sits on a black background and does not show black well. The little reflective lines need to be smoked from the outside to accomplish the look.
And yes, I pulled it apart first and stuck a black shirt in the side and it looked like a Harley tail, so that motivated me to try it on my truck's tails.
And yes, I pulled it apart first and stuck a black shirt in the side and it looked like a Harley tail, so that motivated me to try it on my truck's tails.


