Flare removal pics
#1
 09-02-2011, 11:47 AM


Flare removal pics
For those of you who ever need to remove your factory flares, here are a few pics of what you are going to deal with. You MUST be very careful with the edge, as they damage easily with any sort of pressure from a pry bar, or screwdriver.


This is the front one, notice the two bolts that go through the front bumper filler panel.

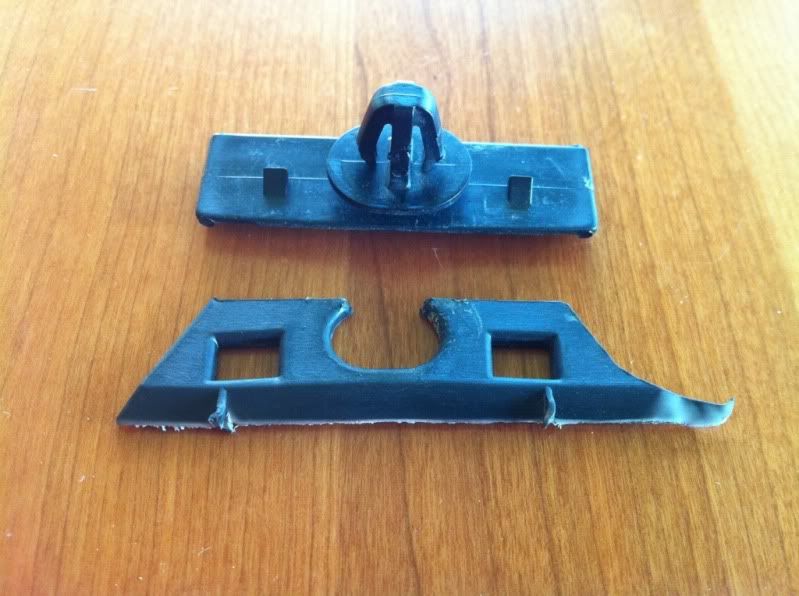
The evil enemy. These puppies can be a PITA, but with patience, they all come off cleanly.

This is the front one, notice the two bolts that go through the front bumper filler panel.
The evil enemy. These puppies can be a PITA, but with patience, they all come off cleanly.
#2
09-02-2011, 02:01 PM

Senior Member
Thanks for the post!
Rather than prying .... could a fellow not simply undo the inner fender plastic, reach up and give those things a squeeze with small pliars and push them out from inside?
Might be good to pull them and clean behind and put some clear protection on painted surface where contact and reinstall.
Rather than prying .... could a fellow not simply undo the inner fender plastic, reach up and give those things a squeeze with small pliars and push them out from inside?
Might be good to pull them and clean behind and put some clear protection on painted surface where contact and reinstall.

#4
09-02-2011, 03:04 PM

Senior Member
Join Date: Jul 2010
Location: Louisville, KY
Posts: 527
Likes: 0
Received 0 Likes
on
0 Posts
#5
09-02-2011, 04:49 PM

Senior Member
Join Date: Jun 2011
Location: S.W. Illinois
Posts: 485
Likes: 0
Received 0 Likes
on
0 Posts
How exactly did you remove the flares FROM the clips if I may ask? I was checking mine out (in prep for mounting my new race red smooth OEM's) and they are against the painted body TIGHTLY. I get the part about the pushpins (christmas tree fasteners on the wheel side), but the other I don't get.
#6
09-02-2011, 05:26 PM
Senior Member
Join Date: Jul 2010
Location: Louisville, KY
Posts: 527
Likes: 0
Received 0 Likes
on
0 Posts
its hard to describe without physically showing you. i broke a clip off of my flare before i figured it out so i'll see if i can't find it and take a pic.
however, the flares are attached to the clips that fit in those holes by little clasping teeth. if you can nudge a flat head in there and separate one of the teeth from the clip the flare will slide out of the clip. there is 9 clips on the front (2 are bolted to the body and require some sliding and jimmying to release) and 11 clips on the rear
i guess I'm off to go rummage through the pile of truck and jeep parts laying on my floor for that clip.
#7
09-02-2011, 05:35 PM
Senior Member
Join Date: Jul 2010
Location: Louisville, KY
Posts: 527
Likes: 0
Received 0 Likes
on
0 Posts


Trending Topics
#8
09-03-2011, 12:22 AM
The front fenders have boxed in blind sections galore, and removing the liners will allow you to access about as many as you can get on the rears. Time not well spent for me. You will be further ahead by using the liner R&I time to fiddle with the clips.
I will try and grab a few pics of the tools i use to do these clips. It basically boils down to a snap on plastic handled version of a dental pick, a super thin 2 inch putty spreader, and a plastic windshield stick. Other than that, it is time and patience.
#9
09-03-2011, 01:10 AM
Senior Member
Join Date: Jun 2011
Location: S.W. Illinois
Posts: 485
Likes: 0
Received 0 Likes
on
0 Posts
That was pretty much the only pics I took, other than the plastics adhesion promotion kit, and sanding/priming steps. The flares on the box have no plastic liners, so you can really only squeeze the clip fingers that you can reach. How far you can get depends on how skinny your arms are. Of the 11 clips, you can expect to get 6 by reach around, the others are going to have to be done the hard way. I pulled ALL the clips leaving them all on the flares. Nothing was left on the truck at all, and none of the flare retaining tabs were cracked or separated. That said, I took my time and finessed them off. Took about 20 minutes per flare.
The front fenders have boxed in blind sections galore, and removing the liners will allow you to access about as many as you can get on the rears. Time not well spent for me. You will be further ahead by using the liner R&I time to fiddle with the clips.
I will try and grab a few pics of the tools i use to do these clips. It basically boils down to a snap on plastic handled version of a dental pick, a super thin 2 inch putty spreader, and a plastic windshield stick. Other than that, it is time and patience.

#11
09-05-2011, 12:48 AM
#12
07-25-2012, 02:40 PM

Junior Member
Join Date: Jul 2012
Location: Massachusetts
Posts: 1
Likes: 0
Received 0 Likes
on
0 Posts