
Custom HID Retrofit!! Light Output Comparisons too


Thread Starter
|
Senior Member
Joined: Mar 2008
Posts: 392
Likes: 1
From: Philadelphia, PA
Okay guys, I know a lot of you have been waiting for an in depth comparison between all the possible lighting systems for our headlights. Many people on here have done the eBay projectors, but I have personally ran the other 3 systems on my truck.
Now I did my best to get the same angles and locations for these comparisons; I went as far as switching back to my stock set up to get these pictures just for y'all Notice the difference in the width of beam spread, the cut-off of the light, the intensity, the glare, and anything else you can pinpoint.
So first is going to be our stock output:

In-cabin viewpoint

Eye-level viewpoint
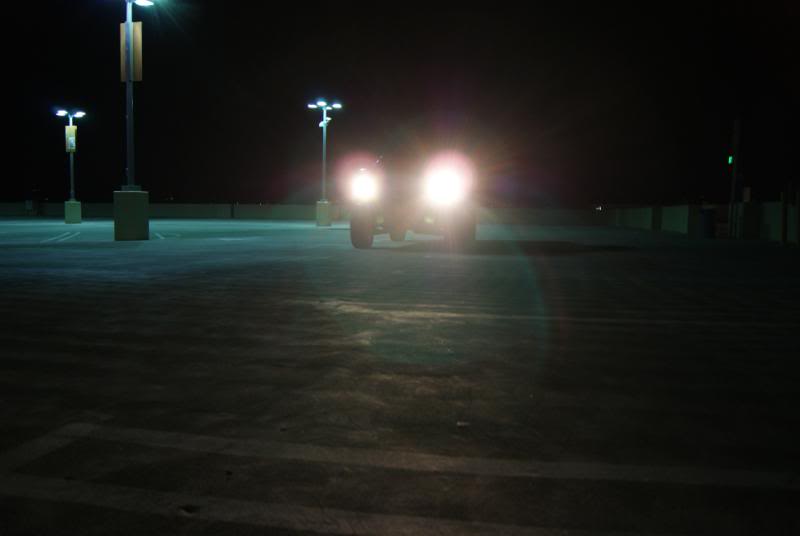
Ground-level viewpoint
The next level of light output, and probably the most common mod done when searching for more light is the.....Plug-n-Play HID kit. This kit was Bi-Xenon 35 watt 6000k HID bulbs:
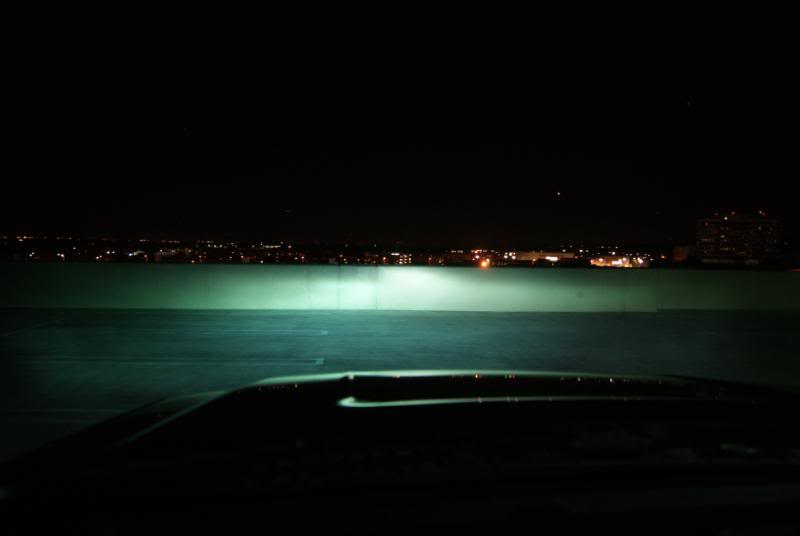
In-cabin viewpoint

Eye-level viewpoint

Ground-level viewpoint
Now the final, and what I feel to be the ultimate set up....the custom retrofitted HID projectors. In this case, Bi-Xenon 35 watt 5000k FX-R HID projectors. I did not get high-beam pictures because of my location of the photoshoot, but will do so if requested.

In-cabin viewpoint

Eye-level viewpoint

Ground-level viewpoint
Now for the aesthetics portion of this modification:
The stock head-on view of my 2009 Platinum:

Angled view:

The custom projector retrofits:

Angled view:

For the close-up shots of these headlights, please go to the following link:
http://hidillusionz.blogspot.com/201...-retrofit.html
The parts were purchased from The Retrofit Source:
Apollo Shrouds (also known as Cayenne shrouds)
FX-R Projectors
5000k bulbs
AMP to D2S bulb adapters (so I could reuse my plug-n-play wiring and ballasts)
ALL OF THIS WORK (minus install) WAS DONE BY RICH AT HID ILLUSIONZ. The work was done in 2 days and the shipping is as fast as you want to pay for.
They were EXCELLENT to work with from start to finish; this was over a month in the making for me. They offered to sell me all necessary parts for the project and do the work, but also said I was free to shop around for better prices and send them the parts if I did find better prices. They sent in-progress pictures of all the work, and even did changes to my liking on the side marker tinting when I wanted it darker than originally done. They always respond quickly, and even called me on the phone when I sent an email with my phone number because of a troubleshooting problem I had during installation.
Please check out their website if you are at all considering getting work like this done. Many processes are done complimentary if having a retrofit done (color-mod for the lens, reflector painting, side marker tinting, etc....). They also offer group discounts for the forum if at least 5 people do it at once.
Unrelated: I also custom tinted my tail lights and will be tinting the orange reflectors on the backs of my mirrors. Please stay tuned for that thread; it will show the final products of the head lights, mirrors, and tail lights.
Now I did my best to get the same angles and locations for these comparisons; I went as far as switching back to my stock set up to get these pictures just for y'all
Notice the difference in the width of beam spread, the cut-off of the light, the intensity, the glare, and anything else you can pinpoint.So first is going to be our stock output:
In-cabin viewpoint
Eye-level viewpoint
Ground-level viewpoint
The next level of light output, and probably the most common mod done when searching for more light is the.....Plug-n-Play HID kit. This kit was Bi-Xenon 35 watt 6000k HID bulbs:
In-cabin viewpoint
Eye-level viewpoint
Ground-level viewpoint
Now the final, and what I feel to be the ultimate set up....the custom retrofitted HID projectors. In this case, Bi-Xenon 35 watt 5000k FX-R HID projectors. I did not get high-beam pictures because of my location of the photoshoot, but will do so if requested.
In-cabin viewpoint
Eye-level viewpoint
Ground-level viewpoint
Now for the aesthetics portion of this modification:
The stock head-on view of my 2009 Platinum:
Angled view:
The custom projector retrofits:
Angled view:
For the close-up shots of these headlights, please go to the following link:
http://hidillusionz.blogspot.com/201...-retrofit.html
The parts were purchased from The Retrofit Source:
Apollo Shrouds (also known as Cayenne shrouds)
FX-R Projectors
5000k bulbs
AMP to D2S bulb adapters (so I could reuse my plug-n-play wiring and ballasts)
ALL OF THIS WORK (minus install) WAS DONE BY RICH AT HID ILLUSIONZ. The work was done in 2 days and the shipping is as fast as you want to pay for.
They were EXCELLENT to work with from start to finish; this was over a month in the making for me. They offered to sell me all necessary parts for the project and do the work, but also said I was free to shop around for better prices and send them the parts if I did find better prices. They sent in-progress pictures of all the work, and even did changes to my liking on the side marker tinting when I wanted it darker than originally done. They always respond quickly, and even called me on the phone when I sent an email with my phone number because of a troubleshooting problem I had during installation.
Please check out their website if you are at all considering getting work like this done. Many processes are done complimentary if having a retrofit done (color-mod for the lens, reflector painting, side marker tinting, etc....). They also offer group discounts for the forum if at least 5 people do it at once.
Unrelated: I also custom tinted my tail lights and will be tinting the orange reflectors on the backs of my mirrors. Please stay tuned for that thread; it will show the final products of the head lights, mirrors, and tail lights.


 If you dont mind me asking how much was the total on that project? I would love to do that to my rig.

Senior Member
Joined: Mar 2001
Posts: 3,248
Likes: 2
From: Rochester, NY, USA
Nice work and very complete post. I think this pretty well shows how simply slapping HID's in the factory housings imporves light output, but can significantly increase glare. (I think it also shows you had a minor aiming issue too.)
The final solution shows how a properly designed HID system works significantly better than anything else. Nice work!
The final solution shows how a properly designed HID system works significantly better than anything else. Nice work!


Member
Joined: Jan 2010
Posts: 85
Likes: 0
From: Arlington, VA
that's perfect and i really like the way you document the progression from stock to projectors. i may do the same now and ptm the housing for ingot slvr. did you diy? what troubleshooting did they help you with? install?
Nice job. The alignment seems to be off. And I don't like the look of that small projector in such a huge housing. Maybe it'll grow on me
Trending Topics

Thread Starter
|
Senior Member
Joined: Mar 2008
Posts: 392
Likes: 1
From: Philadelphia, PA
It all depends how you do this. I purchased a 2nd set of headlights to use while mine were being retrofitted. That was $100+$20 shipping. I already had the plug-n-play HID kit for $125 so I had the ballasts and wiring harness (threw away those bulbs). Then the projectors, shrouds, adapters, and bulbs were bought from The Retrofit Source; all for $220. The work done by Rich is custom quoted, but mine with all the tinting and painting was $350+$40 shipping each way.
For me, it was $895, but I will be selling the 2nd set of headlights to recoup some money. If you were coming from the stock set up and didn't buy a spare set to use in the mean time, it would cost you the estimated $350 for the labor, $315 for a full kit from The Retrofit Source, and then shipping. So about $665+shipping.
Not cheap by any means, but as you can all see....well worth it!!!
Nice work and very complete post. I think this pretty well shows how simply slapping HID's in the factory housings imporves light output, but can significantly increase glare. (I think it also shows you had a minor aiming issue too.)
The final solution shows how a properly designed HID system works significantly better than anything else. Nice work!
The final solution shows how a properly designed HID system works significantly better than anything else. Nice work!

I am happy to say, all is up and running now

As far as the projector size, it is one of the largest projectors with one of the largest shrouds you can buy. It's really just because the housing on our trucks is so damn big.
Thanks. Please see ^^^ in this post for pricing.


Senior Member
Joined: Oct 2008
Posts: 124
Likes: 0
From: NY
im curious as to how he removes the lens, i tried baking it in the oven at 250 for 8 mins and the "glue sealant" didnt really seem to loosen up at all, how ever on my audi RS4 i did the same oven meathod and it works like a charm...suscribing to this one


