


01 motor in a 97...


Thread Starter
|
Junior Member
Joined: Oct 2010
Posts: 5
Likes: 0
01 motor in a 97...
Good day all!! I had a different profile, but I think it got deleted.
Here is a write-up of the 01 motor swap into my 97 F150. My 97 is one of the rare versions that was actually built in 96, with the 97 body style.
I pulled the motor that was very abused during its life. The number 8 journal on the crank was considerably worn after the bearing was destroyed. The knock was so loud, I was unsure if I was going to get the truck on the tow dolly to make it home. Here is the old motor. This block had the 8-bolt crank, which became a real headache later on.


And where it came from. This is after I briefly sprayed the engine bay down. The oil leak from the motor was so extensive and left untouched, it covered the front axle and associated area with a heavy coat of sludge.


Here is the front of the block.


Critters!

The knock sensor became an issue with the new block. I ended up splicing the wires here because the connectors were different. I could’ve use the original sensor with the new block, but I would've had to drill and tap the block. Splicing was just easier.
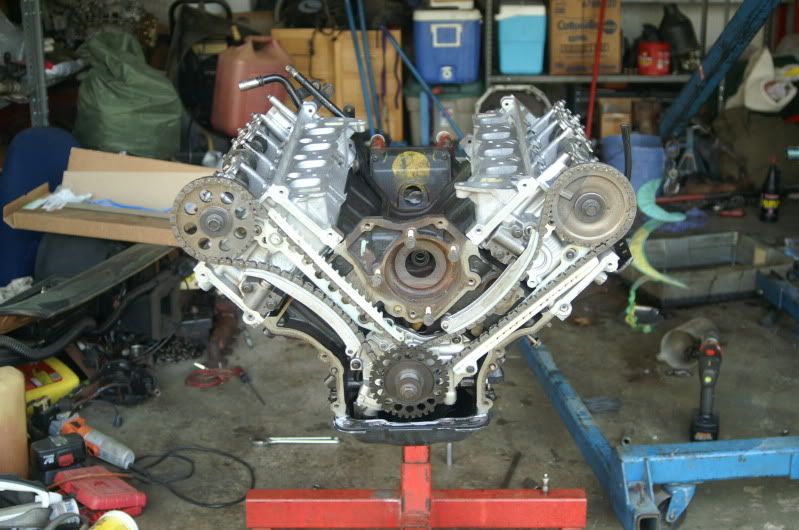
Here is the replacement motor, complete with exhaust manifolds and wiring. I was told this only needed rod bearings, but when I pulled it apart, I found the timing chain guide just sitting under the cover and the chain barely hanging onto timing. I also noticed that the crank was moving around inside the rear bearings, so I replaced all the wear items on this motor.

All new guides and functioning tensioners! I kept things together with ARP head studs!

Here are the heads being cleaned up. This motor was almost as bad as the original, but pulled before any real damage was done. Before and after pictures!! I used my Mark VIII valve spring compressor, which worked great!


And here is it nearly complete. I had it sitting on the floor, with a T-45 bell housing and starter connected up so I could prime the oil system. This was after a long search for a 6-bolt manual trans flywheel since this originally had an auto connected to it. *What is odd about this motor in these pictures? ~ Other than it has a Mustang bell housing connected to it.*


Okay, the meat and potatoes part of this!!! Here is a common problem we face with these motors. This had a total of FIVE broken exhaust studs. I replaced these with 16 Mark VIII bolts. They are the perfect length and strong enough to keep everything together. Make note that these are rather pricy to buy new. And you have to get the bolts from a 93/94 Mark VIII, but they only come on one side in the car ~ but, I can’t remember what side that is. I think it’s the driver’s side. I reused some that I had in the garage.


The oil sending units are different. Older is installed and needed because (IMHO) you should use the original wiring for the truck (not the motor). This is to keep the electrical headaches to a minimum!

Here is a big issue. The old intake has the heater core passage in the rear of the head, and two sensors in the front. The new intake has one sensor in front and a heater core passage where the second sensor use to be. Most drill and tap a sensor port for the second sensor. I used a different approach!


This is what I came up with, and found it completely by accident!! I had an old Mark VIII cylinder head on the shelf and saw this neat little heater core / sensor assy connected to the back. Hmmm, will that fit my 2V cylinder head? As it turns out, it did! I had to do a little mod to the mounting bracket, but it works great!

This is the one I used as it was a lot cleaner than the rusty one in the picture above! I moved the sensor that was replaced by the coolant tube in the new intake, but I imagine you could re-locate either sensor. You have to pull a freeze plug and use sealant to ensure a good seal! The only time consuming part was to pull the wiring apart to re-locate this gray sensor connection to the rear of the motor, then tape it back up.


This 01 motor was neglected!! Here is all the crap that I had to clean before I felt good about putting it on the road. “Before” and “ALMOST done”. It was totally clean when I finished it!


Well, that is about it. I cleaned all the sludge off the truck’s engine bay. I installed the motor, then the wiring harness, then the intake, connected up the trans and exhaust to the manifolds, put the rest back together and fired it up. I had a loud lifter noise until all the lifters filled completely. Using just the starter on the garage floor doesn’t spin the motor fast enough to get “good” oil pressure, but it went away fairly soon after.
I hope this helps!!
Cheers all!!!
Here is a write-up of the 01 motor swap into my 97 F150. My 97 is one of the rare versions that was actually built in 96, with the 97 body style.
I pulled the motor that was very abused during its life. The number 8 journal on the crank was considerably worn after the bearing was destroyed. The knock was so loud, I was unsure if I was going to get the truck on the tow dolly to make it home. Here is the old motor. This block had the 8-bolt crank, which became a real headache later on.
And where it came from. This is after I briefly sprayed the engine bay down. The oil leak from the motor was so extensive and left untouched, it covered the front axle and associated area with a heavy coat of sludge.
Here is the front of the block.
Critters!
The knock sensor became an issue with the new block. I ended up splicing the wires here because the connectors were different. I could’ve use the original sensor with the new block, but I would've had to drill and tap the block. Splicing was just easier.
Here is the replacement motor, complete with exhaust manifolds and wiring. I was told this only needed rod bearings, but when I pulled it apart, I found the timing chain guide just sitting under the cover and the chain barely hanging onto timing. I also noticed that the crank was moving around inside the rear bearings, so I replaced all the wear items on this motor.
All new guides and functioning tensioners! I kept things together with ARP head studs!
Here are the heads being cleaned up. This motor was almost as bad as the original, but pulled before any real damage was done. Before and after pictures!! I used my Mark VIII valve spring compressor, which worked great!
And here is it nearly complete. I had it sitting on the floor, with a T-45 bell housing and starter connected up so I could prime the oil system. This was after a long search for a 6-bolt manual trans flywheel since this originally had an auto connected to it. *What is odd about this motor in these pictures? ~ Other than it has a Mustang bell housing connected to it.*
Okay, the meat and potatoes part of this!!! Here is a common problem we face with these motors. This had a total of FIVE broken exhaust studs. I replaced these with 16 Mark VIII bolts. They are the perfect length and strong enough to keep everything together. Make note that these are rather pricy to buy new. And you have to get the bolts from a 93/94 Mark VIII, but they only come on one side in the car ~ but, I can’t remember what side that is. I think it’s the driver’s side. I reused some that I had in the garage.
The oil sending units are different. Older is installed and needed because (IMHO) you should use the original wiring for the truck (not the motor). This is to keep the electrical headaches to a minimum!
Here is a big issue. The old intake has the heater core passage in the rear of the head, and two sensors in the front. The new intake has one sensor in front and a heater core passage where the second sensor use to be. Most drill and tap a sensor port for the second sensor. I used a different approach!
This is what I came up with, and found it completely by accident!! I had an old Mark VIII cylinder head on the shelf and saw this neat little heater core / sensor assy connected to the back. Hmmm, will that fit my 2V cylinder head? As it turns out, it did! I had to do a little mod to the mounting bracket, but it works great!
This is the one I used as it was a lot cleaner than the rusty one in the picture above! I moved the sensor that was replaced by the coolant tube in the new intake, but I imagine you could re-locate either sensor. You have to pull a freeze plug and use sealant to ensure a good seal! The only time consuming part was to pull the wiring apart to re-locate this gray sensor connection to the rear of the motor, then tape it back up.
This 01 motor was neglected!! Here is all the crap that I had to clean before I felt good about putting it on the road. “Before” and “ALMOST done”. It was totally clean when I finished it!
Well, that is about it. I cleaned all the sludge off the truck’s engine bay. I installed the motor, then the wiring harness, then the intake, connected up the trans and exhaust to the manifolds, put the rest back together and fired it up. I had a loud lifter noise until all the lifters filled completely. Using just the starter on the garage floor doesn’t spin the motor fast enough to get “good” oil pressure, but it went away fairly soon after.
I hope this helps!!
Cheers all!!!

Senior Member
Joined: Jul 2007
Posts: 3,291
Likes: 0
From: Beaverton Or.
Looks good. nice improvises.
You could have just put the gas pedal to the floor and turned it over for 30 seconds or so to build oil pressure. Or like what I did, trip the inertia switch to the pump, turn over then flip the switch back.
I also had an issue with my old motor that was pulled, timing guides were broke, allowing the slack in the chain to smack around. Along with a few main bearings.
My swap was a bit easier though, 99 to 00 motor. Everything hooked right up, other than swapping a few parts.
How do you like the power compared to your old non PI motor?
Looks a bit different than the hads on the 00 motor, yours has these girdle looking things.

Heres what the heads were like on the 00 motor with 10k miles,


This is how nasty the old heads were with 124k


Lots of build up
You could have just put the gas pedal to the floor and turned it over for 30 seconds or so to build oil pressure. Or like what I did, trip the inertia switch to the pump, turn over then flip the switch back.
I also had an issue with my old motor that was pulled, timing guides were broke, allowing the slack in the chain to smack around. Along with a few main bearings.
My swap was a bit easier though, 99 to 00 motor. Everything hooked right up, other than swapping a few parts.
How do you like the power compared to your old non PI motor?
Looks a bit different than the hads on the 00 motor, yours has these girdle looking things.
Heres what the heads were like on the 00 motor with 10k miles,
This is how nasty the old heads were with 124k
Lots of build up
Last edited by Toyz; Oct 26, 2010 at 05:12 PM.
Thread Starter
|
Junior Member
Joined: Oct 2010
Posts: 5
Likes: 0
Looks good. nice improvises.
You could have just put the gas pedal to the floor and turned it over for 30 seconds or so to build oil pressure. Or like what I did, trip the inertia switch to the pump, turn over then flip the switch back.
I also had an issue with my old motor that was pulled, timing guides were broke, allowing the slack in the chain to smack around. Along with a few main bearings.
My swap was a bit easier though, 99 to 00 motor. Everything hooked right up, other than swapping a few parts.
How do you like the power compared to your old non PI motor?
You could have just put the gas pedal to the floor and turned it over for 30 seconds or so to build oil pressure. Or like what I did, trip the inertia switch to the pump, turn over then flip the switch back.
I also had an issue with my old motor that was pulled, timing guides were broke, allowing the slack in the chain to smack around. Along with a few main bearings.
My swap was a bit easier though, 99 to 00 motor. Everything hooked right up, other than swapping a few parts.
How do you like the power compared to your old non PI motor?
Thanks much!! It was all an experiment to see how cheap and easily I could do the swap...
I didn't actually get to drive the 97 with the old motor in it... The 01 motor has a lot of pull off the line, so I think it is far better...
Cheers!!
Last edited by 00bigred; Oct 26, 2010 at 05:10 PM.

Senior Member
Joined: Mar 2002
Posts: 161
Likes: 0
From: SE Wyoming, try and find me
I assume this is a 4.6L? I am throwing a '02 in my '97 right now (both 5.4L's). Have the intake off the '97 and everything but the tranny and AC/PS fully disconnected. Did you have an 8 rib belt and a 6 rib on the two different engines? I am mixing and matching to get that cleared up now, since my AC and PS are 8 I am going to try and convert the '02 to 8 or see if I can run a 6 rib with a few 8 rib pulleys.
I am also replacing everything I can on the exterior-water pump, sensors, pulley and tensioner etc etc. Also putting long tube headers on so the EGR might just get deleted.
After starting to pull things off the '02 last night I also noticed 1 broken stud and am worried many more will break since this engine came from a far rustier area than were I live. How'd you pull the broken ones out? Right now I a hoping PB blaster and vise grips will do the job.
I am also replacing everything I can on the exterior-water pump, sensors, pulley and tensioner etc etc. Also putting long tube headers on so the EGR might just get deleted.
After starting to pull things off the '02 last night I also noticed 1 broken stud and am worried many more will break since this engine came from a far rustier area than were I live. How'd you pull the broken ones out? Right now I a hoping PB blaster and vise grips will do the job.
Last edited by galaxie64; Oct 31, 2010 at 02:57 PM.
Senior Member
Joined: Jul 2007
Posts: 3,291
Likes: 0
From: Beaverton Or.
Removing the EGR system won't yield you any gains and may cause more issues than needed. Not sure about his but my swap but mine was a 00 5.4L going into a 99 5.4L. Motors were all but the same, only had to swap intake manifolds mainly because I wanted to keep the aluminum over the shabby plastic one that came on the 00.
Rusted studs were common. If they break, penetrating oil and vise grips should do it. If not, couple of spot welds to heat it up a bit and it should come out. If your not pulling the heads, be careful and only use heat as a last resort. I found it easier to give it some very light taps on the end while turning outward. Replace with SS and you shouldnt have an issue with them down the road
Rusted studs were common. If they break, penetrating oil and vise grips should do it. If not, couple of spot welds to heat it up a bit and it should come out. If your not pulling the heads, be careful and only use heat as a last resort. I found it easier to give it some very light taps on the end while turning outward. Replace with SS and you shouldnt have an issue with them down the road
Senior Member
Joined: Mar 2002
Posts: 161
Likes: 0
From: SE Wyoming, try and find me
I am not ditching the EGR for gains I am doing to save the $65 for a new valve and cut down on some of the crap it deposits in the TB elbow. A tune won't be a problem since I will be getting a custom one anyway. Plus it will save me a little bit of time not messing with hooking it all back up.

Member
Joined: Oct 2002
Posts: 14
Likes: 0
From: Hudson, WI
How did you splice the wires with the knock sensor? I have the same '97 motor and I am switching form a 4.6 to a 5.4 The 5.4 has a 3 wire knock sensor and the 4.6 has a 2 wire sensor (original motor). Just wondering If I need to take the third wire and ground it? And then which colors to match up. Black and white are the originals and on harness. New motor/sensor has a bare and two coated, but not black and white.
Trending Topics
Thread Starter
|
Junior Member
Joined: Oct 2010
Posts: 5
Likes: 0
How did you splice the wires with the knock sensor? I have the same '97 motor and I am switching form a 4.6 to a 5.4 The 5.4 has a 3 wire knock sensor and the 4.6 has a 2 wire sensor (original motor). Just wondering If I need to take the third wire and ground it? And then which colors to match up. Black and white are the originals and on harness. New motor/sensor has a bare and two coated, but not black and white.
As far as your three wire system, I think the bare wire is more of a shield than anything else... Others may want to chime in here for more specific answer to that... I know CPS's are three wire, with the bare wrapping the other two... This may be the same set-up...
Good luck with the swap and keep us posted, please!!
Cheers and Happy Holidays to all!!!


