5.4 3V Build.
#91
 04-18-2013, 05:16 PM


Senior Member
#92
04-19-2013, 10:04 PM

Senior Member
Join Date: Jul 2011
Location: Central Kansas
Posts: 145
Likes: 0
Received 0 Likes
on
0 Posts
#93
04-24-2013, 03:16 AM

i really cant wait till this build is complete, a buddy of mine wants to build a crazy build like this and he is gonna learn alot from this thread, i dont know if he is gonna get all crazy with the inlet elbow and stuff, but he does want to build a forged block and run as much boost as possible on a wipple
#94
05-21-2013, 08:32 AM
Senior Member
#95
05-21-2013, 02:43 PM

#96
05-28-2013, 06:54 PM
Well, fuel rail done.
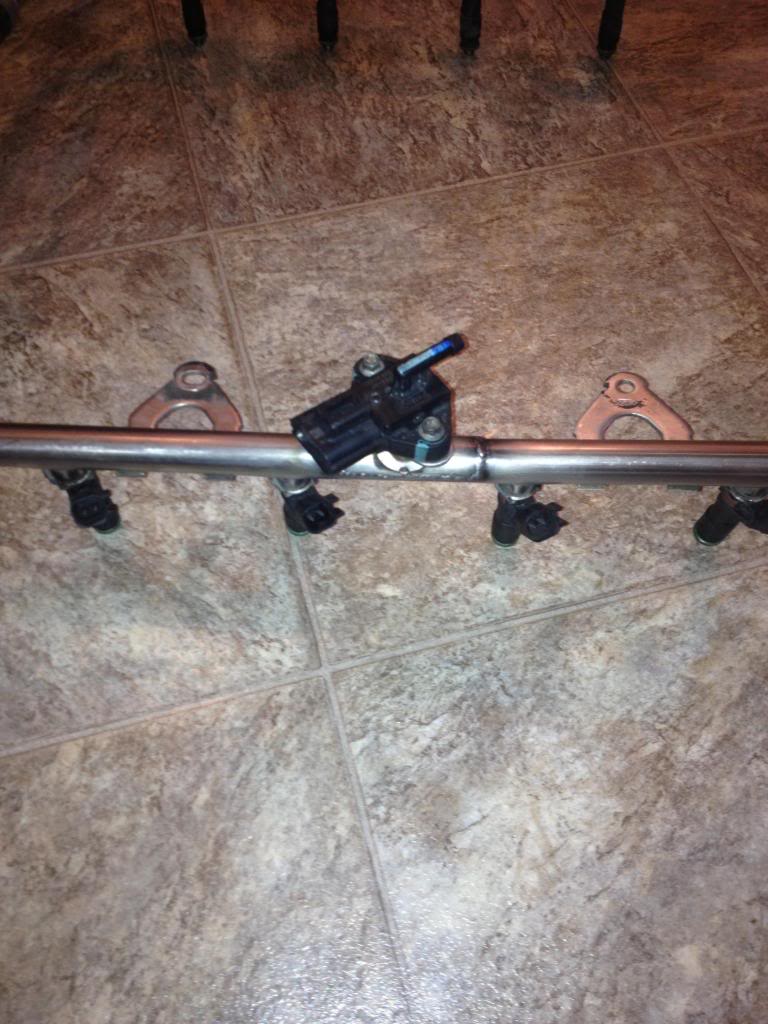
Not the prettiest of welds but a freeby and she held 120psi underwater with no bubbles.
TIG welded with RG60 Rods, purged the rails with Argon so no fall through.
So the last job is the IAT sensor. Anybody know what thread? 3/8 NPT?
Might locate that on the passenger side?

Not the prettiest of welds but a freeby and she held 120psi underwater with no bubbles.
TIG welded with RG60 Rods, purged the rails with Argon so no fall through.

So the last job is the IAT sensor. Anybody know what thread? 3/8 NPT?
Might locate that on the passenger side?
Last edited by Ross-FX4; 05-28-2013 at 07:04 PM.
#97
05-28-2013, 07:07 PM

Yes 3/8 NPT. You can get the parts from Napa or from VMPtuning.
http://vmptuning.com/index.php?p=cat...arent=367&pg=1
I get a discount through napa so I bought a Lightning IAT and pigtail from them for only a tiny bit cheaper but didnt have to wait for shipping.
http://vmptuning.com/index.php?p=cat...arent=367&pg=1
I get a discount through napa so I bought a Lightning IAT and pigtail from them for only a tiny bit cheaper but didnt have to wait for shipping.
#98
05-28-2013, 07:11 PM
Yes 3/8 NPT. You can get the parts from Napa or from VMPtuning.
http://vmptuning.com/index.php?p=cat...arent=367&pg=1
I get a discount through napa so I bought a Lightning IAT and pigtail from them for only a tiny bit cheaper but didnt have to wait for shipping.
http://vmptuning.com/index.php?p=cat...arent=367&pg=1
I get a discount through napa so I bought a Lightning IAT and pigtail from them for only a tiny bit cheaper but didnt have to wait for shipping.
I think I have a pig tail. Might have to make a fancy custom harness to the IAT & FRPS.
So 3/8 NPT. Cool, any tips on fitting? The intake runner doesn't look very meaty!
Once Jason sales me them 80 pounders for a decent dollar the top end is complete. Custom, one off

Last edited by Ross-FX4; 05-28-2013 at 07:13 PM.
#99
05-28-2013, 07:36 PM
#100
05-28-2013, 07:40 PM
Just a nice lump of pipe dope and it should be good.
I understand the location as the harness is from the MAF. Think I will instal on the other bank and then I can trick up a fancy harness.
#101
05-28-2013, 07:45 PM
Senior Member
#103
05-28-2013, 11:06 PM
Yeah # 5 is a good place. I assume everyone puts it there?
We have decided to install on the PAS side, 3rd runner from the front (Not sure which hole that is?) it should make for a neater install paired with the FRPS harness.
Anyhow, couldn't help myself. Bolted it all together to check clearances etc etc.
The original FRPS location. NFG.
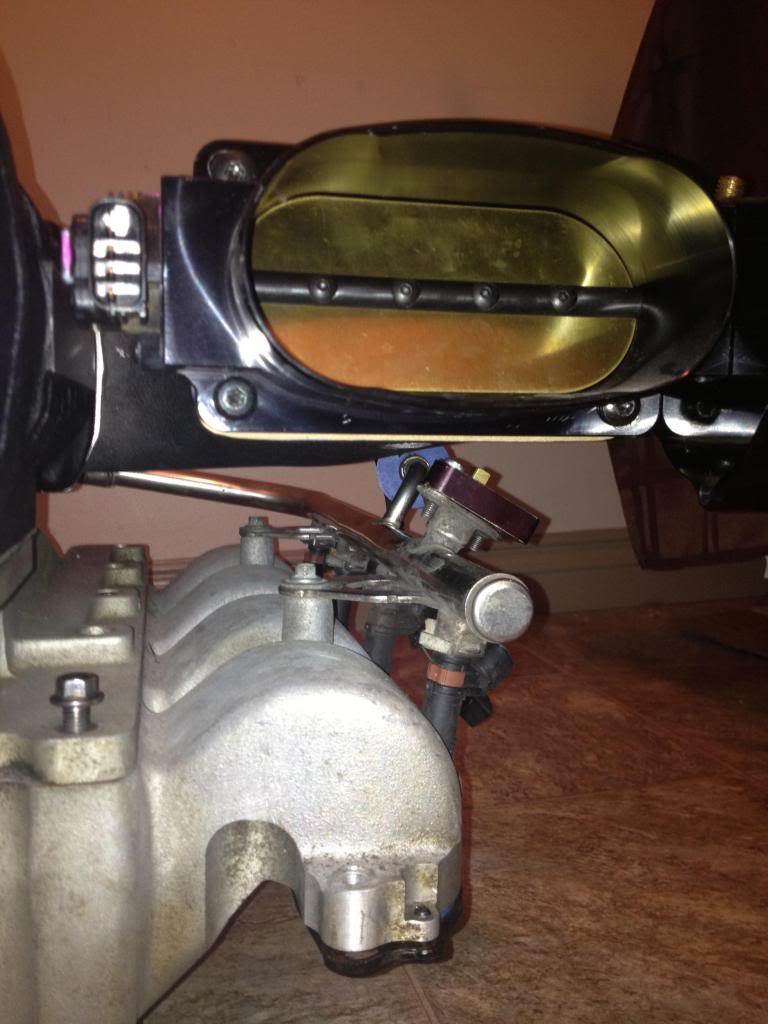
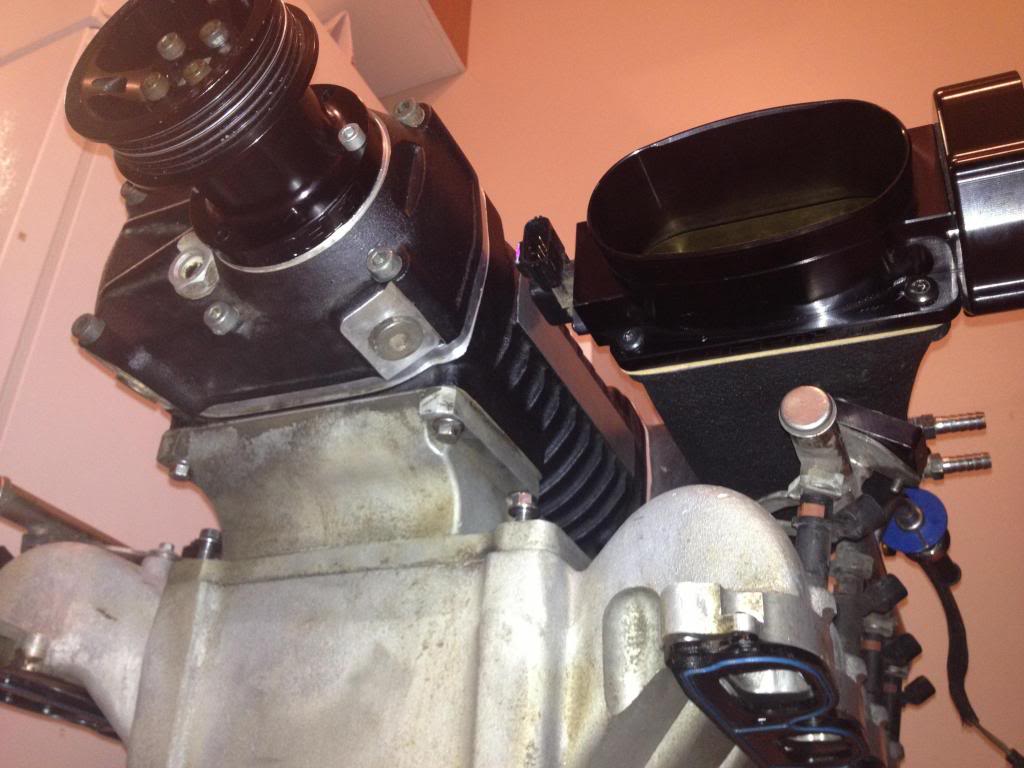
Looks like a lightning Whipple now.
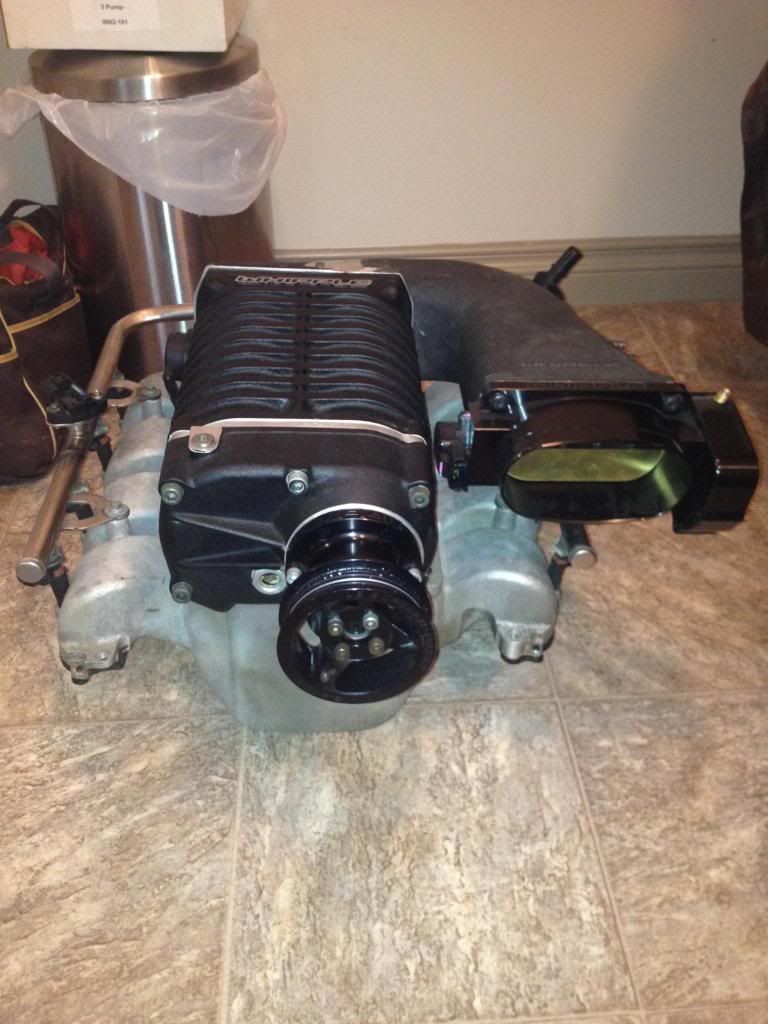
Arty Farty shot as am bored.
Am just pretty frikin stoked TBH. They don't come much more 'Custom - One off' than this. Had my doubts many times.
Only things left on this top end:
• Whipple 8 rib 3.00 pulley.
• IAT install.
• Snout Bolts.
• Jason's 80lb's.
Hey Jason. Still got those 80's? Or are you gonna use them on your build?
We have decided to install on the PAS side, 3rd runner from the front (Not sure which hole that is?) it should make for a neater install paired with the FRPS harness.
Anyhow, couldn't help myself. Bolted it all together to check clearances etc etc.
The original FRPS location. NFG.

Looks like a lightning Whipple now.

Arty Farty shot as am bored.

Am just pretty frikin stoked TBH. They don't come much more 'Custom - One off' than this. Had my doubts many times.
Only things left on this top end:
• Whipple 8 rib 3.00 pulley.
• IAT install.
• Snout Bolts.
• Jason's 80lb's.
Hey Jason. Still got those 80's? Or are you gonna use them on your build?
Last edited by Ross-FX4; 05-28-2013 at 11:22 PM.
#105
06-13-2013, 09:14 PM
Thanks Crash'er!
More parts.
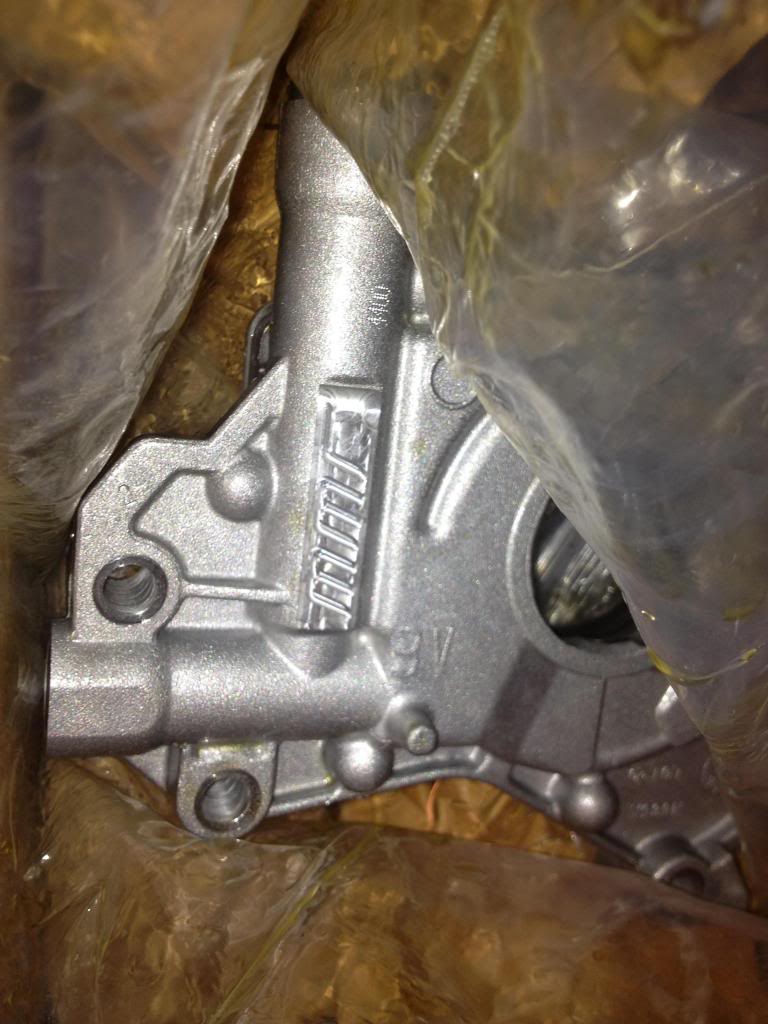
MMR 3v Oil pump & Pick up. Claimed to 100% fit. We will see.
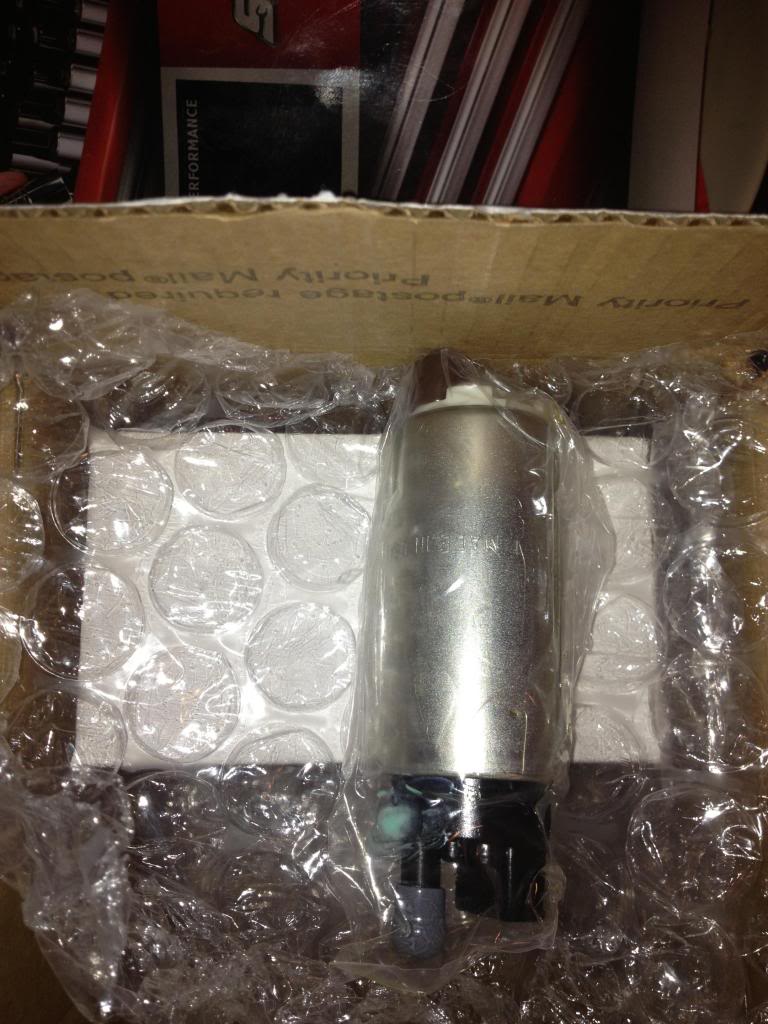
Pair of 255lh Wally's for the Fore Hat.
Still waiting for an order from Sparkteck, Aeromotive fuel system parts.
Anyhow, think av found a nice little RC stepside 5.4.
The 'Little Ford Express Truck'
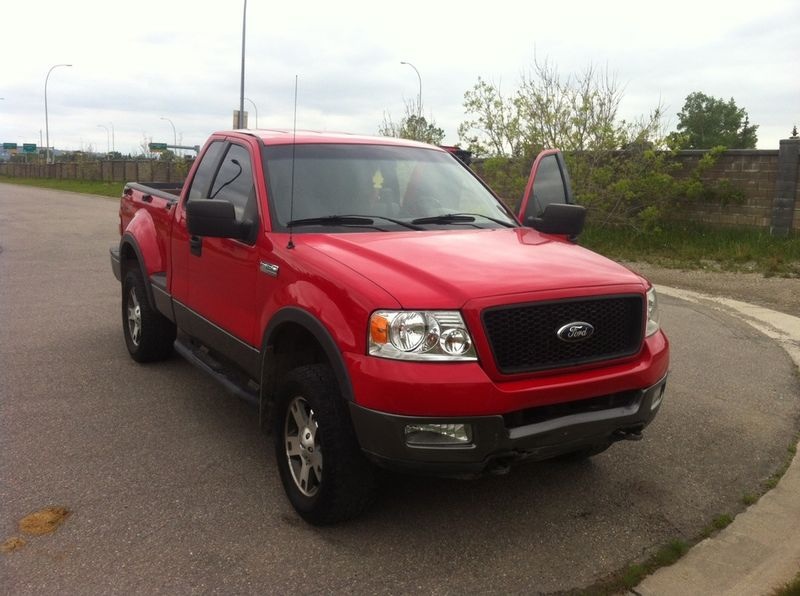
If its still forsale next week I might go and offer some $$$$ for it. The wife said she would drive it until it gets blown.
More parts.
MMR 3v Oil pump & Pick up. Claimed to 100% fit. We will see.

Pair of 255lh Wally's for the Fore Hat.

Still waiting for an order from Sparkteck, Aeromotive fuel system parts.
Anyhow, think av found a nice little RC stepside 5.4.
The 'Little Ford Express Truck'

If its still forsale next week I might go and offer some $$$$ for it. The wife said she would drive it until it gets blown.
Last edited by Ross-FX4; 06-13-2013 at 09:18 PM.