Custom center console box build
#16
 06-19-2011, 05:32 PM


As soon as they were fully cured I checked one last time for clearance.
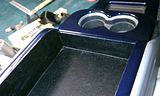
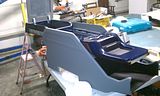
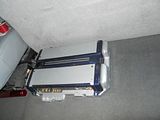
I had to do just a tiny bit of trimming due to paint. 1/16th on each side of the top cover piece. Here it is about 95% together one last time before install.
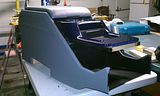
Console lid clearance
And the inside of the console is lined in black fuzzy too.
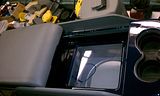
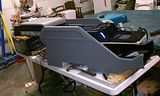
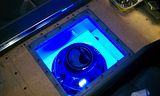
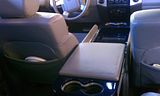
And the console slid back to reveal the plexi and sub.
I then took a few days break while a few smaller pieces were being painted at the shop. I ran the appropriate wiring in the truck for the amp and mounted it (more on that later).
I had to do just a tiny bit of trimming due to paint. 1/16th on each side of the top cover piece. Here it is about 95% together one last time before install.


Console lid clearance

And the inside of the console is lined in black fuzzy too.


And the console slid back to reveal the plexi and sub.


I then took a few days break while a few smaller pieces were being painted at the shop. I ran the appropriate wiring in the truck for the amp and mounted it (more on that later).
#17
06-19-2011, 05:46 PM
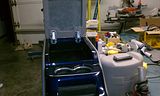
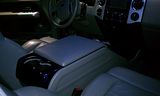
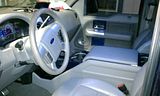
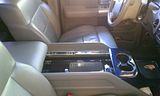
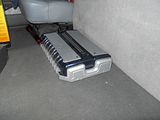
Finally the install.
This box isnt coming out without a fight.
It is bolted down using the four seat bolts on the INSIDE of the box.
The entire top console and cover must be completely taken off to install/remove.
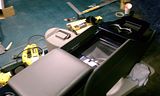
I installed the sub, and bolted the box in place.
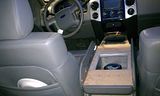
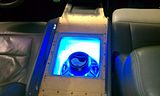
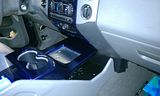
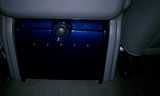
and checked the inner LEDs before i sealed the plexi in.
Then the top trim piece was inserted and bolted down with its hidden fasteners.
And finally the upper console was installed, the sub was wired and the rear oem cupholder/ power outlet were pluged in and installed.
This box isnt coming out without a fight.
It is bolted down using the four seat bolts on the INSIDE of the box.
The entire top console and cover must be completely taken off to install/remove.
I installed the sub, and bolted the box in place.

and checked the inner LEDs before i sealed the plexi in.


Then the top trim piece was inserted and bolted down with its hidden fasteners.


And finally the upper console was installed, the sub was wired and the rear oem cupholder/ power outlet were pluged in and installed.


#18
06-19-2011, 05:53 PM

I have driven various center shift trucks and i dont like the feel of any of them.
The only thing i want in center shift is a six speed

#19
06-19-2011, 06:19 PM
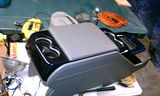
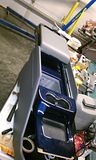
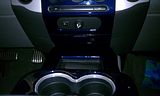
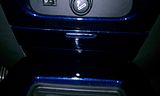
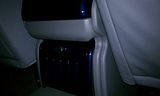
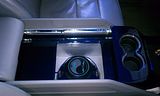
Here is the console opened to reveal the sub.
I am waiting on two small switches to finish wiring the LEDs. The cupholder rings will light and dim with the cluster/panel lights but have a switch for when i want them off and the box LEDs will simply turn on with the switch.
Ill post pics of them once i get them wired.

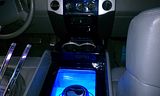
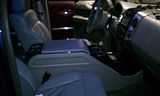
Console opened. The console is about 20% larger overall than the small factory jump seat one.
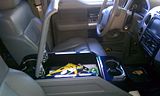
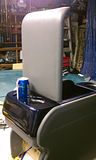
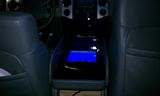
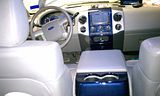
And the console slid back
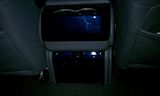
and once slid back the rear cupholders are actually in a pretty handy place for the rear passengers.
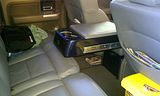
From rear seat
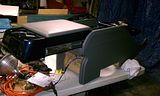
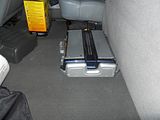
And before I had started on the box i had already made a neat amp mount for under the rear seat.
It has LED lit plexy side walls as well as lit accent tubes.... but after i saw how well the console blended and looked factory i decided to ditch the amp mount and mount it elsewhere to keep the rear floor open.
Here is the link to all 250+ pics. They are from three different camera sources so they are completely random and out of chronological order.
Console Buildup
I am waiting on two small switches to finish wiring the LEDs. The cupholder rings will light and dim with the cluster/panel lights but have a switch for when i want them off and the box LEDs will simply turn on with the switch.
Ill post pics of them once i get them wired.

Console opened. The console is about 20% larger overall than the small factory jump seat one.

And the console slid back


and once slid back the rear cupholders are actually in a pretty handy place for the rear passengers.

From rear seat

And before I had started on the box i had already made a neat amp mount for under the rear seat.
It has LED lit plexy side walls as well as lit accent tubes.... but after i saw how well the console blended and looked factory i decided to ditch the amp mount and mount it elsewhere to keep the rear floor open.


Here is the link to all 250+ pics. They are from three different camera sources so they are completely random and out of chronological order.
Console Buildup
Last edited by Fabian06SC; 06-19-2011 at 06:22 PM.


#22
06-19-2011, 08:18 PM

Senior Member
Join Date: Jan 2008
Location: Middelburg Florida
Posts: 497
Likes: 0
Received 0 Likes
on
0 Posts

#24
06-20-2011, 01:38 AM

Senior Member
Join Date: Jun 2010
Location: louisiana
Posts: 258
Likes: 0
Received 0 Likes
on
0 Posts
#25
06-20-2011, 01:54 AM
Thank you sir.
And thank you as well
Thanks, and honestly i have no clue. I worked on it after work for probably 2 hrs a day twice to 3 times a week and maybe 5-8 hrs every other weekend when possible for about two and a half months. Im guessing probably about 100 hrs or so.
The sad part is, i probably have more money invested in the amount of beer i drank building this than the actual materials to build it lol.
Sub sounds amazing, It definitely doesnt sound like a single ten in there and most importantly it doesnt look like i have ANY subs in there until i show people the sub.
#26
06-20-2011, 02:02 AM
Now theres a question! Would you guys believe this is actually only the THIRD sub box i have built? My second box was a completely custom underseat sub box for a ram 2500 to hold two ID10 v3s fully wrapped to match the seats with a custom cupholder and amp rack. I wish i had pics of it. I did the complete audio in that truck and it sounded spectacular!
I am a carpenter by trade, sub boxes and audio/video fabrication in general are more of a hobby for me.
I am a carpenter by trade, sub boxes and audio/video fabrication in general are more of a hobby for me.
#27
06-20-2011, 05:20 AM

Senior Member
Join Date: Aug 2007
Location: kansas city, missouri
Posts: 1,596
Likes: 0
Received 0 Likes
on
0 Posts
#28
06-20-2011, 05:43 AM

Senior Member
Join Date: Jan 2010
Location: Brecksville, Ohio
Posts: 1,228
Likes: 0
Received 0 Likes
on
0 Posts
#29
06-20-2011, 01:47 PM
Senior Member
Join Date: Jun 2010
Location: louisiana
Posts: 258
Likes: 0
Received 0 Likes
on
0 Posts
Now theres a question! Would you guys believe this is actually only the THIRD sub box i have built? My second box was a completely custom underseat sub box for a ram 2500 to hold two ID10 v3s fully wrapped to match the seats with a custom cupholder and amp rack. I wish i had pics of it. I did the complete audio in that truck and it sounded spectacular!
I am a carpenter by trade, sub boxes and audio/video fabrication in general are more of a hobby for me.
I am a carpenter by trade, sub boxes and audio/video fabrication in general are more of a hobby for me.

