
How to safely remove your headliner (overhead monitor installation


Thread Starter
|
Senior Member
Joined: May 2007
Posts: 3,460
Likes: 0
From: NYC, Ct & NC
How to safely remove your headliner (overhead monitor installation
I have an 07 SCREW and I I just bought the Alpine PKG-RSE2 Overhead monitor. My truck came with the overhead rails for the bins so Im wondering what is the safest way to remove everything. Has anyone else on here with the overhead rails that has installed an aftermarket monitor in their truck. I will be sure to take pics for those who are also looking to do this mod. I wont get the screen until Monday (3/31), than Im probably going to send it out to have it painted the same color as my headliner (this is still up in the air), then I will install it with pics.

Member
Joined: Mar 2007
Posts: 30
Likes: 0
From: Ft. Lauderdale, FL
Originally Posted by pmason718
I have an 07 SCREW and I I just bought the Alpine PKG-RSE2 Overhead monitor. My truck came with the overhead rails for the bins so Im wondering what is the safest way to remove everything. Has anyone else on here with the overhead rails that has installed an aftermarket monitor in their truck. I will be sure to take pics for those who are also looking to do this mod. I wont get the screen until Monday (3/31), than Im probably going to send it out to have it painted the same color as my headliner (this is still up in the air), then I will install it with pics.

Member
Joined: Jan 2008
Posts: 41
Likes: 0
I'll be following this as well. I just finished putting in 3 amps, subs, door speakers and an Avic Z1, so now all I need to complete the project is a drop down screen. I found the rail mount shroud on e-bay a while back, but it's "made for" Audiovox units. I should be able to get a different brand in there as long as it comes with the insert.
We'll see
We'll see

Member
Joined: Dec 2007
Posts: 60
Likes: 0
From: Omaha, NE
I had a drop down monitor in my super duty I used to have but being that my F150 has a moonroof I didnt want the screen that far behind it. I went with Headrest monitors. TView now makes a kit that is like 350 for both with the color matching pretty damn close. My drop down though, I did not remove the headliner. I just cut the headliner out where I needed to where the monitor was going to sit. Way less headache. Good luck guys.

Senior Member
Joined: Jun 2007
Posts: 225
Likes: 0
From: SCPA
Found this if it helps
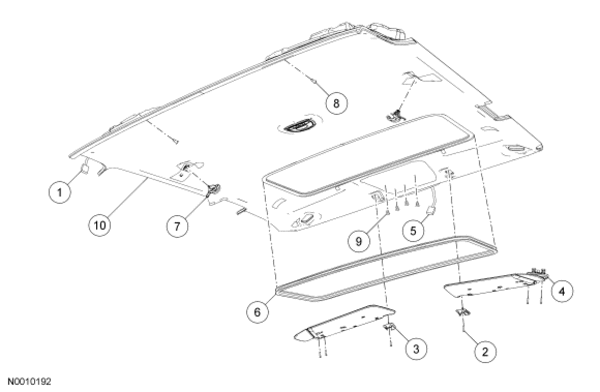
Removal and Installation
All vehicles
-Disconnect the battery ground cable and wait at least one minute. For additional information, refer to Section 414-01 .
-If equipped, remove the rear entertainment system. For additional information, refer to Section 415-07 .
-If equipped with a single overhead console, remove the overhead console. If equipped with a modular overhead console, remove the modular components. For additional information, refer to Section 501-12 .
-Remove the A-pillar trim panel. For additional information, refer to A-Pillar Trim Panel in this section.
-Remove the B-pillar trim panel. For additional information, refer to B-Pillar Trim Panel — Regular Cab , B-Pillar Trim Panel — SuperCab or B-Pillar Trim Panel — SuperCrew in this section.
-If equipped, remove the C-pillar trim panel. For additional information, refer to C-Pillar Trim Panel in this section.
-Disconnect the rear electrical connector.
-Remove the LH and RH sun visor retaining screws.
-Remove the LH and RH sun visor retaining clips.
-Remove the sun visors.
-If equipped, disconnect the electrical connectors.
-Disconnect the interior mirror electrical connector.
-If equipped, remove the roof opening panel trim.
-Remove the 2 coat hooks.
-If equipped, remove the 2 headliner pin-type retainers.
-If equipped, remove the 4 modular overhead console track screws.
Regular Cab and SuperCab
-Remove the LH and RH rear door latch cover bolts.
-Remove the LH and RH rear door latch covers.
-Remove the headliner.
Slide the headliner forward until it detaches from the roof.
SuperCrew
-Position the headliner aside.
-Remove the rear window glass. For additional information, refer to Section 501-11 .
-Remove the headliner.
-Remove the headliner through the rear window glass opening.
All vehicles
To install, reverse the removal procedure.
Place the headliner in position by aligning the headliner and rails with the front overhead console bracket.
Last edited by j2h1; Apr 2, 2008 at 06:35 PM.
Trending Topics


Thread Starter
|
Senior Member
Joined: May 2007
Posts: 3,460
Likes: 0
From: NYC, Ct & NC