
Removing door panel 2004+ F150


Thread Starter
|
Member
Joined: Nov 2002
Posts: 43
Likes: 0
From: Calgary
Removing door panel 2004+ F150
I had to change the mirror on my 04 FX4 (new style) due to a little width problem my son had. What a PITA to figure our what had to be done so I thought I would document it for others
- remove two trim screws at bottom of door panel
- remove the access plate behind the interior door handle (pry out at slot) and two screws (not necessary to remove the handle)
- gently pry up the power window switch panel (part of armrest)
- remove is screw that holds the panel to the door
- remove the speaker cover grill (it pops off with gentle persuasion but is very fragile)
- remove the speaker from the door (4 screws and two wire plugs)
- It's also a good idea to remove the mounting plugs for the speaker screws to eliminate clearance issues (do this by pulling them out carefully so as not to break them)
- to remove the door panel slide it UP about 1 inch to release the clips (it might take a little force but the panel basically just hangs on the door)
Reverse process to install again
I hope this helps others avoid the three hour job it was for me.


Senior Member
Joined: Oct 2007
Posts: 144
Likes: 0
From: Anchorage, Alaska
Last edited by lil_man; Jun 15, 2008 at 03:08 PM.

Senior Member
Joined: Nov 2007
Posts: 119
Likes: 1
From: Calgary, Alberta
Thanks Harley...
Thank you very much Harley.
I followed your instructions to the letter and didn't miss a trick.
I took pictures of every step of the disassembly, if anyone wants to see how it goes before they do it.
This stuff all comes apart so easy... I'd have to say, if something doesn't seem to want to come apart... you are probably not doing it right. It was that easy.
Remove two screws at bottom of panel:

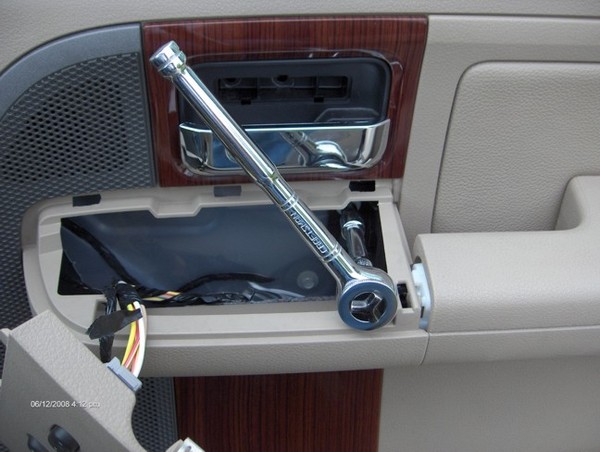
Remove the access cover:

... and the two screws behind it:
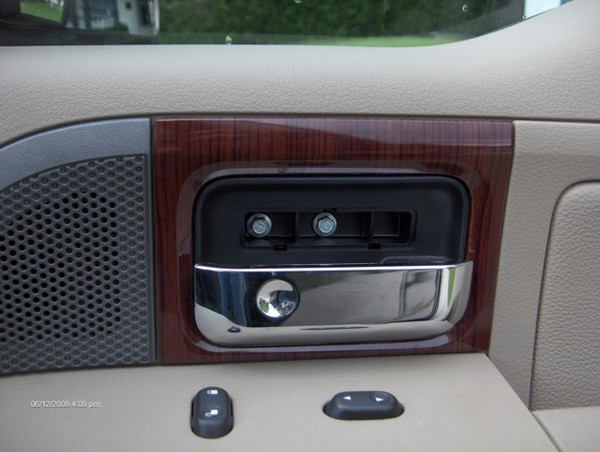
Gently pry up on the power switch panel:
I followed your instructions to the letter and didn't miss a trick.
I took pictures of every step of the disassembly, if anyone wants to see how it goes before they do it.
This stuff all comes apart so easy... I'd have to say, if something doesn't seem to want to come apart... you are probably not doing it right. It was that easy.
Remove two screws at bottom of panel:
Remove the access cover:
... and the two screws behind it:
Gently pry up on the power switch panel:
Senior Member
Joined: Nov 2007
Posts: 119
Likes: 1
From: Calgary, Alberta
pictures (continued)
Unplug the controls:

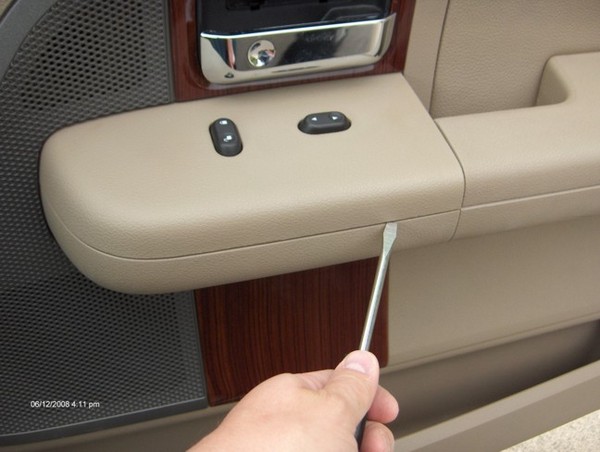
Remove the arm-rest screw:
Pry off the speaker grille (gently!):

(here's what the grille looks like as it comes off):

Remove the arm-rest screw:
Pry off the speaker grille (gently!):
(here's what the grille looks like as it comes off):
Trending Topics
Senior Member
Joined: Nov 2007
Posts: 119
Likes: 1
From: Calgary, Alberta
pictures (the end)
Then the speaker:

and unplug it:

Hey, careful to get these wires (and the arm-rest control ones) back where they belong when you drop the panel back into place... I had it half re-assembled before I realized one of my connectors was missing... had to take it all apart again.
and unplug it:
Hey, careful to get these wires (and the arm-rest control ones) back where they belong when you drop the panel back into place... I had it half re-assembled before I realized one of my connectors was missing... had to take it all apart again.


Senior Member
Joined: Nov 2007
Posts: 119
Likes: 1
From: Calgary, Alberta
Sorry Nate... I don't "know" (but I think):
I'm not sure what a standard connector is... like "RCA", "BNC" or blade type connectors...


The RCA has + and - in one connector, the others have separate ends for + or -... but all or any of those connectors can be purchased as either solder or crimp connectors.
Both those Ford connectors are 2-wire jobs and I think you'd just cut the Ford connector end off and solder (or crimp) on whatever connector you want.
I'm not sure what a standard connector is... like "RCA", "BNC" or blade type connectors...
The RCA has + and - in one connector, the others have separate ends for + or -... but all or any of those connectors can be purchased as either solder or crimp connectors.
Both those Ford connectors are 2-wire jobs and I think you'd just cut the Ford connector end off and solder (or crimp) on whatever connector you want.
