
Automatic Headlight problem


Thread Starter
|
Member
Joined: Jan 2004
Posts: 29
Likes: 0
From: Houston, TX
Automatic Headlight problem
I own a 2004 F150 SuperCrew, new body style. I just started having an issue with my automatic headlights. Since I bought the truck 6 years ago I have always left my headlight switch in the automatic position so that when it gets dark the light come on automatically and turn off when you turn the truck off. Wonderful feature.
Last week I noticed that the headlights were not coming on. The parking lights come on so I know the sensor is working. The headlights work fine if turn the switch to the manual on setting. I don't see in the manual a fuse specifically for the automatic lights. All the headlight fuses are good.
I used the information in a previous thread to check the headlight switch and it all checks out as working properly.
I am tempted to just purchase another switch and put it in but I wanted to make sure I am not missing another solution.

Technical Article Contributor
Joined: Jun 2002
Posts: 10,511
Likes: 10
From: Under the flightpath of old ORD 22R
What is the build date on your 2004 ?
The reason I ask, is I found that the early build 2004 MY trucks ( New Body Style ) had a 12 pin switch in them, that was changed mid MY.
If you tested your switch to the 10 pin version ( one used from mid 2004 to 2008 ), and the pin numbers worked, then I would assume late 2004 Build.
The BSM ( Body Security Module, now called a VSM Vehicle Security Module ) is what controls the autolamps.
The BSM has a headlamp relay out ( powers the headlamps ) and uses Fuse #40 to power.
With the headlamps working in the normal position, I would assume the fuses for the headlamps ( L&R low and Hi ) are fine.
The problem could be the headlamp relay out from the BSM, back to the headlamps switch. This should be in the driver's side door sill.
Pull the driver's side door sill plate, and check the wiring for signs of water damage.
The wire on the BSM that powers the headlamp is the Red w/ Yellow stripe wire.
The BSM is on the back cab wall, closer to the speaker for the standard cabs, about 25% over from the driver's side C pillar on the SCab & SCrew.
Thread in the Technical Articles / How to Forum on getting the seat back out.
Thread Starter
|
Member
Joined: Jan 2004
Posts: 29
Likes: 0
From: Houston, TX
Thanks for the reply SSCULLY.
I assume it is an early build 2004 MY because I bought it in Dec 03 and it has the 12 pin headlight switch. I found your diagram for the 12 pin switch which I used to check my headlight switch.
The fuse #40 appears good, but it was not for the BSM. On my truck the BSM is located on fuse #18. Fuse #18 appears good as well. Since I am at work I could only do a visual check on the fuses.
How would I go about checking the headlamp relay out from the BSM, assuming I can find it?
Technical Article Contributor
Joined: Jun 2002
Posts: 10,511
Likes: 10
From: Under the flightpath of old ORD 22R
If the switch tests good, then it is time to check the door sill for water damage.
I am taking a SWAG that the wire is damaged in the door sill.
Fuse #40 is not for the BSM itself, it is for power for the BSM to operate the headlamps in the autolamp position.
The easy way to check for the power from the BSM to control the headlamps, is to check the output of the BSM ( the reason why I posted the info about rear seat removal ).
Thread Starter
|
Member
Joined: Jan 2004
Posts: 29
Likes: 0
From: Houston, TX
Ok I finally had time this afternoon to work on this issue.
I studied the threads on how to remove the back seat and it still took me thirty minutes to the dang thing off.
I found the red w/ yellow stripe wire coming out of the BSM. Used a test light to test it with the truck running and headlight switch in the automatic position. The test light lit up. I checked the head lights and they were on.... Not sure what I did to cause them to come on.
I then checked for any signs of water damage under the drivers side door sill and could not find anything I would say was water damage. I put everything back together, even though I was confused as to why it started working.
Once it got dark I went out to make sure the head lights were really working while the switch was in the automatic position. Unlocked the door with the remote which should cause the head lights to come on. They did not, oh crap I thought, but not suprised. I put the key in the ignition and before I even turned the key the headlights came on. WTF.
Played around with the headlight switch, turning the truck on and off, locking and unlocking the doors with the remote. The lights always worked as they should.
One thing I did notice is that with the headlight switch in the automatic position the lights are not as bright as when in the manual on position. Is this normal?
Any ideas as to what else to check or do at this point?

Senior Member
Joined: Nov 2006
Posts: 2,068
Likes: 2
From: So. Cal.
Geo- Pretty sure it's completely normal for the HL's not to be quite as bright on auto as manual because they're going through an additional relay. Mine have done the same thing since new, switch from auto to manual and back you can see about a 3-4% difference in brightness.
One other thing- MAKE SURE the ground to the BSM (VSM) is good and secure. Loosen it and retighten it, maybe a star washer under the ground. Grounds are always the 1ST!!! place I check when you have an electrical Demon! 2nd thing is to "reset" the fuses and plugs that have anything to do with the area of trouble.
One other thing- MAKE SURE the ground to the BSM (VSM) is good and secure. Loosen it and retighten it, maybe a star washer under the ground. Grounds are always the 1ST!!! place I check when you have an electrical Demon! 2nd thing is to "reset" the fuses and plugs that have anything to do with the area of trouble.
Thread Starter
|
Member
Joined: Jan 2004
Posts: 29
Likes: 0
From: Houston, TX
I finally got around to removing the back seat again to check the ground wire and re-seat the plugs.
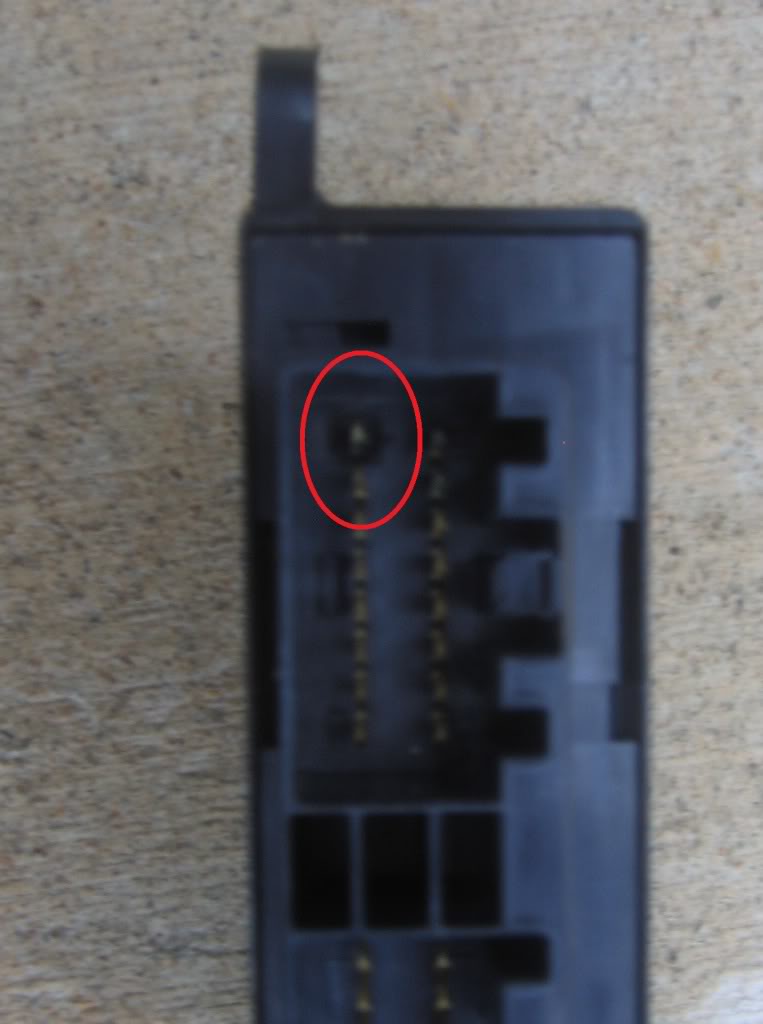
When I removed the plug with the automatic head lights wire (red/ w yellow stripe) I found that it had at some point shorted out / burned / melted the housing. See below image. The burned pin is the red / with yellow stripe wire.

If I wiggle the wire it will make contact and turn the automatic head lights on.
The BSM unit also has a burn spot on it at the same pin. See image. The red circle is indicating the burned pin.
I wish I had thought to pull this plug the first time I pulled the seat back off.
What do you suggest I do? Can I just replace the blue plug? Where would I find just the plug? Should I replace the BSM? Should I just live with the Automatic Head Lights not working?
The other burning question is what caused the pin to short out?
Sorry for the poorly focused images.
When I removed the plug with the automatic head lights wire (red/ w yellow stripe) I found that it had at some point shorted out / burned / melted the housing. See below image. The burned pin is the red / with yellow stripe wire.
If I wiggle the wire it will make contact and turn the automatic head lights on.
The BSM unit also has a burn spot on it at the same pin. See image. The red circle is indicating the burned pin.
I wish I had thought to pull this plug the first time I pulled the seat back off.
What do you suggest I do? Can I just replace the blue plug? Where would I find just the plug? Should I replace the BSM? Should I just live with the Automatic Head Lights not working?
The other burning question is what caused the pin to short out?
Sorry for the poorly focused images.
Trending Topics
Technical Article Contributor
Joined: Jun 2002
Posts: 10,511
Likes: 10
From: Under the flightpath of old ORD 22R
Don't know how easy it is going to be to replace the BSM. Some of the wires in C3008A do not have a connector inline with it, so it could be quite a bit of wire.
Maybe a junk yard, you could get a connector from, and replace it ?
Cannot tell how bad the BSM connector is, if it could be reused or not.
You would have to get a bone yard BSM with all the same features on it, or have a dealer program the BSM ( Autolamps, keypad, etc ).
Maybe a junk yard, you could get a connector from, and replace it ?
Cannot tell how bad the BSM connector is, if it could be reused or not.
You would have to get a bone yard BSM with all the same features on it, or have a dealer program the BSM ( Autolamps, keypad, etc ).
Thread Starter
|
Member
Joined: Jan 2004
Posts: 29
Likes: 0
From: Houston, TX
I can get a BSM from TascaParts.com part number 5L3Z15K602BA - $112. I assume I would have to some how get the new one programed to work with my key fobs. Would a used one from a salvage yard work?
If I can find the plug at a salvage yard would it be ok to splice the used one in by soldering all the wires? Not sure if there would be to much loss of power because of the splices.
Thanks again for helping me out with this!
If I can find the plug at a salvage yard would it be ok to splice the used one in by soldering all the wires? Not sure if there would be to much loss of power because of the splices.
Thanks again for helping me out with this!
Technical Article Contributor
Joined: Jun 2002
Posts: 10,511
Likes: 10
From: Under the flightpath of old ORD 22R
The key fobs you can program yourself, but the feature enabled is the question. Usually the BSM has options that need to be turned on, don't know if you order a new one if everything is enabled by default.
Same issue with one from a salvage yard, what options are configured on it ? Hard to tell.
Soldering and heat shrink the wires from the junk yard connector to your harness is fine. Just be sure to get a good solder joint, and the voltage drop will be very minimal.
Same issue with one from a salvage yard, what options are configured on it ? Hard to tell.
Soldering and heat shrink the wires from the junk yard connector to your harness is fine. Just be sure to get a good solder joint, and the voltage drop will be very minimal.
Thread Starter
|
Member
Joined: Jan 2004
Posts: 29
Likes: 0
From: Houston, TX
I was able to locate a new 16 pin replacement connector, the blue plug in the photo above. I found it online at RockAuto.com for ~$40.
The new plug has sixteen black wires coming out of it. I could splice in all sixteen wires but that seems like it would take a while and could potentially be confusing if anything else goes wrong at a later date.
My other thoughts is to de-pin each plug and only splice in the one that is bad and then re-pin the wires into the new plug. I played around a little bit with the new plug and was able to raise the white portion of the plug up some, but I could not get the wires loose. Does any body know how to de-pin one of these plugs?
Thanks
Technical Article Contributor
Joined: Jun 2002
Posts: 10,511
Likes: 10
From: Under the flightpath of old ORD 22R
With the shape of the connector, you are better off replacing it. You could have an issue later with the burnt area.
The pins usually you release the white holder, and the pins have barbs that need to be released with a pin insert / extract tool.
The pins usually you release the white holder, and the pins have barbs that need to be released with a pin insert / extract tool.

Technical Article Contributor
Joined: Jun 2002
Posts: 10,511
Likes: 10
From: Under the flightpath of old ORD 22R
Read the post just above yours