
Dashboard removal - US Speedo Gauge Overlay Install


Thread Starter
|
Technical Article Contributor
Joined: Sep 2004
Posts: 81
Likes: 0
From: Indiana
Dashboard removal - US Speedo Gauge Overlay Install
I have not been able to find any instructions for removing the panels around the gauge cluster on the 2004+ F150, so here are mine. Hope they help.
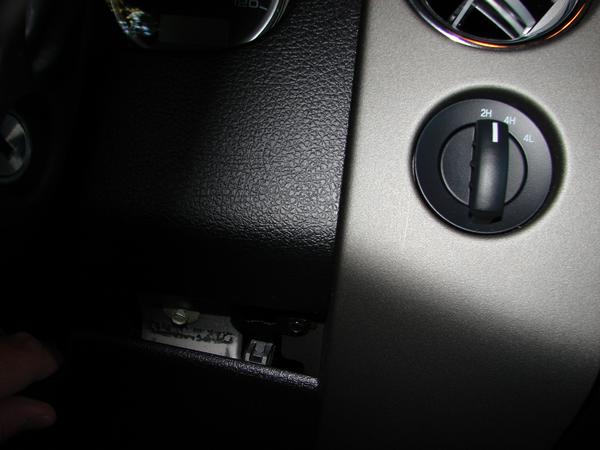
1. There are 2 screws holding the panel under the column, remove those.

2. From the middle of the panel under the column, pull out gently.


1. There are 2 screws holding the panel under the column, remove those.
2. From the middle of the panel under the column, pull out gently.
Thread Starter
|
Technical Article Contributor
Joined: Sep 2004
Posts: 81
Likes: 0
From: Indiana
Dashboard removal - US Speedo Gauge Overlay Install
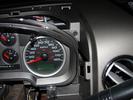
3. Once removed, the screws on either side of column holding the top panel on are exposed, remove those.
4. Remove the piece on top of column to allow for top dash panel to be removed.
5. Lift up on the top dash panel on either side of column to pop the panel out. Then, go to the back of the panel and pull it towards you�the panel fittings slide under the piece in front of it.

6. Now you can lift up on the dash panel.

4. Remove the piece on top of column to allow for top dash panel to be removed.
5. Lift up on the top dash panel on either side of column to pop the panel out. Then, go to the back of the panel and pull it towards you�the panel fittings slide under the piece in front of it.
6. Now you can lift up on the dash panel.

Thread Starter
|
Technical Article Contributor
Joined: Sep 2004
Posts: 81
Likes: 0
From: Indiana
Dashboard removal - US Speedo Gauge Overlay Install
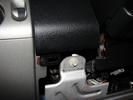
8. Removing the connections on the top of the cluster is done by pulling the grey tab to the left or right, depending on which side you are working on. when you pull the tab, it pushes the connection out.


Thread Starter
|
Technical Article Contributor
Joined: Sep 2004
Posts: 81
Likes: 0
From: Indiana
Dashboard removal - US Speedo Gauge Overlay Install
9. Removing the Parking connection is just a bit tricker. push the black tab hanging down on one side to the inside and pull gently. then do the same on the either side and pull straight down.

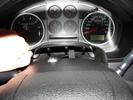
10. With the cluster free, remove the clear panel by popping the tabs (2 on top and 4 on the bottom)
a. do this in clean, dust free environment and don’t touch the inside of the clear panel.

12. TIPS/HINTS:
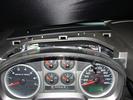
a. Make note of how far down the needles are installed as you will need to reinstall the needles to that position.
b. The needles come off harder than expected. use the tool slowly and gently while also pulling up on it with fingers.
c. The OEM overlay will require a bit more force to remove than you expect as it is, for lack of a better description, “spot welded” around the holes.
d. Pop out the holes on the new overlay before you install it.
e. Be sure that you lay it down gently and ensure it is properly located before you try to adjust it…ONCE it is settled it will not come off easily.
f. Be sure to not push the needles to far down when reassembling.
10. With the cluster free, remove the clear panel by popping the tabs (2 on top and 4 on the bottom)
a. do this in clean, dust free environment and don’t touch the inside of the clear panel.
12. TIPS/HINTS:
a. Make note of how far down the needles are installed as you will need to reinstall the needles to that position.
b. The needles come off harder than expected. use the tool slowly and gently while also pulling up on it with fingers.
c. The OEM overlay will require a bit more force to remove than you expect as it is, for lack of a better description, “spot welded” around the holes.
d. Pop out the holes on the new overlay before you install it.
e. Be sure that you lay it down gently and ensure it is properly located before you try to adjust it…ONCE it is settled it will not come off easily.
f. Be sure to not push the needles to far down when reassembling.
Last edited by SSCULLY; Jun 2, 2009 at 09:04 AM.


Blah, I want to do this but the tutorial is incomplete. You never showed any further steps after 12 and the pictures are way to tiny to even get a help hand from them.
Do you have larger photos and do you have any after result photos?
Do you have larger photos and do you have any after result photos?


