


How-To: Change your cluster color on 97-03


How-To: Change your cluster color on 97-03
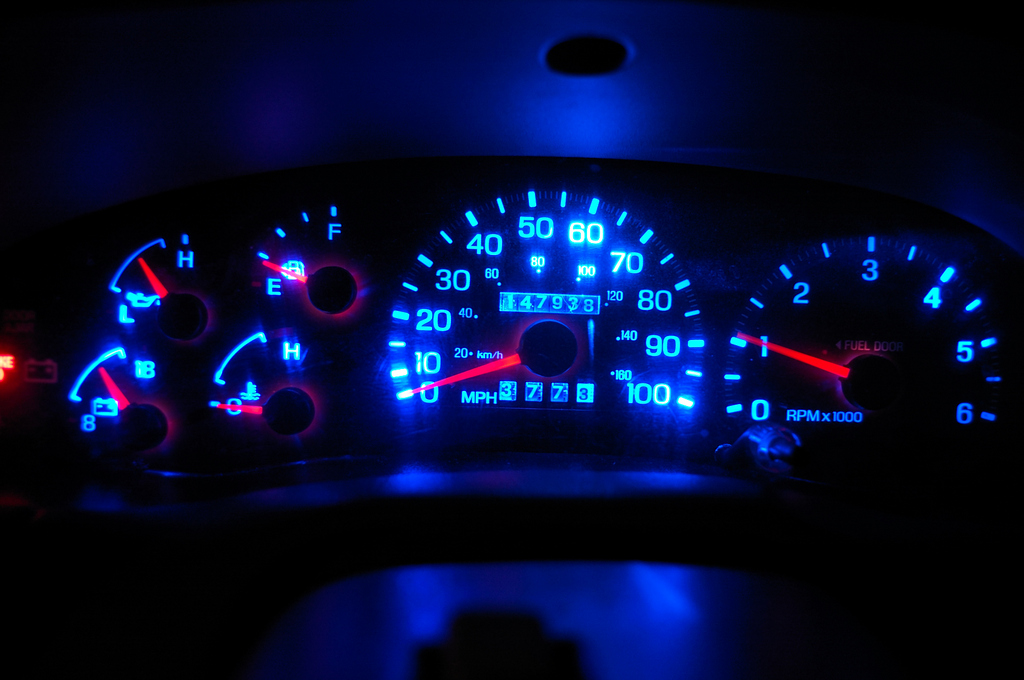
As many of you know, there is a hideous green color coming out of the cluster and everything else around your interior at night. First of all, there is an allusion that the tint behind the actual numbers is green. That is false. Ford actually put a pure, 100% blue tint back there. The problem is, standard incandescent bulbs put out a yellow (3000K) light. So whats that mean? Blue + Yellow = Green, or teal as most of us see. That is why I set out to change that. This mod is for 1997 and 1998 trucks. If you have a 99-04, see below. Keep in mind that to retain maximum light output, use the same color light as the filter. So for the 97-98 trucks, using a blue LED would be your best bet. Feel free to use any color you wish! (at your own discretion, of course!)
Disclaimer: I will not be held responsible for anything that you mess up during this modification. So take your time and relax!
Note: if you have a 1999-2003 (inc. 2004 Heritage models), the process stated below is the same for removing it. [except you will have two cables instead of three]. It should be noted that in 1999 Ford switched from a blue overlay to a straight green one. If you want another color, you can either continue to convert your LEDs to that color and overpower the overlay or you can use acetone and carefully rub off the green. Additionally, 99-04 trucks use only SIX [6] T10 wedge (aka 194 or 161-type) bulbs.
---------------------------------------------------------------------------------------------------------
Tools needed:
5.5mm socket
7mm socket (or 5/16)
7x T10 Wedge LEDs (aka 194/161, your choice of color). 5 are for the cluster, 2 are for the HVAC controls
2x 74 (aka 37/73) LEDs
Pliers (optional)
Flathead screwdriver (optional)
Plastic cup (to store ALL the screws in!)
Wet rag (there will be A LOT of dust. OCD'ers might need the whole cleaning closet)
-----------------------------------------------------------------------------------------------------------
First, a little schooling:
Incandescent bulbs emit light in a full 360- globe area, while LEDs are more know for intense, directed light. The cluster utilizes an array of clear plastic pieces that evenly scatter the light around the cluster. To avoid the omnious "hotspot" issues that arise with LED applications, you are going to want to stick to a convex-type, round head for light disbursement on your diode.
For instance, we are replacing this:

With this:

These will cause hotspot issues:

Where can you get these LEDs you ask? There are several good LED stores out there. In order of (average) price, cheapest to most expensive:
www.ebay.com (very cheap Chinese LEDs, you will have burnout issues months later)
www.autolumination.com (all around great website, huge selection)
www.oznium.com (a little more pricy)
www.v-leds.com (most expensive, but IMO, the best quality LEDs available)
Also, keep in mind you DO retain the dimmer feature!
--------------------------------------------------------
Estimated time: 45 minutes - 1 hour 30 minutes
Estimated cost: $15.00-$30.00
--------------------------------------------------------
Step 1:
Lets start by looking at our center bezel
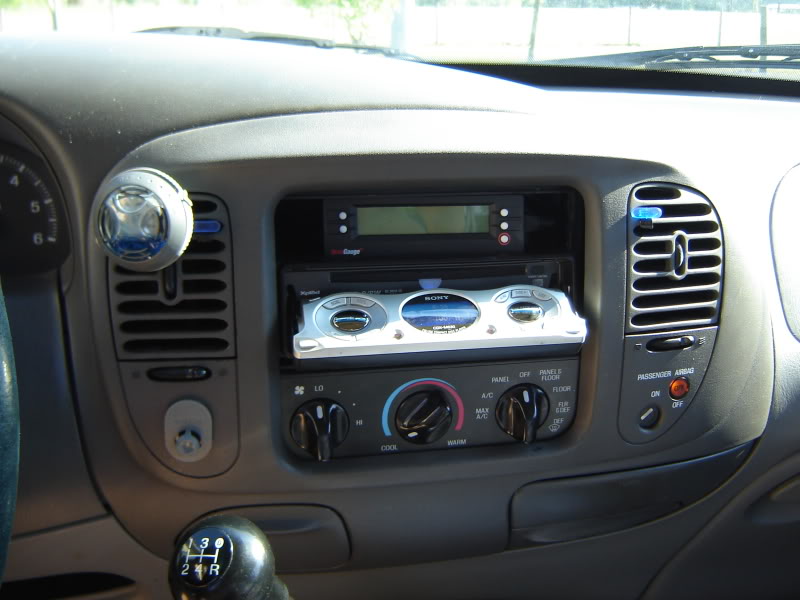
Start by pulling it out. It has four clips holding it in, so just a light tug will break them free of their contraints.
Now that the center section is removed, you have to take the airbag switch off the center section. Use your 5.5mm socket and remove these three screws:
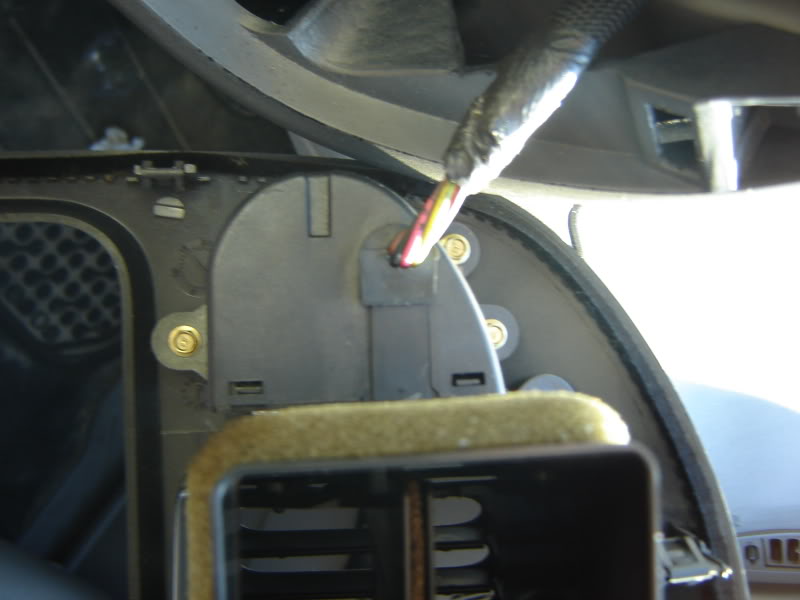
NOTE: SuperCrews do not have this and may skip this step. If you have a 99+ or newer, you will have a quick-connect so you can void this step. Also, I do not have 4x4, so if you do, you will have a different procedure here to remove that as well. Please let me know whoever finds out what type of screws it utilizes and how many so I can update this part.
Which leaves you something looking like this:
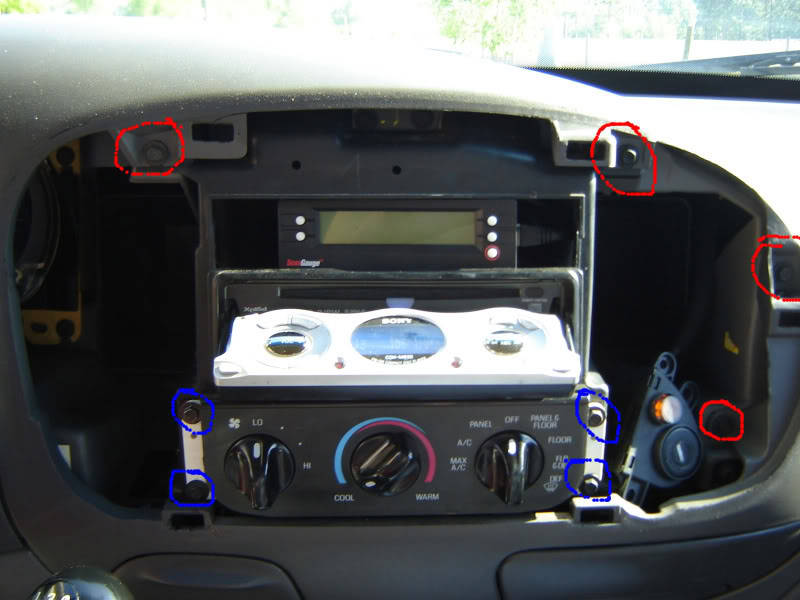
Using your 7mm (or 5/16) socket, remove the red highlighted screws. If you are also doing your HVAC controls (more on that later), those are circled in blue. Do not remove those yet, as we will touch up on it in a bit.
Step 2:
Next, remove the steering wheel surround. It too is held on by nothing more than clips. Be careful not to break it as the bridge is narrow.
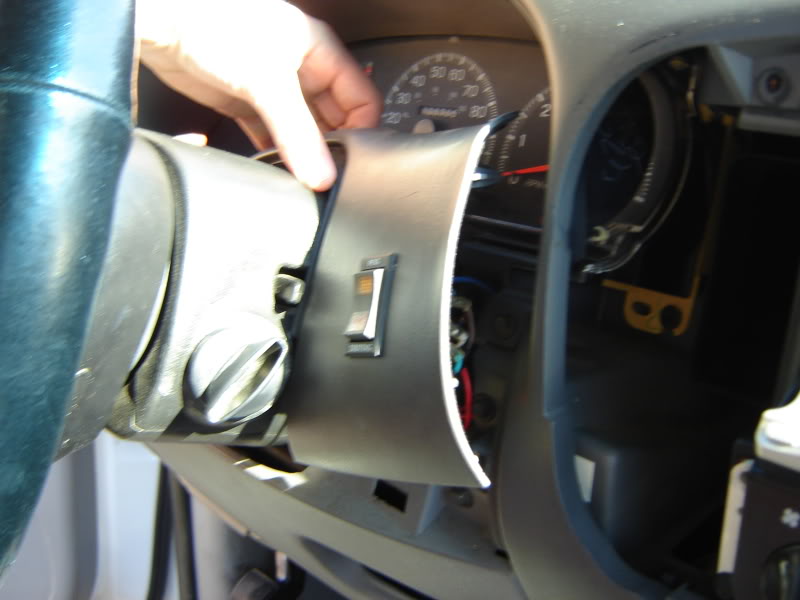
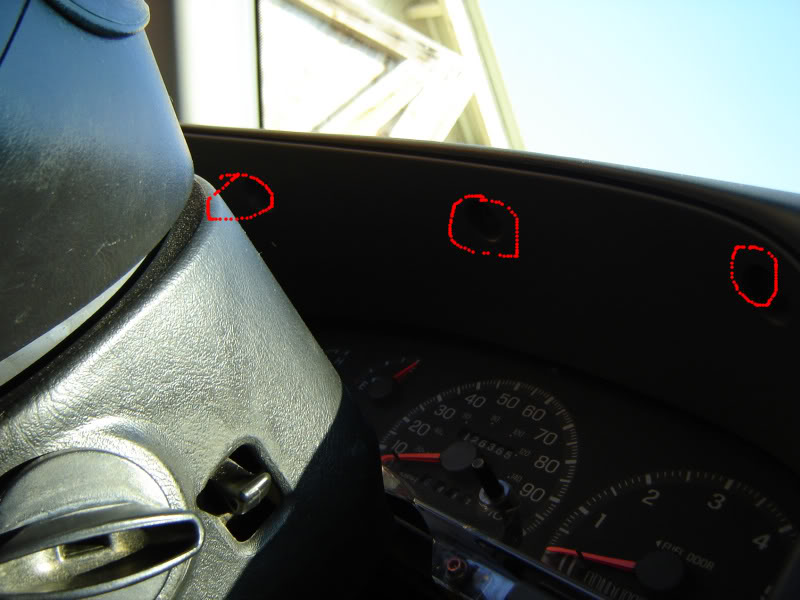
Continue to remove the highlighted screws and put them in your cup. Do not remove the x'ed ones as they belong to the lower kick panel and some plastic peices behind the cluster.
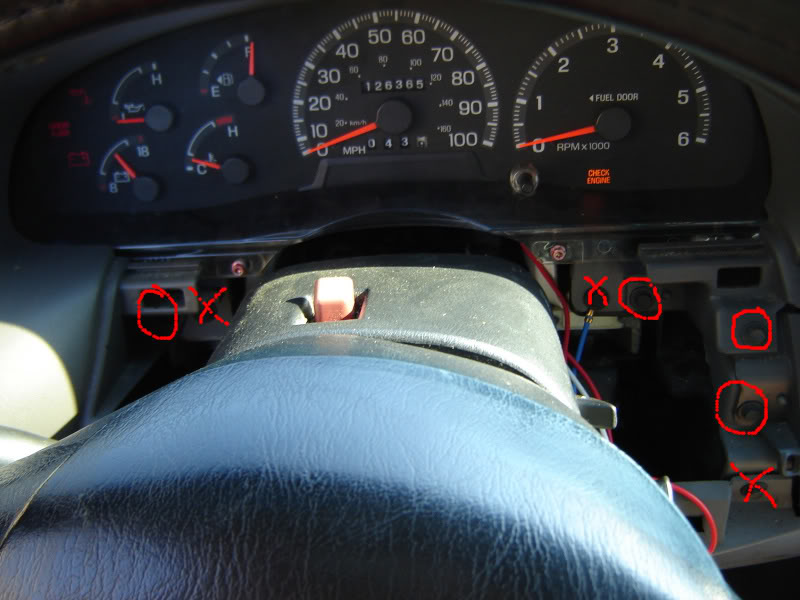
Then theres another screw by where your knee sits at during driving...
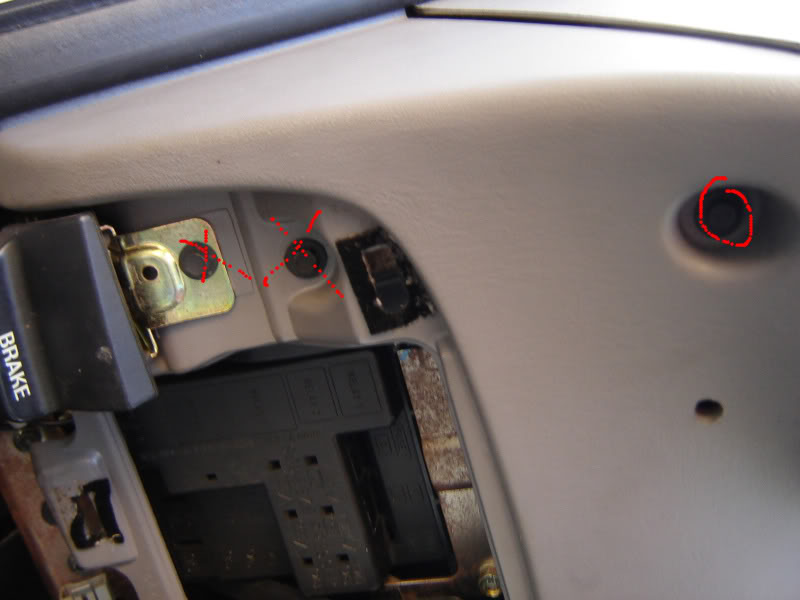
...and the three above the cluster
Disclaimer: I will not be held responsible for anything that you mess up during this modification. So take your time and relax!
Note: if you have a 1999-2003 (inc. 2004 Heritage models), the process stated below is the same for removing it. [except you will have two cables instead of three]. It should be noted that in 1999 Ford switched from a blue overlay to a straight green one. If you want another color, you can either continue to convert your LEDs to that color and overpower the overlay or you can use acetone and carefully rub off the green. Additionally, 99-04 trucks use only SIX [6] T10 wedge (aka 194 or 161-type) bulbs.
---------------------------------------------------------------------------------------------------------
Tools needed:
5.5mm socket
7mm socket (or 5/16)
7x T10 Wedge LEDs (aka 194/161, your choice of color). 5 are for the cluster, 2 are for the HVAC controls
2x 74 (aka 37/73) LEDs
Pliers (optional)
Flathead screwdriver (optional)
Plastic cup (to store ALL the screws in!)
Wet rag (there will be A LOT of dust. OCD'ers might need the whole cleaning closet)
-----------------------------------------------------------------------------------------------------------
First, a little schooling:
Incandescent bulbs emit light in a full 360- globe area, while LEDs are more know for intense, directed light. The cluster utilizes an array of clear plastic pieces that evenly scatter the light around the cluster. To avoid the omnious "hotspot" issues that arise with LED applications, you are going to want to stick to a convex-type, round head for light disbursement on your diode.
For instance, we are replacing this:
With this:
These will cause hotspot issues:
Where can you get these LEDs you ask? There are several good LED stores out there. In order of (average) price, cheapest to most expensive:
www.ebay.com (very cheap Chinese LEDs, you will have burnout issues months later)
www.autolumination.com (all around great website, huge selection)
www.oznium.com (a little more pricy)
www.v-leds.com (most expensive, but IMO, the best quality LEDs available)
Also, keep in mind you DO retain the dimmer feature!
--------------------------------------------------------
Estimated time: 45 minutes - 1 hour 30 minutes
Estimated cost: $15.00-$30.00
--------------------------------------------------------
Step 1:
Lets start by looking at our center bezel
Start by pulling it out. It has four clips holding it in, so just a light tug will break them free of their contraints.
Now that the center section is removed, you have to take the airbag switch off the center section. Use your 5.5mm socket and remove these three screws:
NOTE: SuperCrews do not have this and may skip this step. If you have a 99+ or newer, you will have a quick-connect so you can void this step. Also, I do not have 4x4, so if you do, you will have a different procedure here to remove that as well. Please let me know whoever finds out what type of screws it utilizes and how many so I can update this part.
Which leaves you something looking like this:
Using your 7mm (or 5/16) socket, remove the red highlighted screws. If you are also doing your HVAC controls (more on that later), those are circled in blue. Do not remove those yet, as we will touch up on it in a bit.
Step 2:
Next, remove the steering wheel surround. It too is held on by nothing more than clips. Be careful not to break it as the bridge is narrow.
Continue to remove the highlighted screws and put them in your cup. Do not remove the x'ed ones as they belong to the lower kick panel and some plastic peices behind the cluster.
Then theres another screw by where your knee sits at during driving...
...and the three above the cluster
Last edited by Raptor05121; Jun 6, 2010 at 11:11 PM.
Step 3:
Remove you headlight switch. This is a tricky part, so I made a video of how to do it
<embed width="448" height="361" type="application/x-shockwave-flash" wmode="transparent" src="http://i89.photobucket.com/player.swf?file=http://vid89.photobucket.com/albums/k227/Raptor05121/Write-Ups/MOV02935.flv">
Once that is done, you will have two harnesses plugged into the headlight switch. Take a flathead and pry the little red tabs out until they click and press and remove both harnesses.
Then remove the one screw behind where the headlight switch hides
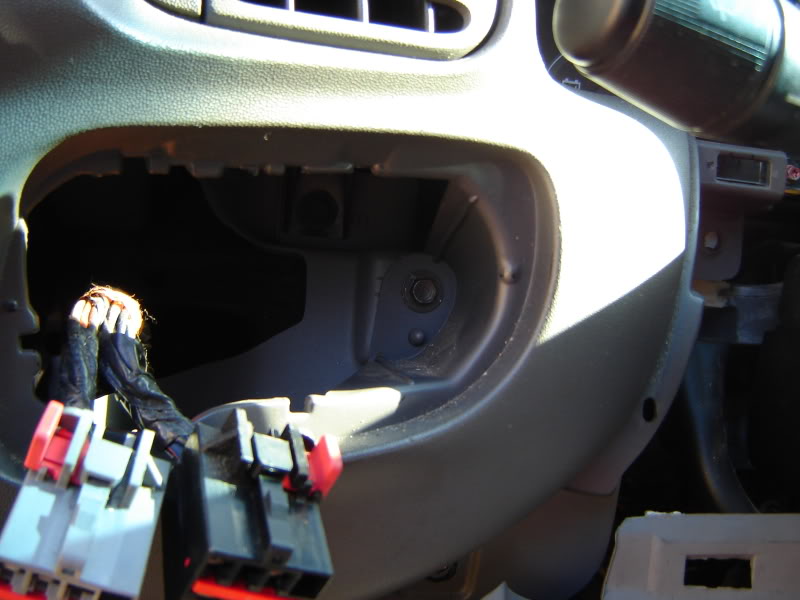
Step 4:
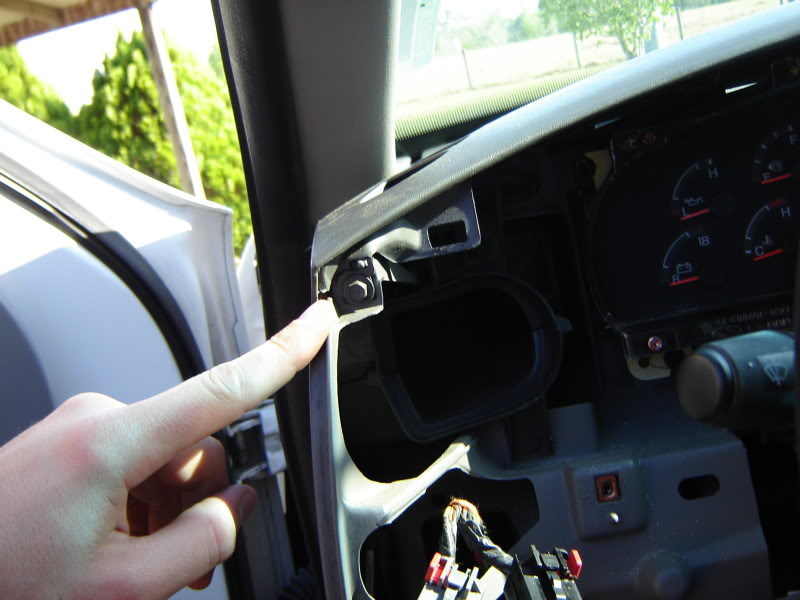
Gently tugging at the piece that sits above your cluster, remove it and get it out of the way. As with the other pieces, sit it well out of your way. I put mine in my bed.
There is yet one more (what a suprise) screw hiding behind the left side.
Step 5:
Pulling rearward on the entire upper piece, it will snap out of place easily.
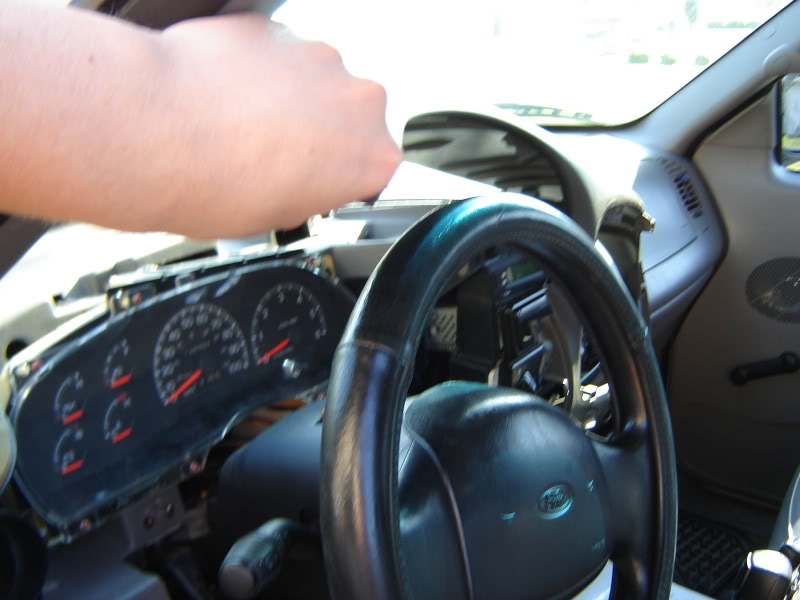
...leaving you this mess:
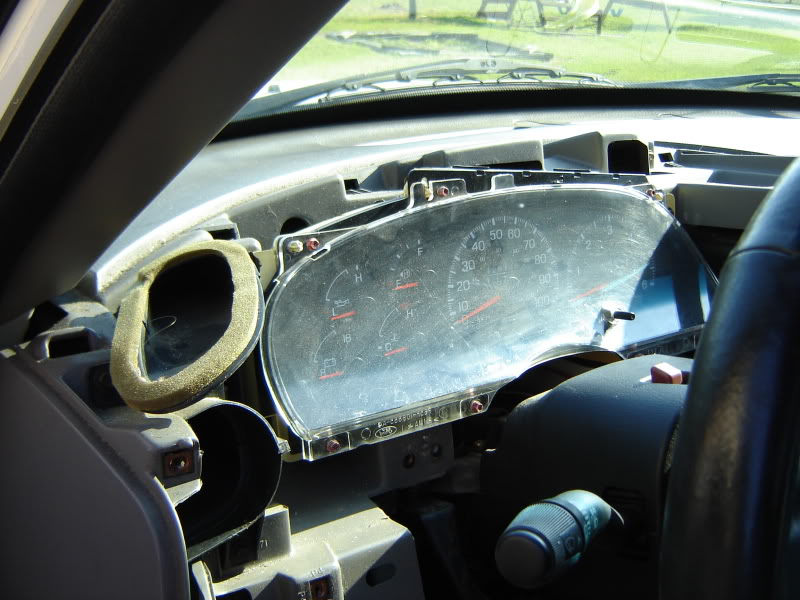
OCD'ers beware!
Step 6:
On the right side of the cluster are two more screws, with another two on the left side.
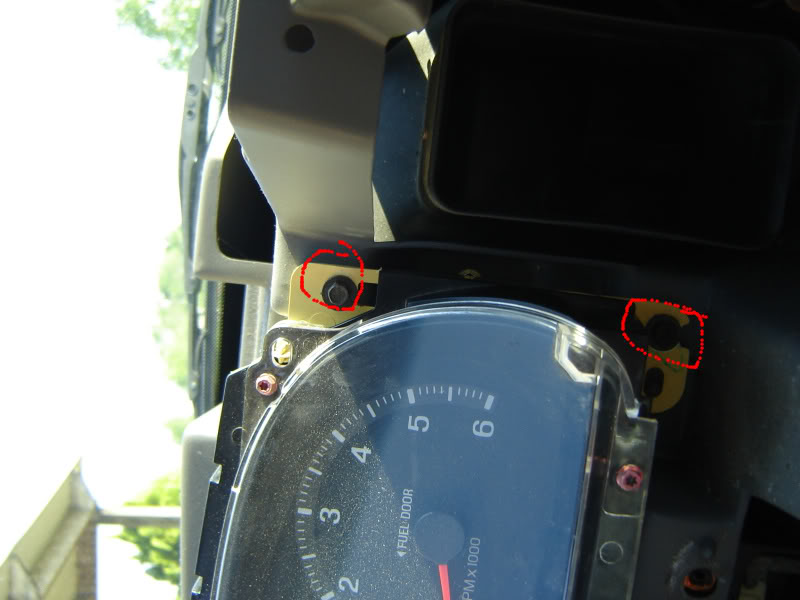
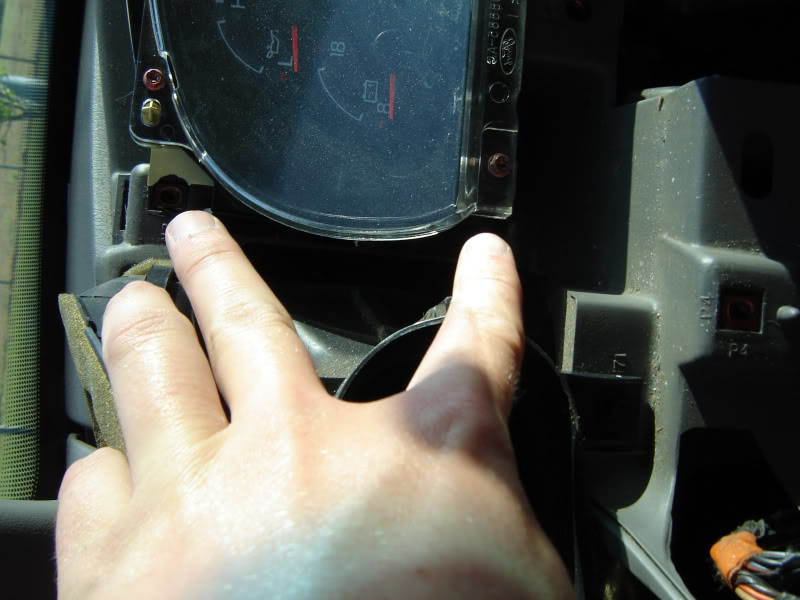
Step 7: Pull the entire cluster back a bit and unclip the three harnesses from the rear. The two side ones unclip from the bottom, with the larger center one having its clip on the top.
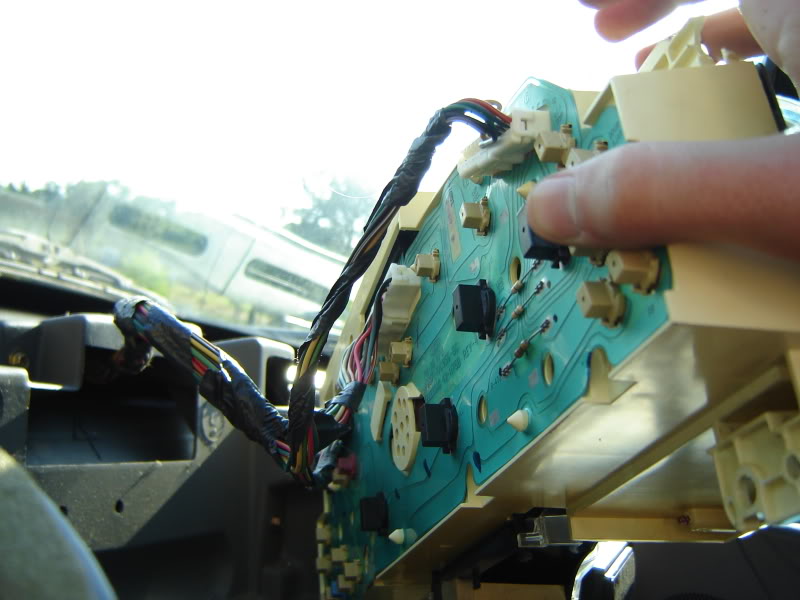
Turn over and locate the five black bulb connectors. They have "ILL" on the back to indicate which ones. These are your 194 holders. Twist them to the left (using a pair of pliars helps for the stubborn ones) just 1/4 turn and they will pop right off. Replace all of these with your LEDs and then locate the two smaller, white holders (37-type) also identified as "ILL". Twist these off and replace these.
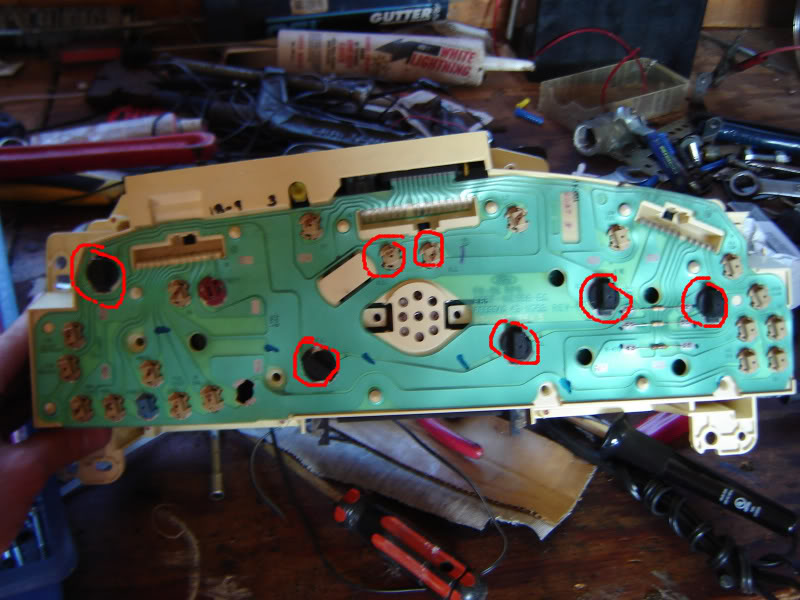
NOTE: LEDs are simple positive/negative electrodes. Basically, you have a 50/50 chance of getting them in the right angle (pos to pos and neg to neg) the first time. Just put them all in and twist back to place. Just reinstall all three harnesses and plug in your headlight switch and turn on your parking lights to see which ones you got right and which ones you didnt. Unplug and simply reverse the sockets that didnt light.
Step 8:
Now that you have them all lighting, simply reverse the process stated above. Here's a rundown.
Plug back in the cluster and screw down with four screws.
Clip the large dash piece in place and screw down
Put the overhead cluster cover in place and screw in the three overheads
Screw behind the headlight harness and reinstall headlight harness
Pop in steering wheel surround.
Step 9:
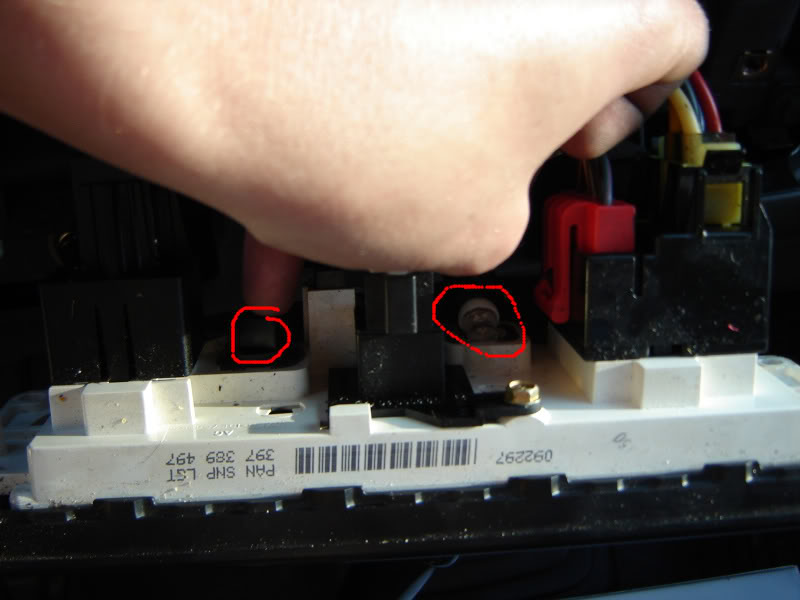
If you wish to do your HVAC, its pretty simple.
Remove the four blue screws located in the third picture. Pull the controls back and you will see the two 194 bulb holders (black) in there. Just pop out, replace, and twist back in place. Screw down, and pop your bezel back in place after you screw your passenger airbag control back onto it.
And thats it folks! Wait until nighttime and light 'em up!!!
-Alex
Edit: Special thanks to 'thejake1989' for going the extra mile and doing a write-up on the headlight switch, heres a link for those willing to do this to compliment your new interior:
97-03 headlight switch blue led swap [write-up]
Remove you headlight switch. This is a tricky part, so I made a video of how to do it
<embed width="448" height="361" type="application/x-shockwave-flash" wmode="transparent" src="http://i89.photobucket.com/player.swf?file=http://vid89.photobucket.com/albums/k227/Raptor05121/Write-Ups/MOV02935.flv">
Once that is done, you will have two harnesses plugged into the headlight switch. Take a flathead and pry the little red tabs out until they click and press and remove both harnesses.
Then remove the one screw behind where the headlight switch hides
Step 4:
Gently tugging at the piece that sits above your cluster, remove it and get it out of the way. As with the other pieces, sit it well out of your way. I put mine in my bed.
There is yet one more (what a suprise) screw hiding behind the left side.
Step 5:
Pulling rearward on the entire upper piece, it will snap out of place easily.
...leaving you this mess:
OCD'ers beware!
Step 6:
On the right side of the cluster are two more screws, with another two on the left side.
Step 7: Pull the entire cluster back a bit and unclip the three harnesses from the rear. The two side ones unclip from the bottom, with the larger center one having its clip on the top.
Turn over and locate the five black bulb connectors. They have "ILL" on the back to indicate which ones. These are your 194 holders. Twist them to the left (using a pair of pliars helps for the stubborn ones) just 1/4 turn and they will pop right off. Replace all of these with your LEDs and then locate the two smaller, white holders (37-type) also identified as "ILL". Twist these off and replace these.
NOTE: LEDs are simple positive/negative electrodes. Basically, you have a 50/50 chance of getting them in the right angle (pos to pos and neg to neg) the first time. Just put them all in and twist back to place. Just reinstall all three harnesses and plug in your headlight switch and turn on your parking lights to see which ones you got right and which ones you didnt. Unplug and simply reverse the sockets that didnt light.
Step 8:
Now that you have them all lighting, simply reverse the process stated above. Here's a rundown.
Plug back in the cluster and screw down with four screws.
Clip the large dash piece in place and screw down
Put the overhead cluster cover in place and screw in the three overheads
Screw behind the headlight harness and reinstall headlight harness
Pop in steering wheel surround.
Step 9:
If you wish to do your HVAC, its pretty simple.
Remove the four blue screws located in the third picture. Pull the controls back and you will see the two 194 bulb holders (black) in there. Just pop out, replace, and twist back in place. Screw down, and pop your bezel back in place after you screw your passenger airbag control back onto it.
And thats it folks! Wait until nighttime and light 'em up!!!
-Alex
Edit: Special thanks to 'thejake1989' for going the extra mile and doing a write-up on the headlight switch, heres a link for those willing to do this to compliment your new interior:
97-03 headlight switch blue led swap [write-up]
Last edited by Raptor05121; May 14, 2010 at 02:04 PM.


Senior Member
Joined: Nov 2008
Posts: 203
Likes: 0
From: Louisiana
is there a way to make the light brighter? or is that just a bad picture? it seems like the needles aren't lit up all the way.
Trending Topics


First of all, I got the bulbs from eBay. Just go in and search "194 white LED" and find the best price (make sure the description says they are sold in pairs- they tend to catch you on that  )
)
Secondly, the needles are plenty bright. The picture was taken with an el-cheapo camera. LEDs are in the same boat as HIDs when it comes to pictures- they just don't do the justice (which makes it more exciting when you actually light them up and see how much brighter they are!)
Lastly, there is a film on the back of the gauges. You can get a Torx #2 and remove the plastic face and then the needles and if you are good, you can use acetone to remove the color. I HIGHLY suggest you have a spare overlay next to you just incase you mess it up.
Any more?
-Alex
) Secondly, the needles are plenty bright. The picture was taken with an el-cheapo camera. LEDs are in the same boat as HIDs when it comes to pictures- they just don't do the justice (which makes it more exciting when you actually light them up and see how much brighter they are!)
Lastly, there is a film on the back of the gauges. You can get a Torx #2 and remove the plastic face and then the needles and if you are good, you can use acetone to remove the color. I HIGHLY suggest you have a spare overlay next to you just incase you mess it up.
Any more?
-Alex


