



How to change the Serpentine Belt, Tensioner, and idler pullies on your 5.4 3v


Thread Starter
|
Senior Member


Joined: Jan 2009
Posts: 10,731
Likes: 47
From: Concord, NC
How to change the Serpentine Belt, Tensioner, and idler pullies on your 5.4 3v
Hi everyone,
After being on this website since high school and now graduating college in a month, I am finally ready to give back what I have learned here. I had no vehicle experience prior to this so I have taken that into my own hands to fix that. I did this job myself and it saved me a ton of money and I was able to make sure it was done properly.
So to change these components I suggest the following parts:
All Gates
1x K061015 belt
1x 36157 ribbed idler pulley
1x 38274 Belt Tensioner
2x 38001 smooth idler pullies


So you will find yourself looking under the hood of your truck as seen here

What you will need to do is loosen the 10mm bolt hold the air intake snorkel and remove it.
Now you are here

Looking over the fan shroud, you will see the belt tensioner on the left side of the belt-drive system. The tensioner needs to be relaxed in order to remove the belt. To do that you take a 1/2 drive rachet and insert it into the 1/2" drive point on the tensioner. It is along the tenioner arm. Then attach a breaker bar to the rachet and pull towards the drivers side of the truck. This pushed the tensioner down and allows you to loosen the belt and snake it towards the lower passenger side of the truck.


This picture is a bit blurry, but you can see how I was snaking the belt through the front of the engine.

Now once the belt is out and removed, you can focus your attention on removing the tensioner. The tensioner is held on by 3x 10mm bolts. One on each side and one on the top.

I loosened them all a little at once and then left the one on the right so it did not fall off. Holding both the tensioner and the bolt I carefully pulled them off since you reuse the hardware.
Then take your new tensioner and put it back in the same position as the original one you removed as seen below.

When you being to tighten down the bolts, do a little at a time and them torque to 18 ft/lbs. And here it is installed and torqued down:

After being on this website since high school and now graduating college in a month, I am finally ready to give back what I have learned here. I had no vehicle experience prior to this so I have taken that into my own hands to fix that. I did this job myself and it saved me a ton of money and I was able to make sure it was done properly.
So to change these components I suggest the following parts:
All Gates
1x K061015 belt
1x 36157 ribbed idler pulley
1x 38274 Belt Tensioner
2x 38001 smooth idler pullies
So you will find yourself looking under the hood of your truck as seen here
What you will need to do is loosen the 10mm bolt hold the air intake snorkel and remove it.
Now you are here
Looking over the fan shroud, you will see the belt tensioner on the left side of the belt-drive system. The tensioner needs to be relaxed in order to remove the belt. To do that you take a 1/2 drive rachet and insert it into the 1/2" drive point on the tensioner. It is along the tenioner arm. Then attach a breaker bar to the rachet and pull towards the drivers side of the truck. This pushed the tensioner down and allows you to loosen the belt and snake it towards the lower passenger side of the truck.
This picture is a bit blurry, but you can see how I was snaking the belt through the front of the engine.
Now once the belt is out and removed, you can focus your attention on removing the tensioner. The tensioner is held on by 3x 10mm bolts. One on each side and one on the top.
I loosened them all a little at once and then left the one on the right so it did not fall off. Holding both the tensioner and the bolt I carefully pulled them off since you reuse the hardware.
Then take your new tensioner and put it back in the same position as the original one you removed as seen below.
When you being to tighten down the bolts, do a little at a time and them torque to 18 ft/lbs. And here it is installed and torqued down:
Thread Starter
|
Senior Member
Joined: Jan 2009
Posts: 10,731
Likes: 47
From: Concord, NC
Now you can focus your attention to the idler pullies. The are 2 smooth and one ribbed. To remove the idlers, you need a ratchet and a 13mm socket. The pulley system is only held on with light torque, so I was able to break each one loose easily. I'd recommend mechanics gloves since the ratchet jerking and sending your hands into the shroud hurts 
Here is the first one removed on the drivers side:

And this is looking down to the ribbed pulley that is directly underneath this smooth one:

Here you can see me about to remove the ribbed idler bolt

And she's out:

The last pulley is above the belt tensioner and is the second smooth pulley in the system

And here it is out:

Now installation is the reverse of removal. Each pulley is torqued to 18 ft/lbs. Make sure you jiggle the pulley as it goes on so that you seat it properly. They appeared to be seated, but then I jiggled them and the slid in further and fit like the originals I removed.
Here are the idlers installed:


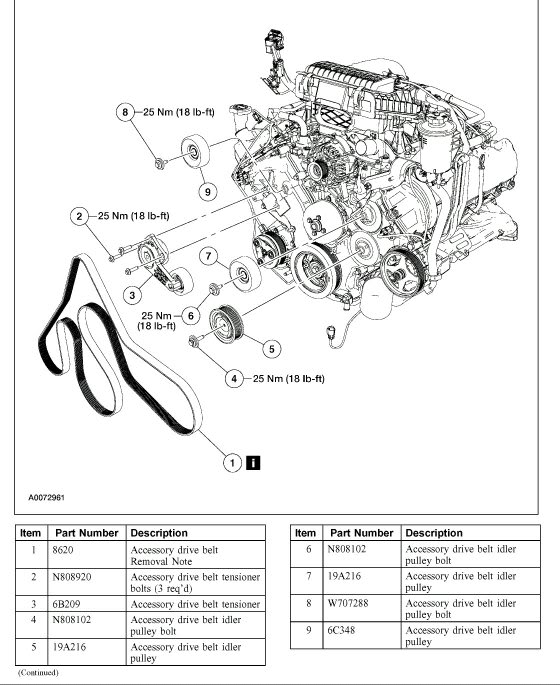
Snaking the belt through the system is not hard, but it is a bit tedious. Make sure you pay close attention to the diagram so that you see how it is routed. I did everything myself up until loosening the tensioner to slide the belt on. Having the belt already snaked through makes it easy once an extra set of hands loosen the tensioner. My brother pushed it to the max amount of play and it popped the belt right on the lowest pulley in the center of the truck. Check to make sure that the belt is seated in all of the grooves before starting. Once you've down that, start here up and admire your work.

Here is the first one removed on the drivers side:
And this is looking down to the ribbed pulley that is directly underneath this smooth one:
Here you can see me about to remove the ribbed idler bolt
And she's out:
The last pulley is above the belt tensioner and is the second smooth pulley in the system
And here it is out:
Now installation is the reverse of removal. Each pulley is torqued to 18 ft/lbs. Make sure you jiggle the pulley as it goes on so that you seat it properly. They appeared to be seated, but then I jiggled them and the slid in further and fit like the originals I removed.
Here are the idlers installed:
Snaking the belt through the system is not hard, but it is a bit tedious. Make sure you pay close attention to the diagram so that you see how it is routed. I did everything myself up until loosening the tensioner to slide the belt on. Having the belt already snaked through makes it easy once an extra set of hands loosen the tensioner. My brother pushed it to the max amount of play and it popped the belt right on the lowest pulley in the center of the truck. Check to make sure that the belt is seated in all of the grooves before starting. Once you've down that, start here up and admire your work.
Last edited by TruckGuy24; Nov 9, 2013 at 03:16 PM.





Senior Member
Joined: Feb 2004
Posts: 10,390
Likes: 10
Great job!
TAC and a spot in the Tech Articles section for you!
Just FYI - for folks who don't wish to R&R the pulleys entirely, just buy some F A G 6203 bearings and press them in with a vise & suitable sized socket ( clean the bore with emery cloth and very lightly grease it to ease installation ).
This will save a pile of ca-ching ( enough to upgrade the belt to a Goodyear Gatorback , lol. ) Additionally, if you do elect to change pulleys, press new bearings into the existing old shells as spares. Ya never know....
Reference: https://www.f150online.com/forums/20...-bearings.html
TAC and a spot in the Tech Articles section for you!
Just FYI - for folks who don't wish to R&R the pulleys entirely, just buy some F A G 6203 bearings and press them in with a vise & suitable sized socket ( clean the bore with emery cloth and very lightly grease it to ease installation ).
This will save a pile of ca-ching ( enough to upgrade the belt to a Goodyear Gatorback , lol. ) Additionally, if you do elect to change pulleys, press new bearings into the existing old shells as spares. Ya never know....
Reference: https://www.f150online.com/forums/20...-bearings.html
Last edited by MGDfan; Nov 10, 2013 at 10:33 AM. Reason: *sigh* there goes the preschool spelling agin! lol
Trending Topics



Senior Member

Joined: Sep 2004
Posts: 336
Likes: 4
From: Groton, MA
Nice write-up TruckGuy24. I just replaced all my pulleys and belt today and I used this post as a reference. Very helpful. The Only thing I did different is that I replaced the tensioner pulley instead of the whole tensioner. Both the smooth pulleys were rough and the tensioner pulley was toast. My truck is now as quiet as when I drove it off the lot.
Thanks for a very helpful post
Thanks for a very helpful post

