2004 - 2008 F-150

Cowl Removal and Painting Step-By-Step (56K Waring)

  #31  
Old 05-04-2008, 08:14 PM
tardman91's Avatar
Technical Article Contributor

Thread Starter
Join Date: Aug 2005
Location: New Port Richey, FL
Posts: 2,331
Likes: 0
Received 0 Likes on 0 Posts
Originally Posted by davenay
A word of caution about removing the wiper arms. There is a small metal key that aligns the arm with a notch in the drive. This key is not secured, and can fall out and get lost if you are not careful.
Good addition! I forgot to put that in there. On mine the driver side was attached when I removed it. I thought maybe the passenger side didn't have one when I took it off, but I found it when I was cleaning out the "cavern" beneath the cowl.
 
  #32  
Old 05-04-2008, 11:07 PM
05_F150's Avatar
Senior Member
Join Date: Feb 2005
Location: Palm Beach, FL
Posts: 223
Likes: 0
Received 0 Likes on 0 Posts
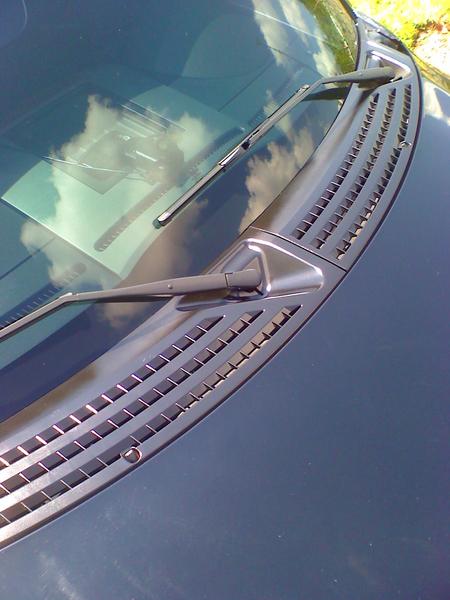
I painted my bed rails and wiper cowl today, from the look of it they look great.. Will post pics tomorrow when all dried and installed.. FYI broke 1 clip on each side n none on tailgate cap, take ur time n its easy.
 
  #33  
Old 05-05-2008, 10:17 AM
dkstone05's Avatar
Senior Member
Join Date: Sep 2005
Location: Indianapolis, area
Posts: 816
Likes: 0
Received 1 Like on 1 Post
I did my cowl the same day tardman post this. I used the same Fusion paint 3 coats but I did not put the clear on. I couldn't find the Fusion clear. So far it looks great and very easy to do.
 
  #34  
Old 05-06-2008, 12:43 AM
Nates06SCab's Avatar
Senior Member
Join Date: Dec 2005
Location: Cape Coral, Florida
Posts: 936
Likes: 0
Received 0 Likes on 0 Posts
Nice write-up. I've been thinking about doing the same, but I found a new-to-me Meg's trim treatment at Advance that made them look deep black, but not glossy.
 
  #35  
Old 05-06-2008, 10:24 AM
j2h1's Avatar
Senior Member
Join Date: Jun 2007
Location: SCPA
Posts: 225
Likes: 0
Received 0 Likes on 0 Posts
has any one drilled out the cowl where it is solid in a couple places so it can drain? I just took mine off this weekend to see about putting the sat radio and nav antennas under it. I broke some of the clips that go under the windshield also had to reapply rtv silicon to the "plastic tree" holder on the pass side window. I did not get to paint it but now I think I have yet another summer project.
 
  #36  
Old 05-06-2008, 12:27 PM
j2h1's Avatar
Senior Member
Join Date: Jun 2007
Location: SCPA
Posts: 225
Likes: 0
Received 0 Likes on 0 Posts
Originally Posted by j2h1
has any one drilled out the cowl where it is solid in a couple places so it can drain?
Disregard that, I see the wiper motor is under it. Guess we have to fab up a shield over it before we drill or dremel the holes.
 
  #37  
Old 05-07-2008, 11:20 AM
05_F150's Avatar
Senior Member
Join Date: Feb 2005
Location: Palm Beach, FL
Posts: 223
Likes: 0
Received 0 Likes on 0 Posts
Here of my pics of my finished product:
No prime or sand, just degresed


  #38  
Old 05-07-2008, 12:19 PM
ckforker's Avatar
Senior Member
Join Date: Aug 2005
Location: Charlotte
Posts: 204
Likes: 0
Received 5 Likes on 5 Posts
Your truck looks awesome, I am going to do this. The next thing that really looks like crap on my truck are the door handles. Those I will probably hav eto take off.
 
  #39  
Old 05-07-2008, 12:47 PM
05_F150's Avatar
Senior Member
Join Date: Feb 2005
Location: Palm Beach, FL
Posts: 223
Likes: 0
Received 0 Likes on 0 Posts
I wanna attemp to do my mirrors, they still look good but ima see how the spray paint holds up on the bed rails n wiper cowl in Floridas summer sun n rain.. The cowl was easy to remove and paint, the bed caps were easy too just start at one end and slowly pop off.. I wouldnt spray paint anything without taking it off and painting in my ware house.. All i need now is a quiet motor and no bed bonce and ill be as happy as when i drove it off the lot
 
  #40  
Old 05-07-2008, 02:45 PM
tardman91's Avatar
Technical Article Contributor

Thread Starter
Join Date: Aug 2005
Location: New Port Richey, FL
Posts: 2,331
Likes: 0
Received 0 Likes on 0 Posts
Your bed caps came out great! That might be something for me to try and tackle over the summer.
I'm just worried about how they'll hold up seeing as they get a lot more contact/abuse than the cowl. Definitely keep us posted about how they hold up!
 
  #41  
Old 05-07-2008, 07:39 PM
Bluejay's Avatar
Global Moderator &
Senior Member

Join Date: Mar 2005
Location: Burleson/Athens/Brownsboro, TX
Posts: 26,015
Received 68 Likes on 64 Posts
There appears to be one push-pin on each cowl piece, located near the fenders. How do you remove these without breaking them?
 
__________________
Jim
  #42  
Old 05-07-2008, 09:08 PM
dkstone05's Avatar
Senior Member
Join Date: Sep 2005
Location: Indianapolis, area
Posts: 816
Likes: 0
Received 1 Like on 1 Post
Originally Posted by bluejay432000
There appears to be one push-pin on each cowl piece, located near the fenders. How do you remove these without breaking them?
Just pull straight up. It's tough and I thought they were going to break but they ended up coming out just fine.
 
  #43  
Old 05-07-2008, 09:13 PM
Bluejay's Avatar
Global Moderator &
Senior Member

Join Date: Mar 2005
Location: Burleson/Athens/Brownsboro, TX
Posts: 26,015
Received 68 Likes on 64 Posts
Originally Posted by dkstone05
Just pull straight up. It's tough and I thought they were going to break but they ended up coming out just fine.
OK, thanks, I was afraid they would break, pulling on them.
 
__________________
Jim
  #44  
Old 05-09-2008, 09:31 AM
tardman91's Avatar
Technical Article Contributor

Thread Starter
Join Date: Aug 2005
Location: New Port Richey, FL
Posts: 2,331
Likes: 0
Received 0 Likes on 0 Posts
Originally Posted by bluejay432000
OK, thanks, I was afraid they would break, pulling on them.
I just lifted them enough to be able to fit some small pliers around the base and pulled up. You'll think you're going to break them, but you won't. One was easy enough for me to remove with my fingers. The other one I need the pliers (I have fat fingers ).
 
  #45  
Old 05-09-2008, 02:30 PM
tx-import's Avatar
Member
Join Date: Apr 2005
Location: Fort Worth
Posts: 84
Likes: 0
Received 0 Likes on 0 Posts
For teh bed rails you may want to try the duplicolor bumper paint. It is suppose to be flexiable and is used for restoring older bumpers. They have a picture on their site where someone with a chevy avalanche with the plastic on the sides use it. Just a thought espceially for the bed rails
 

Thread Tools
Search this Thread
Quick Reply: Cowl Removal and Painting Step-By-Step (56K Waring)


All times are GMT -4. The time now is 07:31 PM.