Write-up: Auto Spring 2.5" Leveling Kit Install
#1
 10-01-2007, 09:14 AM


Join Date: Aug 2006
Location: Katy, TX
Posts: 82
Likes: 0
Received 0 Likes
on
0 Posts
Write-up: Auto Spring 2.5" Leveling Kit Install
My buddy just bought a 2004 regular cab FX4 about a week ago. I am taking his place on the forum because message boards are my kind of place and I have been on here for a little while. The rear end of the truck is extremely high in stock form, and seems even higher with regular cab F-150s. So, a couple days into ownership and he had an Auto Spring 2.5" leveling kit on order ($90 shipped...can't beat that). We did the install Friday night.
I wanted to put together a little write-up for those of you out there that are on the fence about doing this install yourself. This install could not possibly be any easier, and can be done completely in your garage with hand tools.
This is one of three leveling kit installs I’ve done. Each one on a different model of full-size truck, and this was the easiest. That is on top of a few other full suspension lifts and several body lifts I’ve done. Basically, they just get easier and easier. This install took us about 3 hours using only hand tools, and included one trip to AutoZone because it was the only place open at the time where we could get a particular socket.....more on that later.
I took pictures along the way that I will post along with sort of a play by play of our install experience.
And just so you don't have to wait until the end....
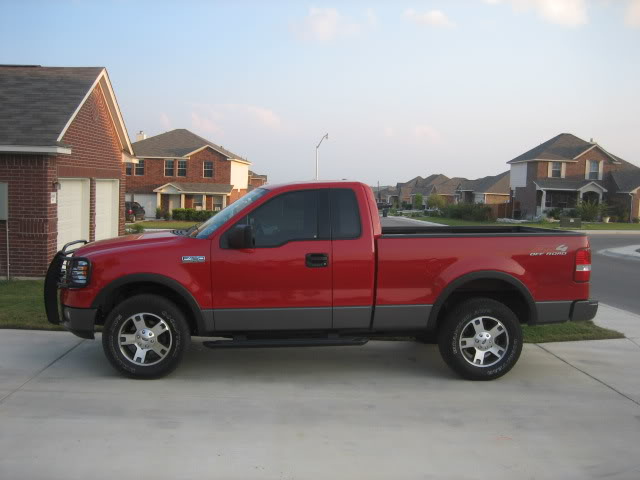
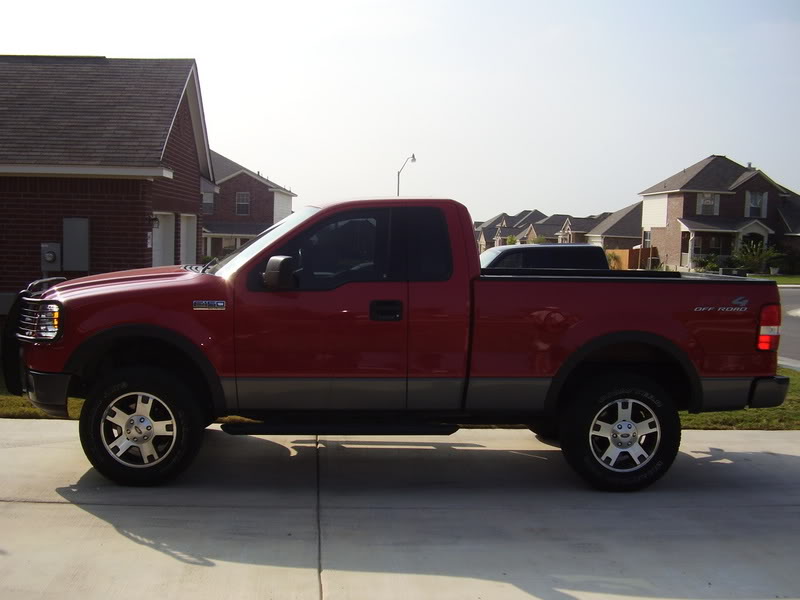
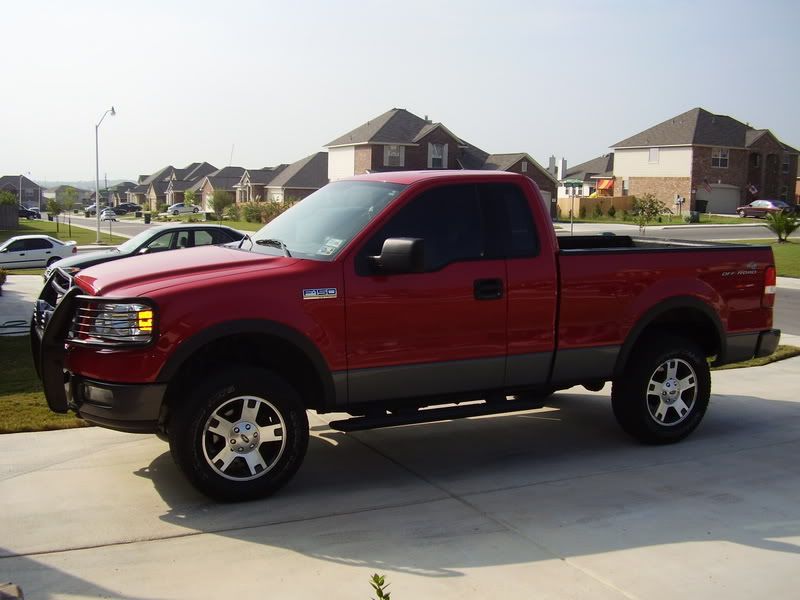
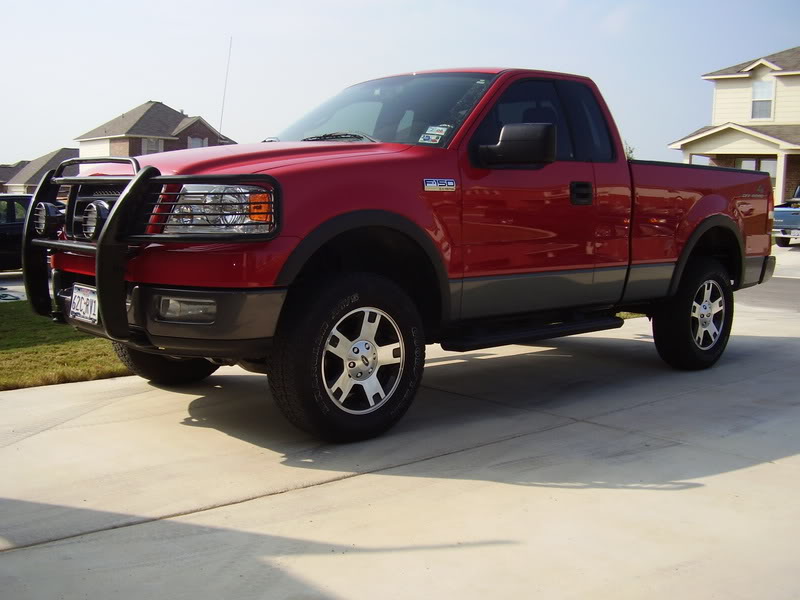
Pre-lift:
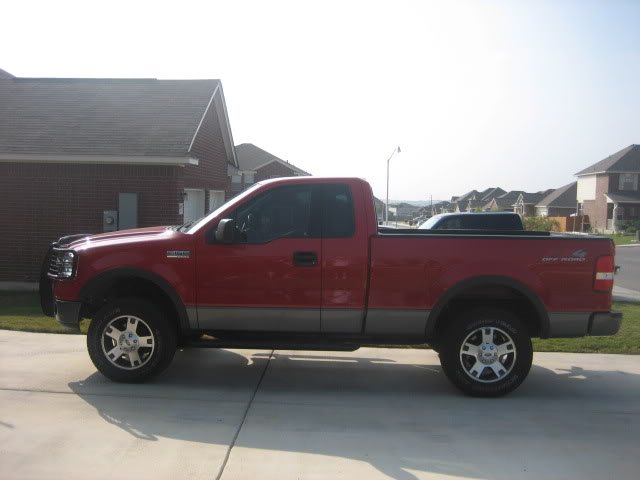
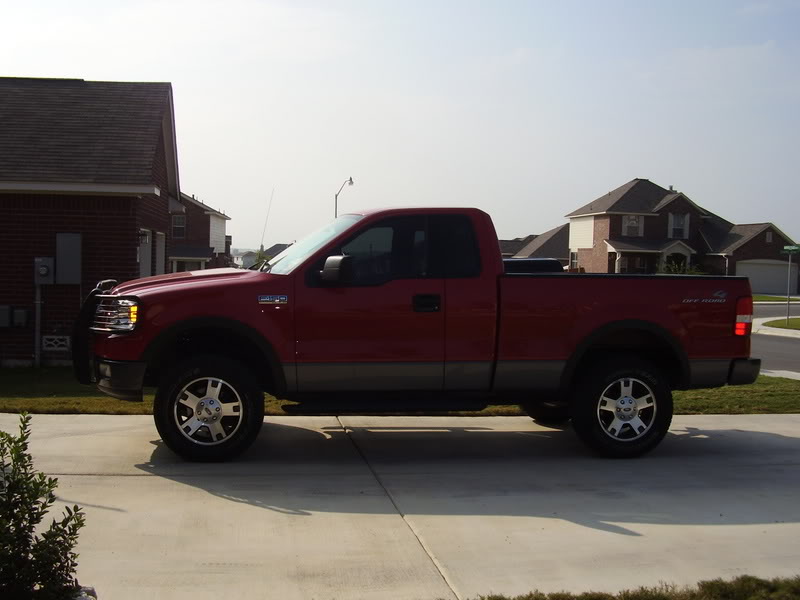
Post-lift:
The instructions Auto Spring includes are simple, but all that is needed to get you through the installation of their kit.
To begin, they give you a list of tools you will need. we found a couple discrepancies here and there so I will give you the exact list of tools needed so if you're on a tight budget and you don’t already have everything, you won't have to go out and buy stuff you don't need....not that having more tools is a bad thing.
* 15mm socket and wrench - the socket is used to remove the three upper strut nuts and the wrench will be used to tighten those same nuts when you put the spacer on top of the strut.
* 17mm socket - this is needed to tighten the new/included nuts to the new strut bolts (attached to the spacer) which go through the tower. The directions also call for a 17mm wrench, but it is not needed. We had room to use a deep socket, but a standard is all you need.
* 18mm deep socket – this is used to remove the sway bar bolt.
* 21mm deep socket – you will use this to remove the ball joint nut. The instructions say to use it to remove your lug nuts, which you certainly could, but the factory tire iron is easier to use….unless you’re using air tools.
* 30mm socket – this is needed to remove the nut on the lower strut bolt. The instructions say you can use a 30mm socket OR a 1 1/16 socket, but the 1 1/16 is too small for the nut. We made the mistake initially of not getting the 30mm socket from the get-go because I had the 1 1/16; however, since it didn’t work, picking up the socket was our trip to AutoZone.
* 1 1/16 wrench – you will need this for the bolt end of the lower strut…bolt.
* Floor Jack – make sure your floor jack will go up to at least 21”. You have a big truck, you need a big jack. i personally wouldn't use anything less than a 3 ton.
* Jack Stands – you would be best with at least 6 ton stands for height, strength, and stability.
* Pitman Arm Puller – the instructions say to use a 1 or 2 pound hammer to knock the ball joint bolt free from the spindle, but the pitman arm puller also works if you have one or can easily rent one.
Step One
Using the flat-head end of your stock tire iron, pop off the center cap of the front rim on the side of the truck you will start with.
Step Two
While the tire is still on the ground, loosen but do not remove all of the lug nuts with the tire iron.
Step Three
Place the floor jack under the front suspension crossmember and jack the front end up.
Step Four
Place a jack stand under the forward most part of the straight part of frame and lower the jack allowing the weight of the truck to rest on the jack stand. For added security, it is good practice to keep the jack in place as an added safety net.
Step Five
Remove the lug nuts and remove the tire.
I wanted to put together a little write-up for those of you out there that are on the fence about doing this install yourself. This install could not possibly be any easier, and can be done completely in your garage with hand tools.
This is one of three leveling kit installs I’ve done. Each one on a different model of full-size truck, and this was the easiest. That is on top of a few other full suspension lifts and several body lifts I’ve done. Basically, they just get easier and easier. This install took us about 3 hours using only hand tools, and included one trip to AutoZone because it was the only place open at the time where we could get a particular socket.....more on that later.
I took pictures along the way that I will post along with sort of a play by play of our install experience.
And just so you don't have to wait until the end....
Pre-lift:
Post-lift:
The instructions Auto Spring includes are simple, but all that is needed to get you through the installation of their kit.
To begin, they give you a list of tools you will need. we found a couple discrepancies here and there so I will give you the exact list of tools needed so if you're on a tight budget and you don’t already have everything, you won't have to go out and buy stuff you don't need....not that having more tools is a bad thing.
* 15mm socket and wrench - the socket is used to remove the three upper strut nuts and the wrench will be used to tighten those same nuts when you put the spacer on top of the strut.
* 17mm socket - this is needed to tighten the new/included nuts to the new strut bolts (attached to the spacer) which go through the tower. The directions also call for a 17mm wrench, but it is not needed. We had room to use a deep socket, but a standard is all you need.
* 18mm deep socket – this is used to remove the sway bar bolt.
* 21mm deep socket – you will use this to remove the ball joint nut. The instructions say to use it to remove your lug nuts, which you certainly could, but the factory tire iron is easier to use….unless you’re using air tools.
* 30mm socket – this is needed to remove the nut on the lower strut bolt. The instructions say you can use a 30mm socket OR a 1 1/16 socket, but the 1 1/16 is too small for the nut. We made the mistake initially of not getting the 30mm socket from the get-go because I had the 1 1/16; however, since it didn’t work, picking up the socket was our trip to AutoZone.
* 1 1/16 wrench – you will need this for the bolt end of the lower strut…bolt.
* Floor Jack – make sure your floor jack will go up to at least 21”. You have a big truck, you need a big jack. i personally wouldn't use anything less than a 3 ton.
* Jack Stands – you would be best with at least 6 ton stands for height, strength, and stability.
* Pitman Arm Puller – the instructions say to use a 1 or 2 pound hammer to knock the ball joint bolt free from the spindle, but the pitman arm puller also works if you have one or can easily rent one.
Step One
Using the flat-head end of your stock tire iron, pop off the center cap of the front rim on the side of the truck you will start with.
Step Two
While the tire is still on the ground, loosen but do not remove all of the lug nuts with the tire iron.
Step Three
Place the floor jack under the front suspension crossmember and jack the front end up.
Step Four
Place a jack stand under the forward most part of the straight part of frame and lower the jack allowing the weight of the truck to rest on the jack stand. For added security, it is good practice to keep the jack in place as an added safety net.
Step Five
Remove the lug nuts and remove the tire.
Last edited by TXST8tj; 03-11-2011 at 12:46 PM.
#2
10-01-2007, 09:16 AM
Join Date: Aug 2006
Location: Katy, TX
Posts: 82
Likes: 0
Received 0 Likes
on
0 Posts
Step Six
Using the 18mm deep socket, remove the nut on the underside of the sway bar.
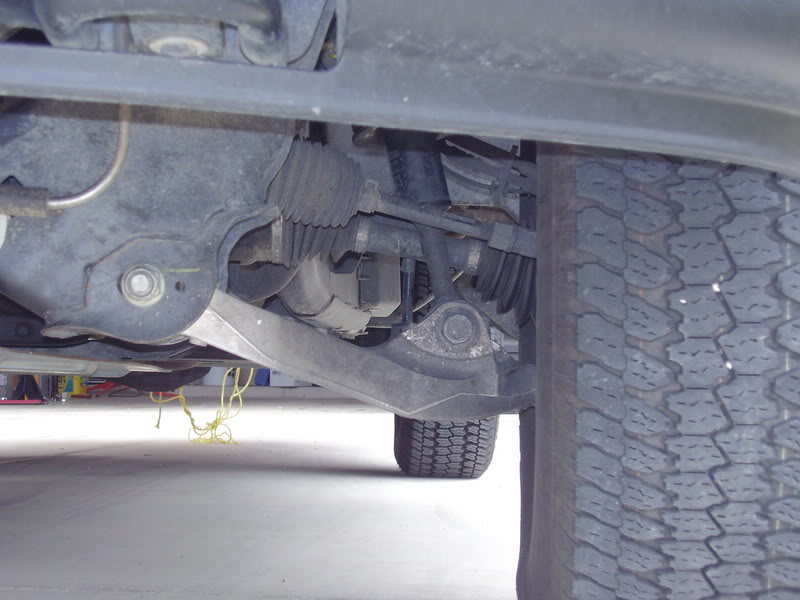
Step Seven
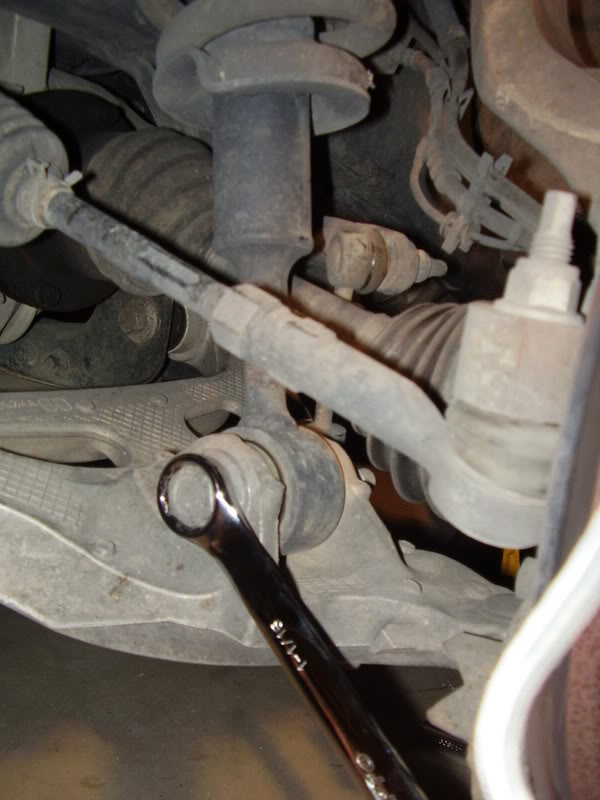
Remove the lower strut bolt using the 30mm socket on the nut end and the 1 1/16” wrench on the bolt end. A note on this nut and bolt…..it is a bear to break loose, so if you’re not strong enough, go grab a buddy that is. I’m not kidding. I'm a hoss, so it was not a problem for me hehe.
Step Eight
Remove the three upper strut nuts using the 15mm socket.
Step Nine
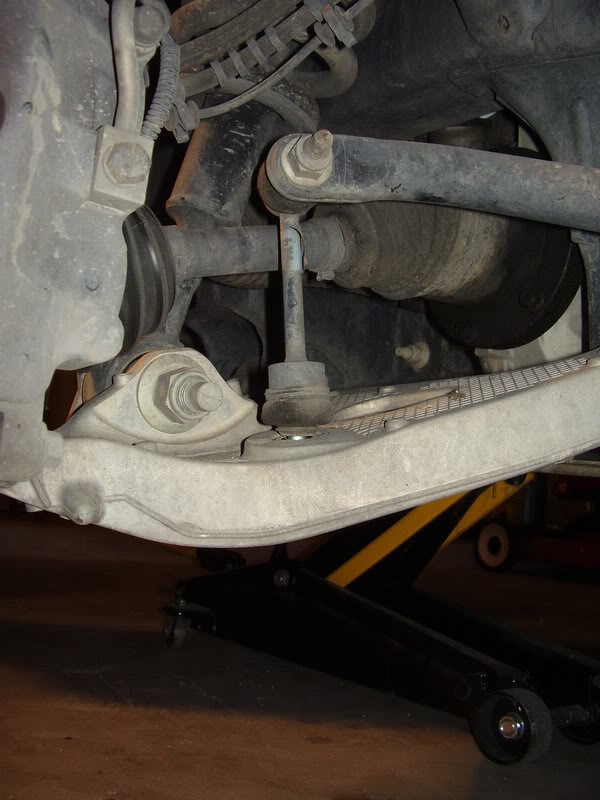
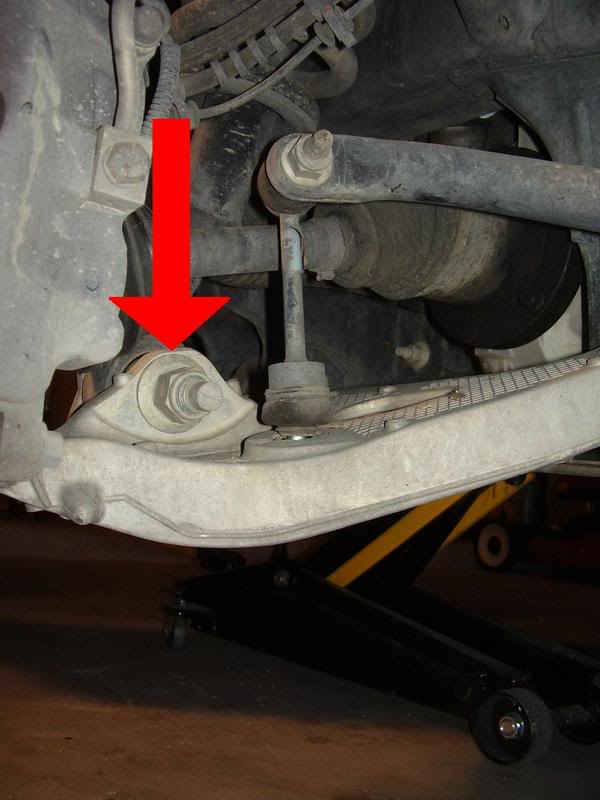
Loosen, but do not remove the nut on the ball joint bolt with the 21mm deep socket.
Using the 18mm deep socket, remove the nut on the underside of the sway bar.
Step Seven
Remove the lower strut bolt using the 30mm socket on the nut end and the 1 1/16” wrench on the bolt end. A note on this nut and bolt…..it is a bear to break loose, so if you’re not strong enough, go grab a buddy that is. I’m not kidding. I'm a hoss, so it was not a problem for me hehe.
Step Eight
Remove the three upper strut nuts using the 15mm socket.
Step Nine
Loosen, but do not remove the nut on the ball joint bolt with the 21mm deep socket.
Last edited by TXST8tj; 10-05-2007 at 09:20 AM.
#3
10-01-2007, 09:17 AM
Join Date: Aug 2006
Location: Katy, TX
Posts: 82
Likes: 0
Received 0 Likes
on
0 Posts
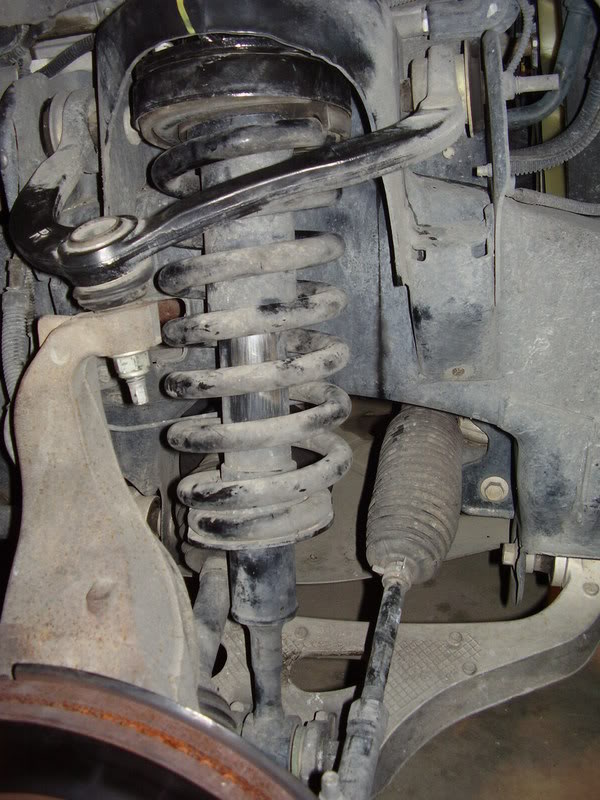
Step Ten
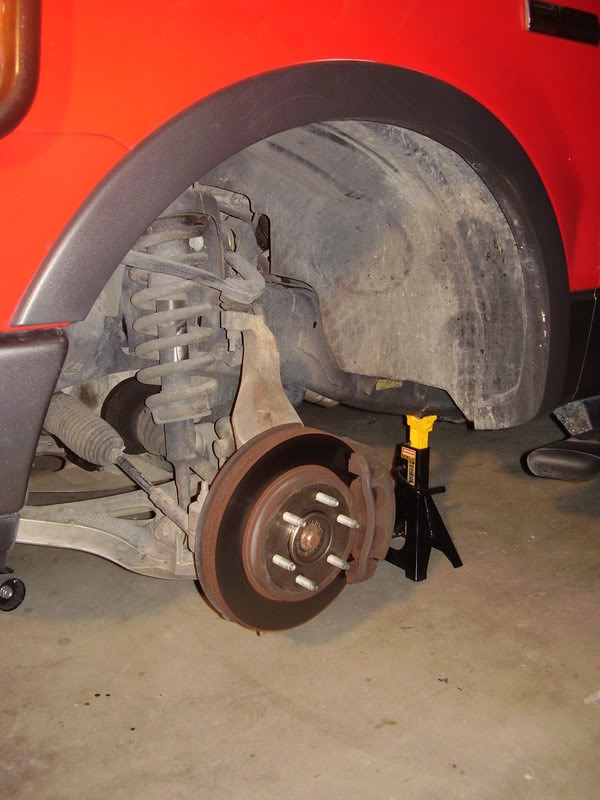
Using the pitman arm puller, break the ball joint bolt free from the spindle. The reason you did not remove the nut in the previous step is because the bolt will break free with a lot of force and the nut will keep everything from flying all over. We also moved the floor jack under the control arm in this step in case there was still some unsprung weight with the strut. There should not be, but it doesn’t hurt to be careful. This would keep the strut from flying out and the lower control arm and spindle from dropping to the ground.
(I forgot to take a picture during this step, but here is the same step using the pitman arm puller from a dodge leveling kit I did a few months ago)
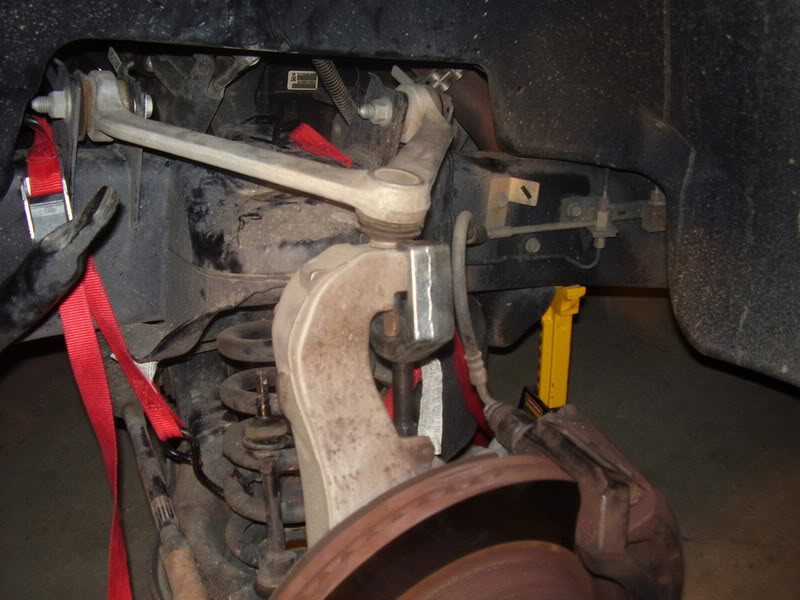
Step Eleven
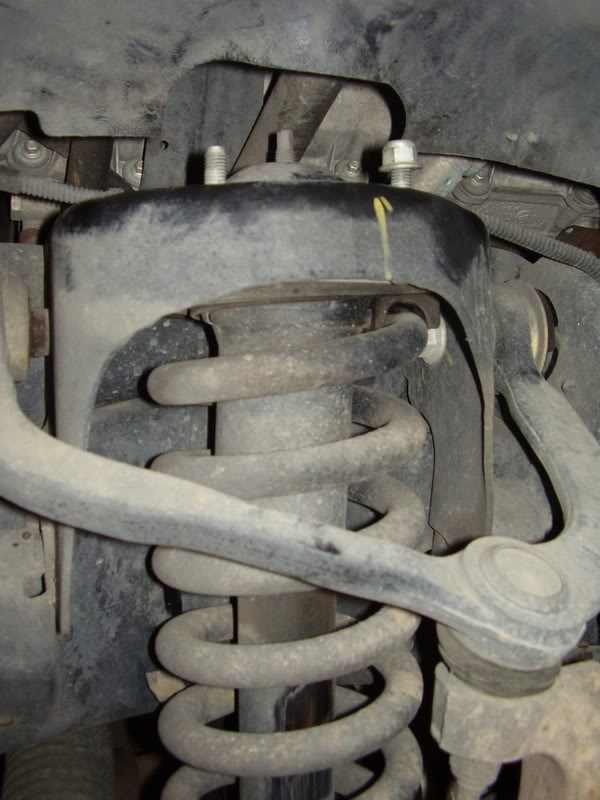
Remove the strut from its placement between the strut tower and the lower control arm. You will need to allow the lower control arm to drop to make room to pull the strut out.
(sorry the picture is so blurry)

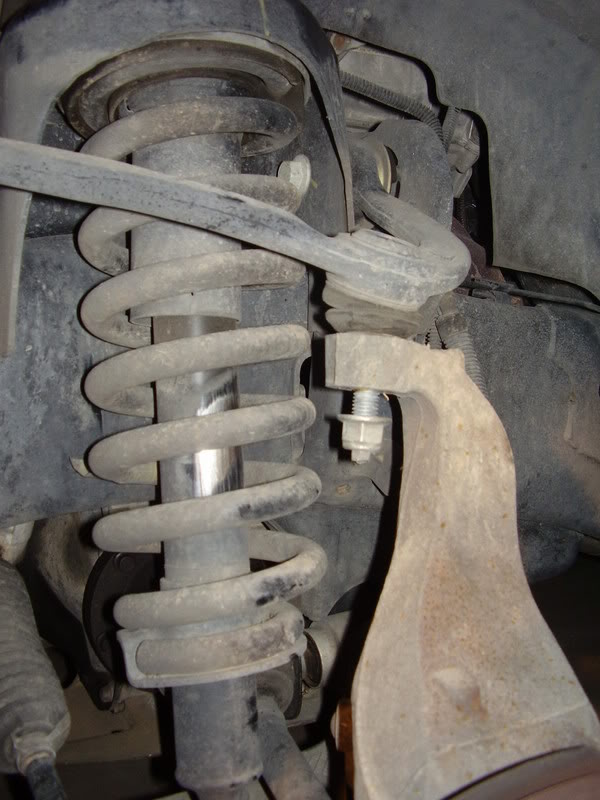
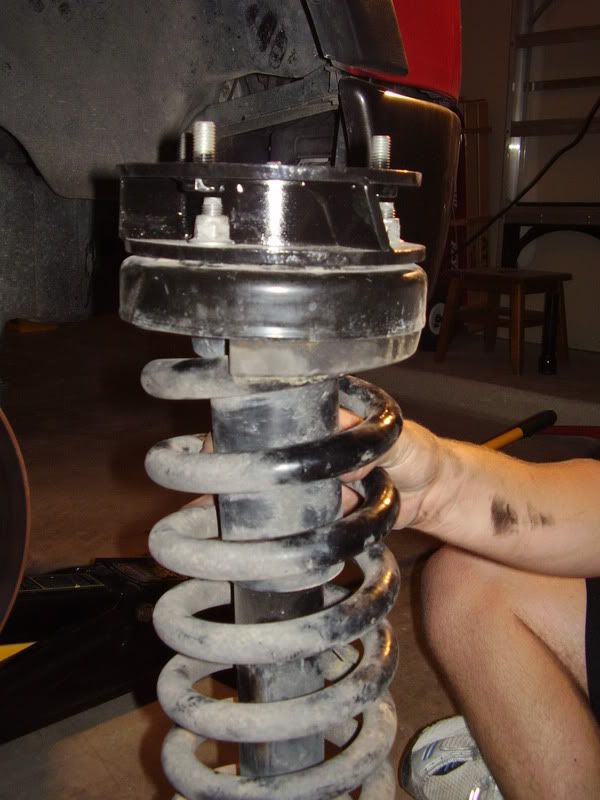
Step Twelve
Place the Auto Spring spacer on top of the strut. The spacer can only line up one way so you can’t do it wrong. Take the factory 15mm nuts and secure the spacer to the struts.

Tighten the nuts with the 15mm wrench.
Using the pitman arm puller, break the ball joint bolt free from the spindle. The reason you did not remove the nut in the previous step is because the bolt will break free with a lot of force and the nut will keep everything from flying all over. We also moved the floor jack under the control arm in this step in case there was still some unsprung weight with the strut. There should not be, but it doesn’t hurt to be careful. This would keep the strut from flying out and the lower control arm and spindle from dropping to the ground.
(I forgot to take a picture during this step, but here is the same step using the pitman arm puller from a dodge leveling kit I did a few months ago)
Step Eleven
Remove the strut from its placement between the strut tower and the lower control arm. You will need to allow the lower control arm to drop to make room to pull the strut out.
(sorry the picture is so blurry)
Step Twelve
Place the Auto Spring spacer on top of the strut. The spacer can only line up one way so you can’t do it wrong. Take the factory 15mm nuts and secure the spacer to the struts.
Tighten the nuts with the 15mm wrench.
Last edited by TXST8tj; 10-01-2007 at 09:57 AM.
#4
10-01-2007, 09:18 AM
Join Date: Aug 2006
Location: Katy, TX
Posts: 82
Likes: 0
Received 0 Likes
on
0 Posts
Step Thirteen
Put the strut back in place. You will be able to tell which direction it goes back into place because the lower bolt hole of the strut has to line up and only one bolt is on the engine side of the strut tower. The strut is also angled at the top to match the angle of the upper strut tower.
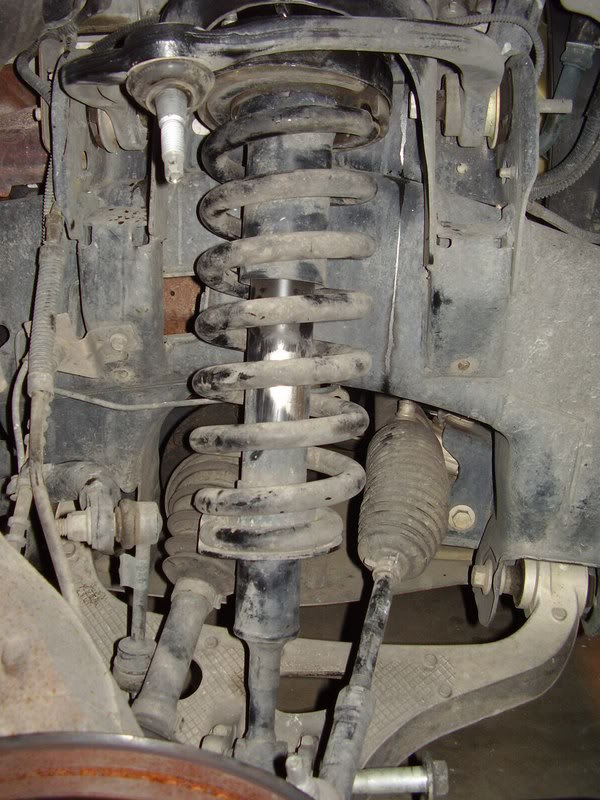
Secure the strut into place with the supplied 17mm nuts and tighten.
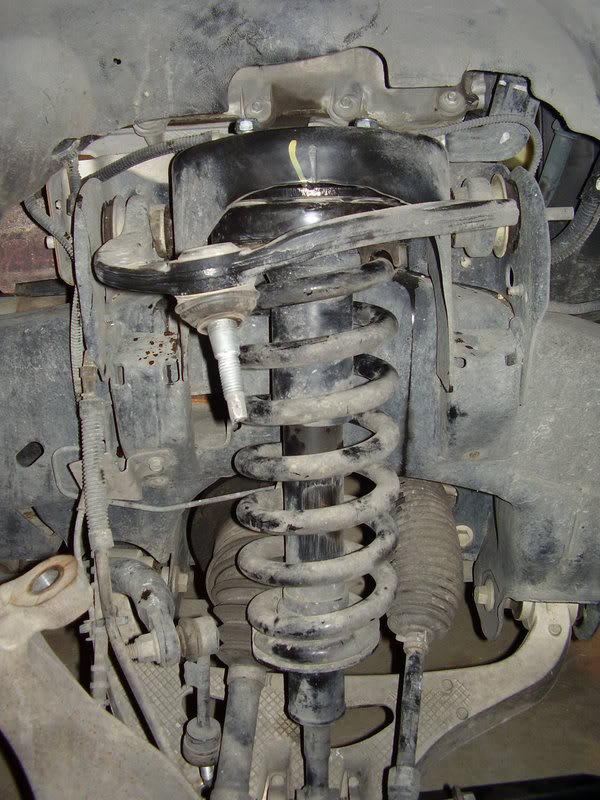
Step Fourteen
Replace the lower strut bolt and nut and retighten.
Step Fifteen
Bolt the ball joint/upper control arm back to the spindle. It may be helpful to have a friend jack the lower control arm up a bit while you lower the upper control arm down to meet the spindle. Have the 21mm nut handy to thread back on the ball joint bolt because it’s not going to want to stay in place by itself.
Retighten the 21mm ball joint nut.
Step Sixteen
Replace and tighten the 18mm sway bar nut.
Step Seventeen
Put the tire back on and thread lug nuts on.
Put the strut back in place. You will be able to tell which direction it goes back into place because the lower bolt hole of the strut has to line up and only one bolt is on the engine side of the strut tower. The strut is also angled at the top to match the angle of the upper strut tower.
Secure the strut into place with the supplied 17mm nuts and tighten.
Step Fourteen
Replace the lower strut bolt and nut and retighten.
Step Fifteen
Bolt the ball joint/upper control arm back to the spindle. It may be helpful to have a friend jack the lower control arm up a bit while you lower the upper control arm down to meet the spindle. Have the 21mm nut handy to thread back on the ball joint bolt because it’s not going to want to stay in place by itself.
Retighten the 21mm ball joint nut.
Step Sixteen
Replace and tighten the 18mm sway bar nut.
Step Seventeen
Put the tire back on and thread lug nuts on.
Last edited by TXST8tj; 10-01-2007 at 09:54 AM.
#5
10-01-2007, 09:19 AM
Join Date: Aug 2006
Location: Katy, TX
Posts: 82
Likes: 0
Received 0 Likes
on
0 Posts
Step Eighteen
Jack the truck up enough to remove the jack stand and lower the truck back to the ground.
Step Nineteen
Tighten all lug nuts and replace center cap.
*Note: tighten all nuts to factory torque specs. Auto Spring notes each of these torque specs on their instruction sheet.
Step Twenty
Repeat all above steps on the other side of the truck.
Step Twenty-one
Marvel in the good work you just completed and the new and improved look of your truck.
Last edited by TXST8tj; 10-01-2007 at 09:55 AM.


#7
10-01-2007, 09:53 AM


Join Date: Jul 2006
Location: Fairfax, Va.
Posts: 2,774
Likes: 0
Received 0 Likes
on
0 Posts
Trending Topics
#8
10-01-2007, 10:06 AM
Join Date: Aug 2006
Location: Katy, TX
Posts: 82
Likes: 0
Received 0 Likes
on
0 Posts
#9
10-01-2007, 11:12 AM

Senior Member
Join Date: Oct 2006
Location: Arkansas
Posts: 1,186
Likes: 0
Received 0 Likes
on
0 Posts

#10
10-01-2007, 11:28 AM
Join Date: Aug 2006
Location: Katy, TX
Posts: 82
Likes: 0
Received 0 Likes
on
0 Posts
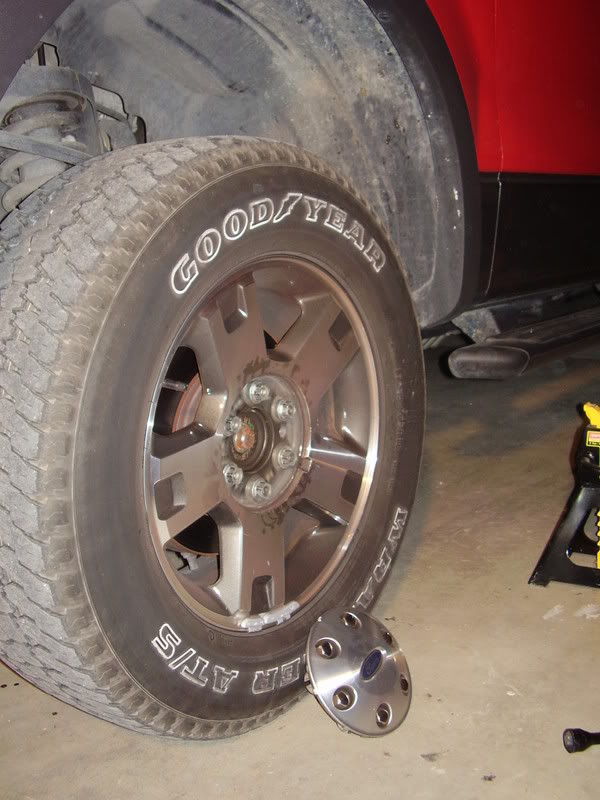
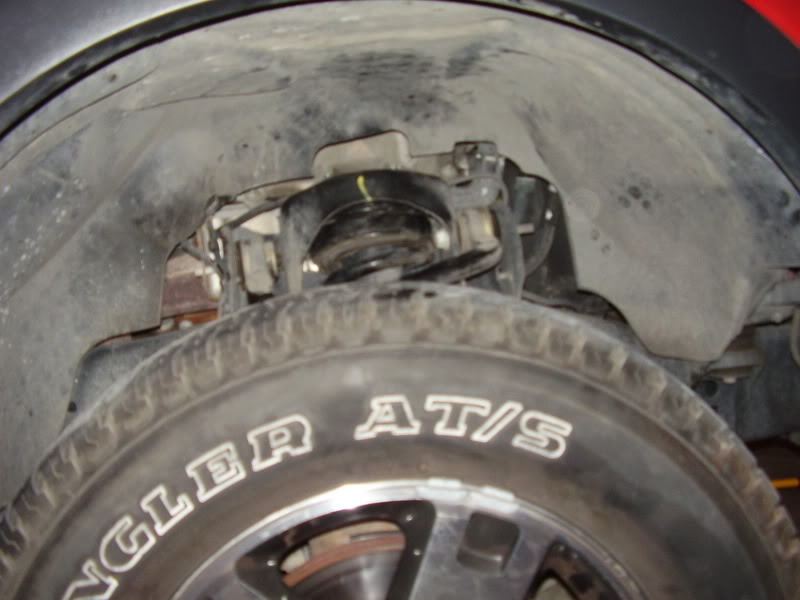
thanks....the 30mm socket doesn't need to be a deep socket because the standard socket is so big itself by nature that it is plenty deep.
this is the best picture of the 30mm nut i have. i should've held the socket up to it to show how big it is, but a deep socket is not necessary.
this is the best picture of the 30mm nut i have. i should've held the socket up to it to show how big it is, but a deep socket is not necessary.
Last edited by TXST8tj; 10-01-2007 at 11:31 AM.

#12
10-01-2007, 12:32 PM
Join Date: Aug 2006
Location: Katy, TX
Posts: 82
Likes: 0
Received 0 Likes
on
0 Posts
it would be the same basic process for the other style of leveling kits out there except they would continue on with compressing the coils after the strut is out.
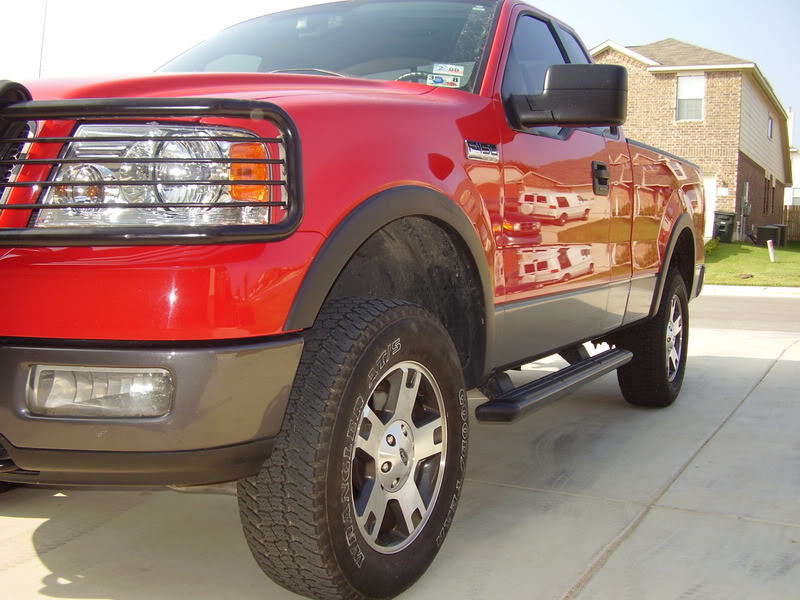
i really think the AS kit is the way to go as far as leveling kits go. it really can't get any easier to install, and retains the stock ride and handling. the stock springrate is not affected and the shocks are no more extended than stock and are not necessary to replace.
i really think the AS kit is the way to go as far as leveling kits go. it really can't get any easier to install, and retains the stock ride and handling. the stock springrate is not affected and the shocks are no more extended than stock and are not necessary to replace.
#13
10-01-2007, 05:15 PM

Senior Member
Join Date: Dec 2004
Location: Michigan
Posts: 1,763
Likes: 0
Received 0 Likes
on
0 Posts

#15
10-01-2007, 07:51 PM

Senior Member
Join Date: May 2007
Location: Gainesville
Posts: 543
Likes: 0
Received 0 Likes
on
0 Posts