Electric Tailgate Install
#1
 05-09-2004, 02:34 AM


Join Date: Jul 2003
Location: New Orleans, LA
Posts: 557
Likes: 0
Received 0 Likes
on
0 Posts
Ever since I got my Retrax cover, having to fumble around w/ an extra set of keys got annoying. So I called the folks over at Truck Gadgets and ordered a DynoLock Electric Tailgate Kit w/High Security Actuator so that I could lock/unlock the tailgate with the powerlocks.
The kit includes everything you'll need to get the job done (minus the tools). It comes with a two-wire actuator mounted to an bracket, two sections of wire (one about 3 feet in length, the other about 20 feet w/quick connectors), rubber grommet, some T-Taps, and instructions.
The install took about an hour (not counting the extra time I took to go ahead and paint my tailgate handle while I had it removed). For my piece of mind, I ran the wire inside of 1/4" split loom and taped it up w/electrical tape. The wire runs out of the drain hole in the tailgate to a waterproof connector (provided w/ the kit), down the inside of the driver's side frame member w/ the other wire harnesses, and through an existing gromet located under the rear driver's side sill plate. The wires tap into the Pink/Black (Unlock) and Pink/Orange (Lock) wires found in the driver's side kick plate. This way I have Driver's door priority on first click, and tailgate (along with the other doors) on the second click.
Here are some pictures:
Overall perspective
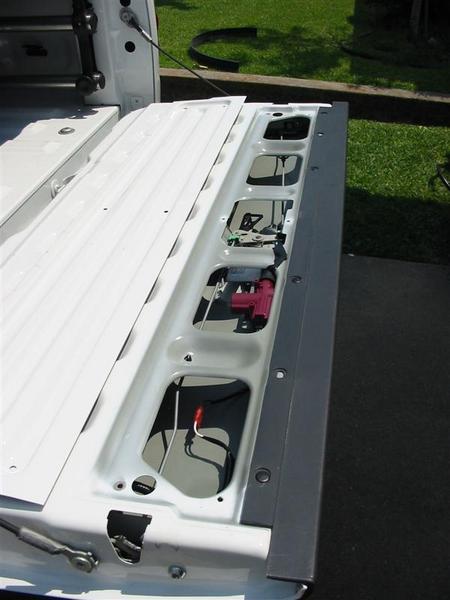
Internal Locking Mechanism w/Actuator Pin Engaged
Painted Tailgate Handle

Hope this sprouts some ideas for a few of you.
TonyPTX
The kit includes everything you'll need to get the job done (minus the tools). It comes with a two-wire actuator mounted to an bracket, two sections of wire (one about 3 feet in length, the other about 20 feet w/quick connectors), rubber grommet, some T-Taps, and instructions.
The install took about an hour (not counting the extra time I took to go ahead and paint my tailgate handle while I had it removed). For my piece of mind, I ran the wire inside of 1/4" split loom and taped it up w/electrical tape. The wire runs out of the drain hole in the tailgate to a waterproof connector (provided w/ the kit), down the inside of the driver's side frame member w/ the other wire harnesses, and through an existing gromet located under the rear driver's side sill plate. The wires tap into the Pink/Black (Unlock) and Pink/Orange (Lock) wires found in the driver's side kick plate. This way I have Driver's door priority on first click, and tailgate (along with the other doors) on the second click.
Here are some pictures:
Overall perspective
Internal Locking Mechanism w/Actuator Pin Engaged
Painted Tailgate Handle
Hope this sprouts some ideas for a few of you.
TonyPTX

#3
05-09-2004, 01:01 PM

#4
05-09-2004, 03:34 PM
Join Date: Jul 2003
Location: New Orleans, LA
Posts: 557
Likes: 0
Received 0 Likes
on
0 Posts
I didn't take any pictures of the electrical as that (to me) was pretty straight forward and actually open to just about anything that pleases you. (I can snap a few shots under the frame if you wish though). As for costs, TruckGadgets wanted $79 for the entire kit (that includes S&H and the high security actuator).
Tony
Tony
#5
05-09-2004, 03:56 PM

Senior Member
Join Date: Sep 2003
Location: Friendswood, Texas
Posts: 293
Likes: 0
Received 0 Likes
on
0 Posts
The wire runs out of the drain hole in the tailgate to a waterproof connector (provided w/ the kit), down the inside of the driver's side frame member w/ the other wire harnesses, and through an existing gromet located under the rear driver's side sill plate. The wires tap into the Pink/Black (Unlock) and Pink/Orange (Lock) wires found in the driver's side kick plate.
Don't mean to pump you with all these questions, but your mod seems like a great candidate for my next project and, not having much experience with truck hardware, I sure would appreciate a little spoon-feeding. Thanks a lot.
Dave...
#6
05-09-2004, 07:23 PM
Join Date: Jul 2003
Location: New Orleans, LA
Posts: 557
Likes: 0
Received 0 Likes
on
0 Posts
Hope these help...
Dave,
Hope these help. Sorry that I didn't remove the sill plates again for the photos, but I'm a strong believer in "if it ain't broke..." Honestly, I don't want to wear the plastic retainer clips that snap the trim piece in place down from excessive on/off cycles. You'll understand it much better once you pull them off yourself.
Here is the wire clearance hanging from the bottom of the tailgate.

Here is how the wire is routed to the frame member. I zip-tied the new wire harness to the existing big 1" wiring harness that runs in the frame channel and provides the trailer turn signal wiring.

(Continued in Next Post)
Tony
Hope these help. Sorry that I didn't remove the sill plates again for the photos, but I'm a strong believer in "if it ain't broke..." Honestly, I don't want to wear the plastic retainer clips that snap the trim piece in place down from excessive on/off cycles. You'll understand it much better once you pull them off yourself.
Here is the wire clearance hanging from the bottom of the tailgate.
Here is how the wire is routed to the frame member. I zip-tied the new wire harness to the existing big 1" wiring harness that runs in the frame channel and provides the trailer turn signal wiring.
(Continued in Next Post)
Tony
#7
05-09-2004, 07:24 PM
Join Date: Jul 2003
Location: New Orleans, LA
Posts: 557
Likes: 0
Received 0 Likes
on
0 Posts
Continued from Above...
Somewheres near the driver's side rear door and the gas tank area, exit the frame from the top and run toward the outer side near the cab step supports and on to the grommet. Use any convient holes to zip-tie your harness. I added some silicone sealant to the grommet after I passed the wire harness through for extra protection.

The wire enters into the cab from here. Remove the front driver's sill plate in a similar manor. From there, just run the wire up the channel to the front and splice into the pink/black & pink/orange wires. These wires can be found in the larger(thicker) of the two wire harnesses located in the tray under the front driver's sill plate.

Tony
The wire enters into the cab from here. Remove the front driver's sill plate in a similar manor. From there, just run the wire up the channel to the front and splice into the pink/black & pink/orange wires. These wires can be found in the larger(thicker) of the two wire harnesses located in the tray under the front driver's sill plate.
Tony
Last edited by TonyPTX; 05-09-2004 at 07:30 PM.
Trending Topics
#8
05-09-2004, 07:28 PM
Join Date: Jul 2003
Location: New Orleans, LA
Posts: 557
Likes: 0
Received 0 Likes
on
0 Posts


#9
05-09-2004, 09:09 PM

Senior Member
Join Date: Oct 2002
Location: Titusville, FL
Posts: 2,363
Likes: 0
Received 0 Likes
on
0 Posts
