
Pop & Lock Connection Wire Colors?
#1
 06-07-2011, 05:31 PM


Join Date: Nov 2010
Location: Central Arkansas
Posts: 16
Likes: 0
Received 0 Likes
on
0 Posts
Pop & Lock Connection Wire Colors?
Help!
I just received my Pop & Lock tailgate lock for my 2010 F150 XLT Super Crew. In attempting to locate the wires to connect to I find that there are no wires in the bundle below the driver door sill that match the wires colors listed in the instructions.
It calls for pink/black and pink/orange. Noting Pink/* found at all.
Has anyone done this install to some other set of wire colors? Please advise, I need a starting place.
Thanks
Rod
#2
06-07-2011, 07:17 PM

Senior Member
Join Date: Sep 2006
Location: Florida
Posts: 1,576
Likes: 0
Received 0 Likes
on
0 Posts
Did you get the Pop and Lock from DynoLock?
I know I had trouble finding the correct wires as well - they weren't the same color as what was listed on the instruction sheet. I tapped in the the left rear door lock so when I hit the unlock button twice, it would unlock the tailgate. I just removed the left rear door panel to see what the colors were at the lock. A few screws/bolts and you're good to go. Probably save you some time and frustration too.
I know I had trouble finding the correct wires as well - they weren't the same color as what was listed on the instruction sheet. I tapped in the the left rear door lock so when I hit the unlock button twice, it would unlock the tailgate. I just removed the left rear door panel to see what the colors were at the lock. A few screws/bolts and you're good to go. Probably save you some time and frustration too.
#3
06-08-2011, 05:55 PM
Join Date: Nov 2010
Location: Central Arkansas
Posts: 16
Likes: 0
Received 0 Likes
on
0 Posts
I bought it through eTrailer.com.
By the way the PL model to use for the 2010 F150 is the PL8250. The PL8255 that is currently recommended is being discontinued due to fitment issues. I think that's why it is out of stock.
Well, my options are down to going into the door panel to find the correct wires. I talked to the Mfg twice and got different wire colors in different locations each time. The last time I got the correct ( I hope? ) wire colors and by removing one end of the rubber boot from the frame to the door and looking at the bundle going through it located them. You actually access the wires behind the kick panel, but it's hidden behind the emergency brake pedal mounting plate and I cannot get to it. The tech suggested going into the door was actually easier.
Anyway, after some on line research on door panel removal I'm going to go into the door and identify the correct wires at the servo. I will tap into the power there and fish a couple of wires through the boot into the cab behind the kick panel. The harness to the tailgate servo is long enough that I can run it forward under the frame and go through the hood release cable grommet in the firewall and make the connection. That will be one more set of connectors but otherwise follows the installation instructions. And I will know I have the correct power connections!
#5
06-13-2011, 10:39 AM

I *just* did this mod over this weekend. On a 2009 SuperCrew XLT the colors were GREY / DARK BROWN stripe and LIGHT BLUE / LIGHT GREEN stripe. I found them in the panel you step over to get into the driver's side door (on the floor, not the kickpanel although they did look to go up to the kickpanel so I'm sure you can find them over there).
I didn't buy they DynoLock though, it didn't come with instructions. It's just a $6 actuator from eBay I saw to get from another thread. Apparently it's supposed to be the exact same part.
I didn't buy they DynoLock though, it didn't come with instructions. It's just a $6 actuator from eBay I saw to get from another thread. Apparently it's supposed to be the exact same part.
Last edited by sharper4; 06-13-2011 at 04:29 PM.
#6
06-15-2011, 02:42 PM

which actuator? I bought one on eBay and tried to install the actuator solution but there is no where to mount the unit. And it is difficult to manuever inside the tailgate.
I have a 2009 lariat but the post showing the installation was from an earlier year and it looks like the engineering of the locking mechanism is much different. ANy pics?
I have a 2009 lariat but the post showing the installation was from an earlier year and it looks like the engineering of the locking mechanism is much different. ANy pics?
#7
06-15-2011, 09:09 PM
Senior Member
Join Date: Sep 2006
Location: Florida
Posts: 1,576
Likes: 0
Received 0 Likes
on
0 Posts
which actuator? I bought one on eBay and tried to install the actuator solution but there is no where to mount the unit. And it is difficult to manuever inside the tailgate.
I have a 2009 lariat but the post showing the installation was from an earlier year and it looks like the engineering of the locking mechanism is much different. ANy pics?
I have a 2009 lariat but the post showing the installation was from an earlier year and it looks like the engineering of the locking mechanism is much different. ANy pics?
Trending Topics
#8
06-16-2011, 10:26 AM


#9
06-16-2011, 12:44 PM
i did not remove the tailgate handle. i will try that.
so, the actuator is positioned at a 90 degree angle to the lock mechanism? It looks like you only drilled one (final :-) )hole for connecting the actuator. Am i seeing this right? the actuator won't move on you with only one screw in the actuator?
How much extension does your actuator provide. Mine extends about an inch. Mine looks similar to yours. thx for the info.
Last edited by goliath; 06-16-2011 at 12:48 PM.
#10
06-16-2011, 12:54 PM
Senior Member
Join Date: Sep 2006
Location: Florida
Posts: 1,576
Likes: 0
Received 0 Likes
on
0 Posts
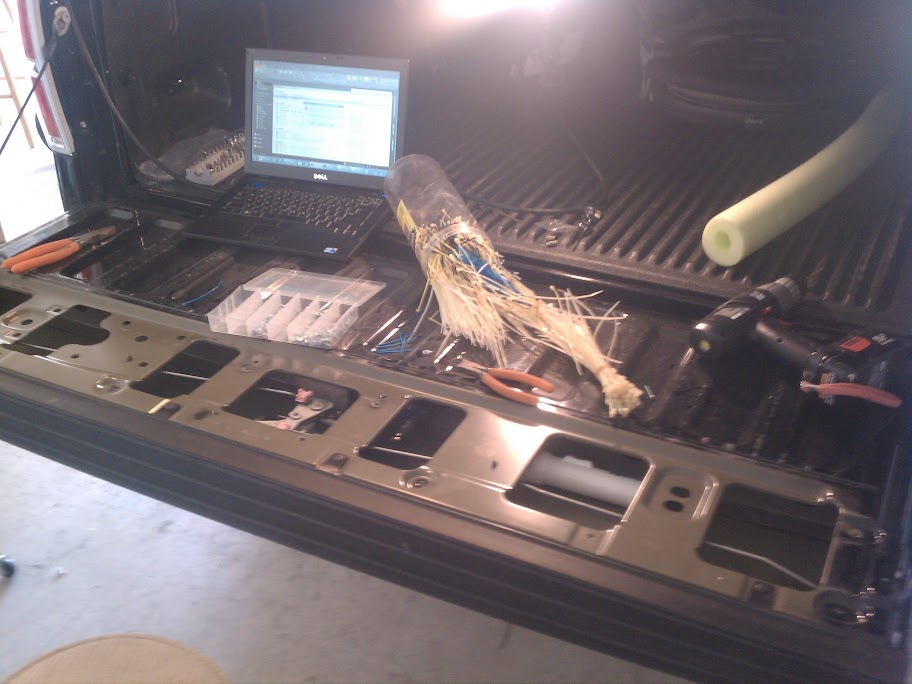
I did not have to do any of this. But I have just the actuator, not the whole Pop'N'Lock device (the actuator alone costs just $3.90 (shipped) from eBay). My pics aren't very good (they're from my phone) but I hope it helps show some of my progress (it was incomplete when the pics were taken).
#11
06-16-2011, 01:41 PM
i did not remove the tailgate handle. i will try that.
so, the actuator is positioned at a 90 degree angle to the lock mechanism? It looks like you only drilled one (final :-) )hole for connecting the actuator. Am i seeing this right? the actuator won't move on you with only one screw in the actuator?
How much extension does your actuator provide. Mine extends about an inch. Mine looks similar to yours. thx for the info.
so, the actuator is positioned at a 90 degree angle to the lock mechanism? It looks like you only drilled one (final :-) )hole for connecting the actuator. Am i seeing this right? the actuator won't move on you with only one screw in the actuator?
How much extension does your actuator provide. Mine extends about an inch. Mine looks similar to yours. thx for the info.
If I recall, the back of the actuator actually sat ever so slightly inside that little hole (facing down) on the inside of the tailgate. When you get inside you'll know what I'm talking about and you'll find it to ease your decision making on where to locate the unit.
I hadn't even considered taking off the locking mechanism. The doc I was following didn't instruct me to do it. Thank God too because it might have overwhelmed me at first glance.
#12
06-16-2011, 02:50 PM
#13
06-17-2011, 11:17 AM
ok. got the actuator positioned. how did you snake the wires thru the tailgate? I have a backup camera that has wiring fed thru a hole in the bottom of the tailgate. I shined a light thru the hole but I see none of the light while looking down from the actuator. It's like it is sealed off by a metal brace running the length of the tailgate.
Never mind. i figured it out. took some fishing with some copper wire but i got it. next. on to the wiring!!
Never mind. i figured it out. took some fishing with some copper wire but i got it. next. on to the wiring!!
Last edited by goliath; 06-17-2011 at 11:40 AM.
#14
08-31-2011, 11:01 AM

Wiring color code

I *just* did this mod over this weekend. On a 2009 SuperCrew XLT the colors were GREY / DARK BROWN stripe and LIGHT BLUE / LIGHT GREEN stripe. I found them in the panel you step over to get into the driver's side door (on the floor, not the kickpanel although they did look to go up to the kickpanel so I'm sure you can find them over there).
I didn't buy they DynoLock though, it didn't come with instructions. It's just a $6 actuator from eBay I saw to get from another thread. Apparently it's supposed to be the exact same part.
I didn't buy they DynoLock though, it didn't come with instructions. It's just a $6 actuator from eBay I saw to get from another thread. Apparently it's supposed to be the exact same part.
of the two. DC test light works to help find wire when open/close is acuated.
#15
12-06-2011, 09:08 AM

Member
Join Date: Dec 2011
Location: Southeast Ohio
Posts: 19
Likes: 0
Received 0 Likes
on
0 Posts