Log In
Register
Forums
F150online Web Site
Introduction Forum
Site Announcements
Questions About The Site?
Truck of the Month / Year
Powertrain & Mechanical
Chips, Tuners & Programming
Exhaust & Intake Systems
Other Powertrain
Superchargers & Turbochargers
Suspension
Transmissions
V6 Engines (including Ecoboost)
V8 Engines
Wheels, Tires & Brakes
Other Aftermarket
Body
Appearance Products
Bedliners, Caps, Tops & Lids
Care & Detailing
Electrical Systems
HVAC
Illumination & Lighting
Interior Care
Other Body
Audio & Video System
Amplifiers
Head Units
Multimedia & Navigation
Other Audio System
Satellite Radio
Speakers & Subwoofers
SYNC System
F-Series Trucks
2021 - 2025 F-150
2015 - 2020 F-150
2009 - 2014 F-150
2004 - 2008 F-150
1997 - 2003 F-150
Pre-1997 Models
F-250 / Super Duty / Diesel
Excursion
Expedition / Navigator
Harley-Davidson
King Ranch
Lightning
Lincoln Blackwood & Mark LT
SuperCrew
SVT Raptor F-150
Other Models
F150 Online MarketPlace
Cheers and Jeers Feedback Forum
Site Vendor Specials & Classifieds
Personal Classifieds
Special Interest
Articles & How-To's
News & Inside Information
The Outdoors
Racing (non-street)
Street Scene
Towing & Hauling
Work Trucks
Tools, Tool Boxes, and more
Owner's Connection
General Discussion
Group Purchases
Happenings & Events
Interesting Web Sites...
Testing 1-2-3
Regional Forums
Mid-Atlantic
Midwest
Northeast
Northwest
South
Southeast
West
Canada
International
The Buyer's Corner
Dealers
Truck Pricing
Buyers Tips & Tricks
News
Gallery
Tools
Car Payment Calculator
Tire Rim Calculator
Vin Decoder
Recalls
Technical Service Bulletins (TSBs)
Members List
Live Feed
Marketplace
Vendor Directory
Become a Vendor
New Posts
View Dark Mode
Please register or login to enable Dark Mode.
Log In
Register
Threads
Google
Threads
Posts
Advanced
Dark Mode
Please register or login to enable Dark Mode.
Log In
Forgot your Password?
By logging into your account, you agree to our
Terms of Use
and
Privacy Policy
, and to the use of cookies as described therein.
or
Login with Google
Login with Facebook
Recent
Commented
Albums
My Pictures
2stroked's Photos
View Profile
Sort:
Commented
Most Recent
Most Comments
Albums
Photos
4373 8691 124929
0
2010/05/07 11:28:15
2stroked
4373 8691 124928
0
2010/05/07 11:28:15
2stroked
4373 8691 124927
0
2010/05/07 11:28:15
2stroked
4373 8691 124926
0
2010/05/07 11:28:15
2stroked
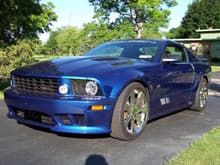
Before. Here's the car as it arrived first thing in the morning. Not bad, right? Other than the tires and wheel wells, it turned a lot of heads on the way in.
0
2009/10/06 10:34:18
2stroked
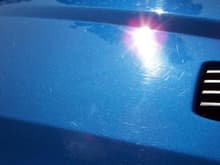
Hood Swirls. Looking a bit closer, one can see that the paint really needed some correction. Every body panel had marring like this from a winter on a dealer lot.
0
2009/10/06 10:32:50
2stroked
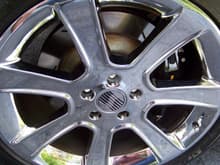
Front Wheel Before. Nice wheels, but they call it "detailing" for a reason. Note the black brake dust on the insdie of the wheel and the rusty / unpainted brake rotor hat. This kind of stuff drives me wild.
0
2009/10/06 09:37:19
2stroked
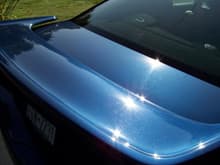
Rear Deck Before. Again, a good looking car that needed some attention to make it great looking.
0
2009/10/06 09:37:19
2stroked
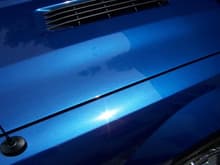
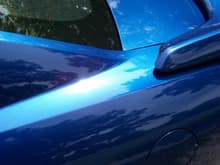
Hood & Fender After. See what 6 hours of special attention will get you? Even in dorect sunlight, the car was virtually flawless. I used Poor Boy's SSR 2.5, then SSR 1 to correct and polish, follwed by Collonite 845 for an LSP.
0
2009/10/06 09:35:24
2stroked
C Pillar After. Here's another stunner. Just look at the depth of the reflections here. The car actually looked about one full shade darker when it was finished.
0
2009/10/06 09:35:24
2stroked
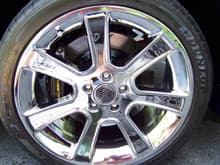
Front Wheel After. Remember that ugly wheel and rotor? I don't generally do this, but with the customer's permission, all 4 wheels were removed, polished front and back, and the rotor hats painted with high heat/ high gloss black paint. Nice huh?
0
2009/10/06 09:35:24
2stroked
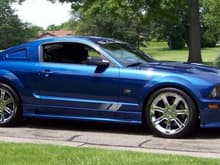
After. This is the poster shot. As I said, the car looked pretty good pulling in, but look how good it appeared as it left. This shot is on the home page of The Detailer's Cafe by the way.
0
2009/10/06 09:35:24
2stroked
Interceptor Slotted Filter: One of the many one of a kind touches (you cannot buy this exact bar from Star) on my bar is the slotted filters. These give a distinct white "pop" at the center of each colored flash. The effect is a dramatically brighter flash from the rotators. I build these myself in all colors. You can also see the side mounted lower level amber LED here.
0
2009/09/23 10:59:09
2stroked
Interceptor Magnet Closeup: The other half of the quick connect system on my bar is a custom 8 magnet mounting system. Each magnet has a 100 pound pull, so it doesn't move. There is white vinyl sign material on the roof under each magnet to prevent scratching.
0
2009/09/23 10:59:09
2stroked
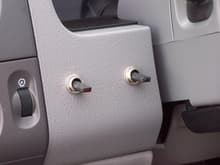
Switches: The whole bar is controlled with just two LED lighted switches. The left (red) switch controls the whole upper level and the right (blue) switch controls the whole lower level. There is one relay for each switch mounted under the hood and all wiring is hidden.
0
2009/09/23 10:37:28
2stroked
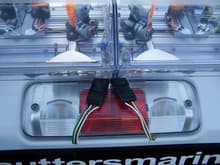
Quick Connects: To get into low overhead places, I created a quick connect system using two standard 4 prong trailer plugs run in opposite orientations to make hookup goof proof. This allows me to quickly remove the entire light bar in less than a minute.
0
2009/09/23 10:37:28
2stroked
Lower Front CLoseup: Here's what the lower front of the bar looked like before I added the amber filters to the intersection clearing lights on the lower level.
0
2009/09/23 10:37:28
2stroked
Brake Lights On: I elected to have two rear facing red lights that came on with my brake lights. Because I use low amperage LED bulbs, these are triggered by the high mount brake light on the rear of the cab.
0
2009/09/23 10:30:54
2stroked
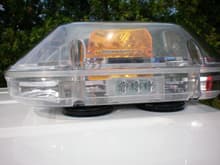
Full Rear: Here is the rear view of the bar. The lower level contains brake lights as shown above on the outside edge, a set of amber LED wig-wags, then a set of amber 27 watt wig-wags. The upper level has 4 amber rotators.
0
2009/09/23 10:30:54
2stroked
Full Front: The upper level is the same as the rear, but the lower level has 4 LED wig-wags, 2 white strobes split evenly on each side. There are also 2 angle mounted 27 watt wig-wags at the front corners that now have amber filters.
0
2009/09/23 10:30:54
2stroked
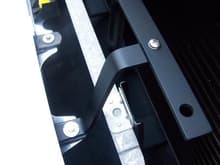
Z Bracket: The basis for my whole syetm is what I call the Z-Bracket - due to its shape. Everything here is fabricated from 1/4" x 3/4" flat aluminum stock from Home Depot. I had to buy slightly longer bolts for the Cooler at the base.
0
2009/09/23 08:52:10
2stroked
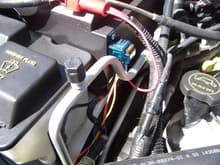
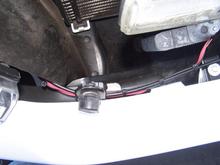
Wiring Along Hood Release Cable: I tried to make all of the wiring look as "factory supplied" as possible. Here's the wiring running from the bracket to the right side of the truck. Some goes up to the high beam hot lead (to trigger the relay) and the rest goes to the relay and battery.
0
2009/09/23 08:52:10
2stroked
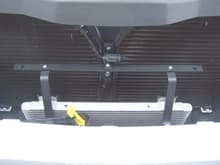
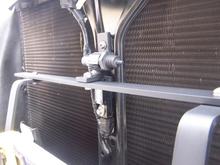
Top View of Cross Member: Here's the basic bracket system in place before mounting the lights. Everything was measured & mocked up with cardboard and / or thin aluminum stock before the final bracket was fabricated, painted and installed.
0
2009/09/23 08:52:10
2stroked
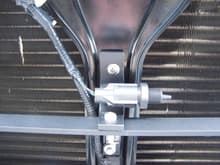
Center Cross Member Closeup: I needed to better support the center of the bracket and find a place to remount the Temperature Sensor. This is the bracket I came up with.
0
2009/09/23 08:47:56
2stroked
Center Cross Member: Here's that same bracket shown from the side.
0
2009/09/23 08:47:56
2stroked
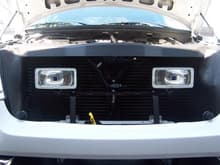
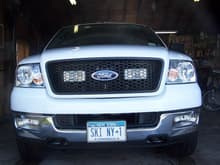
Lights in Grill 2005: This is what the pair of Hella 500 driving lights (with 130 watt bulbs) look like with the hood closed. Note that the bracket is basically invisible. The grill does not cut down on light output appreciably and heat has not been a factor.
0
2009/09/23 08:47:56
2stroked
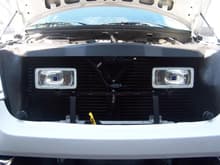
Lights with Hood Open: wWith the hood open, you get a better picture of what the whole system looks like.
0
2009/09/23 08:47:56
2stroked
First
Page
2 of 2
Last
Go To
Page
1
2
2 of 2
Go To
GO
Go to page
of 2
pages
1
2