P0171 and P0174 again with a twist.
#31
 03-28-2009, 02:59 AM


#33
03-28-2009, 10:00 AM
#34
03-28-2009, 12:23 PM

Join Date: Mar 2009
Posts: 18
Likes: 0
Received 0 Likes
on
0 Posts
I dropped the tank once on an astro van, total PITA because the tank was taller than the bottom edge of the van body. I had to lift the whole van up to get the tank out. GM didn't leave me any room under there to do the swap. This one looks like I should be able to get at it while keeping the tank on the ground.
#35
03-28-2009, 01:51 PM

po 171 and po174 solutions
________________________________________
A Ford
P0171 is a LEAN code fpr cylinder bank 1, and P0174 is a LEAN code for cylinder bank 2. These codes commonly occur on many Ford vehicles, and are set when the powertrain control module (PCM) sees the air/fuel mixture is running too lean (too much air, not enough fuel).
When the Check Engine Light comes on, either one of these codes, or both, may be found when a code reader or scan tool is plugged into the vehicle diagnostic connector. IF the vehicle is driven long enough, typically both codes will be set.
A P0171 lean code for bank 1 is the cylinder bank on the RIGHT (passenger) side of the engine on Ford vehicles with a V6 or V8 engine and rear-wheel drive.
A P0174 lean code for bank 2 is the cylinder bank on the LEFT (driver) side of the engine on Ford vehicles with a transverse-mounted V6 engine
and front-wheel drive. This code is not set on four cylinder engines (no bank 2).
WHAT A LEAN CODE MEANS
A lean fuel condition may exist if the engine is sucking in too much air and/or the fuel system is not delivering enough fuel. If bad enough, a lean fuel condition may cause lean misfire, a rough idle, hesitation or stumble when accelerating, and/or poor engine performance.
Unmetered air can enter the engine through a vacuum leak, a dirty airflow sensor that is not reading airflow accurately, an EGR valve is not closing and is leaking exhaust into the intake manifold, an EGR valve that is allowing too much flow (because the EGR differential pressure sensor that monitors EGR flow is faulty and is under-reporting EGR flow).
If the problem is not enough fuel, the underling cause may be a weak fuel pump, restricted fuel filter, leaky fuel pressure regulator or dirty fuel injectors.
DIRTY MAF SENSOR
One of the most common causes of Ford P0171 and P0174 lean codes is a dirty mass airflow (MAF) sensor. The MAF sensor is located in the air inlet tube
just ahead of the throttle body. The MAF sensor should be protected from outside dust and debris by the air filter, but sometimes the air filter doesn't fit real tight inside the housing and allows unfiltered air into the engine. Dirt can stick to the MAF sensor wire and form a coating that slows the response of the sensor to changes in airflow. The MAF sensor can also be contaminated by fuel vapors that back up through the intake manifold and throttle body when the engine is shut off. The vapors can leave a waxy coating on the sensor wire. This causes the MAF sensor to under report airflow, which in turn misleads the powertrain control module (PCM) so it doesn't add enough fuel to maintain a properly balanced air/fuel ratio. As a result, the engine runs lean and sets a P0171 and/or P0174 code (see Ford TSB 98-23-10 for details).
#36
03-28-2009, 01:52 PM
po
If the MAF is dirty, the fix is easy enough: just clean or replace the MAF sensor. In many instances, the MAF sensor can be successfully cleaned by spraying the sensor element with electronics cleaner. Do not use any other type of cleaner as this may damage the sensor.
Disconnect the air inlet tube just ahead of the sensor, and then spray the electronics cleaner through the screen at the wire element in the center of the little MAF sensor. Let the cleaner soak in for several minutes, then give it another shot of cleaner. Let it sit another five minutes, then reconnect the air inlet tubing and start the engine.
If the lean codes keep coming back, the MAF sensor may have to be replaced if the engine does not have a vacuum leak or fuel delivery problem.
VACUUM LEAKS
Another common cause of Ford P0171 and P0174 ean codes is an engine vacuum leak. Ford TSB 04-17-4 details procedures for checking fuel trim and looking for vacuum leaks.
On 3.8L Fords with a split-plenum intake manifold, the port gaskets and isolator bolt assemblies for the upper plenum can deteriorate over time and leak air, often as a result of oil being sucked into the intake manifold through the PCV system. Also the vacuum hose that connects the fuel pressure regulator to the intake manifold can swell and leak vacuum where the hose connects to the manifold. Ford TSB 03-16-1 says the fix involves several steps: remove the upper manifold plenum and replace the original gaskets and bolts with revised ones, replace the front valve cover with a revised valve cover that reduces the amount of oil vapor sucked into the PCV system, inspect and replace the fuel pressure regulator hose, and finally, reflash the PCM so it is less sensitive to lean fuel conditions.
BAD DPFE SENSOR
Ford p0171 AND p0174 lean codes can also be set by a bad EGR differential pressure sensor. These sensors have a very high failure rate once a vehicle has more than about 60,000 miles on the odometer or is more than five or six years old.
The DPFE sensor is mounted on the engine, and is attached with two rubber hoses to the tube that routes exhaust gas to the EGR valve. The original equipment sensor has an rectangular aluminum housing about three inches long. Corrosion inside the sensor reduces its sensitivity to EGR flow, causing it to under-report EGR flow. The PCM responds by increasing EGR flow, which may keep the EGR valve open longer than usual creating a lean condition in the engine. Thus, a bad sensor may set a P0401 code (insufficient EGR flow), or it may not set an EGR code but a P0171 and/or P0174 lean code instead.
The cause of the P0401 code in most cases turns out to be a bad DPFE sensor, not an EGR valve problem or an EGR valve that is plugged up with carbon (though this can also set a P0401 code). An afterma
rket replacement DPFE sensor costs less than $50 and usually gets rid of not only the P0401 code, but also the P0171 and P0174 codes, too.
#37
03-28-2009, 11:31 PM

I dropped the tank once on an astro van, total PITA because the tank was taller than the bottom edge of the van body. I had to lift the whole van up to get the tank out. GM didn't leave me any room under there to do the swap. This one looks like I should be able to get at it while keeping the tank on the ground.

Well I sent yuh 3 procedures this morning. Those were right from the service DVD - The reason you got 3 is because there were subs (a re-direct) in the fuel pump swap directions and since you can't grab the link from your end, I just sent them separately.
You don't have to follow to the letter - it's up to you. I never relieve pressure for anything as they instruct. I let the truck cool a bit before working on her. Pressure bleeds off usually by then. Also, you don't HAVE to suck the tank that. Personally , I pull the the tank vent in the rear (#6) and siphon from there. Which ever is easier for yuh. -
It's not that bad of a job, after you get the majority of fuel removed - takes abut 15 minutes or so. Take your time up top. Soften all three grommets and the two hose connects up real well first, before trying to twist and remove - use/wd40 or something. The vent valves can crack or break fairly easy - The FTPS is worst!! That can snap right off the top. Working a little WD in first does wonders - They' ll pop right out once softened up a bit.
You don't have to remove all the fuel from the tank, You can get it on the bench w/5 gallons or so still in their.
It's really no a bad job.
Good Luck!
BTW - You did get the info this morning correct?
#38
03-29-2009, 03:37 PM
Join Date: Mar 2009
Posts: 18
Likes: 0
Received 0 Likes
on
0 Posts
Thanks jbrew, got all the info. Thanks for getting it to me so quickly. I used alot of liquid wrench and got things off fairly easily. Dropped the tank down and I do not have to remove the tank from usder the vehicle. The sender is right at the back to make it a bit easier. I have run into a snag though. I have not been able to get the damn sender locking ring off, and no, I didn't buy the $100 tool to remove it. Called a couple places locally for a loan a tool with no luck at all. I also see they want this thing torqued to 66lbft putting it back on. I doubt i'm going to get this thing off without that tool. Any suggestions on getting around the tool or where might have one for rent? I might have to fab something up if there is no alternative.
#39
03-29-2009, 03:47 PM

Senior Member
Join Date: Nov 2007
Location: whaleyville, MD
Posts: 3,271
Likes: 0
Received 0 Likes
on
0 Posts
Thanks jbrew, got all the info. Thanks for getting it to me so quickly. I used alot of liquid wrench and got things off fairly easily. Dropped the tank down and I do not have to remove the tank from usder the vehicle. The sender is right at the back to make it a bit easier. I have run into a snag though. I have not been able to get the damn sender locking ring off, and no, I didn't buy the $100 tool to remove it. Called a couple places locally for a loan a tool with no luck at all. I also see they want this thing torqued to 66lbft putting it back on. I doubt i'm going to get this thing off without that tool. Any suggestions on getting around the tool or where might have one for rent? I might have to fab something up if there is no alternative.
this method only works on this style lock ring http://www.carparts.com/wcsstore/car...0277G_SW_1.jpg
but i'm guessing you have the big plastic nut style? i've always used a big set of pliers for those.
these are the pliers i've always used for the plastic nuts http://buy1.snapon.com/catalog/item....re&dir=catalog .
they are meant for oil filters but they really work for those nuts if you grip them right.
Last edited by Matts ford; 03-29-2009 at 03:56 PM.
#40
03-29-2009, 04:40 PM
#41
03-29-2009, 06:33 PM
Join Date: Mar 2009
Posts: 18
Likes: 0
Received 0 Likes
on
0 Posts
There is a huge plastic nut on top. Just to keep updates for all on this one, Autozone did have the tool, they just didn't know it. They have a fuel pump r/r tool set on the loaner program. Of course there are other things in there that are not needed. And of course I rode the HD to look at what they had. The guy was nice enough and I just took the tool needed. Going to return it now but after replacing the pump, no bueno. Still the same pressure readings so now i'm going to replace the FPR...... DAMN!!!
#42
03-29-2009, 07:46 PM
Crap! Didn't you check the regulator? What were the pressure differences - vac on/ vac off ?
Auto Zone is a great resource. Free loaner program is awesome! It's 90 days. Thanks to them, I don't have to purchase,rent or store an engine hoist, it's free!
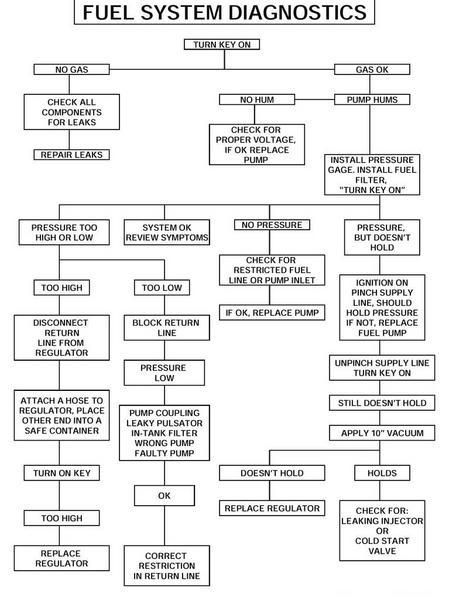
Well, you can use a "Mighty Vac" tool to check the reg as well OR the milkshake method. - Just to be sure. But initial tests should have revealed a bad reg. I didn't see your list of numbers.?
This might help a little -
Auto Zone is a great resource. Free loaner program is awesome! It's 90 days. Thanks to them, I don't have to purchase,rent or store an engine hoist, it's free!
Well, you can use a "Mighty Vac" tool to check the reg as well OR the milkshake method. - Just to be sure. But initial tests should have revealed a bad reg. I didn't see your list of numbers.?
This might help a little -
Last edited by jbrew; 03-29-2009 at 08:14 PM. Reason: tree
#43
03-29-2009, 11:42 PM
Join Date: Mar 2009
Posts: 18
Likes: 0
Received 0 Likes
on
0 Posts
The reg seemed OK at the time. I ran down and got one and threw it in, thinking the fuel pump was a wasted effort. Well unless the pressures you guys put out are incorrect, they were both a wasted effort. With the new pump and reg, rail pressure is still 30 @ idle vac on and 40 at idle vac off. I still got the same codes after driving it around, this time my #4 fuel trim is showing positive (eas negative before) although trim #3 is still negative. I just reset the ECU to try and go back to base maps. Maybe this test was all for not? I'm getting really frustrated on this one, might be time for it to "accidently" catch on fire..........
#44
03-30-2009, 12:04 AM
The reg seemed OK at the time. I ran down and got one and threw it in, thinking the fuel pump was a wasted effort. Well unless the pressures you guys put out are incorrect, they were both a wasted effort. With the new pump and reg, rail pressure is still 30 @ idle vac on and 40 at idle vac off. I still got the same codes after driving it around, this time my #4 fuel trim is showing positive (eas negative before) although trim #3 is still negative. I just reset the ECU to try and go back to base maps. Maybe this test was all for not? I'm getting really frustrated on this one, might be time for it to "accidently" catch on fire..........
I guess it could be very dirty injectors. It's possible, but you have both sides testing positive for lean, so I don't think it's the injectors. You have a good size leak , somewhere, - Try using propane to detect.
#45
03-30-2009, 01:49 AM
Join Date: Mar 2009
Posts: 18
Likes: 0
Received 0 Likes
on
0 Posts
I thought about an injector issue but the only thing that would drop pressure would be a leaking/dripping injector and that would either result in a weird idle or a rich reading on 1 bank. I think the pressures it's supposed to be at are incorrect for this engine. The fuel has to go somewhere if the pressure is low, and it aint falling out from anywhere. If I increase the vacuum @ idle, that would make the reg deliver a lower pressure, hence my thinking the pressure rewuirements @ 35 are incorrect. Tomorrow, i'm going to put in a brand spanking new relay (still has the horn relay on it) and start plugging vacuum holes in the manifold. If there is a hairline crack in the plastic tube off the elbow, I can see that. The elbow is good though. There is also another hose further up on the manifold that I can't figure out where it goes. I'll check that one too. Other than that, do you have the R/R procedure for the intake manifold? I would guess that would be next along with flycutting it on the mill. Looks like fun for another day. Does anyone know what the 3rd and 4th fuel trims are? I posted the freeze frame last pull and now #4 is the only one on the - side and would sure like to know what those are.