
Truck wouldn't start, hairdryer fixed it...


Technical Article Contributor
Joined: Oct 2005
Posts: 25,641
Likes: 19
From: MI
New starter is in and it definately looks better built. It's a Beck/Arnley, new not reman. Looking at the old starter, it looked like the seal (or lack there of) connecting the solenoid to the starter housing was getting moister/water in it pretty bad. Also noticed on the new Beck starter, where I thought was a breather or drain hole on the old starter, the Beck had a rubber stem coming out of the same opening. Guessing the other starter I pulled out should of had the same rubber stem, just guessing of course. Anyways, old one came right out thanks to the anti-seize I used on the 3 bolt's, (threads) last April and the new one went right in. From the time I lifted the truck, pulled the passanger tire, pulled the old, cleaned everything up, installed the new, to driving, 2 1/2 hrs.
By the way Brew, like your starter setup, my old starter and this new one had the same hot-wire extension so you can crimp and heat shrink the connection. I used the one from the old starter (new in April), because I soldered that connection then used my own heat shrink, then taped it up after that.
Also Brew, I had the same problem as you with the factory OEM starter. It was still working @ 142k but I had to replace the wiring harness's because they were corroded up so bad and in doing that, I tried cleaning up the starter and the terminals and it was too corroded to make me happy about putting it back on the truck.
To anyone who hasn't done a starter replacement on the 5.4L
THE KEY to an easy starter replacement, PULL the passanger side tire and you can remove 2 bolts real quick. The top bolt and the side bolt facing you.
I know it won't - I tried it though - Then laughed, -told myself "yea right" then fixed it. (btw- I do talk to myself sometimes
 )
)You might have a better set set up - wheres the pics!

Thread Starter
|
Senior Member
Joined: Mar 2008
Posts: 835
Likes: 2
From: Central New York
By the way Faster150, what happened to our COWBOY'S, man they tick me off. They look awesome playing the Giants and fall apart the last 2 weeks.
At least I can look forward to an awesome season from my Yankee's.
Who says money can't buy you happiness. According to Steinbrener, it can this year. Just give us the ring now, please !

Thread Starter
|
Senior Member
Joined: Mar 2008
Posts: 835
Likes: 2
From: Central New York
Yea I couldn't sleep at night using a crimp fitting on the starter, - specially when it determines the start of your engine. The heat shrink they provided me will not shrink enough to provide adequate protection from the elements.
I know it won't - I tried it though - Then laughed, -told myself "yea right" then fixed it. (btw- I do talk to myself sometimes) We have to talk to ourselves while working on our trucks, makes the job go quicker! 
You might have a better set set up - wheres the pics!
I know it won't - I tried it though - Then laughed, -told myself "yea right" then fixed it. (btw- I do talk to myself sometimes
) We have to talk to ourselves while working on our trucks, makes the job go quicker! You might have a better set set up - wheres the pics!
hot-wire with that same crimp fitting and garbage piece of heat shrink. I did use the crimp fitting they supplied but I solder'ed mine instead of crimping it. Then I used 2 different diameter heat-shrinks to make sure it was water tight and elec. tape on top of that.
No pic's, I was over at my broher-inlaws garage and forgot the dig-cam, my bad.
Kinda sorry I went over, sister-inlaw had everything for an oil change on her 04 explorer, so I did that for her. The sorry part is when I started it up, it was idleing really bad, wouldn't smooth out. Definate time for a tune up and diagnose. Being the family wrench does have it's drawbacks but I know everyone appreciates it.
Hows your truck coming along. Get the front end back on yet.
Technical Article Contributor
Joined: Oct 2005
Posts: 25,641
Likes: 19
From: MI
Ahh, you soldered yours - that's a good lad - That's what I mean by "Rosin Core" - That's the stuff to use.
I dropped the front end down and getting as much done inside the engine compartment as I can before bolting the manifold down - That will be one piece with throttle body and everything else already bolted and torqued.
That's also the trick to changing your plugs in 20 minutes time. The whole top section comes off in one piece and your plugs are there - very easy to change, there's no COP or injector removal to mess with. Just disconnect the the rail from the fuel lines and pop the manifold bolts..
- That's what I mean by "Rosin Core" - That's the stuff to use.I dropped the front end down and getting as much done inside the engine compartment as I can before bolting the manifold down - That will be one piece with throttle body and everything else already bolted and torqued.
That's also the trick to changing your plugs in 20 minutes time. The whole top section comes off in one piece and your plugs are there - very easy to change, there's no COP or injector removal to mess with. Just disconnect the the rail from the fuel lines and pop the manifold bolts..
Last edited by jbrew; Jan 2, 2009 at 11:48 PM.
Thread Starter
|
Senior Member
Joined: Mar 2008
Posts: 835
Likes: 2
From: Central New York
Ahh, you soldered yours - that's a good lad - That's what I mean by "Rosin Core" - That's the stuff to use.
I dropped the front end down and getting as much done inside the engine compartment as I can before bolting the manifold down - That will be one piece with throttle body and everything else already bolted and torqued.
That's also the trick to changing your plugs in 20 minutes time. The whole top section comes off in one piece and your plugs are there - very easy to change, there's no COP or injector removal to mess with. Just disconnect the the rail from the fuel lines and pop the manifold bolts..Excellent idea ! Do you have to replace the intake manifold gasket each time you take it off.
- That's what I mean by "Rosin Core" - That's the stuff to use.I dropped the front end down and getting as much done inside the engine compartment as I can before bolting the manifold down - That will be one piece with throttle body and everything else already bolted and torqued.
That's also the trick to changing your plugs in 20 minutes time. The whole top section comes off in one piece and your plugs are there - very easy to change, there's no COP or injector removal to mess with. Just disconnect the the rail from the fuel lines and pop the manifold bolts..
Excellent idea ! Do you have to replace the intake manifold gasket each time you take it off. 
Technical Article Contributor

Joined: Dec 1997
Posts: 9,417
Likes: 11
From: Windsor,Ontario,Canada
One more thing. If it doesn't have one make sure you use copper nuts on the starter terminals. Anything else and Galvanic corrosion occurs and you will have a hell of a time removing the terminal form the starter.
Technical Article Contributor
Joined: Oct 2005
Posts: 25,641
Likes: 19
From: MI
I painted the starter this time - with di-electric
. It's going to look nasty after awhile, but it should last longer than terminal protecter stuff.You can see the nuts here -
https://www.f150online.com/forums/en...r-again-6.html
Were do you get the Copper nuts @ JMC ? I know I can get brass.
What's nice about the main nut - the washer has teeth -
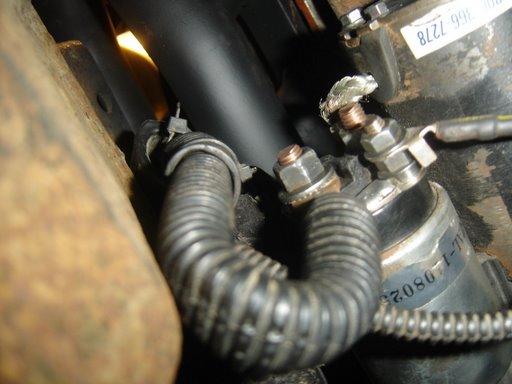
But yea, they will rust in time.
Last edited by jbrew; Jan 3, 2009 at 03:55 PM.
Thread Starter
|
Senior Member
Joined: Mar 2008
Posts: 835
Likes: 2
From: Central New York
I saved all the nuts from my previous starters, their just like the solenoid nuts on the firewall. Their not copper, I think they are partially stainless with that built in slip washer that eventually rusts on the starter.
I painted the starter this time - with di-electric. It's going to look nasty after awhile, but it should last longer than terminal protecter stuff.
You can see the nuts here -
https://www.f150online.com/forums/en...r-again-6.html
Were do you get the Copper nuts @ JMC ? If you really want copper nuts, and can't find them, go to a metal supply co. and buy some copper hex rod. You can drill and tap your own. I own a nice drill press and I have made my own stainless steel nuts for different things. I can think of at least 10 places in Syracuse, NY that would have just about any metal stock or could get it for me pretty quick. It helps that I used to purchase metals for company's I worked for. If you really want the copper nuts, I could see what I could do. Hey maybe you can give me one of your NEW COP's and I can make you some copper nuts.
What's nice about the main nut - the washer has teeth -
But yea, they will rust in time.
I painted the starter this time - with di-electric
. It's going to look nasty after awhile, but it should last longer than terminal protecter stuff.You can see the nuts here -
https://www.f150online.com/forums/en...r-again-6.html
Were do you get the Copper nuts @ JMC ? If you really want copper nuts, and can't find them, go to a metal supply co. and buy some copper hex rod. You can drill and tap your own. I own a nice drill press and I have made my own stainless steel nuts for different things. I can think of at least 10 places in Syracuse, NY that would have just about any metal stock or could get it for me pretty quick. It helps that I used to purchase metals for company's I worked for. If you really want the copper nuts, I could see what I could do. Hey maybe you can give me one of your NEW COP's and I can make you some copper nuts.
What's nice about the main nut - the washer has teeth -
But yea, they will rust in time.

Junior Member
Joined: Jan 2009
Posts: 1
Likes: 0
While we are talking starters. My starter went New Years Day. I took out the two bolts and the starter will not pull out. You can only pry it upwards and then their is a bracket in the way. Two days on the cold ground and little frustrated. Anyone have any input? It is a 1997 4.6L F150 supercab 4X4.


Technical Article Contributor
Joined: Oct 2005
Posts: 25,641
Likes: 19
From: MI
 - Sorry man, but that's funny.
You can see the top two thru the pass side wheel well unless it's really dirty in there. The other is a stud/double nut on the bottom.
Take the top two out first, - then the bottom - Careful, it will fall on yuh .
Last edited by jbrew; Jan 4, 2009 at 12:18 PM.
Technical Article Contributor
Joined: Dec 1997
Posts: 9,417
Likes: 11
From: Windsor,Ontario,Canada
tjk_in_cny tjk_in_cny,
What are the terminals made out of? Copper? Dissimilar metals is a no no. There is actually a TSB out there somewhere about the terminal nuts on the starters.
jbrew,
Check out any starter/alternator repair shop.
What are the terminals made out of? Copper? Dissimilar metals is a no no. There is actually a TSB out there somewhere about the terminal nuts on the starters.
jbrew,
Check out any starter/alternator repair shop.
Technical Article Contributor
Joined: Oct 2005
Posts: 25,641
Likes: 19
From: MI
I searched thru the TSB's using "find" "starter" - Only one that comes up is the "No crank No start" when the temps @ -12
- It's probably out there somewhere.Anyone know how to get motivated into working on your truck? I'm out here just staring at it - Is that weird?
Last edited by jbrew; Jan 4, 2009 at 02:24 PM.

Member
Joined: Jan 2009
Posts: 47
Likes: 0
From: Memphis, TN
Anyone care to guess how important that black solenoid drain plug is? While I was troubleshooting a coolant leak, I noticed the black plug was gone...so I installed a 4" length of 3/16ths clear vinyl tubing in there to help prevent any crap getting in there.
My F150 is 2WD and doesn't see mud, but it drives through plenty of rain.
My F150 is 2WD and doesn't see mud, but it drives through plenty of rain.
Thread Starter
|
Senior Member
Joined: Mar 2008
Posts: 835
Likes: 2
From: Central New York
Anyone care to guess how important that black solenoid drain plug is? While I was troubleshooting a coolant leak, I noticed the black plug was gone...so I installed a 4" length of 3/16ths clear vinyl tubing in there to help prevent any crap getting in there.
My F150 is 2WD and doesn't see mud, but it drives through plenty of rain.
My F150 is 2WD and doesn't see mud, but it drives through plenty of rain.
That is the black plug that was missing from my starter solenoid that I installed in April. There was a massive RUST trail coming from where the plug should have been. Resulting in solenoid moisture + 1 degree = no start.
My new starter had that black-rubber plug in it and has started every time now.
Again, nice pic who ever posted it. Especially for those who need to see that there is 3 bolts holding the starter in and their position.