Home Made CAI


Suspended
Joined: Aug 2007
Posts: 2,234
Likes: 0
From: North of Dallas Tx
Home Made CAI 02-16-2004, 09:59 PM
--------------------------------------------------------------------------------
Home Made Cold Air Intake DIY
Materials needed:
2 – 18” long pieces of 2½” inner diameter exhaust flex tubing
2 – U-bolts with nuts (should come with exhaust flex tubing)
1 – 2½” outer diameter to 2½” outer diameter exhaust adapter
1 – Cone air filter
1 – 2½ inner diameter to 2½ inner diameter Rubber grommet
1 – Breather filter (preferably with a male end but if you can’t find one you’ll need a male to male adapter)
3 – 2” to 3” hose clamps
Instructions:
1. Remove all stock intake components
- snorkel located between driver’s headlamp and battery
- silencer box located underneath battery
- intake transport tube #1 (2 pieces) comes up from silencer box to filter box
- filter box
- intake transport tube #2 goes from filter box to throttle body
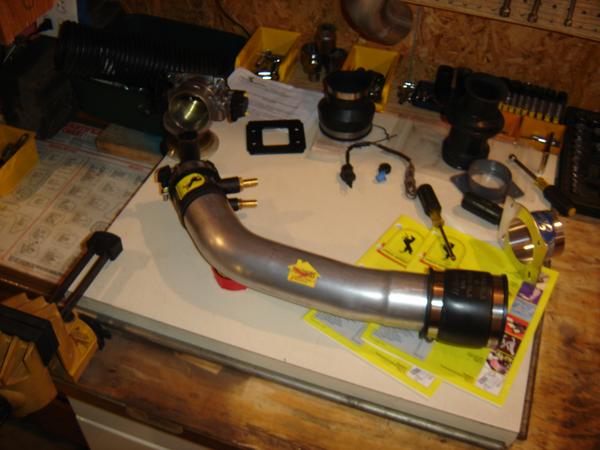
2. Insert Exhaust Adapter into one end of both pieces of flex tubing to create one long piece of flex tubing.
3. Secure with U-bolts.
4. Insert one end of the now 36” flex tubing into the rubber grommet (note: it will be a very tight fit, I intentionally noted a smaller size than needed to ensure a good seal.)
5. Secure with hose clamp
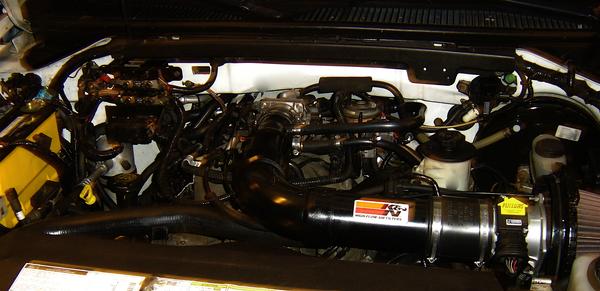
6. Insert the end without the rubber grommet into the hole that you removed intake transport tube #1 from
7. Attach rubber grommet to throttle body
8. Attach cone air filter to bottom end of flex tubing (should hang behind drivers fog light)
9. Secure with hose clamp
10. Attach breather filter to valve breather line (the "vacuum line" that went from your engine to your stock intake tube) using male to male adapter if needed. (you may want to secure this with a hose clamp but because the line is not pressurized it really isn't needed)
11. Enjoy your improved HP, Torque, Throttle response and awesome sound!
Please note that due to the location of the air filter you run the risk of causing severe damage to (i.e. hydro-locking) your engine in wet weather. This is why I use 2 pieces of flex tubing instead of just buying one long one. In the event of rain I recommend that you disconnect the exhaust adapter from the piece of flex tubing closest to your throttle body and attach your air filter in it’s place. I have a second air filter that stays in my trunk just for this reason. YOU CAN BLOW UP YOUR MOTOR IF YOU DO NOT DO THIS!
Also, if you’d like you can also wrap your new intake tube with exhaust heat wrap to shield it from engine heat but I do not recommend this as it is unneeded, messy and an overall pain in the ***.
--------------------------------------------------------------------------------
Home Made Cold Air Intake DIY
Materials needed:
2 – 18” long pieces of 2½” inner diameter exhaust flex tubing
2 – U-bolts with nuts (should come with exhaust flex tubing)
1 – 2½” outer diameter to 2½” outer diameter exhaust adapter
1 – Cone air filter
1 – 2½ inner diameter to 2½ inner diameter Rubber grommet
1 – Breather filter (preferably with a male end but if you can’t find one you’ll need a male to male adapter)
3 – 2” to 3” hose clamps
Instructions:
1. Remove all stock intake components
- snorkel located between driver’s headlamp and battery
- silencer box located underneath battery
- intake transport tube #1 (2 pieces) comes up from silencer box to filter box
- filter box
- intake transport tube #2 goes from filter box to throttle body
2. Insert Exhaust Adapter into one end of both pieces of flex tubing to create one long piece of flex tubing.
3. Secure with U-bolts.
4. Insert one end of the now 36” flex tubing into the rubber grommet (note: it will be a very tight fit, I intentionally noted a smaller size than needed to ensure a good seal.)
5. Secure with hose clamp
6. Insert the end without the rubber grommet into the hole that you removed intake transport tube #1 from
7. Attach rubber grommet to throttle body
8. Attach cone air filter to bottom end of flex tubing (should hang behind drivers fog light)
9. Secure with hose clamp
10. Attach breather filter to valve breather line (the "vacuum line" that went from your engine to your stock intake tube) using male to male adapter if needed. (you may want to secure this with a hose clamp but because the line is not pressurized it really isn't needed)
11. Enjoy your improved HP, Torque, Throttle response and awesome sound!
Please note that due to the location of the air filter you run the risk of causing severe damage to (i.e. hydro-locking) your engine in wet weather. This is why I use 2 pieces of flex tubing instead of just buying one long one. In the event of rain I recommend that you disconnect the exhaust adapter from the piece of flex tubing closest to your throttle body and attach your air filter in it’s place. I have a second air filter that stays in my trunk just for this reason. YOU CAN BLOW UP YOUR MOTOR IF YOU DO NOT DO THIS!
Also, if you’d like you can also wrap your new intake tube with exhaust heat wrap to shield it from engine heat but I do not recommend this as it is unneeded, messy and an overall pain in the ***.

Technical Article Contributor
Joined: Dec 2006
Posts: 1,584
Likes: 0
From: Sask. Canada