
Heater Core Replacement


Thread Starter
|
Member
Joined: Nov 2002
Posts: 16
Likes: 0
From: Columbia MD
Heater Core Replacement
Started out this morning and got the smell of coolant in the cabin and the fog on the glass and last but not least the leaking coolant under the passanger side firewall. Checke the heater hoses and clamps all are dry. Guess it's time for a new core.
Shopped around and found them from $17 at NAPA to $68 at Ford what does everyone suggest?
Labor was quoted at 5 hours. Should I try to do at home or just let someone else have the headach? I have most tools and average skills.
All replys and suggestions will be appreciated.
Thanks!
Shopped around and found them from $17 at NAPA to $68 at Ford what does everyone suggest?
Labor was quoted at 5 hours. Should I try to do at home or just let someone else have the headach? I have most tools and average skills.
All replys and suggestions will be appreciated.
Thanks!

Senior Member
Joined: May 2001
Posts: 1,080
Likes: 0
From: Maryland
do a search here on heater cores. it is a big job because you will need to remove the entire dash board.
however you get the core replaced, afterwards you will need to find out why it failed. it most likely failed due to electrolysis which means you have electrical current traveling through your coolant. it is most commonly caused by bad/old/corroded grounds straps and/or poorly installed aftermarket high wattage stereo equipment.
it is an easy test with a volt meter.

Senior Member
Joined: Oct 2000
Posts: 282
Likes: 0
From: Sugar Land, TX
How many miles are on the truck? It could also just be a faulty part, it ages like everything else. At any rate....its your call on who does it. It IS alot of work, nothing like the changeout on an 85 F-150. That took me all of 1 hour, and at the time, i had NO idea what i was doing, was 17yrs old and an oil change was a big deal. This is a different dog. As stated, the whole dash comes out and you might have to evacuate the AC lines....i dont really know.

Senior Member
Joined: Feb 2001
Posts: 776
Likes: 1
From: Guyton, GA USA
There are no specialized tools needed, just alot of patience. You "do not" have to discharge the air conditioning system, regardless of what the manuals state. Took me about 6.5 hours, and only had a few screws left over. Seemed like there was a million screws to remove. Cheaper than 8-9 hundred dollars for the dealer to do.
Senior Member
Joined: Oct 2000
Posts: 282
Likes: 0
From: Sugar Land, TX
You "do not" have to discharge the air conditioning system, regardless of what the manuals state.

Thread Starter
|
Member
Joined: Nov 2002
Posts: 16
Likes: 0
From: Columbia MD
Thanks for the input the truck has 141,000 miles and has had coolent changed every other year. Since the dealer quoted $586 the shop down the street should be able to do for less hopefully $400/500. I am leaning on leting them do it since I do not have a garage. Would hate to get it all apart and have it rain or not have time to put it back in over a weekend and have to mix up the parts. I also do not have a digital camara and would have to wait for pic. devolopment to track reassembly. Glad to hear the the HVAC will not have to be touched.
Thanks again for input and I will also check for electrolisis since starter was changed a few years back and I do not want this to happen again.
Thanks again for input and I will also check for electrolisis since starter was changed a few years back and I do not want this to happen again.

Senior Member
Joined: May 2001
Posts: 252
Likes: 0
From: Newtown Square, PA
Been there...done that
I replaced mine about 1 1/2 yrs ago. I got the step by step directions on how to do it from a Ford mechanic friend. It was a time consuming job, but it wasn't overly hard. I did get to compare the pictures of one other person who'd done it and posted here, and I gotta say that if I had seen his pics first before doing mine, then I wouldn't have even touched mine. his looked like a nightmare. I think he stripped everything down from the front of the dash to the firewall. No need to do that, but you need to know what to take out and in what sequence to do it in. Unfortunately, I don't have the directions anymore, or I'd send you a copy. Check on eBay...some people have the ford service manual CDs for sale. It beats the hell out of someone taking your $500 from you when you could have done it yourself. I did mine and it took two days with lots of breaks and checking steps, etc. Not a problem to do....just tedeous.
Have fun...

Have fun...
Trending Topics

Senior Member
Joined: Oct 2003
Posts: 2,066
Likes: 0
From: Delcambre, La
did mine about 1 1/2 ago too. again not hard just time consuming. common sense can help to get the dash out. don't pull to hard!! there are screws everywhere. i to had a couple left over but nothing rattles. i had a friend pay almost $800 to get a shop to do his. ****** they put a ground strap to his heater core and said this will help with the electrolisis (sp). might be an idea to look into.

Senior Member
Joined: Oct 2003
Posts: 136
Likes: 0
From: oak harbor, wa / brookings, or
did mine in my 98 f-150. by myself(no room for 2) on the side of the street in front of my house.
not to hard just time consuming. go buy a haynes book for the 97-99. it has pictures and is easy to follow. and it has all the tricks to removeing things like the headlight switch, heater hose firewall connections(watch out for the spacer and "o" rings, dealer don't stock or even no they exist. got mine through napa.), and airbags.
my biggest suggestion is that you track your screw (black round tips go into brass inserts, silver/gold colored go into plastic) removal by the part your removing. helps with screw replacement. the only thing that i did not pull was the main firewall harness disconnects. it looked like a real nightmare to get re-aligned. and just by being carefull and looseing some wire clips you get plenty of room to rotate the passenger dash board clear.
and as much fun as disassembly is reassembly rocks. if you don't like jigsawpuzzles and wrenching on your rig take it to a shop!! (ya driver) for us truck lovers this runs a close second to yankin the motor.

Technical Article Contributor

Joined: Dec 1997
Posts: 9,417
Likes: 11
From: Windsor,Ontario,Canada
If the heater core leak was caused by electrolysis then placing a ground strap on the heater core will speed up the process and you will be replacing the core even sooner. What contributes to the process is the variable ground that Ford uses to control the Blower Motor in the HVAC system. There is an elimination process that has to be followed if you want to eliminate the problem. Check out this site; http://members.shaw.ca/autocheck/electrolosis.htm.
Regards
Jean Marc Chartier
Regards
Jean Marc Chartier

Senior Member
Joined: Mar 2001
Posts: 107
Likes: 0
From: Virginia Beach, VA
Heater core replacement.
This took me two full days to do. Even with my official Ford Maintenance CD-Rom (one must READ it for it to help you).
One of the mistakes I made was I took the dash �shell� off of the dash frame, then had to remove the dash frame. That took six hours. Then I put the frame on a workbench to reattach the �shell� so the whole dashboard went back in the truck in one piece.
Now that I know how to do it, it should only take about two hours to remove the entire dash from the truck.
You DO have to drop the steering wheel down to the floor. Leave the AC alone. You do not have to discharge the AC....
There are three dash screws that are a pain to get out. One on the drivers and two on the passenger side. They are located behind the body weld lip on the door frame, that is exposed when you remove weather stripping from the body panel. You CANNOT see them without a inspection mirror and flashlight. You thought this would be easy
One of the hardest things to figure out was how I was going to get the main data bus connector (under the drives side dash on the firewall) off of the firewall. Removing the three connectors from the engine compartment was easy, getting the connector off of the fire wall was hard. There are three plastic spring tabs on each side of the connector that have to be depressed to get the connector out.
Use another person to help get the dash out. It is heavy. Once you have the dash off then the fun begins.
Get the cover off of the heater box.
Now go into the engine compartment and you have to remove the two heater hoses from the heater core. They are supposed to be �quick disconnect� type of connectors. Be aware that these connections and the tabs are plastic and will break if you try to pry them off. You will feel the two tabs that you must press to get them to release and pull off. Once you get them off you will see how they really work and they make some sense. But until you get them off you are on your own��. Real fun�.
The hose sides are female type fittings and the heater cores are male.
Now here is where the drawings and pictures on the shop manual are lacking. There are TWO O-rings in this fitting. They may or may not stay inside the female side. Check the O-rings to be sure they have not rolled or been crimped/crushed. If so, STOP - GET NEW ONES NOW.
Now pull the heater core out of the truck. Install the new core. The old core has foam rubber glued to itself. Have some thin rubber strips ready to �shim� the core in place. Since I had the box open, I decided to de-fungi the AC. A small bleach (or Tilex or what ever) solution sprayed into the AC heat exchanger will kill all mold/mildew and fungus.
Now put the hoses back on the core from the engine compartment side. The best way is to put one O-ring on the core nipple and one inside the female fitting at the base of the fitting. That was the only configuration that I found that worked without getting large leaks�. Believe me I tried multiple configurations and O-ring placement. There will be no leaks until the engine warms up to the point that the thermostat opens up to allow water to flow. For me, the leaks were VERY obvious� lots of flow. Your results will vary�
Technical Article Contributor
Joined: Dec 1997
Posts: 9,417
Likes: 11
From: Windsor,Ontario,Canada
Shipkiller,
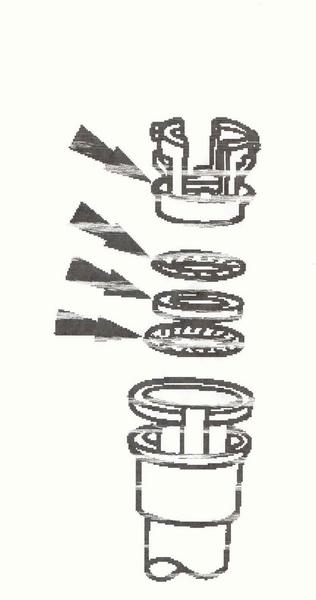
The O rings have a nylon spacer between them. Mine did not leak at all.
Here is a pic of the set up. Please excuse the quality as my printer ran out of ink.
JMC
The O rings have a nylon spacer between them. Mine did not leak at all.
Here is a pic of the set up. Please excuse the quality as my printer ran out of ink.
JMC
Thread Starter
|
Member
Joined: Nov 2002
Posts: 16
Likes: 0
From: Columbia MD
Good News!
All done! Picked up the truck this morning and paid the bill $519.00 7 hours labor and $56 for the part plus taxes and shop supplies.
Seems funny that the one in the Mustang has been in for almost 15 years and no problem and this one only lasted 7 years.
But in speaking with a friend his Tahoe's only lasted about 7 years as well.
At least it did not soak the carpet and pading with that terrible antifreeze stink.
Now I just have to put up with the computer relearning it's idle program, it was all over the place on the way to work but was much improved on the way home.
Thanks again for all the help and advice that's what sets this site apart form all those others!!