

Messed Up Ball Joints and Tie Rod Ends


Thread Starter
|
Senior Member
Joined: Oct 2004
Posts: 379
Likes: 0
From: Eau Claire / Milwaukee, WI; USA
Messed Up Ball Joints and Tie Rod Ends
This is something you don't see every day so I figured I'd post it here.
These pictures are from my Brother-in-Law's 1997 F-150 4x4, it has approx. 199,000 miles on it and all original front end components.
He had a Tie Rod End Seperate yesterday.

Checking his other Tie Rod Ends I could have probably yanked at least 2 more apart by hand.
I also found a few more interesting things while I was looking around under there.
These pictures are from my Brother-in-Law's 1997 F-150 4x4, it has approx. 199,000 miles on it and all original front end components.
He had a Tie Rod End Seperate yesterday.
Checking his other Tie Rod Ends I could have probably yanked at least 2 more apart by hand.
I also found a few more interesting things while I was looking around under there.
Last edited by DDan1967; Mar 30, 2005 at 03:06 AM.
Thread Starter
|
Senior Member
Joined: Oct 2004
Posts: 379
Likes: 0
From: Eau Claire / Milwaukee, WI; USA
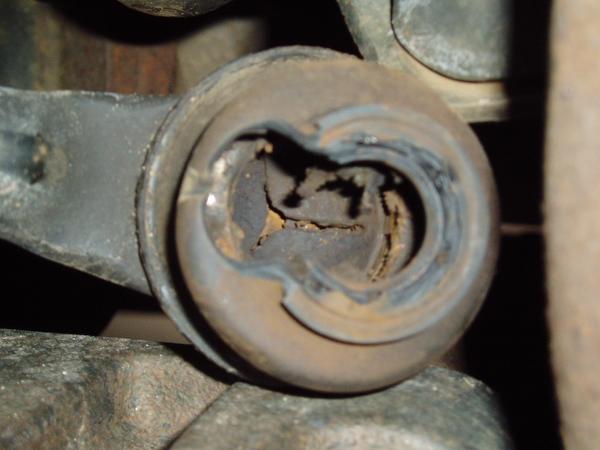
I could bearly believe what I saw when I glanced at the Right Lower Ball Joint.
As you can see the "ball" broke right through the top.
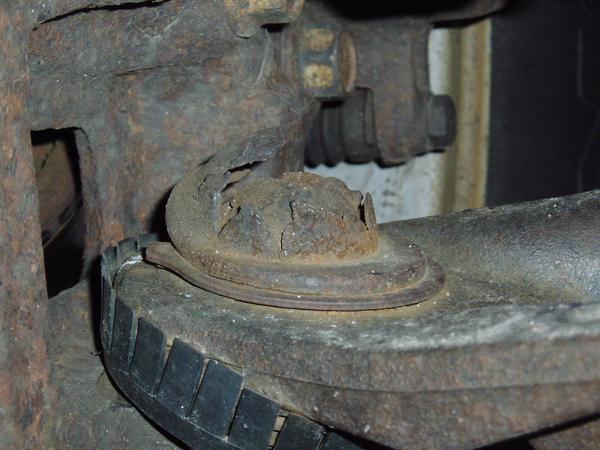
The Left side wasn't much better. The top of Ball Joint should be flat. As you can see it's bulgling.

And check this out. There is at least 1/2 inch of play in the Top Ball Joint. With the tires still on the ground, I was able to move the top of the right tire in and out with one hand.
And my brother-in-law hadn't noticed anything other than some sqeaking when he gets in and out of the Truck.
So I'll be tearing into his truck starting tomarrow.
Doug
As you can see the "ball" broke right through the top.
The Left side wasn't much better. The top of Ball Joint should be flat. As you can see it's bulgling.
And check this out. There is at least 1/2 inch of play in the Top Ball Joint. With the tires still on the ground, I was able to move the top of the right tire in and out with one hand.
And my brother-in-law hadn't noticed anything other than some sqeaking when he gets in and out of the Truck.
So I'll be tearing into his truck starting tomarrow.
Doug


Thread Starter
|
Senior Member
Joined: Oct 2004
Posts: 379
Likes: 0
From: Eau Claire / Milwaukee, WI; USA
Well 11 hours of labor later and its back together.
For simplicity everything mentioned is both Left and Right.
Replaced w/MOOG pars:
Upper Control Arms, one of which had nearly 1/2 inch of play.
Lower Ball Joints
Inner & Outer Tie Rod Ends
Sway Bar End Links
(Parts: $356)
And while I was there I replaced the Front Rotors and Brake Pads. (Parts $178)
I also cranked up the Torsion Bars to raise the front end some.
Now it's off to get an Alignment.


Thread Starter
|
Senior Member
Joined: Oct 2004
Posts: 379
Likes: 0
From: Eau Claire / Milwaukee, WI; USA
I would have liked to thrown some Ranchos on too, but it's my Brother-in-Law's truck and the shocks arent' leaking. So I couldn't convince him to shell out the extra cash.
Doug
Doug
Trending Topics


Thread Starter
|
Senior Member
Joined: Oct 2004
Posts: 379
Likes: 0
From: Eau Claire / Milwaukee, WI; USA
Originally posted by Xpedition
Wow 11 hours that seems like a good time to me. I am about to do everything you did plus shocks and A arm bushings. I am counting on atleast 20 hours for it all. Any tricks you can give me?
Wow 11 hours that seems like a good time to me. I am about to do everything you did plus shocks and A arm bushings. I am counting on atleast 20 hours for it all. Any tricks you can give me?
Anyway. Some tips.
Get MOOG Parts they are serviceable and the Ball Joints & Upper Control Arm come with instructions with most the Torque Values.
If you have a 4x4 this info will apply. I'm not sure how much crosses over to a 2wd.
First make aligning marks on your Torsion Bars and the Cross member that the Torsion Bar Adjuster is in. It will make it much easier to get your ride height back to where it should be.
On 4x4's only Remove the Spindle Nuts before jacking up the truck.
Jack up the front and and support under the frame.
Relieve the tention on the torsion bars by backing the screws out till the adjuster rests on the cross bar. (You don't have to remove the screw or adjuster)
Remove the Brake Calipers and Rotors it will make it easier. (When reinstalling the Rotor, but Anti-Seize compound on both sides of the Rotor hub; where it contacts the wheel and spindle)
Disconnect the End Links on the Sway Bar and swing it up out of the way. (End Link Torqe is 18 lb/ft)
Disconnect the Shocks at the bottom or if you plan on replacing them just remove them all together. (And in that case install the Top mount first. Upper Shock Torque is 30-40 lb/ft, Lower is 75-85 lb/ft)
Disconnecting the Outer Tie Rod End from the spindle carrier makes it much easier to get the CV shaft out and to align the Lower Ball Joints (Tie Rod Castellated Nut torque is 65 lb/ft)
Upper Ball Joint Torque is 65 lb/ft
Lower Ball Joint Torque is 85 lbs/ft
The Spindle Nut is 1 3/8" and Torque is 250 lb/ft so you'll need a 3/4 drive Torque Wrench (Rent if you can)
Rent a Ball Joint Press (Also called a 3-in-1 Tool) Make sure you get the universal adaptor kit too. It makes it so much easier.
Also Rent or buy a Pitman Arm Puller. The type with adjustable jaws is best as the Fixed jaw type won't work in some situations.
Prior to loosening the Upper Control Arm mount bolts make and aligning mark on the Adjuster Cam and Frame. When reinstalling, do Torque the bolts to 150 lb/ft, even though you�re taking it in for an alignment.
If you just replace the lower Ball Joints you don't need to get an alignment.
But if you replace the Upper Control Arms/Ball Joints, you should drive straight to the Alignment shop and no where else.
I don't think I've forgotten anything important.
Johngs
I doubt they are original but they are ford factory shocks. So they may have been replaced at a dealer prior to my brother-in-law buying the truck 2 years ago.
Doug
Last edited by DDan1967; May 14, 2005 at 03:17 AM.