

New member with a project: 1995 2WD F150 with 4.6 SOHC and single turbo

Senior Member


Joined: Dec 2004
Posts: 5,008
Likes: 27
From: Dover AFB DE / Harrisburg PA
You realize you need to go back to the dealer after your done and say there is something up with the 300. Mention whistling and something is off with the torque curve...
Adrianspeeder
Adrianspeeder

Member
Joined: Sep 2005
Posts: 58
Likes: 0
From: Murfreesboro, TN
Originally Posted by adrianspeeder
You realize you need to go back to the dealer after your done and say there is something up with the 300. Mention whistling and something is off with the torque curve...
Adrianspeeder
Adrianspeeder

That project is gonna be sick on the streets. Might even surprise a few Cobras and Camaros


Member
Joined: Sep 2004
Posts: 44
Likes: 0
From: pittsburg ks
Originally Posted by KDPATe
Like to see the looks on their faces
That project is gonna be sick on the streets. Might even surprise a few Cobras and Camaros
That project is gonna be sick on the streets. Might even surprise a few Cobras and Camaros
mullet dude 2 "you got spanked by an non "L" f150"
Member
Joined: Sep 2005
Posts: 58
Likes: 0
From: Murfreesboro, TN
Originally Posted by slow150
mullet dude 1 "dude what the fark was that"
mullet dude 2 "you got spanked by an non "L" f150"
mullet dude 2 "you got spanked by an non "L" f150"
There are a few non-Ls running around here that HAVE ripped some cars a new one...


Thread Starter
|
Senior Member
Joined: Apr 2006
Posts: 106
Likes: 0
Thanks for all the nice compliments guys. Your enthusiasm is keeping my spirits up!
As far as the guys at the Ford garage go, they are already onto the project. When I told them what I was doing they looked at me like I was crazy! I think they might be right.
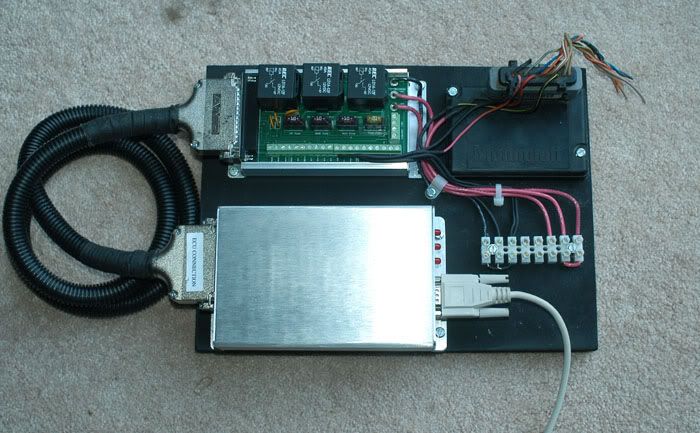
Not much to update right now but here is a little something. I have taken a break from the mechanical end and worked on the electrical side. The pics below show the mount I made for the MegaSquirt. It is a very high tech piece of birch plywood!
Pictured is the Megasquirt EMS, Relay Board, and the Ford EDIS 8 ignition module. The EDIS module will control the 8 COP's to fire the plugs, and the Megasquirt will control timing, all without a distributor. In the earlier pics I showed all of the engine connections I had fabricated. Now I just need to extend them to the relay board and the wiring will be complete! While it doesn't look like much I assure you that TONS of thought and work went into this portion of the project. This is all going to sit right behind the drivers seat by the way.

As usual, more to come!
As far as the guys at the Ford garage go, they are already onto the project. When I told them what I was doing they looked at me like I was crazy! I think they might be right.
Not much to update right now but here is a little something. I have taken a break from the mechanical end and worked on the electrical side. The pics below show the mount I made for the MegaSquirt. It is a very high tech piece of birch plywood!
Pictured is the Megasquirt EMS, Relay Board, and the Ford EDIS 8 ignition module. The EDIS module will control the 8 COP's to fire the plugs, and the Megasquirt will control timing, all without a distributor.
In the earlier pics I showed all of the engine connections I had fabricated. Now I just need to extend them to the relay board and the wiring will be complete! While it doesn't look like much I assure you that TONS of thought and work went into this portion of the project. This is all going to sit right behind the drivers seat by the way.As usual, more to come!
Last edited by PJF; Jun 21, 2006 at 08:55 PM.
Member
Joined: Sep 2004
Posts: 44
Likes: 0
From: pittsburg ks
Originally Posted by KDPATe
There are a few non-Ls running around here that HAVE ripped some cars a new one...
Thread Starter
|
Senior Member
Joined: Apr 2006
Posts: 106
Likes: 0
Well a bit more to report tonight. The Megasquirt, relay board, and EDIS 8 ignition module are all wired and tested now! All that remains is to splice the computer and ignition leads to the engine harness I made up. There are 43 seperate electrical connections in the photo. I am starting to understand why standalone EMS rigs go for $2000.00 and up. A carb would have been so much easier wouldn't it? Anyway here is a pic. Just for the record, there is over 120 feet of wire in that pic.

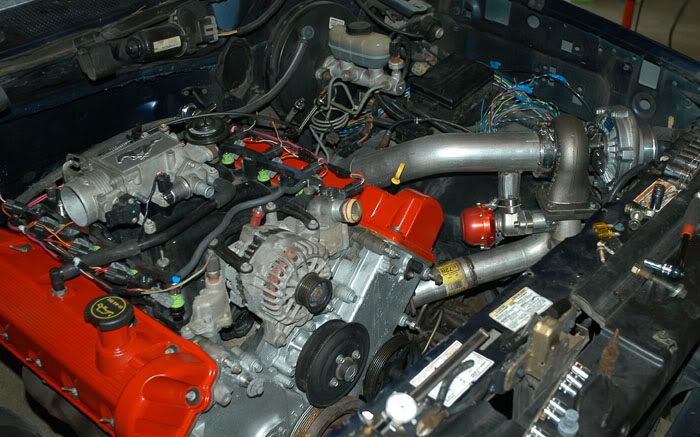
My E-Bay valve covers made it here and I gave them the old rattle can paint job. I think it dresses up the engine pretty nicely.

Making progress everyday, I just have so far to go. Hopefully some major work will get done this weekend.
My E-Bay valve covers made it here and I gave them the old rattle can paint job. I think it dresses up the engine pretty nicely.
Making progress everyday, I just have so far to go. Hopefully some major work will get done this weekend.

Senior Member
Joined: Sep 1999
Posts: 3,083
Likes: 0
From: Ventura, California
Originally Posted by PJF
PKRWUD-
I'm in Maine. You're not planning on stealing my project are you? You better bring a flat bed and some body armor if so!
I'm in Maine. You're not planning on stealing my project are you? You better bring a flat bed and some body armor if so!
Nah, I got out of that line of work years ago. No 401k. lol.
No, I was hoping you were closer so I might be able to see it in person, but you're about as far away from me as a person could get, and still be in the lower 48. Oh well.


Thread Starter
|
Senior Member
Joined: Apr 2006
Posts: 106
Likes: 0
Well I'm back! Sorry for the long time with no updates.
I did a bunch more electrical work and got the Megasquirt permanently installed behind the seat as well as running the wiring harness through the firewall and into the engine bay! I also dropped the engine back in the engine bay and did some fabrication on the wastegate, the associated plumbing, fabricated the beginnings of the exhaust with a piece of 3" pipe, and got my heated o2 sensor installed!
Here is a little Turbo 101 for those that aren't familiar with how a turbo functions.
The turbo is essentially nothing more than two fans connected by a common shaft. One of the fans sits in the path of the exhaust gases and as hot air blows across it, it spins, this in turn spins the fan on the other end of the shaft which forces more air into your engine, more air means you can burn more fuel, which in turn means you can break more parts, wait, you can make more power is what I meant to say!
At some point you want to decrease the flow of air going into your engine so that things DON'T break. We do this by means of a wastegate. A wastegate is nothing more than a valve that is designed to divert exhaust gases away from the turbo and allow it to slow down. The wastegate has a diaphragm that attaches to the intake manifold with a hose. In my case when the pressure reaches 8 psi at the intake the wastegate will open up and the exhaust bypasses the turbo and (hopefully) keeps me from making insanely high amounts of horsepower and breaking things.
After that lengthy explanation on to the pics!
First, the Megasquirt EMS safely installed behind the drivers seat. While I know it is far from factory I think it looks pretty decent for being done by a VERY amateur mechanic. Notice the power feeds, and the grounds coming into the distribution block. It all works perfectly which the laptop as well as the indash Megaview display can attest to. This represents a MASSIVE amount of work.

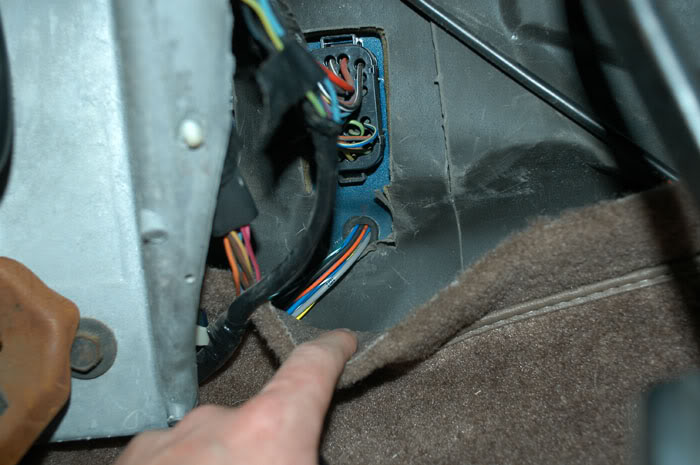
Here is the wiring harness passing through the firewall. All of those wires were safely zip tied and carefully routed underneath the door sill kick plate before going under the carpet and finally exiting just above where my index finger is pointing. Looks almost factory doesn't it? Notice the rubber grommet. It wouldn't do to have a wire chafe through and cause a malfunction, or worse yet, start a fire! It's possible I learned my lesson the hard way about using grommets in cases like this. But I refuse to incriminate myself!
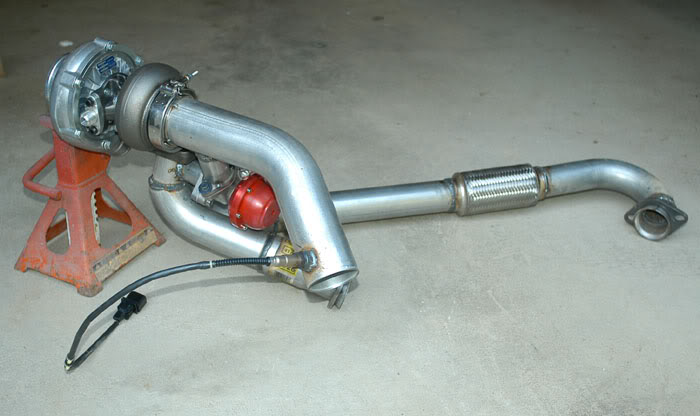
The turbo "hotside". The red bell shaped piece is the wastegate. Following the path of the pipes may help to make my above explanation more clear. Many people will run an open wastegate. Meaning that instead of venting exhaust gasses back into the turbo downpipe they will simply leave the wastegate open. It is horrendously loud when the wastegate opens. I chose to go the more difficult route and feed the gases back into the exhaust stream after the turbo. While it doesn't look like much this was also a tremendous amount of planning and work. Note that not all of the welds are not finished. Some are only tacked in place. I just plain ran out of steam this evening and gave up.

From the reverse. Note the O2 sensor I installed in the turbo downpipe.
I did a bunch more electrical work and got the Megasquirt permanently installed behind the seat as well as running the wiring harness through the firewall and into the engine bay! I also dropped the engine back in the engine bay and did some fabrication on the wastegate, the associated plumbing, fabricated the beginnings of the exhaust with a piece of 3" pipe, and got my heated o2 sensor installed!
Here is a little Turbo 101 for those that aren't familiar with how a turbo functions.
The turbo is essentially nothing more than two fans connected by a common shaft. One of the fans sits in the path of the exhaust gases and as hot air blows across it, it spins, this in turn spins the fan on the other end of the shaft which forces more air into your engine, more air means you can burn more fuel, which in turn means you can break more parts, wait, you can make more power is what I meant to say!
At some point you want to decrease the flow of air going into your engine so that things DON'T break. We do this by means of a wastegate. A wastegate is nothing more than a valve that is designed to divert exhaust gases away from the turbo and allow it to slow down. The wastegate has a diaphragm that attaches to the intake manifold with a hose. In my case when the pressure reaches 8 psi at the intake the wastegate will open up and the exhaust bypasses the turbo and (hopefully) keeps me from making insanely high amounts of horsepower and breaking things.
After that lengthy explanation on to the pics!
First, the Megasquirt EMS safely installed behind the drivers seat. While I know it is far from factory I think it looks pretty decent for being done by a VERY amateur mechanic. Notice the power feeds, and the grounds coming into the distribution block. It all works perfectly which the laptop as well as the indash Megaview display can attest to. This represents a MASSIVE amount of work.
Here is the wiring harness passing through the firewall. All of those wires were safely zip tied and carefully routed underneath the door sill kick plate before going under the carpet and finally exiting just above where my index finger is pointing. Looks almost factory doesn't it? Notice the rubber grommet. It wouldn't do to have a wire chafe through and cause a malfunction, or worse yet, start a fire! It's possible I learned my lesson the hard way about using grommets in cases like this. But I refuse to incriminate myself!
The turbo "hotside". The red bell shaped piece is the wastegate. Following the path of the pipes may help to make my above explanation more clear. Many people will run an open wastegate. Meaning that instead of venting exhaust gasses back into the turbo downpipe they will simply leave the wastegate open. It is horrendously loud when the wastegate opens. I chose to go the more difficult route and feed the gases back into the exhaust stream after the turbo. While it doesn't look like much this was also a tremendous amount of planning and work. Note that not all of the welds are not finished. Some are only tacked in place. I just plain ran out of steam this evening and gave up.
From the reverse. Note the O2 sensor I installed in the turbo downpipe.
Last edited by PJF; Jul 3, 2006 at 10:04 PM.
Thread Starter
|
Senior Member
Joined: Apr 2006
Posts: 106
Likes: 0
And finally another pic from the engine bay with the hotside installed. Of interest in this pic is the Megasquirt wiring harness visible just behind the turbo. I didn't bother to extend the connections to the engine harness as I know the engine has to come out once again! I wish I could just bolt the thing in there permanently but it would be putting the cart before the horse as I still have some fabrication to figure out in regards to the hydraulic clutch and the anti-freeze and oil adapter. Oh well, problems for another day I guess.
As usual stay tuned. I will be doing more this week I hope!
As usual stay tuned. I will be doing more this week I hope!