

Grinding Front/Rear Brake Calipers to Fit 15" Bogarts **PICS**


Thread Starter
|
Technical Article Contributor
Joined: Jan 2006
Posts: 1,292
Likes: 0
From: Port Royal, SC
I have had a set of 15X5 Bogart Drag Star Fronts and 15X10 Bogart Drag Star Rears for a while now. I decided it was time to do a little grinding on the brake calipers to get them to fit. I contacted Bob (Fade 2 Black) and asked if he wanted to get together and tackle this job. He agreed and my wife and I made the 260 mile trip to McDonough, GA. I sought out Bob because of his Lightning expertise and because I really wanted to meet him and see his truck in person. Bob and his wife are truely AWESOME people and I really have to thank them for the hospitality they showed me and my wife.
We got there on Friday evening so we hit-up the local Outback for some dinner and then went to the McDonough Summit Store to pick up the Hoosiers I had them hold for me...


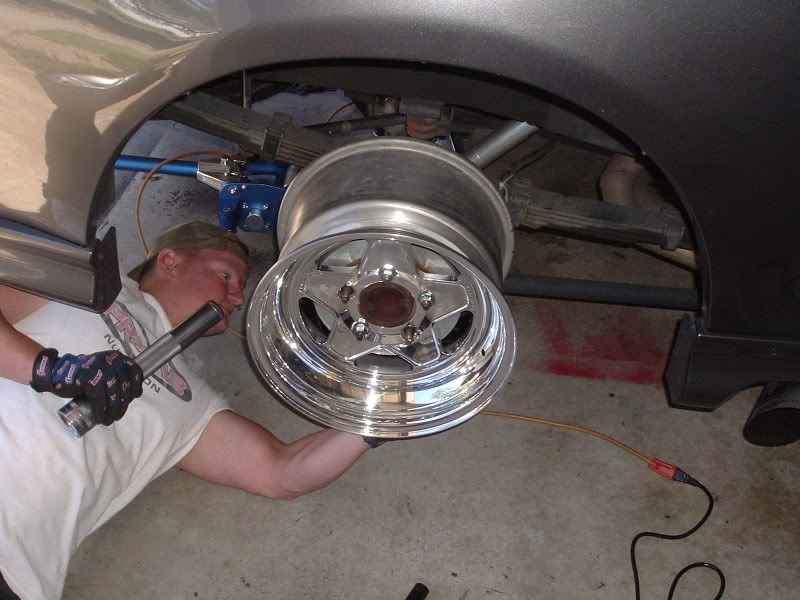
The next day Bob and I got to work. We started with the rear calipers. We started by test-fitting the rear wheels so we could get an idea of how much material needed to be removed. Right away we found that the deep backspacing (6.5") of the 15X10 Bogarts caused them to contact the dust shield. Bob used his tin-snips to cut away the lip of the dust shield...

We got there on Friday evening so we hit-up the local Outback for some dinner and then went to the McDonough Summit Store to pick up the Hoosiers I had them hold for me...
The next day Bob and I got to work. We started with the rear calipers. We started by test-fitting the rear wheels so we could get an idea of how much material needed to be removed. Right away we found that the deep backspacing (6.5") of the 15X10 Bogarts caused them to contact the dust shield. Bob used his tin-snips to cut away the lip of the dust shield...
Thread Starter
|
Technical Article Contributor
Joined: Jan 2006
Posts: 1,292
Likes: 0
From: Port Royal, SC


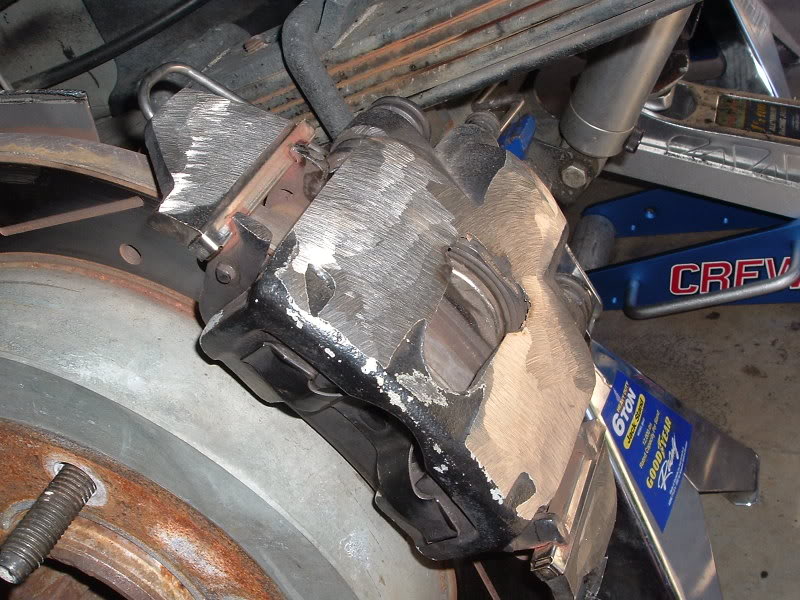
Next he cleaned up the jagged edge of the dust shield a little with an angle grinder. Initially Bob started out with his monster 7" angle grinder but it proved to be too cumbersome. So he switched to the 4" angle grinder I brought with me. Then we moved on to grinding the calipers...

While Bob was grinding he used a level rule to ensure he got any high spots left over...

Thread Starter
|
Technical Article Contributor
Joined: Jan 2006
Posts: 1,292
Likes: 0
From: Port Royal, SC
Here's some pics of what the finished drivers side rear caliper looked like before painting...

Once the wheel cleared the caliper and the dust shield, it still contacted the emergency brake cable. I've heard that you can just bend it back enough to where it doesn't contact the wheel but with this deep backspacing it wasn't possible. Bob displayed the expertise I was talking about and came up with this...

It worked like a charm and the cable now clears the wheel.
We then moved over to the passenger side. Bob went ahead and secured the e-brake cable on this side using some tie-wraps. This cable was a lot more flexible and eaiser to secure...

Once the wheel cleared the caliper and the dust shield, it still contacted the emergency brake cable. I've heard that you can just bend it back enough to where it doesn't contact the wheel but with this deep backspacing it wasn't possible. Bob displayed the expertise I was talking about and came up with this...
It worked like a charm and the cable now clears the wheel.
We then moved over to the passenger side. Bob went ahead and secured the e-brake cable on this side using some tie-wraps. This cable was a lot more flexible and eaiser to secure...


Thread Starter
|
Technical Article Contributor
Joined: Jan 2006
Posts: 1,292
Likes: 0
From: Port Royal, SC

A tip that I need to mention is using a fan to blow the metal shavings away from you. Bob knew this and set it up before we even started. It saved us from having to wear masks and kept the dust off us. Here's a shot of the fan and a shot of how it was set-up during the grinding....


And here's a shot of some of the metal dust that the fan kept off us...

Thread Starter
|
Technical Article Contributor
Joined: Jan 2006
Posts: 1,292
Likes: 0
From: Port Royal, SC
Next, I blasted both brake asemblies with brake parts cleaner and then painted them. I used some gloss caliper paint I bought at Advanced Auto...

While we were waiting for the paint to set up a little and before moving on to the front calipers, I convinced Bob to work his magic on my 3" Kenne Bell Pulley. He does outstanding work on these pulleys and I was extremely impressed. Here's how mine turned out...


Next we mounted my street tires back on the rear and flipped the truck around so the front was facing outside. We did this in order to blow the dust outside and not have it accumulate in Bob's garage. Then we went to work on the fronts. The fronts don't require as much grinding as the rears but there are some key spots that need attention. Like the fins on top and some areas in the front. One clip on each side had to be ground down a little so they wouldn't back themselves out and contact the wheel during use. One thing that saved a little time on the fronts was using some masking tape when test-fitting and spinning the wheel. It would show where the wheel was still making contact with the caliper...

While we were waiting for the paint to set up a little and before moving on to the front calipers, I convinced Bob to work his magic on my 3" Kenne Bell Pulley. He does outstanding work on these pulleys and I was extremely impressed. Here's how mine turned out...
Next we mounted my street tires back on the rear and flipped the truck around so the front was facing outside. We did this in order to blow the dust outside and not have it accumulate in Bob's garage. Then we went to work on the fronts. The fronts don't require as much grinding as the rears but there are some key spots that need attention. Like the fins on top and some areas in the front. One clip on each side had to be ground down a little so they wouldn't back themselves out and contact the wheel during use. One thing that saved a little time on the fronts was using some masking tape when test-fitting and spinning the wheel. It would show where the wheel was still making contact with the caliper...
Trending Topics
Thread Starter
|
Technical Article Contributor
Joined: Jan 2006
Posts: 1,292
Likes: 0
From: Port Royal, SC


Here's what the front calipers looked like when they were finished...

After that I followed the same painting procedures that I used on the rears and we were done. Bob and I agreed that this was not a hard job at all. We got done pretty quick. It could have been done a lot quicker but we took about an hour break to do the pulley. I would estimate this as about a 2-3 hour job. I said "we" a lot but Bob did pretty much all of the work. He's just like me and when he gets to working on something he keeps going until it's done. I honestly believe I would have had a harder time and taken longer if I did this by myself.
I would have gotten a few more pics, but something in Bob's driveway kept distracting me with it's high-gloss shine and killer stance...

It was great meeting Bob and his wife and we really appreciate them allowing us to spend the weekend at their house. It was a lot of fun.


Senior Member
Joined: Aug 2005
Posts: 1,273
Likes: 0
From: NJ
just what I was looking for!!! great write up Spencer!!! Im getting rid of my 16" Bogarts and going with the 15's now.. I need to grind my brakes in the back down for the 31st of this month dont have long but it will be done...
Thread Starter
|
Technical Article Contributor
Joined: Jan 2006
Posts: 1,292
Likes: 0
From: Port Royal, SC
Originally Posted by uncooked
We need pics of the after shots with rims and slicks mounted ! 
Very nice, great looking work.
You both have awsome looking trucks
Very nice, great looking work.
You both have awsome looking trucks

Senior Member
Joined: Feb 2007
Posts: 910
Likes: 0
From: Selden, NY
Originally Posted by Hostile03SVT
just what I was looking for!!! great write up Spencer!!! Im getting rid of my 16" Bogarts and going with the 15's now.. I need to grind my brakes in the back down for the 31st of this month dont have long but it will be done...
YOUR WELCOME
Now whens that $100.00 finders fee coming ....
Nice write up Thomas, Congrats
and way to hook a Bro up Bob (no Rich he is not going to do yours)
AND HOLY YES WHERE THE )#@*% ARE THE SMOKEY SHOTS

Niiiiiiiiiice choice T, NOTHING like Bogarts Baby!!!


Member
Joined: Apr 2005
Posts: 33
Likes: 0
If I was a Gen 2 vendor "cough, cough" I would some how come up with some replacement calipers (professionally machined down) that guys could just buy and install. Seems like such a big market to me. Hey but what do I know I'm just a gen 1 guy.