
How to: darken(clear) headlights(on a budget)


Thread Starter
|
Member
Joined: Jan 2011
Posts: 79
Likes: 0
How to: darken(clear) headlights(on a budget)
Here is a how to darken your own headlights guide some may call it cheap some may think its good, especially if they don't make headlights for your truck like mine.
(P.S) This can also be used to take out the ORANGE reflectors out "for that clear headlight look"
here we go,
steps:
1. take your headlight off
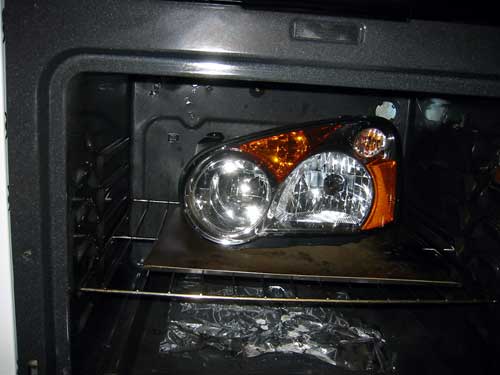
3. put your oven on about 210(15minutes)
4. MAKE SURE YOU take all of the BULBS out
5. put headlight inside oven for about 10 minutes(drink a beer) to soften the glue up
6. Take headlight out*CAUTION ITS HOT*
7. use two butter knives(what i used) and pry the glue off that might take a while be careful so you don't crack the headlight
8. now that you have the cover off you can either darken the housings or if you are just taking out the orange reflectors
--------------
9. Putting it back together get some strong glue like PLASTIC EPOXY(DO NOT USE HOT GLUE) it will be very ugly and when it gets hot it melts and you will lose a headlight cover
here are some pictures of mine i found this first one online just to show the stove

now i primer them


first coat of flat matte black

all panted and ready to dry in the sun


now put back on the truck


still bright

Enjoy guys took me about 5 hours total to do it right but its worth it(mainly waiting) but came out good i like it so that's all that matters.
(P.S) This can also be used to take out the ORANGE reflectors out "for that clear headlight look"
here we go,
steps:
1. take your headlight off
3. put your oven on about 210(15minutes)
4. MAKE SURE YOU take all of the BULBS out
5. put headlight inside oven for about 10 minutes(drink a beer) to soften the glue up
6. Take headlight out*CAUTION ITS HOT*
7. use two butter knives(what i used) and pry the glue off that might take a while be careful so you don't crack the headlight
8. now that you have the cover off you can either darken the housings or if you are just taking out the orange reflectors
--------------
9. Putting it back together get some strong glue like PLASTIC EPOXY(DO NOT USE HOT GLUE) it will be very ugly and when it gets hot it melts and you will lose a headlight cover
here are some pictures of mine i found this first one online just to show the stove
now i primer them
first coat of flat matte black
all panted and ready to dry in the sun
now put back on the truck
still bright
Enjoy guys took me about 5 hours total to do it right but its worth it(mainly waiting) but came out good i like it so that's all that matters.
Last edited by T3audioNavi; Mar 31, 2011 at 03:59 AM.
Thread Starter
|
Member
Joined: Jan 2011
Posts: 79
Likes: 0
yes mine are but i dont suggest it though makes the headlight kind of ugly you cant tell mine in pictures but to the eye you can tell kind of a blur i would just paint the chrome housing and call it a day


Thread Starter
|
Member
Joined: Jan 2011
Posts: 79
Likes: 0
before i actually did this mod i put a light coat of lense paint on it, then trying to take it off after i did the mod and it didnt work out too well so i had to sand it and clear coat it to make it look some what stock. but if you did this on yours lets say then you wouldnt have that hazy look obviously
Trending Topics

Member
Joined: Dec 2005
Posts: 39
Likes: 0
From: NC
I really don't see the point in painting the inside housing if you painted the lenses. I also wouldn't have painted the bulb refector either. I just did mine last week and I recommend the oven on or around 240 degrees for no more than 10 minutes.
Thread Starter
|
Member
Joined: Jan 2011
Posts: 79
Likes: 0
also you putting yours on 240 me putting mine on 450 he putting his on 210 is all personal preference, mine didnt melt or damage so tome its fine.. also the housing on the blinkers i wanted to paint them but as far as the one for the main bulbs if you look in the pictures. it IS NOT painted


Technical Article Contributor
Joined: Aug 2006
Posts: 7,862
Likes: 0
From: Northern California
It doesn't even have to melt, just softening it enough to warp it or change its shape will happen at higher temperatures. Higher the temperature, the less time it takes to warp.
But I guess its different for everybody. I did 250 for 6-7 minutes it worked perfect.
But I guess its different for everybody. I did 250 for 6-7 minutes it worked perfect.

Senior Member
Joined: May 2010
Posts: 371
Likes: 0
2009 Light apart in JUST 60 SECONDS after baking!!!
Alright, everyone here had me really concerned about getting the lights apart. It was trivial! I set my oven to 285, baked the light until the glued edge hit 230 degrees (17 minutes), pried back a tab, put a screwdriver on the clear tab, grabbed the back of the light and pushed. It just peeled back in less than 60 seconds!!! (An IR thermometer to measure the temperatures was nice!
No cutting the lip, no cracking, no slow prying, just one good pull to start and work around!
UPDATE: Just opened my other light. Similar experience. It took a little more prying on the corner to get it started, but was able to pull it apart with my hands as well. I do notice a little crazing on the inside of the clear lens. I don't know if it is there before baking. I doubt I will see it once installed. (Has anyone else noticed this?)
Next Update: The lights in my '99 ford have crazing on the inside of the lens as well (way, way worse than my '09 F150). Perhaps this is just a sign if a Ford light aging. My '05 Honda doesn't have this. I never noticed it when the reflector was behind the acrylic. I doubt that I will notice it after a week or so. (It just looks like the light is slightly dirty, which it almost always is anyways.)
Next Update: Upon closer inspection, the crazing is on the outside. I may use the 3M kit (or similar) to remove. I don't really want to remove the UV coating, so I may just leave it alone. I definitely would tape an insulator to the top of the lens (like a few sheets of cloth) if doing this again.
Last edited by 2009KR; Sep 23, 2011 at 10:31 PM.

Alright, everyone here had me really concerned about getting the lights apart. It was trivial! I set my oven to 285, baked the light until the glued edge hit 230 degrees (17 minutes), pried back a tab, put a screwdriver on the clear tab, grabbed the back of the light and pushed. It just peeled back in less than 60 seconds!!! (An IR thermometer to measure the temperatures was nice!
No cutting the lip, no cracking, no slow prying, just one good pull to start and work around!
No cutting the lip, no cracking, no slow prying, just one good pull to start and work around!
