
Replacing rear pinion seal


Thread Starter
|
Technical Article Contributor
Joined: Mar 2012
Posts: 154
Likes: 0
Replacing rear pinion seal
How to replace a rear pinion seal.
Why replace:

Obviously if you see your differential oil spilling out it needs replaced. Also, if part of your dust cover(plastic piece) is broken, I recommend replacing both the seal and cover for safety reasons. After alot of off-roading and camping mud can get behind these and cause the seal to dry rot, so check your seals for a good clean look and keep your differentials lubricated. My seal was cracked from mud grinding behind the dust cover, so it was easy to diagnose. Fluid was all down my driver line and spinning everywhere.
This how-to was performed on my 03 FX4 Supercab with 5.4L with 9.75 rear end.
Materials:
12mm wrench (12 point)
13mm socket (6 point)
1-1/8 deep well socket
Reversible Puller
Flat head screw driver
Ratchet strap (to hold up drive line)
Impact wrench
New pinion seal (mine is the 9.75") most are 8.8's
Gear Lubricant - SAE 80W-90 (to replace lost fluid)
Brake Cleaner/Fine sand paper for cleaning
Torque wrench
Blocks to keep the vehicle from rolling.
3" PVC pip coupler or 3.5" for 9.75 (Used to push in new seal without hammering edges)* I used the top off an acetylene tank for this.
I wont post a pic of all materials used, just make sure you have the proper seal. I bought both to give you an idea of the difference in the two.

Removing Parts and prepping to install new seal
First: (Materials used: Blocks)
Park the truck in the flattest spot you can find. Now crank the truck if it has electronic 4WD and turn it off.

This will help lock the front tires when you release the drive line later on. Now block up all 4 tires just to be safe.


Second: (Materials used: 12mm wrench(12point) and 13mm socket)
Use a 12mm wrench/socket (MUST BE 12 POINT, NOT 6) to loosen the 4- bolts holding the drive line to the differential. *Where the rear U-joint is, removing the U-joint itself is not necessary*


Once you have those loosened the 4 bolts you can use a 6 point socket to unscrew them the rest of the way off to be a little quicker.

Third: Materials Used (Ratchet strap)
Once all 4 bolts holding the driver line are removed make sure the truck is still secured by the blocks and safe for you to be under it. Now use the ratchet strap to hold up the drive line and get it out of your way, not letting it scrape the ground.

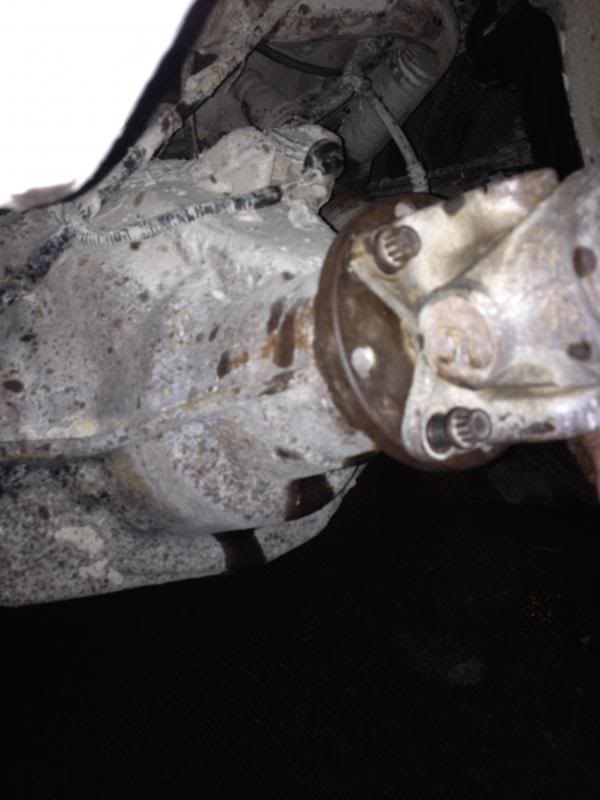
Fourth: Materials used(1-1/8" deep well socket and Impact gun
With the drive line off the back, you should see this:

Now its time to remove the mounting plate for the drive line which is held on by a 1-1/8" nut. I used a 140ft-lb impact gun for this part.

Fifth: Materials used(Reversible puller and air gun with 13mm socket)
Once you remove the 1-1/8" nut you will find out the mounting plate is nearly impossible to remove by hand or by using a brass mallet. Thus I recommend using a reversible puller (WORKS AMAZING).

Notice that the pinion head sticking out has a small hole in the center of it, this is made for a reversible puller. Place the center bolt of the puller in that hole and place the other 3 clamps on the back side of the mounting plate. Once secured, use an air gun to tighten the puller bolt to pull the mounting plate off.


Sixth: Materials Used (Flat head screw driver)
Now you have full access to the the seal dust cover. Remove it, and the use a small flat head to help wedge the old pinion seal out. Be careful and dont damage the dust cover, it can be reused. Placing a small flat head on the edges of the seal helps to break it loose. Once the old seal is out, clean off the yoke and make sure no debris is inside or on the gearing itself.
Also make sure there is no slack "IN OR OUT" on the yoke! Up and down slack is apparent from the removal of the mounting plate, this is normal.

Here is my old seal:

*I went ahead and used a drill/grinder with a coarse bristle to clean off some of the debris on the mounting plate for a clean fit.*

Why replace:

Obviously if you see your differential oil spilling out it needs replaced. Also, if part of your dust cover(plastic piece) is broken, I recommend replacing both the seal and cover for safety reasons. After alot of off-roading and camping mud can get behind these and cause the seal to dry rot, so check your seals for a good clean look and keep your differentials lubricated. My seal was cracked from mud grinding behind the dust cover, so it was easy to diagnose. Fluid was all down my driver line and spinning everywhere.
This how-to was performed on my 03 FX4 Supercab with 5.4L with 9.75 rear end.
Materials:
12mm wrench (12 point)
13mm socket (6 point)
1-1/8 deep well socket
Reversible Puller
Flat head screw driver
Ratchet strap (to hold up drive line)
Impact wrench
New pinion seal (mine is the 9.75") most are 8.8's
Gear Lubricant - SAE 80W-90 (to replace lost fluid)
Brake Cleaner/Fine sand paper for cleaning
Torque wrench
Blocks to keep the vehicle from rolling.
3" PVC pip coupler or 3.5" for 9.75 (Used to push in new seal without hammering edges)* I used the top off an acetylene tank for this.
I wont post a pic of all materials used, just make sure you have the proper seal. I bought both to give you an idea of the difference in the two.

Removing Parts and prepping to install new seal
First: (Materials used: Blocks)
Park the truck in the flattest spot you can find. Now crank the truck if it has electronic 4WD and turn it off.

This will help lock the front tires when you release the drive line later on. Now block up all 4 tires just to be safe.


Second: (Materials used: 12mm wrench(12point) and 13mm socket)
Use a 12mm wrench/socket (MUST BE 12 POINT, NOT 6) to loosen the 4- bolts holding the drive line to the differential. *Where the rear U-joint is, removing the U-joint itself is not necessary*


Once you have those loosened the 4 bolts you can use a 6 point socket to unscrew them the rest of the way off to be a little quicker.

Third: Materials Used (Ratchet strap)
Once all 4 bolts holding the driver line are removed make sure the truck is still secured by the blocks and safe for you to be under it. Now use the ratchet strap to hold up the drive line and get it out of your way, not letting it scrape the ground.

Fourth: Materials used(1-1/8" deep well socket and Impact gun
With the drive line off the back, you should see this:

Now its time to remove the mounting plate for the drive line which is held on by a 1-1/8" nut. I used a 140ft-lb impact gun for this part.

Fifth: Materials used(Reversible puller and air gun with 13mm socket)
Once you remove the 1-1/8" nut you will find out the mounting plate is nearly impossible to remove by hand or by using a brass mallet. Thus I recommend using a reversible puller (WORKS AMAZING).

Notice that the pinion head sticking out has a small hole in the center of it, this is made for a reversible puller. Place the center bolt of the puller in that hole and place the other 3 clamps on the back side of the mounting plate. Once secured, use an air gun to tighten the puller bolt to pull the mounting plate off.


Sixth: Materials Used (Flat head screw driver)
Now you have full access to the the seal dust cover. Remove it, and the use a small flat head to help wedge the old pinion seal out. Be careful and dont damage the dust cover, it can be reused. Placing a small flat head on the edges of the seal helps to break it loose. Once the old seal is out, clean off the yoke and make sure no debris is inside or on the gearing itself.
Also make sure there is no slack "IN OR OUT" on the yoke! Up and down slack is apparent from the removal of the mounting plate, this is normal.

Here is my old seal:

*I went ahead and used a drill/grinder with a coarse bristle to clean off some of the debris on the mounting plate for a clean fit.*

Last edited by Bluejay; May 18, 2013 at 02:44 PM.
Thread Starter
|
Technical Article Contributor
Joined: Mar 2012
Posts: 154
Likes: 0
Installing new parts.
First: Materials used (New pinion/oil and grease seal, PVC coupler for easy mounting)
*This step is much easier if you can find something that perfect fits the edges of the seal so you push it into place(PVC Pipe or the top of an air tank). I don't recommend using a hammer, as the outter part of the seal is pretty fragile. I used the top off my acetylene tank to do this, fits perfect.
Place the seal into the differential and place your coupler or any device with the same circumference as the edge of the seal and slightly hit it with a hammer to wedge it in for a good tight seal. The seal itself has a spring that goes around the yoke and holds after fully secured. Once that is done, use sand paper to touch up the edges on the dust cover as to not let anything harm the new seal. Once it has a clean finish re-install it on the mounting plate.

Second: Materials used (1-1/8" Socket and Impact gun)
With the seal and dust cover in place, reinstall the mounting plate for the drive line.

The plate will go into the groove of the seal once enough pressure is placed on it. This plate has teeth on the inside of it, so make sure you align it with the yoke properly. Use a hammer to make sure you get the teeth biting in the proper place. Don't torque it down until everything is aligned.

Now with the plate on, use the air gun to tighten the nut and force the plate into the seal. Once all the way in, use a torque wrench and set it from 120-140 ft lbs. (Check your manual)

Third: Materials used (12mm tweleve point wrench and a buddy)
With the mounting plate back on and the seal finished its time to bolt up the drive line. So loosen the ratchet strap and place the drive line up on the mounting plate. If may not align perfectly, DONT PANIC! Get a friend to take the truck out of 4WD, with the e-brake and blocks still set. This will give the drive line a little play so you can line the 4- 12mm bolts up perfectly.

Then use your 12point 12mm wrench to torque down the bolts and fasten the drive line securely.
Finally: Materials Used (SAE 80W-90 gear lubricant)
Re-check that everything is torqued to the proper specs and put some gear lubricant into the diff's. Un-block the tires, and go for a slow test drive to make sure everything is in proper working order.

First: Materials used (New pinion/oil and grease seal, PVC coupler for easy mounting)
*This step is much easier if you can find something that perfect fits the edges of the seal so you push it into place(PVC Pipe or the top of an air tank). I don't recommend using a hammer, as the outter part of the seal is pretty fragile. I used the top off my acetylene tank to do this, fits perfect.
Place the seal into the differential and place your coupler or any device with the same circumference as the edge of the seal and slightly hit it with a hammer to wedge it in for a good tight seal. The seal itself has a spring that goes around the yoke and holds after fully secured. Once that is done, use sand paper to touch up the edges on the dust cover as to not let anything harm the new seal. Once it has a clean finish re-install it on the mounting plate.

Second: Materials used (1-1/8" Socket and Impact gun)
With the seal and dust cover in place, reinstall the mounting plate for the drive line.

The plate will go into the groove of the seal once enough pressure is placed on it. This plate has teeth on the inside of it, so make sure you align it with the yoke properly. Use a hammer to make sure you get the teeth biting in the proper place. Don't torque it down until everything is aligned.

Now with the plate on, use the air gun to tighten the nut and force the plate into the seal. Once all the way in, use a torque wrench and set it from 120-140 ft lbs. (Check your manual)

Third: Materials used (12mm tweleve point wrench and a buddy)
With the mounting plate back on and the seal finished its time to bolt up the drive line. So loosen the ratchet strap and place the drive line up on the mounting plate. If may not align perfectly, DONT PANIC! Get a friend to take the truck out of 4WD, with the e-brake and blocks still set. This will give the drive line a little play so you can line the 4- 12mm bolts up perfectly.

Then use your 12point 12mm wrench to torque down the bolts and fasten the drive line securely.

Finally: Materials Used (SAE 80W-90 gear lubricant)
Re-check that everything is torqued to the proper specs and put some gear lubricant into the diff's. Un-block the tires, and go for a slow test drive to make sure everything is in proper working order.

Global Moderator &
Senior Member
Senior Member

Joined: Mar 2005
Posts: 26,079
Likes: 82
From: Burleson/Athens/Brownsboro, TX
Thanks for another great write up. We appreciate the time and effort you put into it and we appreciate the contribution to the site that will help others. I have copied it to the Articles and How To section.
__________________
Jim
Jim
