How to add KC lights behind 04-09 grill "Step by Step"!


#77
 09-16-2010, 07:27 AM

First - Thanks from a squid, Stay Safe, head down and Watch your 6.
Second - Looks good. Thanks for starting the thread.
Will have to rig something up when I do the top end swap.
Thrid - Thanks to all that added their mods. Lots of designs to choose from.
Cheers

Second - Looks good. Thanks for starting the thread.
Will have to rig something up when I do the top end swap.
Thrid - Thanks to all that added their mods. Lots of designs to choose from.
Cheers
#78
10-23-2010, 03:23 PM

Senior Member
Join Date: May 2007
Location: NE Ohio
Posts: 240
Likes: 0
Received 0 Likes
on
0 Posts
Great "How-To" article. I've got a few questions though.
Would y'all go the route of "driving lights"? Or would you go with the "long range" lights? What watt?
How hard are these to wire up? I'd like to have them on their own separate switch versus having them wired with the high beam activation.
Did you have to wire them into a fuse? If so, are they on their own fuse or are they tied in with some other fuse?
Anything else I need to know about the wiring process? I can fab/cob up a bracket no problem, but the wiring has me a little leery.
#79
11-01-2010, 09:43 AM

#80
11-04-2010, 10:00 PM

Senior Member
Join Date: Aug 2010
Location: LITTLE ELM, TX
Posts: 224
Likes: 0
Received 0 Likes
on
0 Posts
https://www.f150online.com/forums/me...ry-sturdy.html
Ok I did this. It started just to try out but this is sturdy.. Doesnt move at all.
Ok I did this. It started just to try out but this is sturdy.. Doesnt move at all.
#81
11-04-2010, 10:17 PM
Senior Member
Join Date: Aug 2010
Location: LITTLE ELM, TX
Posts: 224
Likes: 0
Received 0 Likes
on
0 Posts


VERY STURDY
Just so happens there are 2 Metric 10x40mm bolts that screw directly into the frame.
I bought a piece of unistrut and 2 L brackets and some square spacers.
spacers to raise the height of the bar.
Fortunately I work at Fastenal here in Dallas and picked up the stuff all in one place.
Best of ALL.. All I had to cut was the unistrut. Then bolt up.
I will be taking it all off Saturday and painting Black to prevent rust.
Last edited by HamboneFX4; 11-04-2010 at 10:24 PM.
#82
11-05-2010, 04:09 AM
Senior Member
Join Date: Aug 2010
Location: LITTLE ELM, TX
Posts: 224
Likes: 0
Received 0 Likes
on
0 Posts
#83
12-14-2010, 05:33 PM


I just put some lights behind the grill today, bought cheap walmart lights and went with Okla's design, seemed like a much easier install. Wiring it all up tomorrow.
Edit: My friend and I can't find an easy way through the firewall. Anyone got some insight? I want to wire the lights to a separate switch but can't find a way inside!
Edit: My friend and I can't find an easy way through the firewall. Anyone got some insight? I want to wire the lights to a separate switch but can't find a way inside!
Last edited by Barrett; 12-15-2010 at 02:21 PM.
#84
12-20-2010, 01:01 AM

Member
Join Date: Dec 2010
Location: Lincoln, NE, USA
Posts: 61
Likes: 0
Received 0 Likes
on
0 Posts
First of all, thank you to all the folks who posted information in this thread, and particularly to those who added pictures to their posts.
I fabbed the pieces for my light bar today, I need to drill holes for mounting the lights tomorrow morning, then give the chunks to the welders, then over to powder coat. Black wrinkle PC will disappear nicely, I think. The material is 1"x.125" steel, not sure what grade, but it cut and drilled harder than I expected. I pulled it out of the scrap pile at work.
The bar bolts down under the headlight mounting bolt on one side, straight across to the other headlight mounting bolt, and has two braces down to the bumper bolts. The bar sits flat with respect to the airflow, but I put a 90 degree twist on each end that turns it up in the correct orientation for mounting under the headlight bolts. Much like Phattacorider's design with the stabilizers, but built that way from the beginning, and all one piece. I used the vise and a Crescent wrench to do the twist, and a vise and a hammer to do the bends on the braces.
I'm using some smaller, 4" 55W lights, so the whole bar is higher than the other designs I've seen here. It cleared the square sensor mounted in front of the radiator by about that much, so I decided to take a notch out of the middle to give it some more clearance. I also modded the mounting brackets on the lights themselves, as they were designed to mount from the top, and hang down, and I wanted them mounted on top of the bar.
Here are some pics, first one is the end of the light bar, and the two braces. If you look carefully, you can see the notch for sensor clearance in the middle of the light bar. The black Sharpie line just beyond the braces marks the middle of the bar, and that's where the notch is.

This is the connection of the light bar to the headlight mounting bolt.

This is the bar mock-up with one light. The light will actually be farther from the center, almost to the twist.

The mock-up with hood closed, and the light about where it will be. Yes, I know it's filthy. Sloppy streets will do that to a vehicle.

I am going to wire the lights to work only when the high beams are on. I am considering a switch to turn them off, but haven't decided yet. I can always add one later if I feel it's necessary.
I'll add more pics after welding, powder coat, and installation.
I fabbed the pieces for my light bar today, I need to drill holes for mounting the lights tomorrow morning, then give the chunks to the welders, then over to powder coat. Black wrinkle PC will disappear nicely, I think. The material is 1"x.125" steel, not sure what grade, but it cut and drilled harder than I expected. I pulled it out of the scrap pile at work.
The bar bolts down under the headlight mounting bolt on one side, straight across to the other headlight mounting bolt, and has two braces down to the bumper bolts. The bar sits flat with respect to the airflow, but I put a 90 degree twist on each end that turns it up in the correct orientation for mounting under the headlight bolts. Much like Phattacorider's design with the stabilizers, but built that way from the beginning, and all one piece. I used the vise and a Crescent wrench to do the twist, and a vise and a hammer to do the bends on the braces.
I'm using some smaller, 4" 55W lights, so the whole bar is higher than the other designs I've seen here. It cleared the square sensor mounted in front of the radiator by about that much, so I decided to take a notch out of the middle to give it some more clearance. I also modded the mounting brackets on the lights themselves, as they were designed to mount from the top, and hang down, and I wanted them mounted on top of the bar.
Here are some pics, first one is the end of the light bar, and the two braces. If you look carefully, you can see the notch for sensor clearance in the middle of the light bar. The black Sharpie line just beyond the braces marks the middle of the bar, and that's where the notch is.
This is the connection of the light bar to the headlight mounting bolt.
This is the bar mock-up with one light. The light will actually be farther from the center, almost to the twist.
The mock-up with hood closed, and the light about where it will be. Yes, I know it's filthy. Sloppy streets will do that to a vehicle.
I am going to wire the lights to work only when the high beams are on. I am considering a switch to turn them off, but haven't decided yet. I can always add one later if I feel it's necessary.
I'll add more pics after welding, powder coat, and installation.
Last edited by tenzip; 12-20-2010 at 01:03 AM.
#85
01-24-2011, 12:35 AM

Senior Member
Join Date: Aug 2008
Location: 918!
Posts: 289
Likes: 0
Received 0 Likes
on
0 Posts

#86
01-26-2011, 03:32 PM

Senior Member
Join Date: Nov 2009
Location: richmond va
Posts: 1,519
Likes: 0
Received 0 Likes
on
0 Posts
i was in the same boat. if you dont have a bunch of tools do i the way i did it. it can be done with a drill for the most part
go to lowes, get a 1.25 inch piece of 1/8th inch angle iron. just a L shape piece of iron, its in the section with the strap metal of different thicknesses, i think i paid 11 dollars or so for it.
cut it somehow (drill a bunch of holes, and smooth it once its cut, or find a grinder or cutter of some sort) to 39.75 inches long, round off the edges.
then you have the bar you need to connect each side of the headlight housing. drill 4 holes in it, 2 on the sides so the stock headlight bolt can go through your angle iron, then the headlight, then to the body bolt like factory. you will have to cut a L shape in the rubber liner too but thats not hard, if you press on it, you can feel an outline of the headlight, mark where it needs to be cut and snip away at it to make your cut.
then mount the lights and wire them up. i followed hellas wiring instructions, and cut the high beam wire and soldered in the trigger wire and put heatshrink over everything. everything in the bay is in wire loom.

and i have no pictures of mine, but this is buckys photo, and mine mounts simmilar to this, but i didnt add a bolt to the bottom like he did. 1.5 inch angle iron wont fit in there, and youll have to cut it, but 1.25 inch iron will fit in there perfectly.

lights are hella 500ff's, i found them at wallmart for 68 dollars, they are on amazon for 68 also.
this setup is plenty fine for keeping them still, ive never seen them move. i can stand on this bar (165 pounds) and it wont budge. i can grab it and push and pull against it and rock my truck with it. the only time the bar twists is when im tigtening down on the bolt that aims the hellas.
i also mounted the switch where another guy on here did, next to the headlight switch. feel free to reply or pm me with questions.
go to lowes, get a 1.25 inch piece of 1/8th inch angle iron. just a L shape piece of iron, its in the section with the strap metal of different thicknesses, i think i paid 11 dollars or so for it.
cut it somehow (drill a bunch of holes, and smooth it once its cut, or find a grinder or cutter of some sort) to 39.75 inches long, round off the edges.
then you have the bar you need to connect each side of the headlight housing. drill 4 holes in it, 2 on the sides so the stock headlight bolt can go through your angle iron, then the headlight, then to the body bolt like factory. you will have to cut a L shape in the rubber liner too but thats not hard, if you press on it, you can feel an outline of the headlight, mark where it needs to be cut and snip away at it to make your cut.
then mount the lights and wire them up. i followed hellas wiring instructions, and cut the high beam wire and soldered in the trigger wire and put heatshrink over everything. everything in the bay is in wire loom.
and i have no pictures of mine, but this is buckys photo, and mine mounts simmilar to this, but i didnt add a bolt to the bottom like he did. 1.5 inch angle iron wont fit in there, and youll have to cut it, but 1.25 inch iron will fit in there perfectly.
lights are hella 500ff's, i found them at wallmart for 68 dollars, they are on amazon for 68 also.
this setup is plenty fine for keeping them still, ive never seen them move. i can stand on this bar (165 pounds) and it wont budge. i can grab it and push and pull against it and rock my truck with it. the only time the bar twists is when im tigtening down on the bolt that aims the hellas.
i also mounted the switch where another guy on here did, next to the headlight switch. feel free to reply or pm me with questions.
Last edited by fivespeedsteed; 01-26-2011 at 03:37 PM.
#87
02-18-2011, 12:36 PM

Member
Join Date: Jan 2011
Location: Calgary, AB, Canada
Posts: 16
Likes: 0
Received 0 Likes
on
0 Posts
Im going to be doing this install this weekend. Bought some 5" baja driving lights from Canadian tire. Its low budget and i would really love the KC or Hella lights but for 250 bucks they can keep them for now lol. At least i can get the setup done and see how everything looks. Will post pics of before and after later on next week.
PS. my wife doesnt know i have them yet lol so im sure ill have some explaining to do. Birthday is in a month so i guess early birthday present from myself
PS. my wife doesnt know i have them yet lol so im sure ill have some explaining to do. Birthday is in a month so i guess early birthday present from myself
Last edited by Kingford7012; 02-18-2011 at 12:37 PM. Reason: Additional Info
#88
02-25-2011, 12:26 AM

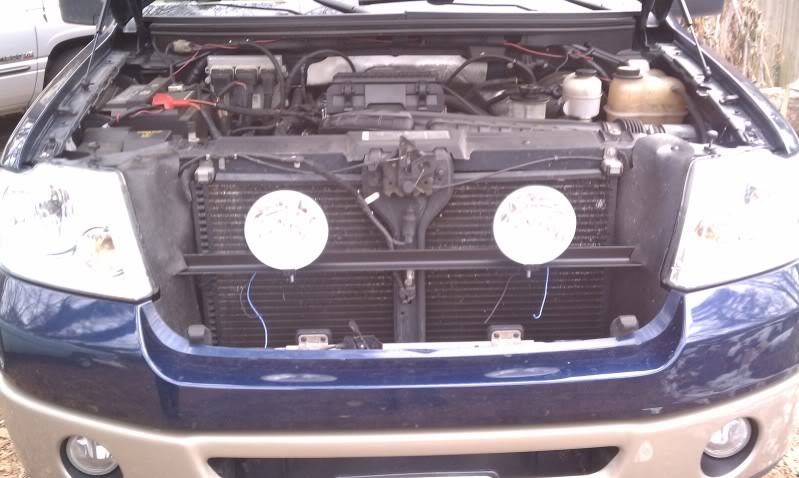
Here's my set up. Once piece of aluminum bent to shape, holds 2 100w KC Daylighters.
IMAG0157.jpg?t=1298611441
IMAG0156.jpg?t=1298611437
IMAG0157.jpg?t=1298611441
IMAG0156.jpg?t=1298611437
#89
04-16-2011, 12:09 AM

Senior Member
Join Date: Jul 2009
Location: Petal, Mississippi
Posts: 154
Likes: 0
Received 0 Likes
on
0 Posts
#90
04-20-2011, 10:53 AM
