


How-to Blackout / Tint your Tail Lights


Thread Starter
|
Technical Article Contributor
Joined: Jun 2006
Posts: 428
Likes: 0
From: Louisiana
How-to Blackout / Tint your Tail Lights
How to Blackout/Smoke/Tint your F150 tail lights. People were asking how I tinted my tail lights so I decided to make another how-to (btw I am not a pro at this, this is just how I learned/researched how to tint). This mod is a little easier than painting your headlights.
Be aware of your local laws, in Louisiana your tail light reflector must be visible from 30 feet. You might also want to add some sort of additional brake lighting to your vehicle after doing this mod, to insure that the vehicles behind you can safely see when you're braking.
Supplies:
-masking tape
-Windex
-Razor Blade
-Palmovile dish soap
-VHT Nite Shades
-Clearcoat (recommend taking to paint shop)
-800, 1500 grit sand paper
-Bucket or small ice chest
-Polishing Compound
-Squirt bottle
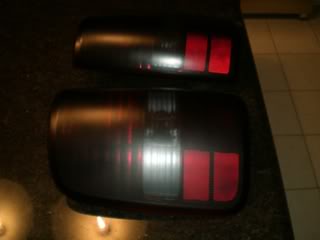
*Notice reflector is visible*
Be aware of your local laws, in Louisiana your tail light reflector must be visible from 30 feet. You might also want to add some sort of additional brake lighting to your vehicle after doing this mod, to insure that the vehicles behind you can safely see when you're braking.
Supplies:
-masking tape
-Windex
-Razor Blade
-Palmovile dish soap
-VHT Nite Shades
-Clearcoat (recommend taking to paint shop)
-800, 1500 grit sand paper
-Bucket or small ice chest
-Polishing Compound
-Squirt bottle
*Notice reflector is visible*
Thread Starter
|
Technical Article Contributor
Joined: Jun 2006
Posts: 428
Likes: 0
From: Louisiana
Step 1: With your tail lights and third brake light removed from your vehicle, remove the bulbs and cover the bulb holes with masking tape to prevent moisture from getting inside your tail light.Thoroughly clean the tail lights with Windex.
Step 2: You need to fill your bucket or ice chest with water and few drops of Palmolive dish soap (Palmolive removes the oil from your hands which will affect the lights when they are painted). Get your 800 grit sand paper and start sanding your lights evenly. Be sure that your tail lights are always moist with your soap water, when ever plastic grit accumulates use your squirt bottle to spray it away then clean your sandpaper off in the soap water. (Don't forget you don't want any water in the lights, it's a pain to get the moister out). Once the lights are very very hard to see through, you are ready to move on.
Step 3: It is very important to handle the lights without touching the areas you are going to paint. You DO NOT want any oil from your hands on the painting area this will show up in the final product. Spray the lights off with your squirt bottle water and allow them to completely air dry.
Step 3: If you plan on leaving your reverse reflector clear, this is when you need to mask off that area and use your razor blade to get a clean edge. (you might want to use a flexible ruler to get a straight edge) I did not do this step but a few f150online members have done this. Here is an example of what masking and not masking will look like. (Take your time when masking, if you do a lazy job they are going to come out looking like poop)
Step 4: Before painting make sure there is no dust or finger prints on the lights, you might want to wipe the lights down with a lent free cloth. You want to take your time when painting it will be worth it in the end(paint where there is little moisture and no wind). It is best to suspend your lights from a wire or bent coat hanger,hung from garage door rail or something like that (this will allow you to paint parallel to the surface of the lights and a rattle can sprays better when it is up-right). You want to make your coats as light as possible. Paint one coat and let it dry for about 25 minutes, and repeat until you get a darkness that you are satisfied with. Do not go trigger happy on the lights, they dry a lot darker than they appear when wet (You do not want your tail lights too dark, if you go too dark you will have to start over and re-sand until the red completely comes back). Keep in mind that after I clear coated my lights they came out a little darker than I had hoped.
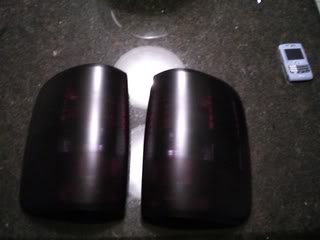
Step 5: Let the tail lights dry for at least 24 hours. I took my tail lights to a local body shop to have them clear coated. I HIGHLY recommend you do this,it might be free or very cheap either way its worth it. Professional clear coat will hold up better than a rattle can clear coat (You don't want your clear coat peeling off after the first pressure washing). Remove all masking tape,except the tape covering the bulb holes,before doing the clear coat. If you do not plan on taking them to a pro, you can use enamel based clear coat to clear the lights. NEVER use lacquer based clear coat, it will strip the Nite Shades off the tail lights. Before you clear coat you want to make sure the lights are lent, dust, and fingerprint free. Use the same painting techniques as before(hang then, light coats,ect.). After adding about 4-5 coats let the lights dry for at least 24 hours.
Step 6: After the lights have set for 24 hours, you want to wet sand with 1500 grit sand paper. If you have little or no orange peel skip this step.
Step 7: If you want your tail lights very shiny, you want to use polish them with a good polishing compound. Finally re-install the tail lights to your vehicle and insure that your lights are perfectly visible in the day light. MY LIGHTS CAME OUT VERY DARK. So, I added a Recon Line-of-Fire led light under my tailgate. I hard wired the light so it only comes on when I apply my brake or use a turn signal. I do not care for the looks of the light, I just added it for extra safety and so no one can rear end me and say, oh I couldn't see his brake lights. If you have any other recommend or if I forgot anything, to the how-to, feel free to throw in your two cents.
Step 2: You need to fill your bucket or ice chest with water and few drops of Palmolive dish soap (Palmolive removes the oil from your hands which will affect the lights when they are painted). Get your 800 grit sand paper and start sanding your lights evenly. Be sure that your tail lights are always moist with your soap water, when ever plastic grit accumulates use your squirt bottle to spray it away then clean your sandpaper off in the soap water. (Don't forget you don't want any water in the lights, it's a pain to get the moister out). Once the lights are very very hard to see through, you are ready to move on.
Step 3: It is very important to handle the lights without touching the areas you are going to paint. You DO NOT want any oil from your hands on the painting area this will show up in the final product. Spray the lights off with your squirt bottle water and allow them to completely air dry.
Step 3: If you plan on leaving your reverse reflector clear, this is when you need to mask off that area and use your razor blade to get a clean edge. (you might want to use a flexible ruler to get a straight edge) I did not do this step but a few f150online members have done this. Here is an example of what masking and not masking will look like. (Take your time when masking, if you do a lazy job they are going to come out looking like poop)
Step 4: Before painting make sure there is no dust or finger prints on the lights, you might want to wipe the lights down with a lent free cloth. You want to take your time when painting it will be worth it in the end(paint where there is little moisture and no wind). It is best to suspend your lights from a wire or bent coat hanger,hung from garage door rail or something like that (this will allow you to paint parallel to the surface of the lights and a rattle can sprays better when it is up-right). You want to make your coats as light as possible. Paint one coat and let it dry for about 25 minutes, and repeat until you get a darkness that you are satisfied with. Do not go trigger happy on the lights, they dry a lot darker than they appear when wet (You do not want your tail lights too dark, if you go too dark you will have to start over and re-sand until the red completely comes back). Keep in mind that after I clear coated my lights they came out a little darker than I had hoped.
Step 5: Let the tail lights dry for at least 24 hours. I took my tail lights to a local body shop to have them clear coated. I HIGHLY recommend you do this,it might be free or very cheap either way its worth it. Professional clear coat will hold up better than a rattle can clear coat (You don't want your clear coat peeling off after the first pressure washing). Remove all masking tape,except the tape covering the bulb holes,before doing the clear coat. If you do not plan on taking them to a pro, you can use enamel based clear coat to clear the lights. NEVER use lacquer based clear coat, it will strip the Nite Shades off the tail lights. Before you clear coat you want to make sure the lights are lent, dust, and fingerprint free. Use the same painting techniques as before(hang then, light coats,ect.). After adding about 4-5 coats let the lights dry for at least 24 hours.
Step 6: After the lights have set for 24 hours, you want to wet sand with 1500 grit sand paper. If you have little or no orange peel skip this step.
Step 7: If you want your tail lights very shiny, you want to use polish them with a good polishing compound. Finally re-install the tail lights to your vehicle and insure that your lights are perfectly visible in the day light. MY LIGHTS CAME OUT VERY DARK. So, I added a Recon Line-of-Fire led light under my tailgate. I hard wired the light so it only comes on when I apply my brake or use a turn signal. I do not care for the looks of the light, I just added it for extra safety and so no one can rear end me and say, oh I couldn't see his brake lights. If you have any other recommend or if I forgot anything, to the how-to, feel free to throw in your two cents.


Thread Starter
|
Technical Article Contributor
Joined: Jun 2006
Posts: 428
Likes: 0
From: Louisiana
Trending Topics


Senior Member
Joined: Jan 2009
Posts: 712
Likes: 0
From: PA
I nightshaded the tails on my old ranger and most recently the F150, just thought I'd clutter this thread with some more tinted tails pics


I went super dark on the ranger and decided to try a different route and just change the color on the F150, either way I think looks good but you need black paint to pull off the really dark lights. And I personally don't care to tint over the reverse light, I think it looks cleaner and doesn't hinder your light output when backing up at night.
I went super dark on the ranger and decided to try a different route and just change the color on the F150, either way I think looks good but you need black paint to pull off the really dark lights. And I personally don't care to tint over the reverse light, I think it looks cleaner and doesn't hinder your light output when backing up at night.
Senior Member
Joined: Jan 2009
Posts: 712
Likes: 0
From: PA
You can polish and wax em as of now but if your unhappy with the glossy finish you can wet sand with 2000 or greater then hit it with rubbing then polishing compound to really make it shiney, yo.


Junior Member
Joined: Jul 2009
Posts: 3
Likes: 0
From: Orange County, CA
To blackf150337:
I absolutely love your tail lights. That's what I want my truck's to look like, it's black as well. Thankyou for the directions... I will try it this weekend and see how it looks, and post pictures if it turns out well.
I absolutely love your tail lights. That's what I want my truck's to look like, it's black as well. Thankyou for the directions... I will try it this weekend and see how it looks, and post pictures if it turns out well.