How to: 04-08 OEM headlights FX-R Projector HID retrofit.


#93
 01-26-2011, 11:24 AM

Senior Member
Join Date: Dec 2009
Location: New Port Richey, Florida
Posts: 231
Likes: 0
Received 0 Likes
on
0 Posts
Please let us know what you figure out for this, I'd like to do this on mine while I am doing this conversion, would make fine tuning A LOT easier.
#94
01-26-2011, 11:22 PM

Rotational adjustment would be sweet! It will be quite complicated since the adjustment will have to be made into a bracket that rotates the projector housing only while still holding it steady to the reflector bowl. There isnt much room back there as is, so im very interested in seeing what you got cooking there!
As far as right/left adjustment, the easiest would be to extend one of the lower outside mounting points on the main bowl reflector much like the top up/down adjuster is.
Good luck and post up pics!
I got to sort all my pics out so i can get them posted up.
As far as right/left adjustment, the easiest would be to extend one of the lower outside mounting points on the main bowl reflector much like the top up/down adjuster is.
Good luck and post up pics!
I got to sort all my pics out so i can get them posted up.
#96
01-27-2011, 11:57 PM
ok got my pics up last night.
EDIT
(Sorry guys, got thumbnails up to slightly smaller pics, hope that helps.)
The build up pics are just like powerz' pics at the
beginning just with a different background so no sense in posting up doubles.
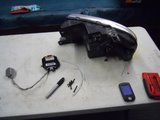
Here is my initial parts setup.
Two FX-Rs, Two complete M45 lo only with three piece shrouds.
two matsu ballasts two morimoto three fives.
Four apollo shrouds and misc other items.
th_Thesetup.jpg?t=1296270793
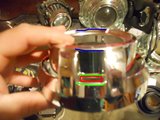
I initially wanted to use the M45 shrouds with the FX-Rs in the housing but the projector would have to be heavily modified to use them so that went out the window. The chrome areas on the M45 also had a green tinge to them so they would have to be sent for a clean re-chrome.
(crappy shot with a broken headlight assembly)
th_M45projector.jpg?t=1296270793
So no need to post install pics as there are already plenty on here, and well i was to excited doing it that i didnt take any.
But here are some pics of what to do to mount the apollo shrouds.
First and foremost, you have to grind/sand/cut down the two small nibs that are on the bottom of the FXR near the screw for the hi/lo/ solenoid.
(borrowed pic from the web)
Take these all the way down to the flat area where the screw mounts.
th_Projector036.jpg?t=1296270793
The shrouds have to be trimmed just a bit.
The red indicates what will be removed in this pic. Both small "vents" on either side will be cut and the bottom will need to be cut as shown.
th_Projector035.jpg?t=1296270793
When you do the two sides, trim enough so that when you hold the shroud level (the two blue lines are lined up) the inner cup (red) is cut even with the top of the outer cup (green)
th_Projector033.jpg?t=1296270793
This is a basic shape of the cut on the bottom. Once you do the two vents youll have to trim this a bit at a time to get perfect around the screw and peg area we trimmed before on the FXR.
th_Projector034.jpg?t=1296270793
I actually took the screw out (see projector pic above) and kept test fitting till the shroud sat perfect on the lense and there was about 1/16 gap all around the cut. Once its trimmed, simply make a very very tiny fingernail shape notch on the outer ring where the screw hits.
That should get your apollos fitting nicely. Remember, take the black rings, and superglue them to the shrouds and let them sit BEFORE putting the headlight all together. As a matter of fact, do it before modifying the shroud.
EDIT
(Sorry guys, got thumbnails up to slightly smaller pics, hope that helps.)
The build up pics are just like powerz' pics at the
beginning just with a different background so no sense in posting up doubles.
Here is my initial parts setup.
Two FX-Rs, Two complete M45 lo only with three piece shrouds.
two matsu ballasts two morimoto three fives.
Four apollo shrouds and misc other items.
th_Thesetup.jpg?t=1296270793
I initially wanted to use the M45 shrouds with the FX-Rs in the housing but the projector would have to be heavily modified to use them so that went out the window. The chrome areas on the M45 also had a green tinge to them so they would have to be sent for a clean re-chrome.
(crappy shot with a broken headlight assembly)
th_M45projector.jpg?t=1296270793
So no need to post install pics as there are already plenty on here, and well i was to excited doing it that i didnt take any.
But here are some pics of what to do to mount the apollo shrouds.
First and foremost, you have to grind/sand/cut down the two small nibs that are on the bottom of the FXR near the screw for the hi/lo/ solenoid.
(borrowed pic from the web)
Take these all the way down to the flat area where the screw mounts.
th_Projector036.jpg?t=1296270793
The shrouds have to be trimmed just a bit.
The red indicates what will be removed in this pic. Both small "vents" on either side will be cut and the bottom will need to be cut as shown.
th_Projector035.jpg?t=1296270793
When you do the two sides, trim enough so that when you hold the shroud level (the two blue lines are lined up) the inner cup (red) is cut even with the top of the outer cup (green)
th_Projector033.jpg?t=1296270793
This is a basic shape of the cut on the bottom. Once you do the two vents youll have to trim this a bit at a time to get perfect around the screw and peg area we trimmed before on the FXR.
th_Projector034.jpg?t=1296270793
I actually took the screw out (see projector pic above) and kept test fitting till the shroud sat perfect on the lense and there was about 1/16 gap all around the cut. Once its trimmed, simply make a very very tiny fingernail shape notch on the outer ring where the screw hits.
That should get your apollos fitting nicely. Remember, take the black rings, and superglue them to the shrouds and let them sit BEFORE putting the headlight all together. As a matter of fact, do it before modifying the shroud.
Last edited by Fabian06SC; 01-28-2011 at 10:28 PM. Reason: pics
#98
01-28-2011, 01:08 AM
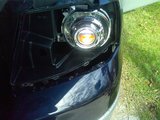
Heres some pics of the reflectors and the projectors installed and aiming
.
my rotational adjustment as well as left/right adjustment is damn near dead on.
(sorry for the previous large pics, Click for larger pics)
th_IMAGE_324.jpg?t=1296190866
th_IMAGE_323.jpg?t=1296190866
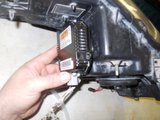
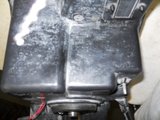
I also decided to mount the OEM ballasts on the housing itself.
No dumb hanging ballasts. Just three 10/24 allen head bolts and some tubing per side.
th_Projector001.jpg?t=1296190866
I started off by picking a nice place, this fit perfect in the small space the F150s have to work with.
th_Projector005.jpg?t=1296190866
th_Projector002.jpg?t=1296190866
Marked my locations
th_Projector006.jpg?t=1296190866
Drilled, then tapped them
th_Projector007.jpg?t=1296190866
Cut some tubing to length
th_Projector003.jpg?t=1296190866
And went for a test fit.
th_Projector014.jpg?t=1296190866
test fit in truck,
th_Projector018.jpg?t=1296190866
And marked where i needed to trim for the connector.
th_Projector017.jpg?t=1296190866
Took all the spacers out, and cut some for the other side and shot them trim black
th_Projector023.jpg?t=1296190866
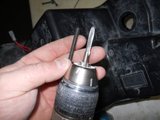
I then took some black RTV to the threads before the final assembly,
th_Projector026.jpg?t=1296190866
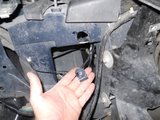
I also made a spot for the stock wire tie to screw to.
th_Projector029.jpg?t=1296190866
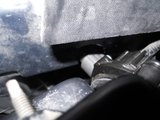
then i installed the OEM plug on harness and ran it thru my new hole
th_Projector024.jpg?t=1296190866
Right side all installed
th_Projector032.jpg?t=1296190866
nice close up
th_Projector030.jpg?t=1296190866
Repeat for other side,
th_Projector037.jpg?t=1296190866
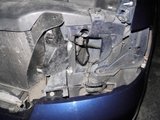
core support
th_Projector038.jpg?t=1296190866
A few more pics on the slideshow.
.
my rotational adjustment as well as left/right adjustment is damn near dead on.
(sorry for the previous large pics, Click for larger pics)
th_IMAGE_324.jpg?t=1296190866
th_IMAGE_323.jpg?t=1296190866
I also decided to mount the OEM ballasts on the housing itself.
No dumb hanging ballasts. Just three 10/24 allen head bolts and some tubing per side.
th_Projector001.jpg?t=1296190866
I started off by picking a nice place, this fit perfect in the small space the F150s have to work with.
th_Projector005.jpg?t=1296190866
th_Projector002.jpg?t=1296190866
Marked my locations
th_Projector006.jpg?t=1296190866
Drilled, then tapped them
th_Projector007.jpg?t=1296190866
Cut some tubing to length
th_Projector003.jpg?t=1296190866
And went for a test fit.
th_Projector014.jpg?t=1296190866
test fit in truck,
th_Projector018.jpg?t=1296190866
And marked where i needed to trim for the connector.
th_Projector017.jpg?t=1296190866
Took all the spacers out, and cut some for the other side and shot them trim black
th_Projector023.jpg?t=1296190866
I then took some black RTV to the threads before the final assembly,
th_Projector026.jpg?t=1296190866
I also made a spot for the stock wire tie to screw to.
th_Projector029.jpg?t=1296190866
then i installed the OEM plug on harness and ran it thru my new hole
th_Projector024.jpg?t=1296190866
Right side all installed
th_Projector032.jpg?t=1296190866
nice close up
th_Projector030.jpg?t=1296190866
Repeat for other side,
th_Projector037.jpg?t=1296190866
core support
th_Projector038.jpg?t=1296190866
A few more pics on the slideshow.
Last edited by Fabian06SC; 01-28-2011 at 10:31 PM.


#100
01-28-2011, 10:37 PM
Sorry guys I was so excited about fixing my camera that i forgot they were 12 megapixel pics...
Im running a 17 monitor on 1280 X 1224 and the links show up as 21% and look a nice size, let me know if anyone wants a smaller res pic, but i really dont want to resize all of them. My old PC doesnt have the disk space to multitask as fast i do lol.
Im running a 17 monitor on 1280 X 1224 and the links show up as 21% and look a nice size, let me know if anyone wants a smaller res pic, but i really dont want to resize all of them. My old PC doesnt have the disk space to multitask as fast i do lol.
#101
01-29-2011, 01:06 PM

Senior Member
Join Date: Nov 2007
Location: Dallas, Texas
Posts: 2,469
Likes: 0
Received 0 Likes
on
0 Posts
#102
02-01-2011, 04:50 PM

#103
02-02-2011, 12:26 AM

Join Date: Apr 2009
Location: ED, AB, Canada
Posts: 566
Likes: 0
Received 0 Likes
on
0 Posts
Thanks! That means a lot. I'm glad you were able to use it as a guide line. I'm enjoying how everyone is doing their little spin on things. The next thing I'm thinking how to do is projectors in the round fogs.
#104
02-02-2011, 12:41 AM

Join Date: Aug 2006
Location: Northern California
Posts: 7,862
Likes: 0
Received 0 Likes
on
0 Posts
D2S minis! I know they will fit the 04-05 fogs, i bet they'd fit yours too with some modification.
#105
02-02-2011, 11:43 AM
Join Date: Apr 2009
Location: ED, AB, Canada
Posts: 566
Likes: 0
Received 0 Likes
on
0 Posts
Yeah I'm kinda leaning towards the D2S minis, or the ford Fusion fogs. Just need a small sealed projector. The hardest part is picking a good one that will work.