
How To: Blue Gauges, w/o the green film.


Thread Starter
|
Senior Member
Joined: Sep 2006
Posts: 144
Likes: 0
From: Rosemead
How To: Blue Gauges, w/o the green film.
Well after looking at different threads and how people have tried to get rid of the green film behind the gauge face to change it to a different color i finally decided to take a crack at it. still working on it as i type so ill update later with final pics. here's what i have so far.
this is after removing the gauge cluster, removing the clear lens, needles(scariest part of removal, feel almost like ur gonna break them but the DO come out eventually) and peeling off the spot welded gauge film. this is the back showing the two spot welds per needle hole. if u look above that red circle on the holes there is two spots on each side. this is where it is held on to the clear plastic diffuser.

the "spot welds" are tricky to pry away from the clear diffuser because u dont wanna damage the gauge sheet. what i did was use a razor blade behind the sheet and the clear plastic light diffuser to pry the film sheet from the clear plastic diffuser. the "spot welds are on the holes where the needle is and there are 2 per needle hole. so 12 total "spot welds u have to pry off" this pic shows after i removed the gauge film.
this next pic shows how the film looks after i sanded it a little bit. i tried nail polish remover but really didnt do anything. i got some 400 grit sandpaper, folded it into a small square and sanded only in the areas where the green shines through. dont be so scared if u sand a little bit of the white off. IT WILL NOT RUIN ur gauges if u sand a little of the white off. try to avoid just goings nuts and sanding the whole entire back. you wanna focus on the numbers that shine green.

this pic shows the other side of the gauge face. i layed it against my window in the sun shining. you can see where the green is that i havent yet sanded. and u can see the part i sanded between the 40-70MPH marks. those are now showing through clear.

this last pic that i have currently is when i installed some blue SMT leds.(more details of where i got them once i finish the whole install). it wasnt completely dark yet but i like the results so far. although i may need to look into finding some brighter ones.

hopefully this answers some of the questions we've all been wondering about getting blue gauges. i wrote this up pretty quick so let me know if u have any other questions or if u want pics of something specific while i have things apart. i'll post final pics when i finish most likely tommorrow morning.
I want to thank 928gt for his thread (https://www.f150online.com/forums/sh...d.php?t=223276) on painting the plastic cover on the fx4/fx2 gauges. it's what got me into wanting to do this mod as well. will have pics of the painted aluminum rings after as well.
also fireman137 for his thread (https://www.f150online.com/forums/sh...ghlight=gauges) of the actual test with diff. led lights. i believe he just put the led lights in and didnt sand the green film off.
this is after removing the gauge cluster, removing the clear lens, needles(scariest part of removal, feel almost like ur gonna break them but the DO come out eventually) and peeling off the spot welded gauge film. this is the back showing the two spot welds per needle hole. if u look above that red circle on the holes there is two spots on each side. this is where it is held on to the clear plastic diffuser.
the "spot welds" are tricky to pry away from the clear diffuser because u dont wanna damage the gauge sheet. what i did was use a razor blade behind the sheet and the clear plastic light diffuser to pry the film sheet from the clear plastic diffuser. the "spot welds are on the holes where the needle is and there are 2 per needle hole. so 12 total "spot welds u have to pry off" this pic shows after i removed the gauge film.
this next pic shows how the film looks after i sanded it a little bit. i tried nail polish remover but really didnt do anything. i got some 400 grit sandpaper, folded it into a small square and sanded only in the areas where the green shines through. dont be so scared if u sand a little bit of the white off. IT WILL NOT RUIN ur gauges if u sand a little of the white off. try to avoid just goings nuts and sanding the whole entire back. you wanna focus on the numbers that shine green.
this pic shows the other side of the gauge face. i layed it against my window in the sun shining. you can see where the green is that i havent yet sanded. and u can see the part i sanded between the 40-70MPH marks. those are now showing through clear.
this last pic that i have currently is when i installed some blue SMT leds.(more details of where i got them once i finish the whole install). it wasnt completely dark yet but i like the results so far. although i may need to look into finding some brighter ones.
hopefully this answers some of the questions we've all been wondering about getting blue gauges. i wrote this up pretty quick so let me know if u have any other questions or if u want pics of something specific while i have things apart. i'll post final pics when i finish most likely tommorrow morning.
I want to thank 928gt for his thread (https://www.f150online.com/forums/sh...d.php?t=223276) on painting the plastic cover on the fx4/fx2 gauges. it's what got me into wanting to do this mod as well. will have pics of the painted aluminum rings after as well.
also fireman137 for his thread (https://www.f150online.com/forums/sh...ghlight=gauges) of the actual test with diff. led lights. i believe he just put the led lights in and didnt sand the green film off.

Thread Starter
|
Senior Member
Joined: Sep 2006
Posts: 144
Likes: 0
From: Rosemead
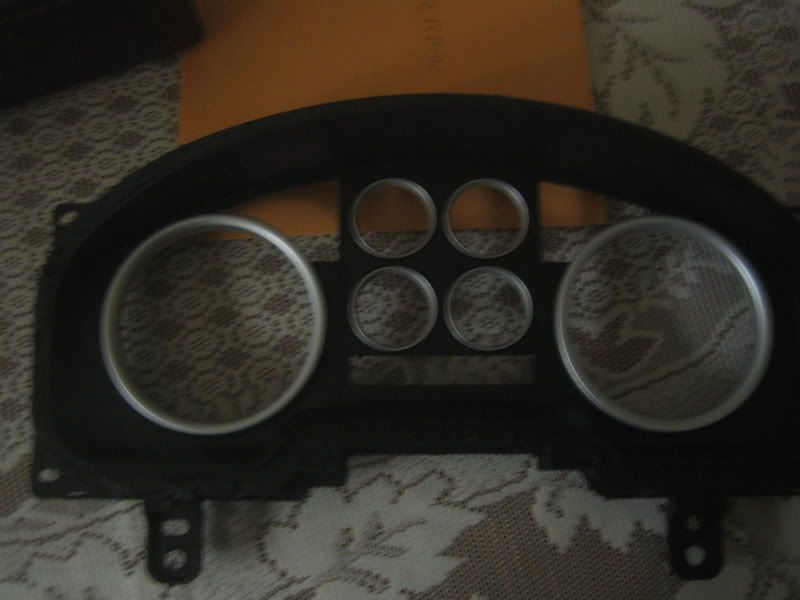
i just realized everytime i mention "clear plastic diffuser" i didnt post a pic so u guys will know what i'm talking about. so anyways the clear plastic diffuser is between the gauge cluster and the electronics and such and the actual gauge film so the film lays on top of the clear plastic part, then that goes on top of the whole cluster assembly. heres a pic to give u an idea.


Member
Joined: Apr 2005
Posts: 86
Likes: 0
From: Maryland
Thanks for the write up, I just placed my order for dash leds, but I already had a bunch of interior LEDs for the map and dome lights, and I changed out the floor shifter gear indicator light as well. Well there is a green film there, I first scraped off what I could, then used sandpaper and got all the green off. I then used some clear plastic scratch remover and polished it. It looks 10 times better then the green stuff, and the light is a lot brighter now.


Senior Member
Joined: Mar 2007
Posts: 303
Likes: 1
From: Blacksburg,VA
Trending Topics
Thread Starter
|
Senior Member
Joined: Sep 2006
Posts: 144
Likes: 0
From: Rosemead
update: well it looks like i am gonna have to order some new needles from US Speedo since the stock red ones are completely useless with the blue led lights. havent had alot of time since my younger brother scratched my truck. had to have my lower valance, bumper and upper bumper cover repainted completely. but here's what i got so far. hopefully i'll be done with everything tommorow.
this is the pic after i finished sanding the back side.

as u can see i tried to avoid over sanding the spots i didnt need to sand. as long as u use some 400 grit sand paper should come off pretty easy w/o badly scratching the surface too much.

this is the shot with all the leds installed. there are small dim spots between 3-5k rpm. and also between 40-70mph. im considering switching to white and see if it looks any better.
last is the pic of the painted bezel looks 10X better than the stock one did and it blends alot better.

this is the pic after i finished sanding the back side.
as u can see i tried to avoid over sanding the spots i didnt need to sand. as long as u use some 400 grit sand paper should come off pretty easy w/o badly scratching the surface too much.
this is the shot with all the leds installed. there are small dim spots between 3-5k rpm. and also between 40-70mph. im considering switching to white and see if it looks any better.
last is the pic of the painted bezel looks 10X better than the stock one did and it blends alot better.


Thread Starter
|
Senior Member
Joined: Sep 2006
Posts: 144
Likes: 0
From: Rosemead
i like the bezel as well. eco i didnt have anytime today to finish getting everything back together. the body shop finished repairing my bumper, valance, and upper bumper cover and spent the afternoon putting that in. and i already have the blue led on order for that odometer hopefully it'll be here tommorow. sorry for the delay.
Thread Starter
|
Senior Member
Joined: Sep 2006
Posts: 144
Likes: 0
From: Rosemead
k this are the final (for now) pics. bezel is in and lights are on. still waiting on the blue led bulb for the odometer but its installed for now. crappy camera. the blue is actually alot deeper and darker.


***** i still have the white needles and other led bulbs, a roush scoop, auto spring level kit, hid's, custom license plate, carriage works monster billet lower bumper grill, and a TruckPC (long ongoing project, something alot of people havent seen) for my indash radio going in by the end of july. will have pics of everything as they come in. thanks guys. any ?'s feel free to ask
***** i still have the white needles and other led bulbs, a roush scoop, auto spring level kit, hid's, custom license plate, carriage works monster billet lower bumper grill, and a TruckPC
(long ongoing project, something alot of people havent seen) for my indash radio going in by the end of july. will have pics of everything as they come in. thanks guys. any ?'s feel free to ask
Last edited by cgndhhh; Jun 26, 2008 at 11:31 PM.

Senior Member
Joined: Sep 2003
Posts: 6,760
Likes: 4
From: Nebraska
The blue looks amazing. Not just the 'cool' factor, but I bet it is easier on the eyes too, which I would love to have.
What about the lights on the window/lock switches and the buttons/***** in the center of the dash?
What about the lights on the window/lock switches and the buttons/***** in the center of the dash?
Thread Starter
|
Senior Member
Joined: Sep 2006
Posts: 144
Likes: 0
From: Rosemead
thanks, yea the blue is easier to look at but now the rest of the green on the truck is buggin me, so that's one of my next projects. after i get done with all the others it never stops i've got a ton of things lined up to finish and projects to do. i've been working on this TruckPC indash Nav, DVD, MP3, Media player, basically an indash computer with internet! i've been working on and off with that for the past 4 months and i'm almost close to installing it in the coming weeks.
it never stops i've got a ton of things lined up to finish and projects to do. i've been working on this TruckPC indash Nav, DVD, MP3, Media player, basically an indash computer with internet! i've been working on and off with that for the past 4 months and i'm almost close to installing it in the coming weeks.
Last edited by cgndhhh; Jun 27, 2008 at 02:15 AM.