Autospring install with photos
#61
 06-18-2006, 09:51 AM


#64
06-28-2006, 05:44 PM

Senior Member
Join Date: Dec 2005
Location: Cape Coral, Florida
Posts: 936
Likes: 0
Received 0 Likes
on
0 Posts
Originally Posted by 06STX4x4
The bandwidth has been exceeded on the server and i can not see the pictures. Does anyone have these saved so i can see them?


#67
06-28-2006, 06:39 PM

#68
06-28-2006, 06:56 PM

Senior Member
Join Date: Sep 2005
Location: Pittsburgh
Posts: 1,035
Likes: 0
Received 0 Likes
on
0 Posts
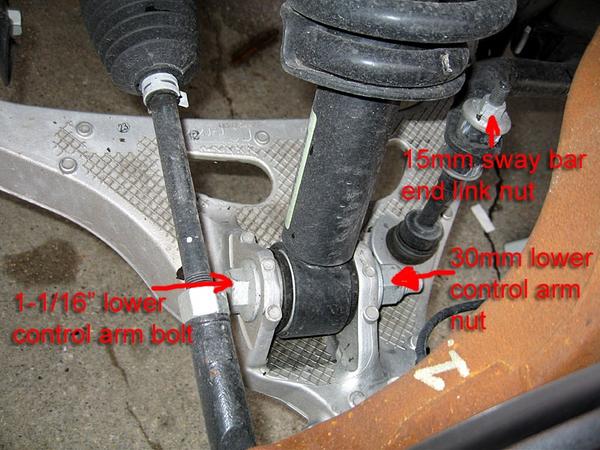
Not sure I got em all, but here's four. Had these saved and didn't need any others. Also added my copy/pasted instructions I used:
Step 1: Remove the 30MM lower strut nut and the 15mm sway bar endlink nut.
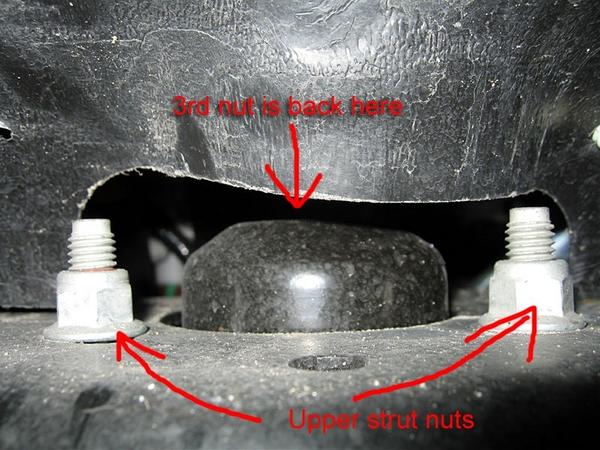
Step 2: Remove the (3) 15mm upper strut nuts
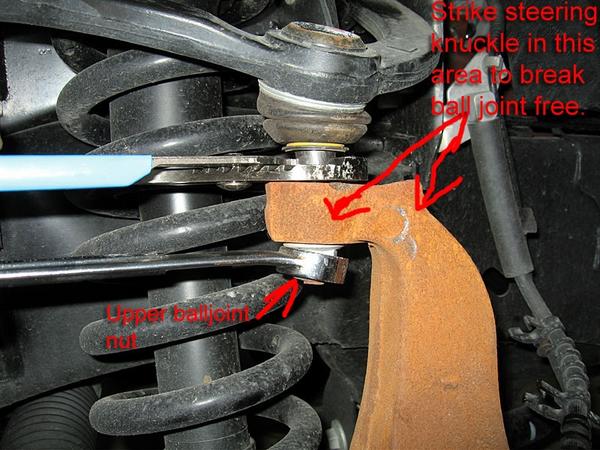
Step 3: Remove the upper ball joint nut and hit where indicated with a hammer until it pops loose
Step 4: Now to remove the strut, you lift up on it, push the bottom of the strut toward the rear of the truck, push down, lift up on the upper control arm and pull the
strut out of the way.
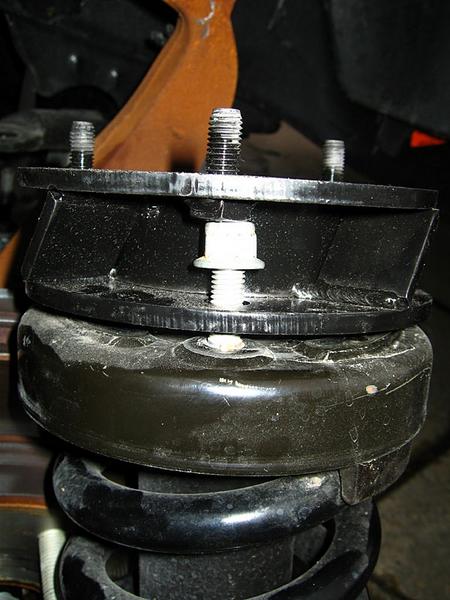
Step 5: Install the Autospring spacer onto the strut.
Step 6: Wiggle the strut back into place and reinstall the upper strut nuts and the lower strut bolt and nut.
Step 7: Place a jack under the lower control arm and raise until you can push down on the upper control arm and fit it into place. Note that you do not need to raise the lower control arm too far, only enough so that you can push down on the upper control arm and fit the ball joint into place.
Step 8: Tighten the ball joint nut and sway bar end link nut. To keep the upper ball joint from spinning as you tighten the nut you just need to keep downward pressure on the upper control arm.
Step 9: Replace the tire and repeat the process on the other side.
Step 1: Remove the 30MM lower strut nut and the 15mm sway bar endlink nut.
Step 2: Remove the (3) 15mm upper strut nuts
Step 3: Remove the upper ball joint nut and hit where indicated with a hammer until it pops loose
Step 4: Now to remove the strut, you lift up on it, push the bottom of the strut toward the rear of the truck, push down, lift up on the upper control arm and pull the
strut out of the way.
Step 5: Install the Autospring spacer onto the strut.
Step 6: Wiggle the strut back into place and reinstall the upper strut nuts and the lower strut bolt and nut.
Step 7: Place a jack under the lower control arm and raise until you can push down on the upper control arm and fit it into place. Note that you do not need to raise the lower control arm too far, only enough so that you can push down on the upper control arm and fit the ball joint into place.
Step 8: Tighten the ball joint nut and sway bar end link nut. To keep the upper ball joint from spinning as you tighten the nut you just need to keep downward pressure on the upper control arm.
Step 9: Replace the tire and repeat the process on the other side.
#70
06-28-2006, 07:53 PM

Senior Member
Join Date: May 2005
Location: Michigan
Posts: 348
Likes: 0
Received 0 Likes
on
0 Posts

#71
06-28-2006, 10:30 PM
Senior Member
Join Date: Sep 2005
Location: Pittsburgh
Posts: 1,035
Likes: 0
Received 0 Likes
on
0 Posts
Originally Posted by travis08
do you to put your truck on jack stands or can you do it with just a jack???
#72
06-29-2006, 01:32 AM

Senior Member
Join Date: Oct 2005
Location: Lincoln, NE
Posts: 300
Likes: 0
Received 0 Likes
on
0 Posts
Originally Posted by savage250
Hey, I also would like those pictures...just about to order my kit. Do any of you have the kit on a 4.6L? most of the pictures seem to be with the 5.4 and I'm wondering if it will still be level with the lesser weight of the 4.6. (I definitely do not want the nose up in the air)
#73
06-29-2006, 08:32 AM

Senior Member
Join Date: Oct 2001
Location: Clinton, MS
Posts: 694
Likes: 0
Received 0 Likes
on
0 Posts
#74
06-29-2006, 02:14 PM

Member
I just had the 2 1/2" leveling kit installed yesterday. I'm really happy with it. I have the short box (5.5' bed)...some people say it's a little higher in the rear than the 6.5' bed. I haven't measured it yet...but it looks level.
Before Auto Spring Install
After Auto Spring Install
Before Auto Spring Install
After Auto Spring Install
Originally Posted by savage250
Hey, I also would like those pictures...just about to order my kit. Do any of you have the kit on a 4.6L? most of the pictures seem to be with the 5.4 and I'm wondering if it will still be level with the lesser weight of the 4.6. (I definitely do not want the nose up in the air)