F150 Headlight FAQ Walkthrough Draft

Headlights: What you need to know
– Headlight Component Breakdown
– Halogen vs HID
– Headlight Color
– What headlight bulbs should I avoid?
– What headlight bulbs do I want?
Headlights: Upgrades and Fixes
– How to Replace a Headlight Bulb
– How to Restore foggy/yellowed headlights
– How to aim your headlights
– How to deal with headlight condensation
– How to upgrade halogen headlights
– How to upgrade to HID headlights
Diagnostics – “Help! My…
– Headlights won’t turn on!
– Headlights work intermittently!
– Headlights are dim
– Automatic headlights aren’t working!
– My turn signals turn off my headlights!
– Headlight connectors clips broke!
Introduction
Headlights! They’re the most important part of your truck if you ever plan on driving at night. They’re also the jumping off point for most people wanting to modify their car or truck. Luckily, they’re also pretty simple. This guide will walk you through the things you need to know about your headlights, how to fix a broken f-150 headlight, what bulbs you need in your truck, and how to upgrade your lights. Lets get started.
Headlights – What You Need to Know
Headlight Parts breakdown – what part is which photo/description
for 2004 – 2008 trucks
-
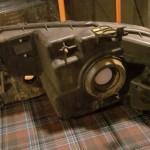
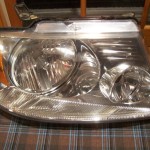
- Assembly – The clear plastic part on the front is called the lens. The chrome bowl that houses the headlight is called a reflector.
-
- Assembly – The clear plastic part on the front is called the lens. The chrome bowl that houses the headlight is called a reflector.
-

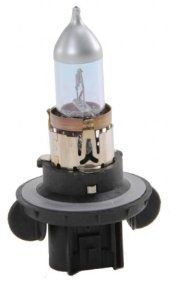
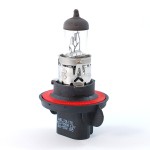
- Bulb – The prongs at the bottom of the headlight are called the connectors, or leads. The curly silver spring in the center is called a filament.
-
- Bulb – The prongs at the bottom of the headlight are called the connectors, or leads. The curly silver spring in the center is called a filament.
-

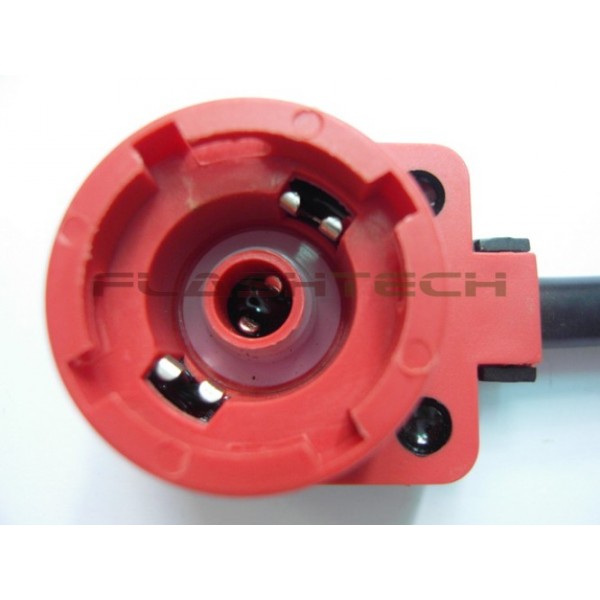
- Connector – This plugs into the back of the headlight bulb (which plugs into the back of the headlight housing.)
-
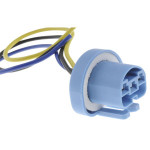
- Connector – This plugs into the back of the headlight bulb (which plugs into the back of the headlight housing.)
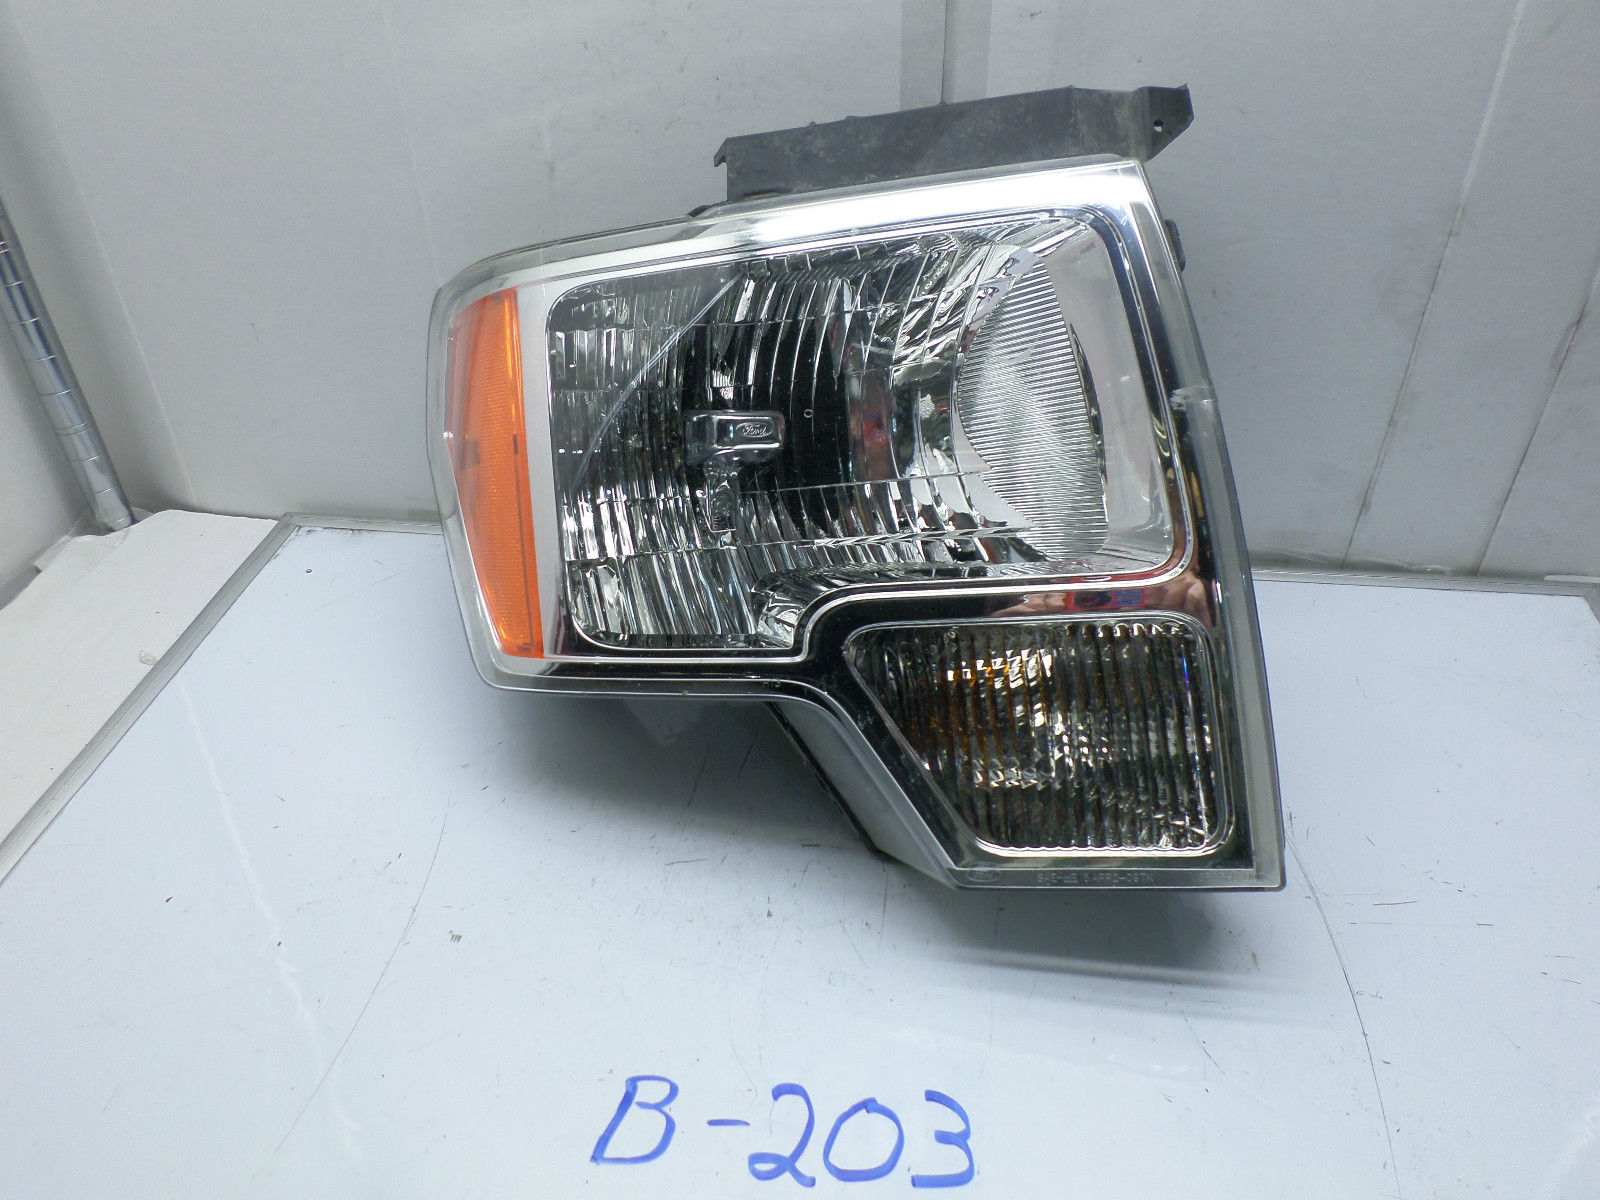
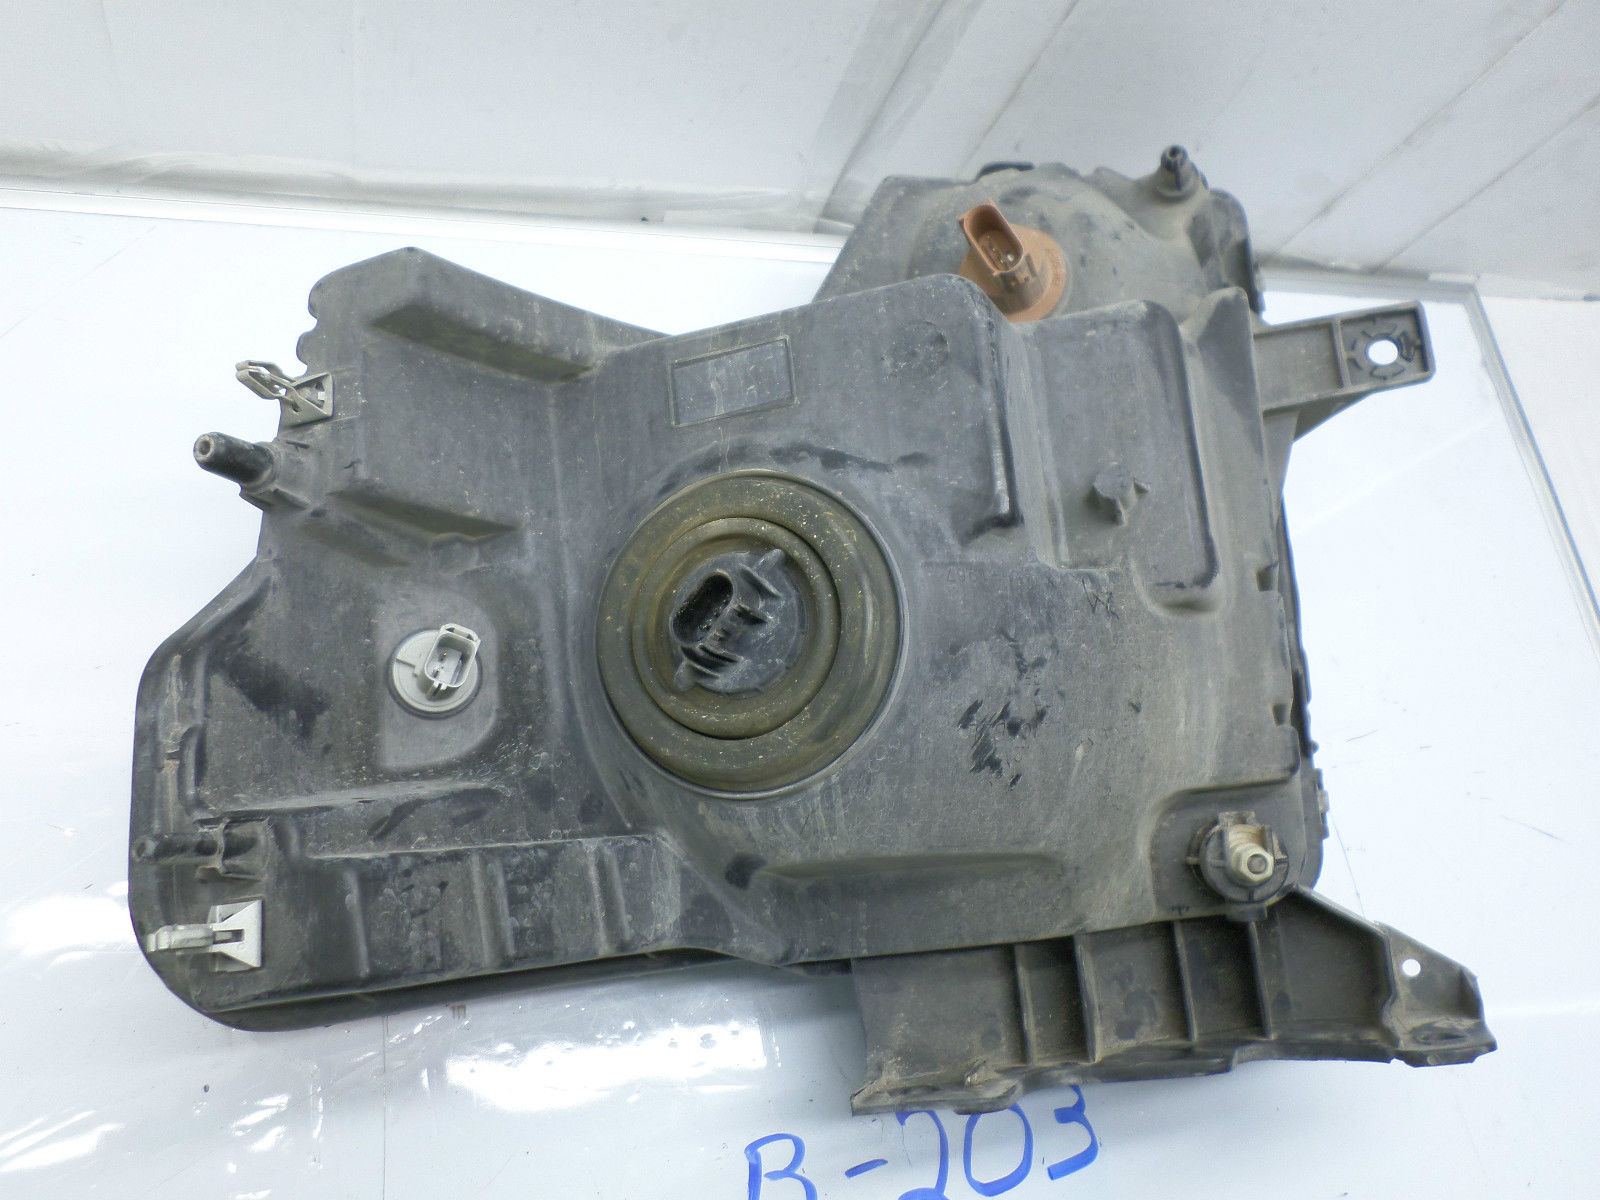
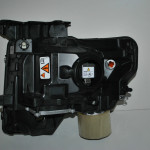
For 2009 – 2014 trucks,
Assembly
-
- Assembly – The clear plastic part on the front is called the lens. The chrome bowl that houses the headlight is called a reflector.
-
- Assembly – The clear plastic part on the front is called the lens. The chrome bowl that houses the headlight is called a reflector.
Bulb
-
- Bulb – The prongs at the bottom of the headlight are called the connectors, or leads. The curly silver spring in the center is called a filament.
-
- Bulb – The prongs at the bottom of the headlight are called the connectors, or leads. The curly silver spring in the center is called a filament.
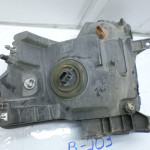
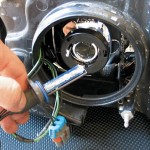
Connector
-
- Connector – This plugs into the back of the headlight bulb (which plugs into the back of the headlight housing.)
-
- Connector – This plugs into the back of the headlight bulb (which plugs into the back of the headlight housing.)
For 2014 trucks with HID lights,
Assembly
-
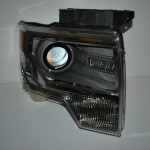
- Like the halogens, the plastic front cover is called the lens. The smaller, glass lens that holds the headlight bulb is called a projector. Light only comes from there instead of being bounced around by a mirrored bowl.
-
- Like the halogens, the plastic front cover is called the lens. The smaller, glass lens that holds the headlight bulb is called a projector. Light only comes from there instead of being bounced around by a mirrored bowl.
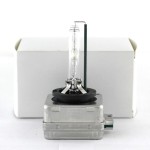
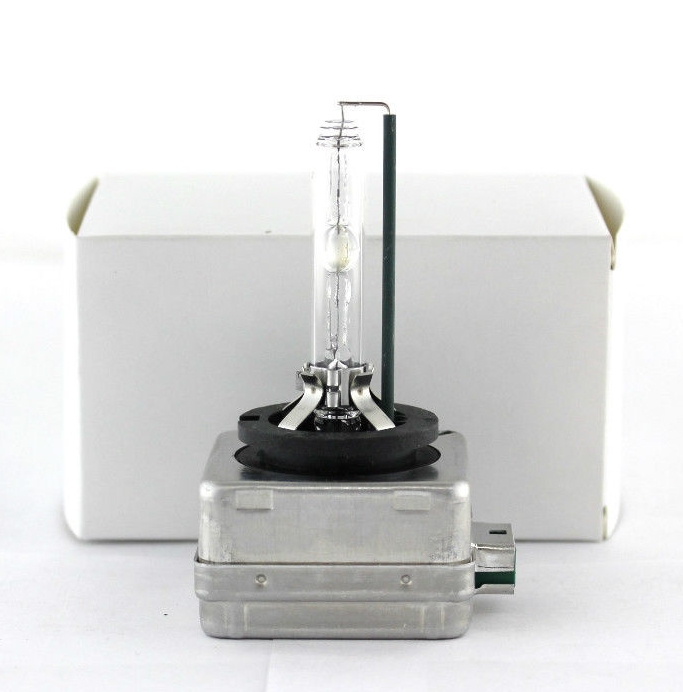
Bulb
-
- HID headlights are lit by bulbs filled with Xenon gas. An arc of electricity charges the gas which then releases light.
-
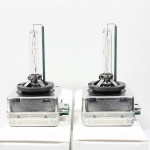
- HID headlights are lit by bulbs filled with Xenon gas. An arc of electricity charges the gas which then releases light.

-
- HID headlights are lit by bulbs filled with Xenon gas. An arc of electricity charges the gas which then releases light.
Connector
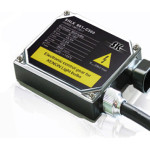
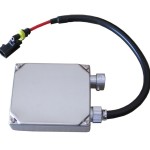
Ballast
What’s the difference between Halogens and HIDs?
The real difference between the two in practice is brightness. High-Intensity Discharge lighting (or HIDs) have a much greater output of light in lumens than older headlights. However, there’s a lot going on besides a bulb swap.
– The Lightbulbs

Halogen bulbs runs a current through a coil of tungesten suspended in a halogen gas fog. The reaction creates light naturally between 3000k and 4000k, which is optimal for driving. There’s good reason we’ve used Halogen bulbs for as long as we’ve had.
Bi-Xenon These are the headlights that you find in modern cars. Unlike halogens, Xenons create light by arcing electricity between two conduits, through gas.They emit more light with less energy and will last over twice as long as a halogen bulb.
– The Optics
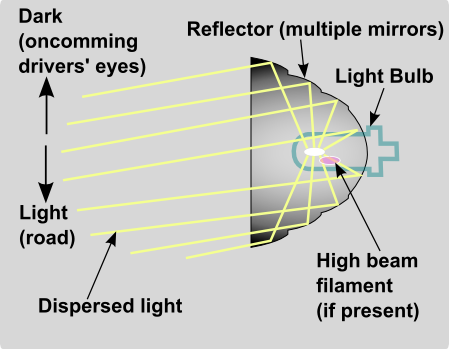
Reflectors Their design is simple: take a small light source and magnify it into a powerful beam with an array of mirrors. The housing is curved and covered with a reflective material. A bulb is mounted right in the center, and when it’s on, the light strikes the reflective surface and is bounced back as a stronger, brighter and larger beam. The downside to this type of lamp, though, is that some of the light will inevitably scatter away and be lost. Almost 95% of all headlights on the roads use this design.
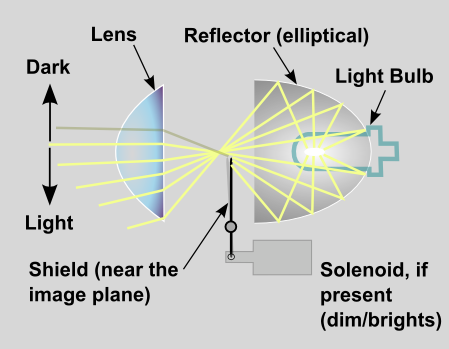
Projectors The latest and greatest in automotive lighting technology is projector headlight technology. They work much like the traditional reflector optics, but with an added step. After the light bounces off the reflective surface, it travels through a lens, which focuses the light into an incredibly wide, powerful beam. Hardly any light is scattered away, so you’re left with brilliant illumination. Along with this focused beam, projectors also feature a cutoff that prevents blindness from oncoming drivers. They can use halogen bulbs or arc-xenon capsules. All Xenon HIDs use projectors.
Link to the forum: Everything You Need to Know About Halgoens and HIDs
What’s the difference when it comes to color for headlights?
Color is very important when it comes to nighttime lighting. In the case of light, color is referred to as a Kelvin. When it comes to nighttime driving, most people believe the whiter light is better. This is false. Selective yellow is the best color for nighttime driving (this same principal also applies to a yellow chalk on a blackboard). That is why halogens were among the first choice when they were developed- they naturally produced the best nighttime driving color (~3700K). This is also true for HIDs on the same scale. For their systems, the most light you can extract from a 35W xenon system is around 3200 lumens @ 4300K. As you go higher (into the blues) light output drops significantly. Since an HID bulb can emit different colors by using different salts, they are preferred for their color crispness. However, halogens naturally emit a yellowish color and some manufacturers can up the color output to a whiter color (marketing ploy) but at a price of losing light by putting a filter over the bulb.
All figures are based on a 35W Philips D2S bulb:
Color Temp vs. Light Output
3000k = 3040lm
4300k = 3300lm (brightest)
5000k = 2900lm
6000k = 2360lm
7000k = 1790lm
7000k = 1390lm
8000k = 1180lm
10000k = 760lm

PRO-TIP
You’ll want headlights that display in the 4000k-5000k range if you want to most useable light. Above that, the light becomes cooler (more blue) and scatters more quickly.
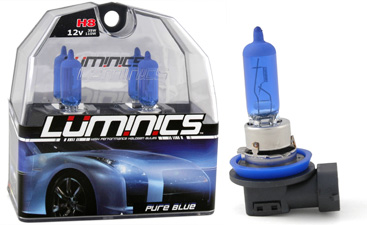
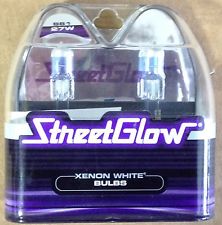
What headlight bulbs should I avoid?
Cheap, off-brand headlights. Street Glows, Luminics, Nokyas, et cetera. Cheap headlights are generally bad, not DOT approved, and likely to get you a ticket. They might change to color of your headlights by using a filter, but you’ll actually be putting out less light. They also have a tendency to cause excessive glare which is dangerous to other drivers. That’s especially true in the case high-ride height vehicles, like trucks.

What headlight bulbs do I want?
All F-150s in the eleventh generation (2004-2008) and most of the twelfth generation trucks (2009 – 2014) had regular halogen headlights. Specifically, Ford used these units from GE,

Manufacturer: General Electric
Model: T4.75
Output: 1345/990 lumens
Wattage: 65/55W
Lifetime: 150/400 hrs
Color: 3100K
Retails: ~$20-$25
You do NOT need these exact models if you need to replace your headlights. Any H13 halogen light bulb will technically fit. What that means, is that there’s also room for upgrades to halogen bulbs with different specs. Most of which are broken down on F-150 here.
Link to forum: Headlight Bulbs Guide!
Link to site: Headlight Bulb Comparison!
Headlights – Upgrades/Fixes
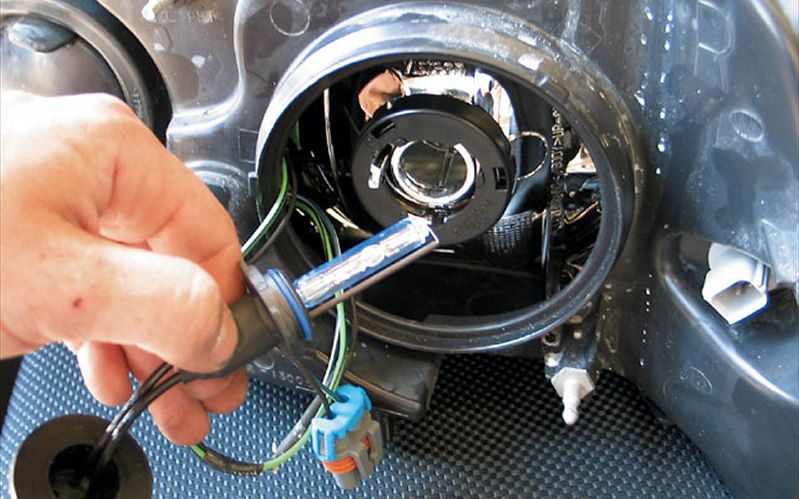
How to Remove the Headlight Assembly/Replace a Headlight Bulb
Remember this thing? If you want to remove your actual headlight bulb, you’re going to have to learn how to remove it. Luckily it’s a simple operation that’s largely the same for every edition of F-150.
STEP 1 Unbolt headlight assembly from three spots. You’ll need a 10mm socket and driver.
2004-2008

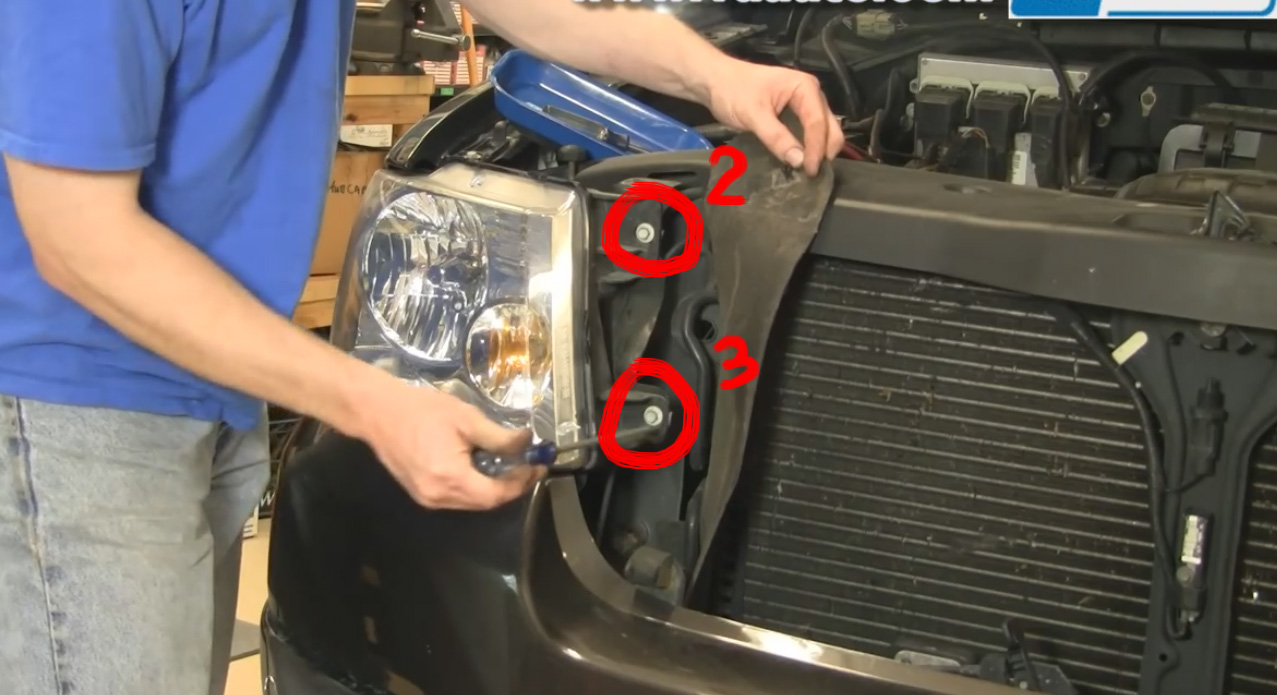
2009-2014

STEP 2 Once the bolts are removed pull up on the plastic tab nearest the top bolt, and work the headlight assembly loose.
STEP 3 Remove the headlight bulb from assembly by twisting counter clockwise.
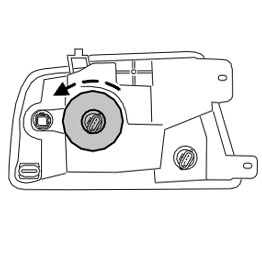
2004 – 2014 F-150
2009 – 2014 F-150
STEP 4 Install new bulb.
PRO-TIP
Don’t touch the headlight bulb with your fingers! The oil on your fingers can cause hot spots on the light bulb, leading to premature failure. If you touched the glass, clean it off with rubbing alcohol. The alcohol will dissolve the oil and evaporate quickly.
Video Walkthrough
– If you have HID bulbs
STEP 1 Remove the Headlamp unit entirely from the truck. 3 bolts. 2 on top, 1 in the middle, pull unit towards you and outward to remove. Remove all 3 cables. (See above section)
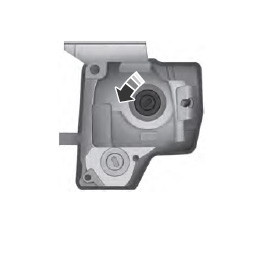
STEP 2 Remove rubber seal
STEP 3 Use a T10 Torx head screwdriver to remove screws holding lamps in
STEP 4 If you plan on keeping the original bulb twist it carefully out. They fit in there pretty tight and breaking the outside filament is a REAL possibility. If you twist and angle it right you can get them out without breaking them.
STEP 5 Remove the retainer clip from the bulb. It’s what the t10 screws went into.
STEP 6 Replace retainer clip on new bulb (it’s keyed to fit one way).
STEP 7 Reverse steps from 4 back
Link to Forum: 2013 OEM HID Headlights Disassembled
How to restore foggy/yellowed headlights
Over the years, the film that protects the plastic in your headlights will wear off and they’ll eventually begin turning a shade of yellow. This haze will tint and diffuse the light from your headlights. Cleaning them up will improve your car’s safety, but more importantly, it’ll make it look better. There’s a reason you don’t see yellowed headlights at car shows.
From the Forums
F150online user “mblouir” says,
I know a lot of us have newer vehicles and don’t have to worry about this (yet), but many of you own several vehicles. This should help if your headlights have that nasty, yellow, “cloudy” look, as such:

Disclaimer: Neither I nor F150Online.com are responsible for any damage done to your vehicle in the case of anything going wrong. That being said, you really shouldn’t run into any problems if you follow the directions. See post 3.
Before I start I’ll just say that if your stock of detailing supplies is low don’t worry. You can do this with a limited number of supplies. All you really need you can buy at Wal-Mart. The bare-bone essentials are: some rags, 1000/2000 grit sandpaper, and polish (Meg’s Ultimate Compound @ Wal-Mart). I will list everything I used, though. Some of it probably wasn’t necessary, but I did it anyway.
The entire process would have taken me 20 minutes tops had I not stopped to take pictures several times. The headlights aren’t big at all so it doesn’t take long to get them looking great again.
(again, this is what I used)
Materials:
1. Bowl or bucket filled with soapy water
2. Some old rags (type doesn’t matter)
3. 1000 grit sandpaper
4. 2000 grit sandpaper
5. Masking tape (I used blue painter’s)
6. DA polisher
7. M105 + heavy cut pad
8. M205 + light cut pad
9. Plast-X + foam hand pad
10. Latex Gloves

My Steps:
1. Put the sandpaper into the soapy dish to soak for a few minutes while you prep everything else.


5. Wipe off all the water with a rag.
6. Use the M105 with a heavy-cut pad. You shouldn’t really worry about screwing anything up since headlights are far less prone to damage than paint. Put a few drops of M105on the pad.


9. If it looks pretty clear (mine did after the M105 alone) use the M205 the exact same way as the M105. This time use the light-cut pad. If it still looks pretty foggy from the wet sanding then do another pass or two.
10. Wipe off the M205 and put a small drop of Plast-X on the foam hand pad to work in by hand. Spread it around and rub it in.

12. Reapply Plast-X from time to time to keep the UV protection going, or add a few coats of clear. Your choice.
Here are a few comparison shots after the first headlight was finished (I did the passenger side first, obviously):


I feel I could have gotten away with using just 2000 grit and M105. If you’re short on stock or cheap feel free to try it this way and report back to us. After I used the M105 the headlight was pretty clear. I just used the extra stuff because I had already taken the time to pack it up and take it home in the first place. Hopefully this helps some people–I know my mother appreciated the early Christmas gift.
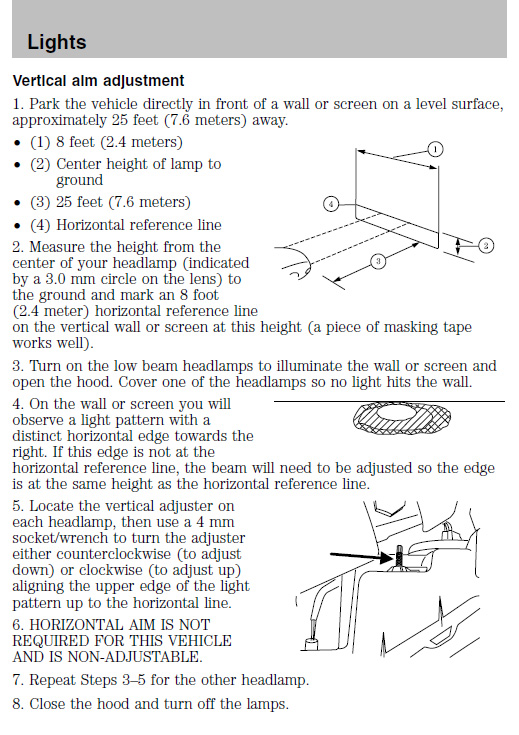
How to adjust your headlights
So somehow, some way, your headlights got thrown out of wack. Let’s say you’ve dropped in a new pair of headlight assemblies because your last one’s cracked. Or you’ve decided to upgrade to some aftermarket lights. After you’ve gotten everything working, you’ll probably need to readjust your headlights so that the light goes where it’s supposed to (and not into the eyes of oncoming traffic.)
From the Forums
Have seen this question posed a few times, and I posted this about a year ago in a thread back when I got HIDs. It should help a few people out. This is in the manual, but for those that don’t have one or prefer pictures, here you go.Here’s how:
1. Find a level surface that can allow you to park looking at a wall from ~25 feet.

2. Pull right up against the wall and mark a horizontal line at the center of the headlights. Also mark two vertical lines…one for each headlight.

3. Measure out 25 feet away from the wall.

4. Park your truck where the headlights are on the 25 foot mark. Doesn’t have to be perfect.

5. Pop the hood and find the adjustment bolt. This is for ’04-’08 body styles. The bolt is right behind the headlight and is 4mm. There’s not enough room to fit a regular 1/4″ socket wrench back there so I used a pair of plastic-grip pliers to turn it. Don’t know why they designed it with so little space in there.

6 . Turn on your headlights and see where they are. As I said earlier my passenger light is pointed more to the right than I’d like, but I’ve already driven at night and it’s not noticeable. Better off pointing away from oncoming traffic than toward. Bambi spotter.

7. Now since we can’t adjust our lights left or right (only up and down), you want to get the low beams ~2″ below the horizontal line earlier marked. Better to go a bit lower if you’re estimating, as HIDs are powerful enough.

8. Check out the high beams and make sure they don’t go over the line. You want the high beams pointing at or just below the horizontal line.

Simple as that. If you have HIDs an even easier way is to park next to a car with stock halogen lights. Aim them down until the distance the HIDs reach matches the distance the stock halogens reach.
Video Walkthrough
for 2004-2008
for 2009-2014 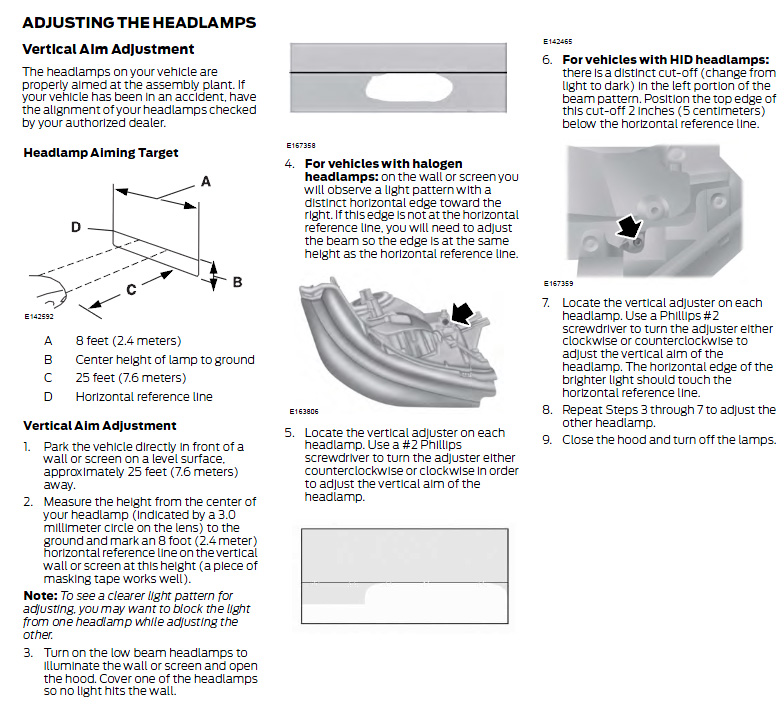
How to fix headlights with water/condensation
This is actually a pretty common issue that generally has a simple solution. In humid climates, water can condense on the inside of the headlight. In these cases, it’s generally a good idea to just let it burn off. The stock headlights on an F-150 are vented in such a way as to allow for light condensation to evaporate and escape.
However, if your headlight is cracked somewhere, you might be taking on water that way. In that case you’ll need to replace them. If you don’t have a crack and your lights are still taking on water, there’s a chance the lens isn’t sealed well. Here’re a few tips.
From the Forums
F150forum user mSaLL150 says:
The best way would be to open them up and completely re-seal them. Depending on if they are OEM or not, this can be either really hard or really easy (OEMs use permaseal, very tough to open). Use the Oven method (google it) to open the lights up. Often ~250 degrees for 8 minutes or so is a good starting point to get the glue soft. DONT go much hotter then that, you could melt the lens or plastic reflector. Once you get them open, warm up the black plastic back of the light again to get the leftover glue warm again, then scrape it ALL out. Once the channel is cleaned out, use 3M butyl tape liberally in the channel all the way around, and soften it up either in the oven or with a heatgun on low. clamp the lens back onto the housing and let it seal completely (allow at least 6 hours at room temp with it clamped).
See steps 1 and 6 here for a bit more detail:
http://www.f150forum.com/f2/how-mini…trofit-110117/
If this task is too hard or you are worried about messing up, you can use silicone around the outsides but it may not get the seal perfectly to fix the problem and can also be quite messy if you are not very careful.
F150forum user Especial86 says:
You can also use permatex ultra black RTV adhesive…A quick way to seal without splitting them open is to heat the back black plastic with a heat gun. Seal the outside of the backing to lens seal with silicone and clamp them tight… I use lashing straps.. Run the heat gun around the perimeter and listen for creeks and squeaks. Heat it, goop it, strap it, heat it, re-check or tighten the straps…If this doesn’t work, then you have to split the lens and reseal.
Link to Forum: How-to Separate Headlight Lens From Headlight
Video Walkthrough
Upgrades for Halogens
If you don’t have HIDs already installed on your truck, you might be able to upgrade the existing lights for an instant improvement. Halogen bulbs come in a variety of different colors and brightnesses. Here’s the important stuff you need to know:
– Any Lightbulb rated H13 will work in your headlight housings.
– Sylvania Silverstar and Sylvania Silverstar Ultras are well regarded for increasing light output and increasing light color to 4000k. They’re more expensive and burn out more quickly, but they’re higher quality.
– PIAA’s headlights are good, but far overpriced in comparison to Sylvania models
– General Electric “Nighthawks” and Phillip’s “Xtreme Night Vision” bulbs are also good lights. Cheaper than the Silverstars, but they also have a warmer light.
Link to the Forum – F150online’s Headlight Bulb Guide
Upgrading to HIDs
There are only a handful of ways to upgrade to HID lights.
– The Wrong Way
While it’s possible to install HID bulbs into a halogen bulb housing (the stock headlight for all F-150’s that didn’t come with HIDs installed), this is a bad idea. Xenon lights require their own special kind of housing. The reflectors for halogens break up the light from xenon bulbs in a way that causes other drivers glare. The effect is similar to having your headlights aimed incorrectly… except you can’t twist an knob to fix it. It’s dangerous in a car, but in a high riding vehicle like a truck, wiring up your headlights this way is exceptionally dangerous (and worst of all, rude.)
– The Aftermarket Way
The alternative to to buy an aftermarket set of headlights off eBay or a store or whatever. These housing come with a lens specifically made to disperse the light. Frequently, the HID Kits and headlight assemblies are sold separately. This is the frequently the least expensive way to upgrade to HIDs.
Link to Forum: Is an HID Kit worth the $$$
Link to Forum: Everything You Need to Know About Halgoens and HIDs
– The Retrofit
This is the way to go for the do it yourself-ers. You can take apart your old headlight housings and upgrade them to properly support HIDs. This is more common for 2009-2014 year trucks, as the headlight shape is the same as the 2014 OEM HIDs. Frequently people opt to have another company retrofit their current headlight for HIDs. Bilinvic’s retrofits has a lot of good press on the forums. Retrofitting is more common on 2009-2014 trucks. This is a pretty involved task, so it’s not recommended for amateurs. However, if you feel confident about your ability to follow directions, there are two DIYs for you.
Link to Forum: FX-R projector 2004-2008 F-150 HID Retrofit DIY
Link to Forum: Mini H1 04-2008 F-150 HID Retrofit DIY
Headlights – Further Diagnostics
My headlights won’t come on at all!
STEP 1: Remove headlight bulbs, examine filaments


if they’e burned out, replace them.
There are many reasons for this! Most likely, they’re just old. Different light bulbs have different average ages of life, so it’s hard to pin down when exactly you should expect yours to fail. However, if your headlights are blowing out prematurely/instantly, there might be some other electrical issue at work.
else…
STEP 2: Check connectors and wiring for obvious damage (melting, cut cables, etc.)

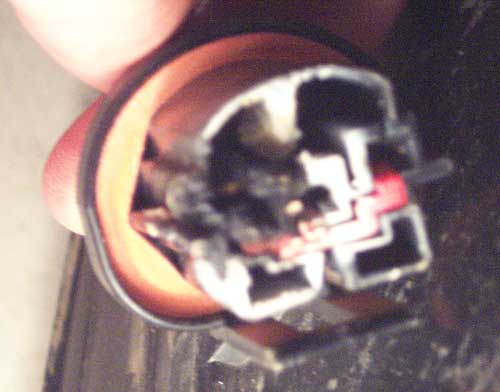
if obviously damaged, replace parts.
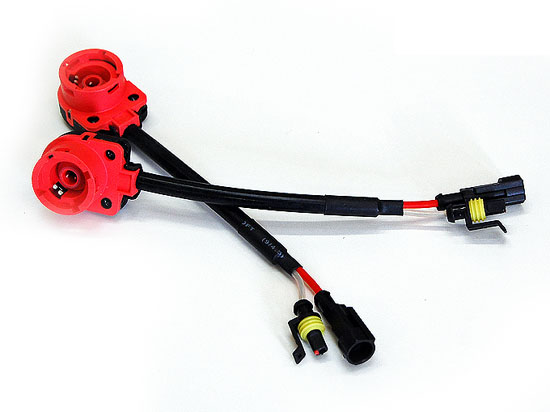
Likely, the contacts between the connector and the headlight bulb pins are not tight. Loose connectors generate heat and melt. Also, this might happen if you’re using higher wattage bulbs than what the truck had originally. Also, if you’re running aftermarket headlights, it could be that the wiring in your headlight harness is too thin and over heating. You can avoid this problem with aftermarket ceramic plugs.
Forum Link: Why is my Headlamp Connector Melting?
Forum Link: Headlight Connector Replacement Walkthrough
else…
STEP 3 Check fuses, headlights with multimeter
2004-2008 Trucks keep their fuses in the passenger compartment fuse box

2009-2014 Trucks with halogen lights keep their fuses in the passenger compartment fuse box
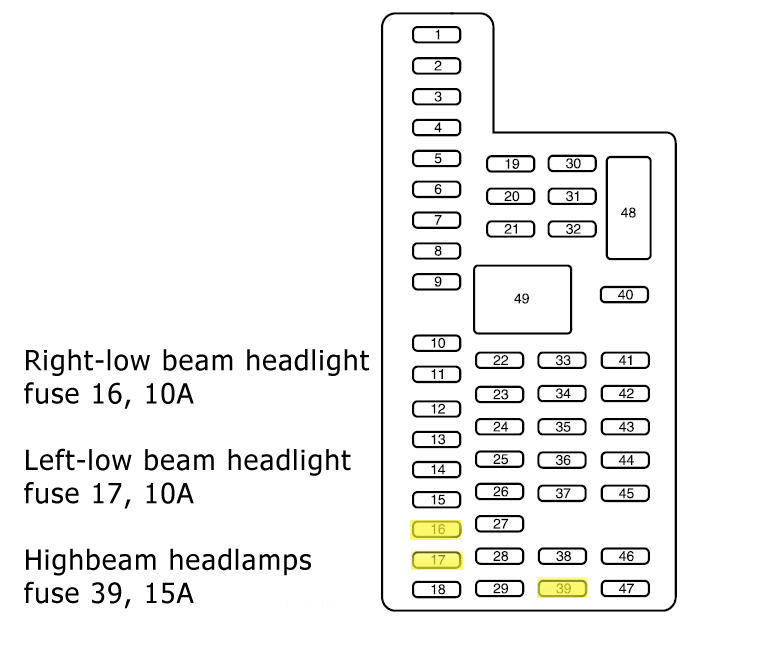
2014 models with HID headlights carry their fuses in the power distribution box. It is found in the engine bay.
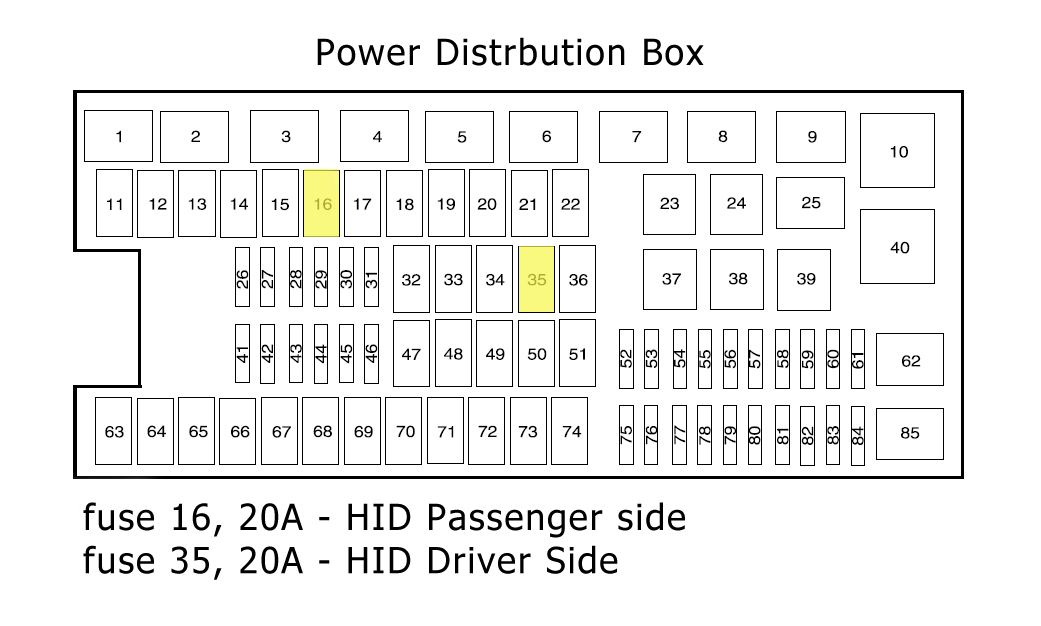

Fuses generally blow for two reasons. Either there’s a surge of current that blows the fuse (this is how they protect your electronics. Fuses blow so your other stuff doesn’t) or there’s a short somewhere. Check you– Check bulb and Connector with multimeter.
Link to Forum: How to test a headlight switch with Multimeter
STEP 4 Examine leads from the headlight switch (for 2004-2008)
Remove headlight switch
- Turn the headlights to on and pull the switch out a little bit
- Then look at the bottom of the knob, you should see a very small opening
- Insert a very thin tool into the knob, and that should release the knob
- Rotate the knob 180 degrees and reinstall it. The bottom of the knob should now be pointing at the headlights on position
- Now, turn the knob counter-clockwise like you’re turning the lights off.
- Turn the knob back to the headlights on position. This is what releases the entire switch assembly from the dash.
- Pull the assembly to remove it. Be sure to disconnect the 3 wiring harnesses
Disconnect the wire connector and look for the connector that resembles the one highlighted
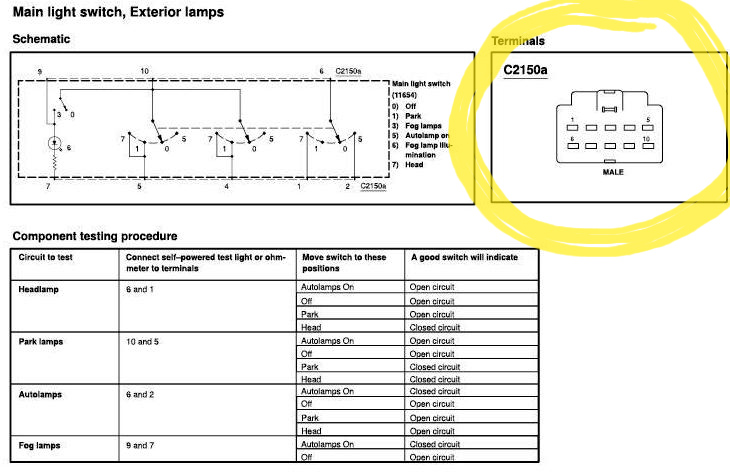
Connect your multimeter or test-light to terminals 6 and 1
Turn headlight switch to the Head position
– if it’s an open circuit (the test light stays off, or the multimeter silent), you need to replace your headlight switch.
– if it’s a closed circuit (the test light turns on, or the multimeter beeps)…
My headlights work intermittently!
STEP 1 Check connectors to headlight socket
if connector clips are broken, secure with electrical tape/superglue/other non-conductive adhesive
Forum Link: Broke Clips for Headlight Electrical Connector
Forum Link: Headlamp Retainer Clips Broke
else…
STEP 2: Check connectors and wiring for obvious damage (melting, cut cables, etc.)
if obviously damaged, replace parts.
Likely, the contacts between the connector and the headlight bulb pins are not tight. Loose connectors generate heat and melt. Also, this might happen if you’re using higher wattage bulbs than what the truck had originally. Also, if you’re running after market headlights, it could be that the wiring in your headlight harness is too thin and over heating. You can avoid this problem with aftermarket ceramic plugs.
Forum Link: Why is my Headlamp Connector Melting?
Forum Link: Headlight Connector Replacement Walkthrough
My headlights are dim!
STEP 1: Check connectors and wiring for obvious damage (melting, cut cables, etc.)
if obviously damaged, replace parts.
Likely, the contacts between the connector and the headlight bulb pins are not tight. Loose connectors generate heat and melt. Also, this might happen if you’re using higher wattage bulbs than what the truck had originally. Also, if you’re running aftermarket headlights, it could be that the wiring in your headlight harness is too thin and over heating. You can avoid this problem with aftermarket ceramic plugs.
Forum Link: Why is my Headlamp Connector Melting?
Forum Link: Headlight Connector Replacement Walkthrough
else…
STEP 2 Check the Ground wiring on your headlights
Examine the wiring from the back of the headlight connector. The black wire is the ground. Follow it as far as you can throughout the car. You’re looking wiring that is damaged in some way. Maybe it melted against a hot part of the engine somewhere. The headlights will dim or be inconsistent if the ground connection is dirty or broken.
If ground connection to battery corroded, clean and reconnect with diaelctric grease.
The short answer is, anywhere against the bare metal chassis. So long as it’s secure and clean, you’re fine. However, this video will show you convenient places to ground whatever needs grounding.
else…
STEP 3 Check alternator
Does the engine growl or whine?
Does the engine smell like burning rubber/wiring?
Is the alternator belt intact?
Is the wiring that connects to the alternator intact?
Do other lights in your car suffer from flickering or intermittent power?
else…
STEP 4 Check headlight lenses
If yellowed or foggy, go to “Restoring your Headlights” or replace
My headlights start dim and get brighter!
STEP 1 Check connectors to headlight socket
if loose, reconnect until secure
if broken, secure with electrical tape OR Replace socket
Forum Link: Headlight Connector Replacement Walkthrough
STEP 2 Check alternator
Does the engine growl or whine?
Does the engine smell like burning rubber/wiring?
Is the alternator belt intact?
Is the wiring that connects to the alternator intact?
Do other lights in your car suffer from flickering or intermittent power?
My automatic headlights aren’t working!
STEP 0 Turn the headlight switch to Head mode. If they don’t turn on, jump to the “My Headlights Aren’t Working” FAQ
else…
STEP 1 Make sure the sensor is uncovered. It should be located on the dashboard between the defroster vents. If it’s covered, it might cause your lights to stay on continuously.
else…
STEP 2 Examine leads from the headlight switch (for 2004-2008)
Remove headlight switch
- Turn the headlights to on and pull the switch out a little bit
- Then look at the bottom of the knob, you should see a very small opening
- Insert a very thin tool into the knob, and that should release the knob
- Rotate the knob 180 degrees and reinstall it. The bottom of the knob should now be pointing at the headlights on position
- Now, turn the knob counter-clockwise like you’re turning the lights off.
- Turn the knob back to the headlights on position. This is what releases the entire switch assembly from the dash.
- Pull the assembly to remove it. Be sure to disconnect the 3 wiring harnesses
Disconnect the wire connector and look for the connector that resembles the one highlighted
Connect your multimeter or test-light to terminals 6 and 2
Turn headlight switch to the Autolamps On position
– if it’s an open circuit (the test light stays off, or the multimeter silent), you need to replace your headlight switch.
– if it’s a closed circuit (the test light turns on, or the multimeter beeps)…
STEP 4 Check Fuse #40 in the Passenger Compartment Fuse Box
– If it’s blown, replace it.
More information
Link to Forum: 2004 F-150 Automatic Headlight Issues/Body Security Module
Link to Forum: 2005 F-150 Automatic Headlights Don’t Work
I broke the plastic clips for my headlight connectors!
Generally, the friction from the plug is enough to ensure they stay seated. However, if they’re old or don’t fit well you might need to secure them some other way. Keeping them secure with electrical tape is a common solution.
Link to Forum – Plastic Clip for Headlight Electrical Connector Broke
You must be logged in to post a comment.