F150online Forums
  • LOG IN
  • REGISTER
  • Forums
    • F150online Web Site
      • Introduction Forum
      • Site Announcements
      • Questions About The Site?
      • Truck of the Month / Year
    • Powertrain & Mechanical
      • Chips, Tuners & Programming
      • Exhaust & Intake Systems
      • Other Powertrain
      • Superchargers & Turbochargers
      • Suspension
      • Transmissions
      • V6 Engines (including Ecoboost)
      • V8 Engines
      • Wheels, Tires & Brakes
      • Other Aftermarket
    • Body
      • Appearance Products
      • Bedliners, Caps, Tops & Lids
      • Care & Detailing
      • Electrical Systems
      • HVAC
      • Illumination & Lighting
      • Interior Care
      • Other Body
    • Audio & Video System
      • Amplifiers
      • Head Units
      • Multimedia & Navigation
      • Other Audio System
      • Satellite Radio
      • Speakers & Subwoofers
      • SYNC System
    • F-Series Trucks
      • 2021 - 2026 F-150
      • 2015 - 2020 F-150
      • 2009 - 2014 F-150
      • 2004 - 2008 F-150
      • 1997 - 2003 F-150
      • Pre-1997 Models
      • F-250 / Super Duty / Diesel
      • Excursion
      • Expedition / Navigator
      • Harley-Davidson
      • King Ranch
      • Lightning
      • Lincoln Blackwood & Mark LT
      • SuperCrew
      • SVT Raptor F-150
      • Other Models
    • F150 Online MarketPlace
      • Cheers and Jeers Feedback Forum
      • Site Vendor Specials & Classifieds
      • Personal Classifieds
    • Special Interest
      • Articles & How-To's
      • News & Inside Information
      • The Outdoors
      • Racing (non-street)
      • Street Scene
      • Towing & Hauling
      • Work Trucks
      • Tools, Tool Boxes, and more
    • Owner's Connection
      • General Discussion
      • Group Purchases
      • Happenings & Events
      • Interesting Web Sites...
      • Testing 1-2-3
    • Regional Forums
      • Mid-Atlantic
      • Midwest
      • Northeast
      • Northwest
      • South
      • Southeast
      • West
      • Canada
      • International
    • The Buyer's Corner
      • Dealers
      • Truck Pricing
      • Buyers Tips & Tricks
  • News
  • Marketplace
    • Vendor Directory
    • Become a Vendor
  • New Posts
  • Tools
    • Car Payment Calculator
    • Tire Rim Calculator
    • Vin Decoder
    • Recalls
    • Technical Service Bulletins (TSBs)
    • Members List
    • Live Feed
  • Gallery
  • View Dark Mode
    • Please register or login to enable Dark Mode.
  • Log In
  • Register
F150online Forums
    • Threads
      • Advanced
Dark Mode

Please register or login to enable Dark Mode.

Log In

Forgot your Password?

By logging into your account, you agree to our Terms of Use and Privacy Policy, and to the use of cookies as described therein.
or
 
  • Recent
  • Commented
  • Albums
  • My Pictures

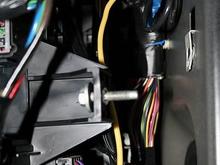
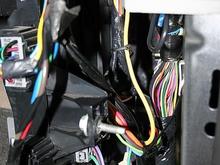
HOW TO:Passenger Window Lock Bypass

RoushF150
June 25, 2009
 11
 0
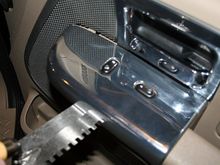
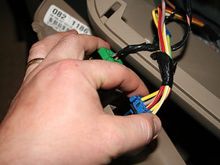
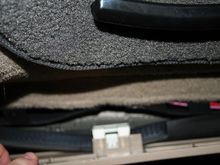
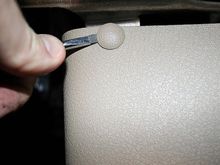
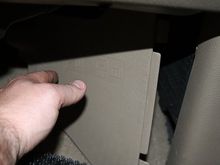
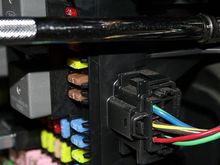
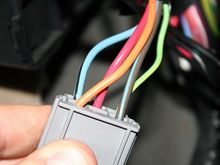
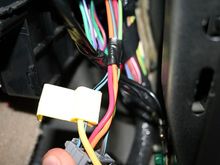
This project involves bypassing the kid window lock on the passenger window. This is quite handy when you don't want the rearkids to be able to roll the windows down, but allow both parents to run them at their hearts' content Read more ยป
Sort:
Default
  • Default
  • Most Recent
Step 1: Using a scraper or flat metal tool, gently pry up the passenger side door control panel.
0 2009/06/25 17:31:25 RoushF150
Step 2: Remove the switches and pull the connectors loose out of the door.
0 2009/06/25 17:32:20 RoushF150
Step 3: Remove the passenger side kick panel. Use a scraper and screw drivers to gently pry the panel out of the door area. Set the door rubber seal aside as much as you can.
0 2009/06/25 17:33:11 RoushF150
Step 4: Remove the panel covering the fuse box. You can use a small screwdriver or special tool to remove the top plastic snap fastener.
0 2009/06/25 17:34:36 RoushF150
Step 5: Remove the fuse box cover and place it out of the way.
0 2009/06/25 17:36:09 RoushF150
Step 6: Loosen up the fuse box bolt using a 10mm socket wrench. The back side of the fuse box has a plastic l brack that holds the back in place so you won't need to go digging for it.
0 2009/06/25 17:37:06 RoushF150
Step 7: Locate the connector on the back (towards the a pillar) of the fuse box with the orange, red, green, blue, and black connectors. Disconnect this connector and locate the BLUE/BLACK 12 gauge wire.
0 2009/06/25 17:39:52 RoushF150
Step 8: Locate the wires coming in from the door (look way up in the A pillar). There will be a 14 gauge YELLOW/GREEN wire (yellow with green strip). Cut this wire about 3" from where it goes into the pillar.
0 2009/06/25 17:42:16 RoushF150
STEP 9: Use 6" of 12 gauge wire and a yellow tap quick splice and connect it to the 12 gauge BLUE/BLACK (blue wire with black stripe) wire. Use a pair of pliers to compress the metal tab first, then click the quick splice cover in place.
0 2009/06/25 17:42:16 RoushF150
STEP 10: Place a blue crimp terminator on the wire going to the wiring harness.

Then use a 12 gauge yellow crimp connector to connect the yellow wire to the YELLOW/GREEN wire going to the door.
STEP 10: Place a blue crimp terminator on the wire going to the wiring harness. Then use a 12 gauge yellow crimp connector to connect the yellow wire to the YELLOW/GREEN wire going to the door.
0 2009/06/25 17:42:16 RoushF150
STEP 11: This is when it's the right time to use an ohmmeter to check that the window connector and the fuse box connector have good connectivity. Place one lead of the ohmetter into the YELLOW/GREEN wire connector for the window switch and the other lead into the BLUE/BLACK wire connector for the fuse box. Ensure 0 ohms.

Zip tie the wire in place. Reconnect everything. Test the window to ensure you can open and close it using the passenger side window switch with or without the window lock switch enabled on the driver's side door.

When finished, reattach all fasteners, covers, and plates. Enjoy!
STEP 11: This is when it's the right time to use an ohmmeter to check that the window connector and the fuse box connector have good connectivity. Place one lead of the ohmetter into the YELLOW/GREEN wire connector for the window switch and the other lead into the BLUE/BLACK wire connector for the fuse box. Ensure 0 ohms. Zip tie the wire in place. Reconnect everything. Test the window to ensure you can open and close it using the passenger side window switch with or without the window lock switch enabled on the driver's side door. When finished, reattach all fasteners, covers, and plates. Enjoy!
0 2009/06/25 17:42:16 RoushF150
 

Top
F150online Forums
  • FAQ
  • Archive
  • Advertising
  • Cookie Policy
  • Privacy Statement
  • Terms of Service
  • Your Privacy Choices
  • Manage Preferences

© 2026 MH Sub I, LLC dba Internet Brands


When you click on links to various merchants on this site and make a purchase, this can result in this site earning a commission. Affiliate programs and affiliations include, but are not limited to, the eBay Partner Network.