


Who is running a Powerdyne?


Thread Starter
|
Senior Member
Joined: May 2000
Posts: 1,961
Likes: 1
Well, Mike Troyer shipped the MAF, Injectors and Superchip next day mail and I received them today at noon. He shipped no additional postage. Now that's customer service.
I spent the morning changing my plugs to one heat range cooler. I gapped at 40 instead of 35 since I am running Accel coils.
I started the install at about 6:30 PM and I just got back from a test ride 3:30AM EST. I was done about 2:30AM.
This kit is not a simple bolt on. I am sure it was made for a truck just not mine. I had to do a lot of fabrication mostly because I have coil pacs instead of C.O.P. The instructions are one-size-fits-all and did not have a lot of really important information on the instillation on my truck. The kit did have all the parts and that's good.
That being said, It started on the first turn of the ignition. No leaks and steady idle at 600 RPM.
It just rained but I took it out for a test ride anyway and got sideways twice. I can definitely feel a BIG difference but will have to wait for dry pavement to really report back.
I will post some of the modifications I had to do but right now I am far too tired to get that long winded.
I will say this is not for a novice. I am a pretty good shade tree mechanic and this one really tested my ability...
I spent the morning changing my plugs to one heat range cooler. I gapped at 40 instead of 35 since I am running Accel coils.
I started the install at about 6:30 PM and I just got back from a test ride 3:30AM EST. I was done about 2:30AM.
This kit is not a simple bolt on. I am sure it was made for a truck just not mine. I had to do a lot of fabrication mostly because I have coil pacs instead of C.O.P. The instructions are one-size-fits-all and did not have a lot of really important information on the instillation on my truck. The kit did have all the parts and that's good.
That being said, It started on the first turn of the ignition. No leaks and steady idle at 600 RPM.
It just rained but I took it out for a test ride anyway and got sideways twice. I can definitely feel a BIG difference but will have to wait for dry pavement to really report back.
I will post some of the modifications I had to do but right now I am far too tired to get that long winded.
I will say this is not for a novice. I am a pretty good shade tree mechanic and this one really tested my ability...
Thread Starter
|
Senior Member
Joined: May 2000
Posts: 1,961
Likes: 1
I know some are waiting for me to post my results. I will do so in the next week. There are things I don't like about the kit and I am working on solutions. I am also waiting on a boost gauge from Summit Racing so I can post boost levels as well.
I will say my truck is a whole new beast. This thing is a blast to drive and I am overall quite pleased with the results.


I will say my truck is a whole new beast. This thing is a blast to drive and I am overall quite pleased with the results.
Last edited by WLF; May 7, 2005 at 10:29 AM.
Thread Starter
|
Senior Member
Joined: May 2000
Posts: 1,961
Likes: 1
I got the boost gage installed today and it confirmed one thing, Mike Troyer's tune has as much to do with how well it is running as the Supercharger. I say that because most of the time it is in vacuum so that is just the tune. The boost gage hits 6lb at 5000 RPM's.
I promise a long post soon about the install and my impressions.
My problem right now is I know for just the price of the pulley and belt, I can have 3 more pounds of boost. That would also void my warrantee... It is tempting...
I promise a long post soon about the install and my impressions.
My problem right now is I know for just the price of the pulley and belt, I can have 3 more pounds of boost. That would also void my warrantee... It is tempting...

Senior Member
Joined: Jul 2001
Posts: 1,109
Likes: 1
From: Nu Joizey
Heeheehee, ya see how bad it can get. 
You just finished the install and already you crave more. Cool your jets cowboy.
If you can resist the 9# urge, you'll more than likely get 2 reliable, enjoyable, and uneventful years of service from your present setup. If you still feel the urge after that, then get the pulley, belt, & tune.
My $.02

You just finished the install and already you crave more. Cool your jets cowboy.
If you can resist the 9# urge, you'll more than likely get 2 reliable, enjoyable, and uneventful years of service from your present setup. If you still feel the urge after that, then get the pulley, belt, & tune.
My $.02
Thread Starter
|
Senior Member
Joined: May 2000
Posts: 1,961
Likes: 1
Thanks LE PEW, good advice.
I have the instillation post pretty much done. I will add the pictures today or tomorrow and post it.
My impressions post will follow closely but I think you already know I like the results... but they may not be for everyone so, I will post exactly what this supercharger has done and what it has not done for my truck .
I have the instillation post pretty much done. I will add the pictures today or tomorrow and post it.
My impressions post will follow closely but I think you already know I like the results... but they may not be for everyone so, I will post exactly what this supercharger has done and what it has not done for my truck .
Thread Starter
|
Senior Member
Joined: May 2000
Posts: 1,961
Likes: 1
Ok here goes. I will have to do this in two posts because of length.
First check your kit carefully; Powerdyne gave me two used parts in the kit. The Harmonic balancer was obviously used and the supercharger mounting bracket was scratched and had been used. This is unacceptable as far as I am concerned and I contacted the company. They agreed to replace the parts and I am waiting for the replacement parts to be shipped to me.
I will say that everything was in the kit (but not in the instructions). That is a real plus since those of us with 97-98 trucks have coil packs and plug wires. The brackets to relocate them are included but the instructions are not. The install itself will take every bit of 8 hours.
To start with, make sure you have a set of Allen drivers. You will need several sized so you might as well get a whole set of the metric sizes. These are available at Wal-Mart for about $8.
I already had the electric fan conversion so I did not have to do the fan removal. That part of the instructions is well covered and looks like it is not difficult.
The removal of the harmonic balancer is pretty strait forward. Before you remove the serpentine belt, have someone bridge the fan bolts with a big screw driver and remove the nut on the harmonic balancer. Remove the serpentine belt by loosing the tensioner then remove the harmonic balancer. You will need a Harmonic balancer removal tool; I rented mine from Advanced Auto Parts (still have not returned). Use a little high temp silicone on the keyway of the new balancer and start it on the shaft. Then bolt on the supercharger drive pulley and seat it completely using the supplied Allan bolts. You can then bolt the balancer on the engine again using the supplied bolt. Get it as tight as you can and put the serpentine belt back on. Have your helper hold the screw driver on the fan bolts again while you tighten the bolt the rest of the way.
Next you move the power steering reservoir to the new location using the supplied bracket. If your truck has the brake proportioning valve bolted to the master cylinder like mine did, you will have to remove it and put the bracket between the master cylinder and the proportioning valve (this is not in the instructions). You also will not find any bolts in the kit like is stated in the instructions.
Next you will need to relocate the driver’s side coil pack. There is a bracket included in the kit (in fact there are two you will bolt to the same location). You have to remove the bracket that holds the plastic 4.6L cover over the throttle body on the driver’s side. There are two valves (solenoids?) attached to this bracket and they will be unbolted. You will find two brackets in the kit that both bolt in the same location on the intake as this bracket. One mounts upwards to hold the two valves/solenoids, the other mounts downward to hold the driver’s side coil pack. I am posting pictures of these brackets so you can see what I mean. It is not easy to figure out how these brackets go and there is nothing in the instructions about installing these brackets.

here is the coil pack
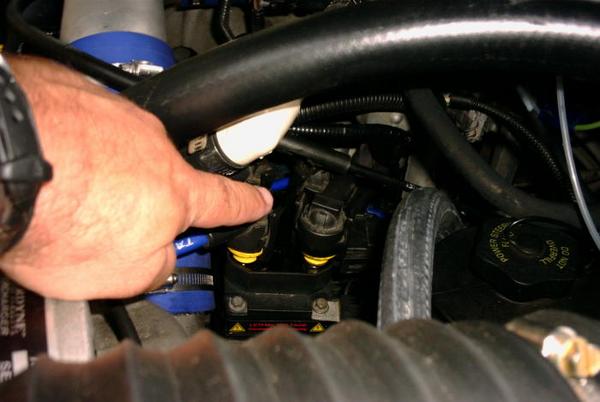
Now it is time to splice the coil electrical connection long enough to reach the coil pack (3 wires), also splice the ground wire that attaches to the corner bolt of the coil pack. None of this is in the instructions. I personally do not like the location of the coil pack and am going to remount mine to the other coil pack by modifying the original mounting bracket. I will include pictures of this when I do it. Make sure you get all the wires connected correctly on the splice and I soldered everything. I also used the same gauge wire so as not to change anything that could affect resistance. Make sure it is long enough to reach. Mine is a little longer since I plan on mounting it to the opposite side of the engine eventually.
Now it is time to bolt on the Supercharger mounting bracket and Supercharger. This is pretty strait forward and is covered in the instructions.
The Idle Air Bypass Discharge Tube is next and then the aluminum Discharge Tube to the Throttle Body. The rubber hose that was to connect the Idle Bypass was not long enough. Also because of the coil pack, I had to come strait up with the discharge tube on the Bypass Bracket and that caused the hose to crimp (hard to explain but when you get there you will know what I mean). I used some ¾ CPVC pipe and fabricated a ridged connection between these two ports with elbows to clean up the look and flow. Again here is a picture.

continued in next post...................
First check your kit carefully; Powerdyne gave me two used parts in the kit. The Harmonic balancer was obviously used and the supercharger mounting bracket was scratched and had been used. This is unacceptable as far as I am concerned and I contacted the company. They agreed to replace the parts and I am waiting for the replacement parts to be shipped to me.
I will say that everything was in the kit (but not in the instructions). That is a real plus since those of us with 97-98 trucks have coil packs and plug wires. The brackets to relocate them are included but the instructions are not. The install itself will take every bit of 8 hours.
To start with, make sure you have a set of Allen drivers. You will need several sized so you might as well get a whole set of the metric sizes. These are available at Wal-Mart for about $8.
I already had the electric fan conversion so I did not have to do the fan removal. That part of the instructions is well covered and looks like it is not difficult.
The removal of the harmonic balancer is pretty strait forward. Before you remove the serpentine belt, have someone bridge the fan bolts with a big screw driver and remove the nut on the harmonic balancer. Remove the serpentine belt by loosing the tensioner then remove the harmonic balancer. You will need a Harmonic balancer removal tool; I rented mine from Advanced Auto Parts (still have not returned). Use a little high temp silicone on the keyway of the new balancer and start it on the shaft. Then bolt on the supercharger drive pulley and seat it completely using the supplied Allan bolts. You can then bolt the balancer on the engine again using the supplied bolt. Get it as tight as you can and put the serpentine belt back on. Have your helper hold the screw driver on the fan bolts again while you tighten the bolt the rest of the way.
Next you move the power steering reservoir to the new location using the supplied bracket. If your truck has the brake proportioning valve bolted to the master cylinder like mine did, you will have to remove it and put the bracket between the master cylinder and the proportioning valve (this is not in the instructions). You also will not find any bolts in the kit like is stated in the instructions.
Next you will need to relocate the driver’s side coil pack. There is a bracket included in the kit (in fact there are two you will bolt to the same location). You have to remove the bracket that holds the plastic 4.6L cover over the throttle body on the driver’s side. There are two valves (solenoids?) attached to this bracket and they will be unbolted. You will find two brackets in the kit that both bolt in the same location on the intake as this bracket. One mounts upwards to hold the two valves/solenoids, the other mounts downward to hold the driver’s side coil pack. I am posting pictures of these brackets so you can see what I mean. It is not easy to figure out how these brackets go and there is nothing in the instructions about installing these brackets.
here is the coil pack
Now it is time to splice the coil electrical connection long enough to reach the coil pack (3 wires), also splice the ground wire that attaches to the corner bolt of the coil pack. None of this is in the instructions. I personally do not like the location of the coil pack and am going to remount mine to the other coil pack by modifying the original mounting bracket. I will include pictures of this when I do it. Make sure you get all the wires connected correctly on the splice and I soldered everything. I also used the same gauge wire so as not to change anything that could affect resistance. Make sure it is long enough to reach. Mine is a little longer since I plan on mounting it to the opposite side of the engine eventually.
Now it is time to bolt on the Supercharger mounting bracket and Supercharger. This is pretty strait forward and is covered in the instructions.
The Idle Air Bypass Discharge Tube is next and then the aluminum Discharge Tube to the Throttle Body. The rubber hose that was to connect the Idle Bypass was not long enough. Also because of the coil pack, I had to come strait up with the discharge tube on the Bypass Bracket and that caused the hose to crimp (hard to explain but when you get there you will know what I mean). I used some ¾ CPVC pipe and fabricated a ridged connection between these two ports with elbows to clean up the look and flow. Again here is a picture.
continued in next post...................
Thread Starter
|
Senior Member
Joined: May 2000
Posts: 1,961
Likes: 1
another picture of the idle bypass

You will have to splice the IAT wire so it will easily reach the location provided in the discharge tube. This location is perfect for placement and puts the IAT about 4 inches from the Throttle Body. Again pay attention to use the proper gage wire and solder all connections. Next the instructions have you threading the IAT sender so it can be screwed into the aluminum discharge tube. I filed off the little lip that holds it in the rubber grommet (stock set up) and just threaded it into the port on the aluminum Discharge Tube. The IAT sender is plastic and accepted the threads without problem. I then removed it and put a little high temp silicone on the IAT near the outside. I threaded it back in and looked inside the discharge tube to make sure the IAT was positioned correctly inside. This is easier done before mounting the aluminum Discharge Tube.
You can just see the IAT in this picture below my hand
I will skip the instillation of the bypass valve set-up since it is not part of the original kit but you can see it in this picture.

Also I did not use the FMU but the instructions on this seem complete and it should not be a hard install.
The intake from the MAF to the Supercharger is really tight. I had to bend the bracket holding the power steering reservoir closer to the firewall to get the two black elbows to fit. The MAF/Air Filter Housing is also a tight fit. The kit comes with fittings to connect the Crank Case Ventilation but again no instructions. Use the brass elbow first and thread it into the side of the MAF/Air Filter Housing, then put on the brass nipple fitting. You then run the supplied hose from there to the crank case ventilation port on the drivers side head. None of this is in the instructions. You will have to clean the excess oil off the mounting lip on the inside of the Air Cleaner to get it to say on. Other wise it will slip off every time you try to put the MAF/Air Filter Housing in the location it is made for. I did not permanently mount this housing and will be adding rubber to the bottom since it rests right on part of my electrical harness. I used a zip tie to keep it in place. The flexible tube that connects the black intake elbow to the MAF housing will install easily but I think this is cheep way to make this connection and I will be looking for a better solution.
The instillation of the belt and tensioner is easily done. On mine, the tensioner was in too far and hitting on the outside of the belt. I used two stainless flat washers (large circumference) that I got from Lowe’s to correct this. Put one on the top and one on the bottom to space the tensioner away from the mounting bracket. This centered the tensioner perfectly. I adjusted the tensioner pretty tight. Initially I could hear some slipping a 4500 RPM but this stopped when I tightened the belt a little more.
The rest of the install involve the replacement of the Injectors with 42 # units (done before the install) and installing the 4 program chip (easily completed).
MY TRUCK STARTED RIGHT UP, FIRST TRY!!!
I will post more pictures of the location of the coil pack bracket when I take off the supercharger to replace the used parts when I receive the new parts.
Now for my impressions. This post is getting pretty lengthy so I will give impressions in an additional post.
You will have to splice the IAT wire so it will easily reach the location provided in the discharge tube. This location is perfect for placement and puts the IAT about 4 inches from the Throttle Body. Again pay attention to use the proper gage wire and solder all connections. Next the instructions have you threading the IAT sender so it can be screwed into the aluminum discharge tube. I filed off the little lip that holds it in the rubber grommet (stock set up) and just threaded it into the port on the aluminum Discharge Tube. The IAT sender is plastic and accepted the threads without problem. I then removed it and put a little high temp silicone on the IAT near the outside. I threaded it back in and looked inside the discharge tube to make sure the IAT was positioned correctly inside. This is easier done before mounting the aluminum Discharge Tube.
You can just see the IAT in this picture below my hand
I will skip the instillation of the bypass valve set-up since it is not part of the original kit but you can see it in this picture.
Also I did not use the FMU but the instructions on this seem complete and it should not be a hard install.
The intake from the MAF to the Supercharger is really tight. I had to bend the bracket holding the power steering reservoir closer to the firewall to get the two black elbows to fit. The MAF/Air Filter Housing is also a tight fit. The kit comes with fittings to connect the Crank Case Ventilation but again no instructions. Use the brass elbow first and thread it into the side of the MAF/Air Filter Housing, then put on the brass nipple fitting. You then run the supplied hose from there to the crank case ventilation port on the drivers side head. None of this is in the instructions. You will have to clean the excess oil off the mounting lip on the inside of the Air Cleaner to get it to say on. Other wise it will slip off every time you try to put the MAF/Air Filter Housing in the location it is made for. I did not permanently mount this housing and will be adding rubber to the bottom since it rests right on part of my electrical harness. I used a zip tie to keep it in place. The flexible tube that connects the black intake elbow to the MAF housing will install easily but I think this is cheep way to make this connection and I will be looking for a better solution.
The instillation of the belt and tensioner is easily done. On mine, the tensioner was in too far and hitting on the outside of the belt. I used two stainless flat washers (large circumference) that I got from Lowe’s to correct this. Put one on the top and one on the bottom to space the tensioner away from the mounting bracket. This centered the tensioner perfectly. I adjusted the tensioner pretty tight. Initially I could hear some slipping a 4500 RPM but this stopped when I tightened the belt a little more.
The rest of the install involve the replacement of the Injectors with 42 # units (done before the install) and installing the 4 program chip (easily completed).
MY TRUCK STARTED RIGHT UP, FIRST TRY!!!
I will post more pictures of the location of the coil pack bracket when I take off the supercharger to replace the used parts when I receive the new parts.
Now for my impressions. This post is getting pretty lengthy so I will give impressions in an additional post.
Last edited by WLF; Aug 12, 2004 at 08:21 AM.


Senior Member
Joined: Jan 2004
Posts: 796
Likes: 3
From: Charleroi PA
check the 1/4 inch bolts that hold the dischrge housing to the back of the supercharger powerdyne seem not to be able to properly tifgten these bolts from the factory. Also recheck the lower crank pulley they sometimes are not perfictly centered when you install and with a couple of drive cycles will center itself and need retightened. Also seen problem with original belt stretching quickly, and needing adjusted or replaced with a gatorback. MY gatorback belt seems to be very noisy in damp weather, but does not cause a problem. Hope this helps!!!!
Thread Starter
|
Senior Member
Joined: May 2000
Posts: 1,961
Likes: 1
It is definitely the bearings. Can feel the grinding when I turn the pulley with the belt off. I am sending to Powerdyne tonight.
I am promised a 3 day turn around from receipt to receiving back. This is only a 3 week old purchase.... and I mentioned I used VISA. One phone call to VISA will get things rolling.
If I don't have it in one week then I will let VISA handle it.
I think there is a fine line between tight enough on the belt and too tight. That may explain why so many of the bearings in these things go up.
I wonder if one could adapt the spring tensioner from a Procharger...
I am promised a 3 day turn around from receipt to receiving back. This is only a 3 week old purchase.... and I mentioned I used VISA. One phone call to VISA will get things rolling.
If I don't have it in one week then I will let VISA handle it.
I think there is a fine line between tight enough on the belt and too tight. That may explain why so many of the bearings in these things go up.
I wonder if one could adapt the spring tensioner from a Procharger...
Senior Member
Joined: Jul 2001
Posts: 1,109
Likes: 1
From: Nu Joizey
Aaauugh, major bummer! I hope you get it back quick.
I think that if you could get a spring tensioner on there you would still have to load up the spring with enough tension to keep it from slipping. If so, then its the same amount of force on the belt and bearings any how.
Good luck?
I think that if you could get a spring tensioner on there you would still have to load up the spring with enough tension to keep it from slipping. If so, then its the same amount of force on the belt and bearings any how.
Good luck?
Thread Starter
|
Senior Member
Joined: May 2000
Posts: 1,961
Likes: 1
You may be right but the problem is with the system Powerdyne uses, you have no way to measure the tension. I may have just plain adjusted the belt too tight for the type of dry bearings being used. The advantage of a spring tensioner is it will keep the belt tight, allow for any runout (that really puts pressure on the bearings) and the tension is regulated by the spring rate. When I get this back, I will be very careful when tightening the belt. I will add a little tension at a time until I get just enough to stop any slipping.
Thread Starter
|
Senior Member
Joined: May 2000
Posts: 1,961
Likes: 1
Update:
I spoke with Nick at Powerdyne yesterday and my supercharger has a bad outer bearing, I could have told them. He is checking the shaft and casing to make sure there is not an external reason for the failure, he suspects just a bad bearing. He says he will replace all the bearings and it will be FIXED by Friday. He will ship two day as promissed and I will have it back Tuesday or Wednesday of next week.
I am still having problems with the tune (running very rich) and have replaced every sensor in the truck so its back to Mike to try to get this worked out.
I am also waiting for Crash to ship me the spring tensioner so I can try to prevent future bearing failures -so- the saga continues.
I spoke with Nick at Powerdyne yesterday and my supercharger has a bad outer bearing, I could have told them. He is checking the shaft and casing to make sure there is not an external reason for the failure, he suspects just a bad bearing. He says he will replace all the bearings and it will be FIXED by Friday. He will ship two day as promissed and I will have it back Tuesday or Wednesday of next week.
I am still having problems with the tune (running very rich) and have replaced every sensor in the truck so its back to Mike to try to get this worked out.
I am also waiting for Crash to ship me the spring tensioner so I can try to prevent future bearing failures -so- the saga continues.


