
my console/sub box build


Thread Starter
|
Senior Member
Joined: Jul 2007
Posts: 282
Likes: 0
From: OC, MD
my console/sub box build
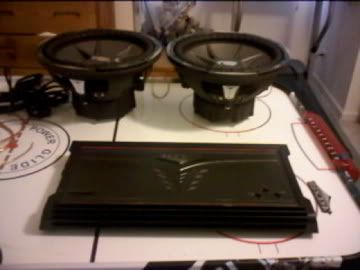
so like a few other members on here im making my own center console/sub box, i never use the little jump seat so i figured it was time for a change. i picked up 2 12in. kicker cvx's, a 1500watt kicker amp, and an ugly sub box up off of craigslist for 400! so im going to run all this in my box with a little big of plexyglass and some neon. then on top of the box im going to have a little storage bin and a switch plate. then im going to fiberglass it all and paint it silver. the worst part thus far has been playing with all the sizes of the chambers to get the airspace right.
a few weeks ago i decided to start on the build by taking a big piece of cardboard and cut it out as a template to how i wanted the box to look/fit in. after that was done i went out and got some 3/4in mdf and used a router to cut my template onto that.
today finished up most of the inside panels and decided to cut into the outter walls itself so the inner panels slide into place with the router again (i figured it would be a little stronger and tighter fit this way. you can kind of see one of the places i cut in for the wood in the pictures.
o and did i mention its ported!

side of the box... (its upside down)

inside from top...

again...

from bottom...

a few weeks ago i decided to start on the build by taking a big piece of cardboard and cut it out as a template to how i wanted the box to look/fit in. after that was done i went out and got some 3/4in mdf and used a router to cut my template onto that.
today finished up most of the inside panels and decided to cut into the outter walls itself so the inner panels slide into place with the router again (i figured it would be a little stronger and tighter fit this way. you can kind of see one of the places i cut in for the wood in the pictures.
o and did i mention its ported!
side of the box... (its upside down)
inside from top...
again...
from bottom...
Last edited by RJaeger; May 10, 2009 at 07:12 PM. Reason: forgot info


Technical Article Contributor
Joined: Mar 2008
Posts: 2,268
Likes: 2
From: Rural NE
Trending Topics
Thread Starter
|
Senior Member
Joined: Jul 2007
Posts: 282
Likes: 0
From: OC, MD
no updates yet, been real busy with work (this week is cruiser week) but im home now so im hoping ill get working on it a little later.
05_sprcrew- thanks! but no im just keeping it up front. its cut off around the same place as the back of the old one, the back of the console im building will have plexyglass so that you can see the sub from the backseat then i think im going to relocate the little power outlet thing somewhere on there but im not 100% where i want it yet, most likely on the bottom
05_sprcrew- thanks! but no im just keeping it up front. its cut off around the same place as the back of the old one, the back of the console im building will have plexyglass so that you can see the sub from the backseat then i think im going to relocate the little power outlet thing somewhere on there but im not 100% where i want it yet, most likely on the bottom
Thread Starter
|
Senior Member
Joined: Jul 2007
Posts: 282
Likes: 0
From: OC, MD
alright first off i wanted to say sorry for taking so long to update but today was the first day in too long i finally got to work on it a little.
so heres the update:
-finished cutting all of the little cross sections where the wood slides into
-painted all of the inner sides of wood, silver, that you will be able to see when you look through the plexi (had to use a spray can of poly to coat the wood then prime then paint, i started by just trying prime then paint but it turned out looking all splotchy)
-cut the holes to where the plexi will lay into
im hoping sometime later this week i will cut and mount the plexi then i can finally start putting it all together. more pictures will be up soon!


Senior Member
Joined: Apr 2008
Posts: 302
Likes: 0
From: Canada
just a tip, it's not the power that kills all the time it's improperly sealed air spaces and high volume. Also can be related to shared air space depending on set ups.
None the less great start, looking forward to the finished product.
None the less great start, looking forward to the finished product.
Thread Starter
|
Senior Member
Joined: Jul 2007
Posts: 282
Likes: 0
From: OC, MD
alright got some new pictures, as of now its put together (for the most part) and all the inside is painted.
from back without back panel

from side holes (around where your legs are when your sitting up front)

bottom

from back without back panel
from side holes (around where your legs are when your sitting up front)
bottom
