


Turn Signals Not Working When Tilt Wheel is Lowered?


Senior Member
Joined: May 2007
Posts: 493
Likes: 0
From: Long Beach, CA
I have just devised a repair method for this problem. I discovered this on my truck 2 days ago, and and after reading posts on this and other forums, have learned that it is common.
My method does not require a new connector, and does not create potential future repair problems, as gluing the connector in place might do. This took about 20 minutes start-to-finish, once I read up on how to open up the steering column.
First, disconnect the battery - you don't want any chance of that airbag hitting you when your face is right in front of it.
To expose the steering column to access the connector:
1) Use your fingers to pry up the dash trim that surrounds the steering column. It is held by four clips, just like the trim around the stereo and heater controls. Start at the bottom, they just pop loose.
2) There are three phillips screws holding the bottom half of the steering column wrapper to the top half. Take them out. There is a fourth hole used to release the cylinder lock. More on that in the next step.
3) The cylinder lock must come out to remove the top half of the steering column enclosure. Don't worry - its simple. You need a very thin screwdriver or a piece of coat hanger wire. Put the key in the lock and turn it to the "Run" position. There is a small hole in the bottom of the lock cylinder housing. You need to push the wire into that hole to push back the spring-loaded retainer pin, then just pull the lockset straight out. That's what the fourth hole in the bottom cover is for. However, I found it easier to undo the bottom cover and move it aside so that I could see the hole in the housing.
4) once the lock cylinder has been pulled, the top cover can be wiggled out and set aside.
Fixing the connector:
1) refer to this picture. (sorry, its a little blurry)
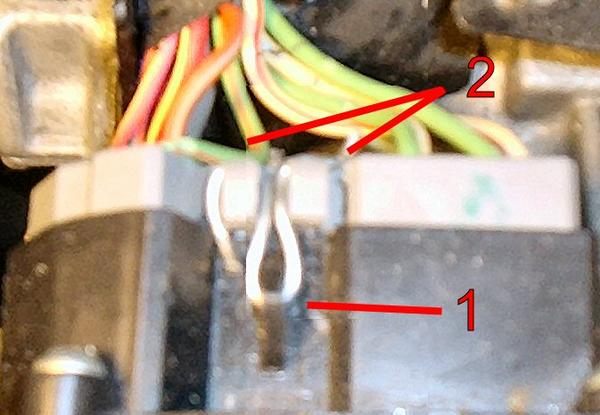
See the piece of steel wire that snakes between items #1 and #2 in the picture, essentially creating a new clip where the original has broken off.
2) Note the triangular bump that would have retained the clip that broke off the connector ( item #1 in the image). With a very small drill bit carefully drill through the center of it,close to the body of the socket. You can only approach it at a steep angle so drill from both sides, until you have a through opening.
3) Use a dremel tool with a small cutting disk to make notches in the back of the connector, directly in line with the broken clip (item #2 in the image) be careful not to cut any wires.
4) Using needlenose pliers, thread a piece if thin, but sturdy steel wire through the hole that you drilled, then wrap the ends around the back of the connector so that it is in the notches that you cut.
Note, if you keep your steering wheel very low, or use your tilt mechanism regularly, I recommend that you splice some length into those wires, or stretch them somehow, so that the problem doesn't reoccur.
My method does not require a new connector, and does not create potential future repair problems, as gluing the connector in place might do. This took about 20 minutes start-to-finish, once I read up on how to open up the steering column.
First, disconnect the battery - you don't want any chance of that airbag hitting you when your face is right in front of it.
To expose the steering column to access the connector:
1) Use your fingers to pry up the dash trim that surrounds the steering column. It is held by four clips, just like the trim around the stereo and heater controls. Start at the bottom, they just pop loose.
2) There are three phillips screws holding the bottom half of the steering column wrapper to the top half. Take them out. There is a fourth hole used to release the cylinder lock. More on that in the next step.
3) The cylinder lock must come out to remove the top half of the steering column enclosure. Don't worry - its simple. You need a very thin screwdriver or a piece of coat hanger wire. Put the key in the lock and turn it to the "Run" position. There is a small hole in the bottom of the lock cylinder housing. You need to push the wire into that hole to push back the spring-loaded retainer pin, then just pull the lockset straight out. That's what the fourth hole in the bottom cover is for. However, I found it easier to undo the bottom cover and move it aside so that I could see the hole in the housing.
4) once the lock cylinder has been pulled, the top cover can be wiggled out and set aside.
Fixing the connector:
1) refer to this picture. (sorry, its a little blurry)
See the piece of steel wire that snakes between items #1 and #2 in the picture, essentially creating a new clip where the original has broken off.
2) Note the triangular bump that would have retained the clip that broke off the connector ( item #1 in the image). With a very small drill bit carefully drill through the center of it,close to the body of the socket. You can only approach it at a steep angle so drill from both sides, until you have a through opening.
3) Use a dremel tool with a small cutting disk to make notches in the back of the connector, directly in line with the broken clip (item #2 in the image) be careful not to cut any wires.
4) Using needlenose pliers, thread a piece if thin, but sturdy steel wire through the hole that you drilled, then wrap the ends around the back of the connector so that it is in the notches that you cut.
Note, if you keep your steering wheel very low, or use your tilt mechanism regularly, I recommend that you splice some length into those wires, or stretch them somehow, so that the problem doesn't reoccur.
So I plan on doing this fix tomorrow. I called Ford to get a quote for a replacement MFS and they said about $400...so no way am I going to do that.
I took everything apart and noticed that the plug and connector are lose and figure that when my steering wheel is at its lowest tilt the plug gets pulled out making the connection fragile.
So any tips when I'm drilling the hole for the wire to go through? I'm using a 1/16" drill bit and 24 gauge galvanized steel wire. I don't want to screw anything up...otherwise I really will be down $400
I didn't have a dremel tool so I had to buy one for $50. Will I absolutely need one for this fix to work? If not I'd be happy to return it to get some money back.

Junior Member
Joined: Apr 2008
Posts: 1
Likes: 0
From: Georgia
Success
I have just devised a repair method for this problem. I discovered this on my truck 2 days ago, and and after reading posts on this and other forums, have learned that it is common.
My method does not require a new connector, and does not create potential future repair problems, as gluing the connector in place might do. This took about 20 minutes start-to-finish, once I read up on how to open up the steering column.
First, disconnect the battery - you don't want any chance of that airbag hitting you when your face is right in front of it.
To expose the steering column to access the connector:
1) Use your fingers to pry up the dash trim that surrounds the steering column. It is held by four clips, just like the trim around the stereo and heater controls. Start at the bottom, they just pop loose.
2) There are three phillips screws holding the bottom half of the steering column wrapper to the top half. Take them out. There is a fourth hole used to release the cylinder lock. More on that in the next step.
3) The cylinder lock must come out to remove the top half of the steering column enclosure. Don't worry - its simple. You need a very thin screwdriver or a piece of coat hanger wire. Put the key in the lock and turn it to the "Run" position. There is a small hole in the bottom of the lock cylinder housing. You need to push the wire into that hole to push back the spring-loaded retainer pin, then just pull the lockset straight out. That's what the fourth hole in the bottom cover is for. However, I found it easier to undo the bottom cover and move it aside so that I could see the hole in the housing.
4) once the lock cylinder has been pulled, the top cover can be wiggled out and set aside.
Fixing the connector:
1) refer to this picture. (sorry, its a little blurry)
See the piece of steel wire that snakes between items #1 and #2 in the picture, essentially creating a new clip where the original has broken off.
2) Note the triangular bump that would have retained the clip that broke off the connector ( item #1 in the image). With a very small drill bit carefully drill through the center of it,close to the body of the socket. You can only approach it at a steep angle so drill from both sides, until you have a through opening.
3) Use a dremel tool with a small cutting disk to make notches in the back of the connector, directly in line with the broken clip (item #2 in the image) be careful not to cut any wires.
4) Using needlenose pliers, thread a piece if thin, but sturdy steel wire through the hole that you drilled, then wrap the ends around the back of the connector so that it is in the notches that you cut.
Note, if you keep your steering wheel very low, or use your tilt mechanism regularly, I recommend that you splice some length into those wires, or stretch them somehow, so that the problem doesn't reoccur.
My method does not require a new connector, and does not create potential future repair problems, as gluing the connector in place might do. This took about 20 minutes start-to-finish, once I read up on how to open up the steering column.
First, disconnect the battery - you don't want any chance of that airbag hitting you when your face is right in front of it.
To expose the steering column to access the connector:
1) Use your fingers to pry up the dash trim that surrounds the steering column. It is held by four clips, just like the trim around the stereo and heater controls. Start at the bottom, they just pop loose.
2) There are three phillips screws holding the bottom half of the steering column wrapper to the top half. Take them out. There is a fourth hole used to release the cylinder lock. More on that in the next step.
3) The cylinder lock must come out to remove the top half of the steering column enclosure. Don't worry - its simple. You need a very thin screwdriver or a piece of coat hanger wire. Put the key in the lock and turn it to the "Run" position. There is a small hole in the bottom of the lock cylinder housing. You need to push the wire into that hole to push back the spring-loaded retainer pin, then just pull the lockset straight out. That's what the fourth hole in the bottom cover is for. However, I found it easier to undo the bottom cover and move it aside so that I could see the hole in the housing.
4) once the lock cylinder has been pulled, the top cover can be wiggled out and set aside.
Fixing the connector:
1) refer to this picture. (sorry, its a little blurry)
See the piece of steel wire that snakes between items #1 and #2 in the picture, essentially creating a new clip where the original has broken off.
2) Note the triangular bump that would have retained the clip that broke off the connector ( item #1 in the image). With a very small drill bit carefully drill through the center of it,close to the body of the socket. You can only approach it at a steep angle so drill from both sides, until you have a through opening.
3) Use a dremel tool with a small cutting disk to make notches in the back of the connector, directly in line with the broken clip (item #2 in the image) be careful not to cut any wires.
4) Using needlenose pliers, thread a piece if thin, but sturdy steel wire through the hole that you drilled, then wrap the ends around the back of the connector so that it is in the notches that you cut.
Note, if you keep your steering wheel very low, or use your tilt mechanism regularly, I recommend that you splice some length into those wires, or stretch them somehow, so that the problem doesn't reoccur.

Junior Member
Joined: Oct 2012
Posts: 1
Likes: 0
dbischoff,
thank you for your post as i was about to rewire my 99 Expedition to solve this problem...
i replaced the flasher and turn signal flashers also the. actual turn signal armature and i still had nothing. then i came across a link and saw your post, (i ran to my truck turned the key to ACC and hit my turn signal switch and tilted my steering wheel up and presto i saw my turn signal worked)... thank you very mutch for your insight
as it has saved me a lot of time
thank you for your post as i was about to rewire my 99 Expedition to solve this problem...
i replaced the flasher and turn signal flashers also the. actual turn signal armature and i still had nothing. then i came across a link and saw your post, (i ran to my truck turned the key to ACC and hit my turn signal switch and tilted my steering wheel up and presto i saw my turn signal worked)... thank you very mutch for your insight
as it has saved me a lot of time

Senior Member
Joined: Dec 2006
Posts: 180
Likes: 0
From: Carthage, IL
I have an 03 and my cruise and horn will only work when it is cold out. I repleaced the clock spring and nothing. I'm thinking loose connection behind steering column. Anyone else run into this.

Junior Member
Joined: Oct 2012
Posts: 1
Likes: 0
This information has been very helpful so far. No signal lights, hazard lights or brake lights when in lower tilted position. However in the upward tilted position the hazards do work and so do the brake lights but not the signal lights when you apply the brakes.

Junior Member
Joined: Jun 2014
Posts: 1
Likes: 0
2001 Lincoln Navigator Turn signals stop working made buzzing noise
I am really so happy about this site. Can you believe I googled was lead to this forum because my turn signals seemed like they were shortaged out and eventually quit. They were making a buzzing noise. Did not want to take it to the shop so I lagged around and avoided it for 1 week and I came across this forum and Someone might have been dbischoff
 said something about the steering wheel. I remembered I lowered my steering wheel before the signals went out. I lift the steering wheel and there goes the problem. I thank you guys so very much I was worried to death.
 I appreciate everything I am so happy.

and avoided it for 1 week and I came across this forum and Someone might have been dbischoff said something about the steering wheel. I remembered I lowered my steering wheel before the signals went out. I lift the steering wheel and there goes the problem. I thank you guys so very much I was worried to death. I appreciate everything I am so happy.

Junior Member
Joined: Aug 2014
Posts: 1
Likes: 0
re tilt/turn signals
I have a99 f150 just fixed the same issue the wires that come up the column on left side one big black plug it runs on top of column goes to the wiper /turn signal switch/ my fix was went to a auto wrecker got a replacement harness from a non tilt column its est a 25 min job drop the column so it rests on the edge of seat from there its excessable hope that works ps a non tilt has not had the wire move up or down so they should be still sturdy

Junior Member

Joined: Nov 2010
Posts: 5
Likes: 0
Greetings, i was able to use this post to fix a problem on my 2003 Screw where the right rear blinker and brake light quit working. Orange wire with black strip had broken, stripped it back and soldered in a solder splice. All is good now. Appreciate the post.

Junior Member
Joined: Feb 2019
Posts: 2
Likes: 0
I have a 1998 F150 that just started to do this. This truck has 76000 miles and a one onwer. They seem to have a lot of electrical issue.
I had the battery draining over night, Sometime it will be ok and most dead. I found by pulling the fuse to the radio it seem to help but not fixed. Then I pulled the radio out and the battery never had and more issues. No I have the Turn Signal Issue?
Thanks for all the Excellent info here!
I had the battery draining over night, Sometime it will be ok and most dead. I found by pulling the fuse to the radio it seem to help but not fixed. Then I pulled the radio out and the battery never had and more issues. No I have the Turn Signal Issue?
Thanks for all the Excellent info here!
Junior Member
Joined: Feb 2019
Posts: 2
Likes: 0
Bottom sterling cover can’t see how to get off! Read here 1998
one of the screws is going to a plastic peace that turns with the screw. I’m I missing something here?

